译者:baiyutang
原文:https://medium.com/@asticode/how-to-add-a-gui-to-your-golang-app-in-5-easy-steps-c25c99d4d8e0
构建一个 Golang 应用是简单而有趣的。但有时你想在蛋糕上加点糖:GUI。
这个案例,我将利用 astilectron 讲解如何在简单的 Golang 应用上添加 GUI。
这里能找到最终的代码。
第一步:组织项目
文件结构目录如下:
|--+ resources |--+ app |--+ static |--+ css |--+ base.css |--+ js |--+ index.js |--+ lib |--+ ... (all the css/js libs we need) |--+ index.html |--+ icon.icns |--+ icon.ico |--+ icon.png|--+ bundler.json|--+ main.go|--+ message.go
复制代码
如你所见,我们需要三种不同格式的图标来实现跨平台:.icns 对应 darwin,.ico 对应 windows,.png 对应 linux。
我们将使用以下的 CSS 和 JS 库:
第二步:实现骨架
Go
第一,我们需要安装 astilectron 的 bootstrap 在 main.go
package main
import (	"flag"
	"github.com/asticode/go-astilectron"	"github.com/asticode/go-astilectron-bootstrap"	"github.com/asticode/go-astilog"	"github.com/pkg/errors")
// Varsvar (	AppName string	BuiltAt string	debug   = flag.Bool("d", false, "enables the debug mode")	w       *astilectron.Window)
func main() {	// Init	flag.Parse()	astilog.FlagInit()
	// Run bootstrap	astilog.Debugf("Running app built at %s", BuiltAt)	if err := bootstrap.Run(bootstrap.Options{		AstilectronOptions: astilectron.Options{			AppName:            AppName,			AppIconDarwinPath:  "resources/icon.icns",			AppIconDefaultPath: "resources/icon.png",		},		Debug:    *debug,		Homepage: "index.html",		Logger:   astilog.GetLogger(),		MenuOptions: []*astilectron.MenuItemOptions{{			Label: astilectron.PtrStr("File"),			SubMenu: []*astilectron.MenuItemOptions{				{Label: astilectron.PtrStr("About")},				{Role: astilectron.MenuItemRoleClose},			},		}},		OnWait: func(_ *astilectron.Astilectron, iw *astilectron.Window, _ *astilectron.Menu, _ *astilectron.Tray, _ *astilectron.Menu) error {			w = iw			return nil		},		WindowOptions: &astilectron.WindowOptions{			BackgroundColor: astilectron.PtrStr("#333"),			Center:          astilectron.PtrBool(true),			Height:          astilectron.PtrInt(700),			Width:           astilectron.PtrInt(700),		},	}); err != nil {		astilog.Fatal(errors.Wrap(err, "running bootstrap failed"))	}}
复制代码
第二,全局变量 AppName 和 BuiltAt 将使用 bundler 被自动填充。
你能看到的主页是 index.html。我们将会有一个包含两项条目( about 和 close )的漂亮的菜单,我们的主窗口尺寸 700x700,居中并且设置 #333 的背景色。
我们为了能够使用 HTML/JS/CSS 开发工具,还依赖 Go flag 增加了 debug 选项。
最后,我们存放了一个指针,在全局变量 w 中,指向了 astilectron.Window,为了我们稍后需要用到选项 OnWait 。一旦窗口、菜单、和其他所有对象被创建,OnWait 会被执行。
HTML
现在,我们需要在 resources/app/index.html 创建我们的 HTML 主页:
<!DOCTYPE html><html lang="en"><head> <meta charset="UTF-8"> <link rel="stylesheet" href="static/css/base.css"/> <link rel="stylesheet" href="static/lib/astiloader/astiloader.css"> <link rel="stylesheet" href="static/lib/astimodaler/astimodaler.css"> <link rel="stylesheet" href="static/lib/astinotifier/astinotifier.css"> <link rel="stylesheet" href="static/lib/font-awesome-4.7.0/css/font-awesome.min.css"></head><body> <div class="left" id="dirs"></div> <div class="right"> <div class="title"><span id="path"></span></div> <div class="panel"><span class="stat" id="files_count"></span> file(s)</div> <div class="panel"><span class="stat" id="files_size"></span> of file(s)</div> <div class="panel" id="files_panel"> <div class="chart_title">Files repartition</div> <div id="files"></div> </div> </div> <script src="static/js/index.js"></script> <script src="static/lib/astiloader/astiloader.js"></script> <script src="static/lib/astimodaler/astimodaler.js"></script> <script src="static/lib/astinotifier/astinotifier.js"></script> <script src="static/lib/chart/chart.min.js"></script> <script type="text/javascript"> index.init(); </script>
复制代码
没有什么特别的:我们声明了 css 和 js 文件,安装了 html 结构,并确保我们的 js 脚本能够通过 index.init() 初始化。
CSS
现在我们需要在 resources/app/static/css/base.css 创建 CSS 样式:
* {    box-sizing:  border-box;}
html, body {    background-color: #fff;    color: #333;    height: 100%;    margin: 0;    width: 100%;}
.left {    background-color: #333;    color: #fff;    float: left;    height: 100%;    overflow: auto;    padding: 15px;    width: 40%;}
.dir {    cursor: pointer;    padding: 3px;}
.dir .fa {    margin-right: 5px;}
.right {    float: right;    height: 100%;    overflow: auto;    padding: 15px;    width: 60%;}
.title {    font-size: 1.5em;    text-align: center;    word-wrap: break-word;}
.panel {    background-color: #f1f1f1;    border: solid 1px #e1e1e1;    border-radius: 4px;    margin-top: 15px;    padding: 15px;    text-align: center;}
.stat {    font-weight: bold;}
.chart_title {    margin-bottom: 5px;}
复制代码
JS
最后,我们在 resources/app/static/js/index.js 创建我们的 JS 脚本:
let index = { init: function() { // Init asticode.loader.init(); asticode.modaler.init(); asticode.notifier.init(); }};
复制代码
第三步:创建 Go 和 JS 之间的通信
一切都步入正轨,但是我们仍缺少一个关键的组件:Go 和 JS 之前的通信。
从 JS 到 Go 的通信
为了从 JS 到 Go 能够通信,我们首先需要从 JS 到 Go 发送消息,并且一旦接收到响应能够接执行回调:
// This will wait for the astilectron namespace to be readydocument.addEventListener('astilectron-ready', function() { // This will send a message to GO astilectron.sendMessage({name: "event.name", payload: "hello"}, function(message) { console.log("received " + message.payload) });})
复制代码
同时,我们需要监听 Go 的消息,并通过 MessageHandler bootstrap 的选项,发回一个可选项的消息给 JS 。
func main() {	bootstrap.Run(bootstrap.Options{		MessageHandler: handleMessages,		})}
// handleMessages handles messagesfunc handleMessages(_ *astilectron.Window, m bootstrap.MessageIn) (payload interface{}, err error) {	switch m.Name {	case "event.name":		// Unmarshal payload		var s string		if err = json.Unmarshal(m.Payload, &s); err != nil {		    payload = err.Error()		    return		}		payload = s + " world"	}	return}
复制代码
这里简单的例子将会打印 received hello world 在 JS 的输出。
在我们的案例中,我们将添加更多逻辑,因为我们想要考虑浏览文件夹并显示有价值的信息。
因此,我们添加了如下代码到 resources/app/static/js/index.js:
let index = {    addFolder(name, path) {        let div = document.createElement("div");        div.className = "dir";        div.onclick = function() { index.explore(path) };        div.innerHTML = `<i class="fa fa-folder"></i><span>` + name + `</span>`;        document.getElementById("dirs").appendChild(div)    },    init: function() {        // Wait for astilectron to be ready        document.addEventListener('astilectron-ready', function() {            // Explore default path            index.explore();        })    },    explore: function(path) {        // Create message        let message = {"name": "explore"};        if (typeof path !== "undefined") {            message.payload = path        }
        // Send message        asticode.loader.show();        astilectron.sendMessage(message, function(message) {            // Init            asticode.loader.hide();
            // Check error            if (message.name === "error") {                asticode.notifier.error(message.payload);                return            }
            // Process path            document.getElementById("path").innerHTML = message.payload.path;
            // Process dirs            document.getElementById("dirs").innerHTML = ""            for (let i = 0; i < message.payload.dirs.length; i++) {                index.addFolder(message.payload.dirs[i].name, message.payload.dirs[i].path);            }
            // Process files            document.getElementById("files_count").innerHTML = message.payload.files_count;            document.getElementById("files_size").innerHTML = message.payload.files_size;            document.getElementById("files").innerHTML = "";            if (typeof message.payload.files !== "undefined") {                document.getElementById("files_panel").style.display = "block";                let canvas = document.createElement("canvas");                document.getElementById("files").append(canvas);                new Chart(canvas, message.payload.files);            } else {                document.getElementById("files_panel").style.display = "none";            }        })    }};
复制代码
一旦 JS astilectron 命名空间准备好,它执行新建的 explore 方法,然后给 Go 发送消息,此后就接收到响应,相应的更新 HTML 。
我们添加如下代码到 message.go:
package main
import (	"encoding/json"	"io/ioutil"	"os"	"os/user"	"path/filepath"	"sort"	"strconv"
	"github.com/asticode/go-astichartjs"	"github.com/asticode/go-astilectron"	"github.com/asticode/go-astilectron-bootstrap")
// handleMessages handles messagesfunc handleMessages(_ *astilectron.Window, m bootstrap.MessageIn) (payload interface{}, err error) {	switch m.Name {	case "explore":		// Unmarshal payload		var path string		if len(m.Payload) > 0 {			// Unmarshal payload			if err = json.Unmarshal(m.Payload, &path); err != nil {				payload = err.Error()				return			}		}
		// Explore		if payload, err = explore(path); err != nil {			payload = err.Error()			return		}	}	return}
// Exploration represents the results of an explorationtype Exploration struct {	Dirs       []Dir              `json:"dirs"`	Files      *astichartjs.Chart `json:"files,omitempty"`	FilesCount int                `json:"files_count"`	FilesSize  string             `json:"files_size"`	Path       string             `json:"path"`}
// PayloadDir represents a dir payloadtype Dir struct {	Name string `json:"name"`	Path string `json:"path"`}
// explore explores a path.// If path is empty, it explores the user's home directoryfunc explore(path string) (e Exploration, err error) {	// If no path is provided, use the user's home dir	if len(path) == 0 {		var u *user.User		if u, err = user.Current(); err != nil {			return		}		path = u.HomeDir	}
	// Read dir	var files []os.FileInfo	if files, err = ioutil.ReadDir(path); err != nil {		return	}
	// Init exploration	e = Exploration{		Dirs: []Dir{},		Path: path,	}
	// Add previous dir	if filepath.Dir(path) != path {		e.Dirs = append(e.Dirs, Dir{			Name: "..",			Path: filepath.Dir(path),		})	}
	// Loop through files	var sizes []int	var sizesMap = make(map[int][]string)	var filesSize int64	for _, f := range files {		if f.IsDir() {			e.Dirs = append(e.Dirs, Dir{				Name: f.Name(),				Path: filepath.Join(path, f.Name()),			})		} else {			var s = int(f.Size())			sizes = append(sizes, s)			sizesMap[s] = append(sizesMap[s], f.Name())			e.FilesCount++			filesSize += f.Size()		}	}
	// Prepare files size	if filesSize < 1e3 {		e.FilesSize = strconv.Itoa(int(filesSize)) + "b"	} else if filesSize < 1e6 {		e.FilesSize = strconv.FormatFloat(float64(filesSize)/float64(1024), 'f', 0, 64) + "kb"	} else if filesSize < 1e9 {		e.FilesSize = strconv.FormatFloat(float64(filesSize)/float64(1024*1024), 'f', 0, 64) + "Mb"	} else {		e.FilesSize = strconv.FormatFloat(float64(filesSize)/float64(1024*1024*1024), 'f', 0, 64) + "Gb"	}
	// Prepare files chart	sort.Ints(sizes)	if len(sizes) > 0 {		e.Files = &astichartjs.Chart{			Data: &astichartjs.Data{Datasets: []astichartjs.Dataset{{				BackgroundColor: []string{					astichartjs.ChartBackgroundColorYellow,					astichartjs.ChartBackgroundColorGreen,					astichartjs.ChartBackgroundColorRed,					astichartjs.ChartBackgroundColorBlue,					astichartjs.ChartBackgroundColorPurple,				},				BorderColor: []string{					astichartjs.ChartBorderColorYellow,					astichartjs.ChartBorderColorGreen,					astichartjs.ChartBorderColorRed,					astichartjs.ChartBorderColorBlue,					astichartjs.ChartBorderColorPurple,				},			}}},			Type: astichartjs.ChartTypePie,		}		var sizeOther int		for i := len(sizes) - 1; i >= 0; i-- {			for _, l := range sizesMap[sizes[i]] {				if len(e.Files.Data.Labels) < 4 {					e.Files.Data.Datasets[0].Data = append(e.Files.Data.Datasets[0].Data, sizes[i])					e.Files.Data.Labels = append(e.Files.Data.Labels, l)				} else {					sizeOther += sizes[i]				}			}		}		if sizeOther > 0 {			e.Files.Data.Datasets[0].Data = append(e.Files.Data.Datasets[0].Data, sizeOther)			e.Files.Data.Labels = append(e.Files.Data.Labels, "other")		}	}	return}
复制代码
在接收到正确信息后,将会执行新的 explore 方法,它将返回关于路径的有价值的信息。
最后,我们不要忘了添加完整的 MessageHandler bootstrap 选项,像简单例子展示的那样。
从 Go 到 JS 的通信
为了从 Go 到 JS 能够通信,我们首先需要从 Go 给 JS 发送消息,一旦接收响应就执行回调:
// This will send a message and execute a callback// Callbacks are optionalbootstrap.SendMessage(w, "event.name", "hello", func(m *bootstrap.MessageIn) {    // Unmarshal payload    var s string    json.Unmarshal(m.Payload, &s)
    // Process message    log.Infof("received %s", s)})
复制代码
同时,我们需要监听 JS 的消息并发回一些选项信息给 Go:
// This will wait for the astilectron namespace to be readydocument.addEventListener('astilectron-ready', function() { // This will listen to messages sent by GO astilectron.onMessage(function(message) { // Process message if (message.name === "event.name") { return {payload: message.message + " world"}; } });})
复制代码
这个简单的例子将打印 received hello world 在 Go 的输出。
在这里案例中,我先添加如下代码到 main.go:
func main() { // Create logger l := log.New(log.Writer(), log.Prefix(), log.Flags()) // Run bootstrap bootstrap.Run(bootstrap.Options{ MenuOptions: []*astilectron.MenuItemOptions{{ Label: astilectron.PtrStr("File"), SubMenu: []*astilectron.MenuItemOptions{ { Label: astilectron.PtrStr("About"), OnClick: func(e astilectron.Event) (deleteListener bool) { if err := bootstrap.SendMessage(w, "about", htmlAbout, func(m *bootstrap.MessageIn) { // Unmarshal payload var s string if err := json.Unmarshal(m.Payload, &s); err != nil { l.Println(errors.Wrap(err, "unmarshaling payload failed")) return } l.Printf("About modal has been displayed and payload is %s!\n", s) }); err != nil { l.Println(errors.Wrap(err, "sending about event failed")) } return }, }, {Role: astilectron.MenuItemRoleClose}, }, }}, OnWait: func(_ *astilectron.Astilectron, iw *astilectron.Window, _ *astilectron.Menu, _ *astilectron.Tray, _ *astilectron.Menu) error { w = iw go func() { time.Sleep(5 * time.Second) if err := bootstrap.SendMessage(w, "check.out.menu", "Don't forget to check out the menu!"); err != nil { l.Println(errors.Wrap(err, "sending check.out.menu event failed")) } }() return nil }, })}
复制代码
它能让 about 条目可点击并且显示一个包含适当内容的对话框,在 Go 应用已被初始化后 5 秒,它请求显示一个通知。
最后,我们添加如下代码到 resources/app/static/js/index.js:
let index = { about: function(html) { let c = document.createElement("div"); c.innerHTML = html; asticode.modaler.setContent(c); asticode.modaler.show(); }, init: function() { // Wait for astilectron to be ready document.addEventListener('astilectron-ready', function() { // Listen index.listen(); }) }, listen: function() { astilectron.onMessage(function(message) { switch (message.name) { case "about": index.about(message.payload); return {payload: "payload"}; break; case "check.out.menu": asticode.notifier.info(message.payload); break; } }); }};
复制代码
它监听 Go 消息并相应的回应。
第四步:打包应用
现在,代码都就位了,我们需要确保我们能够以最好的方式向我们的用户展示 Golang GUI 应用:
darwin 用户需要的 MacOS 应用
windows 用户需要的 .exe 应用
linux 用户需要的简单二进制文件
幸运的是,我们有 astilectron 的 bundler 可以做到。
首先,我们通过运行如下安装:
go get -u github.com/asticode/go-astilectron-bundler/...
复制代码
然后,我们在 main.go 添加完整的 bootstrap 选项:
func main() { bootstrap.Run(bootstrap.Options{ Asset: Asset, RestoreAssets: RestoreAssets, })}
复制代码
创建名为 bundler.json 的配置文件:
{ "app_name": "Astilectron demo", "icon_path_darwin": "resources/icon.icns", "icon_path_linux": "resources/icon.png", "icon_path_windows": "resources/icon.ico", "output_path": "output"}
复制代码
最后我们运行如下命令在项目目录:
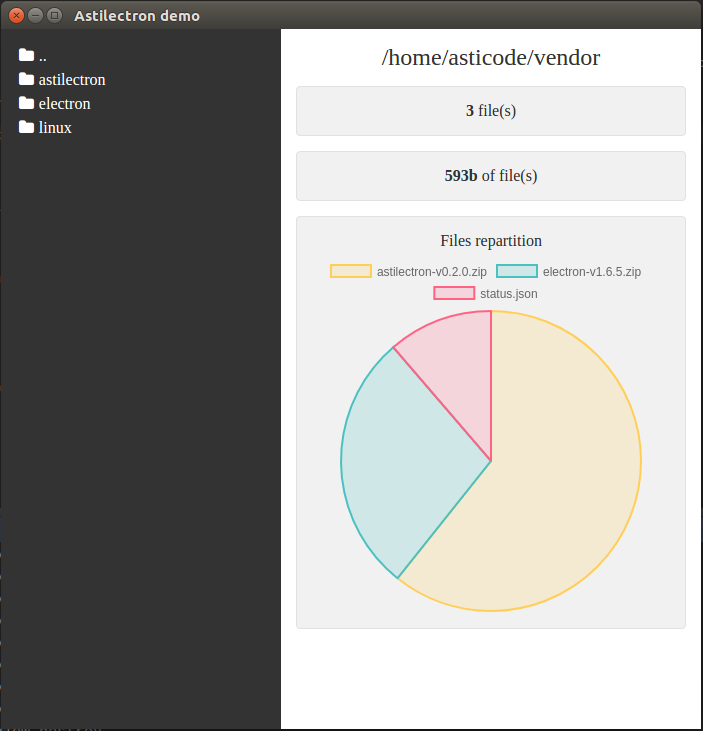
第五步:看实际效果
结果在 output/<os>-<arch> 目录,准备去测试 :)
当然,你也打包你的 Golang GUI 应用到其他环境,请查看 bundler 文档,看下如何能够实现。
总结
只需要少量的组织和结构,让添加 GUI 到你的 Golang 应用变得从未如此简单,这要感谢 astilectron 及其 bootstrap 和 bundler。
使用它有两个主要的缺点值得注意:
二进制文件大小至少要 50MB,并且第一次执行后,包含二进制的文件夹至少要 200MB。
内存消耗的会比较紧张,因为 Electron(在后台运行时)已知的内存管理不是很好。
但是如果你准备好了,你将很快添加 GUI 到你的 Golang 应用中。
GUI 编码愉快。


评论