JUnit 是一个基于 Java 的开源框架,可帮助测试人员执行单元测试。JUnit 主要用于测试应用程序的每个单元或组件,例如类和方法。它有助于编写和运行可重复的自动化测试,以确保项目代码按预期运行。还可以使用 JUnit 执行 Selenium 自动化测试用例,以测试 Web 应用程序或网站。
在我们开始讨论 Selenium 中的 JUnit 注解之前,让我们快速回顾一下 JUnit 在测试人员社区中流行的原因。
为什么 JUnit 在测试人员中如此受欢迎
毫无疑问,JUnit 被认为是顶级 Java 测试框架之一。以下是 JUnit 之所以流行的主要原因:
开源框架
提供与 Eclipse、IntelliJ 等 IDE 的集成,可以快速地测试运行代码。
提供与 Jenkins、Teamcity 等 CI/CD 工具的集成,以帮助创建稳定的交付管道。
提供丰富的断言能力以帮助验证结果是否为预期。
提供多种注解以帮助您识别测试方法的类型。
提供创建测试套件的工具,该套件还包括多个测试用例甚至其他测试套件。
提供 Test Runner 来轻松执行测试套件。
使测试代码更易读、更优雅并提高质量。
提供 HTML 格式的 JUnit 测试报告生成。
什么是 JUnit 注解
正如上面的论述,Selenium 中的 JUnit Annotations 有助于识别我们在测试代码中定义的方法类型。为了使用 JUnit 执行 Selenium WebDriver 测试,有必要在脚本中添加 JUnit Annotations。
以下是 Selenium 中常见的 JUnit 注解列表:
@BeforeClass
@Before
@Test
@After
@AfterClass
@Ignore
Selenium 中用于特定目的的 JUnit 注解列表:
@ParameterizedTest
@RunWith
@RepeatedTest
@Parameters
此 JUnit 认证为那些希望通过 JUnit 推进 Selenium 自动化测试事业的人建立了测试标准。
Selenium 中的 JUnit 注解
@BeforeClass
此注解用于初始化我们在运行测试用例中使用的对象。当我们在 BeforeClass 方法中初始化任何对象时,它只会被调用一次。
@BeforeClass public static void SetUpClass() { System.out.println("This is @BeforeClass annotation"); }
复制代码
@Before
当我们想在使用该方法时初始化任何对象时,都会使用此注解。假设我们有 5 个测试用例,Before 方法将在每个测试方法之前被调用,总计调用 5 次。因此,每次执行测试用例时都会调用它。此注解通常用于设置测试环境。
@Before public void SetUp() { System.out.println("This is @Before annotation"); }
复制代码
@Test
该注解告诉 JUnit,它所附加的 public void method() 可以作为测试用例运行。此注解包括要测试的应用程序的测试方法。单个自动化测试脚本中可能包含许多测试方法。
@Test public void Addition() { c= a+b; assertEquals(15,c); System.out.println("This is first @Test annotation method= " +c); } @Test public void Multiplication() { c=a*b; assertEquals(50,c); System.out.println("This is second @Test annotation method= " +c); }
复制代码
@After
无论我们在 @Before 注解方法中初始化了什么对象、资源,该初始化都应该在 @After 注解方法中释放。因此,每次测试方法之后都会执行此注解。@After 注解的主要目的是删除临时数据的过程。Teardown 方法也可用于定义默认值或清除测试环境。
@After public void TearDown() { c= null; System.out.println("This is @After annotation"); }
复制代码
@AfterClass
无论我们在 @BeforeClass 注解方法中初始化了什么,该初始化都应该在 @AfterClass 注解方法中释放。所以,这个注解只执行一次,它会在所有测试执行完毕后执行。
@AfterClass public static void TearDownClass() { System.out.println("This is @AfterClass annotation"); }
复制代码
@Ignore
这个注解告诉 JUnit 这个方法不应该被执行。在特定测试用例中我们的代码模块没有准备好的场景中,我们可以暂时将该代码模块放在 @Ignore 注解方法中以避免测试用例失败。JUnit 4 提供了强大的报告功能来帮助您了解被忽略的测试计数以及运行的测试计数和失败的测试计数。
@Ignore public void IgnoreMessage() { String info = "JUnit Annotation Blog" ; assertEquals(info,"JUnit Annotation Blog"); System.out.println("This is @Ignore annotation"); }
复制代码
下面是一个案例,包含了以上所有注解:
package JUnitAnnotationBlog; import static org.junit.Assert.assertEquals; import org.junit.After;import org.junit.AfterClass;import org.junit.Before;import org.junit.BeforeClass;import org.junit.Ignore;import org.junit.Test; public class JUnitAnnotations { int a=10; int b=5; Object c; @BeforeClass public static void SetUpClass() { System.out.println("This is @BeforeClass annotation"); } @Before public void SetUp() { System.out.println("This is @Before annotation"); } @Test public void Addition() { c= a+b; assertEquals(15,c); System.out.println("This is first @Test annotation method= " +c); } @Test public void Multiplication() { c=a*b; assertEquals(50,c); System.out.println("This is second @Test annotation method= " +c); } @After public void TearDown() { c= null; System.out.println("This is @After annotation"); } @AfterClass public static void TearDownClass() { System.out.println("This is @AfterClass annotation"); } @Ignore public void IgnoreMessage() { String info = "JUnit Annotation Blog" ; assertEquals(info,"JUnit Annotation Blog"); System.out.println("This is @Ignore annotation"); } }
复制代码
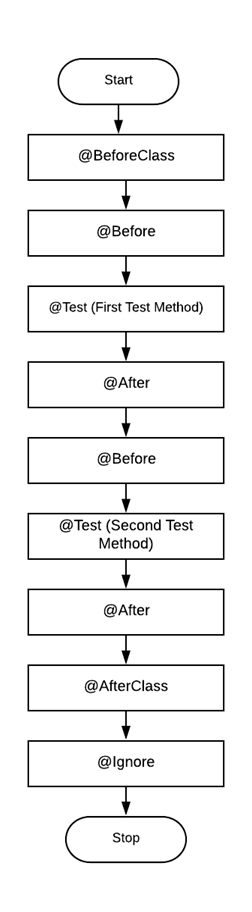
JUnit 注解的执行顺序
JUnit Annotations 的基本流程图,可帮助理解测试流程。
JUnit 中用于特定目的的注解
在前面的部分中,我们介绍了 Selenium 中最基本的 JUnit 注解。现在分享一些高级 JUnit 注解及其特定用途。
@ParameterizedTest
这个注解有点类似于 @Test 注解,不同的是它是用来标识参数化的测试方法。我们还可以使用 @ValueSource 注解在注解测试方法后提供方法参数。参数的数据类型可以是任何类型,例如字符串或整数。在下面的示例代码中,作为参数传递的 String 类型的变量 data 从源注解中获取一个参数。
此注解的主要目的是使用不同的参数多次运行测试。
注意:在使用这些注解之前添加以下库
org.junit.jupiter.params.ParameterizedTestorg.junit.jupiter.params.provider.ValueSource
复制代码
例子:
@ParameterizedTest @ValueSource(strings = {"LambdaTest", "JUnit", "Annotations", "Blog"}) void ExampleCode(String data) { assertNotNull(data); }
复制代码
@RepeatedTest
JUnit 5 中引入的这个注解用于根据需要多次运行测试方法。测试进行的重复次数可以作为参数传递给 @RepeatedTest 注解。
例子:
@Test @RepeatedTest(5) public void Addition() { int a=10; int b=5; Object c; c= a+b; assertEquals(15,c); System.out.println("This is @RepeatedTest annotation method= " +c); }
复制代码
@RunWith
当一个类被 @RunWith 注解时,JUnit 调用被注解的类来执行测试。这个注解基本上与 @SuiteClasses 注解一起运行,它指定了一组要执行的许多类。套件中的每个类在执行之前运行的类之后执行。
例子:
@RunWith(Suite.class)               @Suite.SuiteClasses({                 TestSample1.class,  TestSample2.class,  TestSample3.class,  TestSample4.class,  TestSample5.class,  })
public class JunitTest {                            }
复制代码
@Parameters
注意:不要混淆 @ParameterizedTest 注解和 @Parameters 注解。@Parameters 注解需要 @RunWith 注解来指定测试将使用参数化运行器运行。而在 @ParameterizedTest 注解中,@ValueSource 将用作传递参数的源注解。
在使用 @Parameters 注解时,我们使用 @RunWith 注解来指定测试将使用 Parameterized Runner 运行。运行程序寻找初始化测试的方法,为测试提供值并执行测试。在下面的代码中,值集定义为使用 @Parameters 注解的列表对象数组。参数化测试是一种常见的测试,它使用测试参数一次又一次地执行。这为开发人员使用不同的输入类型执行相同的测试节省了大量时间。
@RunWith(Parameterized.class)public class Blog1 {
   String name, password;      @Parameters   public Object[][] getData()   {   Object[][] info = {{"ramit1","ramitd11"}, {"ramit2","ramitd22"}};   return info;   }      public Blog1(String id, String pass)   {       this.name = id;       this.password= pass;          }       @Test   public void Sample()   {       SampleCode.login(name, password);   }}
复制代码
以下是上述示例中使用的 SampleCode 类的代码:
public class SampleCode{ public static void login(String name, String password) { System.out.println(“Login credentials are ” + name + password ) ; }}
复制代码
Selenium 中与 JUnit 注解组合使用的属性
JUnit 中的这些测试注解具有多个可用于我们的测试方法的属性:
timeout
为每个测试用例指定超时,在 @Test 注解中指定 timeout 属性。超时时间以毫秒为单位指定。
@Test(timeout=10000) public void ExampleCode() throws InterruptedException { System.setProperty("webdriver.chrome.driver","chromedriver.exe"); WebDriver driver = new ChromeDriver(); driver.get("https://www.****.com"); driver.manage().window().maximize(); ***省略步骤细节*** Thread.sleep(2000); //Password driver.quit(); }
复制代码
如果您想为多个测试用例设置相同的超时时间,则无需在脚本中指定的每个 @Test 注解中添加超时属性。在这种情况下可以使用 @Rule 注解来定义适用于脚本的每个 @Test 方法注解的全局超时。
例子:
@Rulepublic Timeout globalTimeout = Timeout.seconds(10); //设置 10s 的全局超时
复制代码
expected
这是 JUnit 4 引入的一个特殊功能,它提供了跟踪执行特定代码时预期的异常的工具。运行代码时可能会出现不同类型的异常,例如 NoSuchMethodException、ArithmeticException、IndexOutOfBoundsExceptions 等。例如,当特定数字除以零时,您希望代码发生异常,在这种情况下,需要将使用 ArithmeticException。如果没有发生异常异常,则测试执行将失败。
例子:
@Test(expected= ArithmeticException.class) public void ExampleCode() { int a= 10,b=0,c; c=a/b; System.out.println("Value= " +c); }
复制代码


评论