本文的结构将和使用 Spring Boot 2.0、Eureka 和 Spring Cloud 的微服务快速指南非常相似,因为他们都描述了应用程序开发的相同方面。我将重点向你展示 Spring Cloud 和 Kubernetes 在开发方面的异同。
本文涉及的话题有:
在云原生开发中使用 Spring Boot 2.0
使用 Spring Cloud Kubernetes 项目为所有微服务提供服务发现
使用 Kubernetes 的 Config Maps 和 Secrets 为应用程序 pod(译者注:Kubernetes 中的最小管理单元)注入配置设置
使用 Docker 构建应用程序镜像并使用 YAML 配置文件将他们部署到 Kubernetes 上。
Spring Cloud Kubernetes 和 Zuul 代理一起使用,为所有微服务公开一个独立的 Swagger API 文档
当你构建微服务环境时,Spring Cloud 和 Kubernetes 可能成为互相威胁的竞争解决方案。
Spring Cloud 提供的如 Eureka、Spring Cloud Config 或 Zuul 等组件可能被 Kubernetes 的如 services、config maps、secrets 或 ingresses 等内置对象所替代。
但是即使你决定使用 Kubernetes 组件替代 Spring Cloud,你也可以利用整个 Spring Cloud 项目提供的一些有趣的功能。
开发中帮助我们的一个非常有趣的项目是 Spring Cloud Kubernetes。虽然它还处于孵化阶段,但绝对值得在它上面献上一些时间。它将 Spring Cloud 和 Kubernetes 集成在一起。我将向你展示如何使用客户端发现的实现、Ribbon 客户端的服务间通信以及使用 Spring Cloud Kubernetes 的 Zipkin 发现。
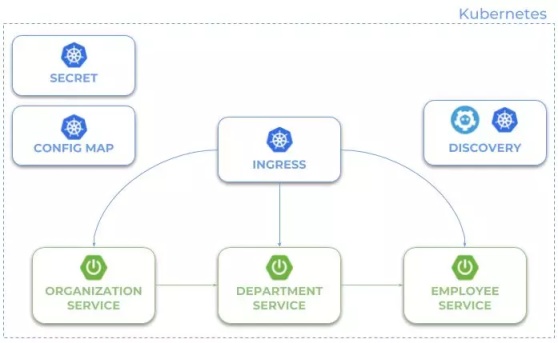
它说明了我们示例程序的架构。它和之前文章提到的关于 Spring Cloud 上的微服务架构非常相似。这里有三个独立应用程序( employee-service、 department-service 、 organization-service),通过 REST API 互相通信。
这些 Spring Boot 微服务使用一些 Kubernetes 内置机制:用于分发配置的 config maps 和 secrets、用于服务发现的 etcs 和用于 API 网关的 ingresses。
让我们继续执行。目前,Spring Cloud 的最新稳定版本是 Finchley.RELEASE。该版本的 spring-cloud-dependencies 应该声明一个依赖管理的 BOM。
<dependencyManagement> <dependencies> <dependency> <groupId>org.springframework.cloud</groupId> <artifactId>spring-cloud-dependencies</artifactId> <version>Finchley.RELEASE</version> <type>pom</type> <scope>import</scope> </dependency> </dependencies> </dependencyManagement>
复制代码
Spring Cloud Kubernetes 未在 Spring Cloud Release Trains 下发布,所以我们需要显式定义其版本。因为我们使用 Spring Boot 2.0,所以我们必须包含最新 SNAPSHOT 版本的 spring-cloud-kubernetes 工件,版本号为 0.3.0.BUILD-SNAPSHOT。
前提要求
为了能部署和测试我们的示例微服务,我们需要准备一个开发环境。我们通过一下步骤实现:
你至少需要在你本地机器上运行的 Kubernetes(Minikube)或 Openshift(Minishift)的单节点集群实例。
你应该启动它并公开他们提供的嵌入式 Docker 客户端。有关 Minishift 的详细说明可以在我的在 Openshift 上部署 Java 应用程序的快速指南里找到。你也可以使用这份说明来运行 Minikube,只需要用“minikube”替换单词“minishift”。事实上,如果你选择 Kubernetes 或 Openshift 并没什么关系,本教程的下一部分对他们都适用。
Spring Cloud Kubernetes 需要访问 Kubernetes API,以便于能够检索为单个服务运行的 pod 的地址列表。如果你使用 Kubernetes,你应该只执行以下命令:
$ kubectl create clusterrolebinding admin --clusterrole=cluster-admin --serviceaccount=default:default
复制代码
如果你在 Minishift 上部署你的微服务,首先你需要启用 admin-user 插件,然后以集群管理员身份登陆并授予所需权限。
$ minishift addons enable admin-user$ oc login -u system:admin$ oc policy add-role-to-user cluster-reader system:serviceaccount:myproject:default
复制代码
apiVersion: apps/v1 kind: Deployment metadata: name: mongodb labels: app: mongodb spec: replicas: 1 selector: matchLabels: app: mongodb template: metadata: labels: app: mongodb spec: containers: - name: mongodb image: mongo:latest ports: - containerPort: 27017 env: - name: MONGO_INITDB_DATABASE valueFrom: configMapKeyRef: name: mongodb key: database-name - name: MONGO_INITDB_ROOT_USERNAME valueFrom: secretKeyRef: name: mongodb key: database-user - name: MONGO_INITDB_ROOT_PASSWORD valueFrom: secretKeyRef: name: mongodb key: database-password---apiVersion: v1kind: Servicemetadata: name: mongodb labels: app: mongodbspec: ports: - port: 27017 protocol: TCP selector: app: mongodb
复制代码
1. 使用 Config Maps 和 Secrets 注入配置
使用 Spring Cloud 时,在你的系统中实现分发配置的最明显的选择是 Spring Cloud Config。用 Kubernetes,你可以使用 Config Map。它保存了能在 pod 中使用或用户存储配置数据的配置数据键值对。
它用于存储和共享非敏感、未加密的配置信息。要在你的集群中使用敏感信息,你必须使用 Secrets。
基于 MongoDB 链接设置的示例们可以完美的演示使用这两个 Kubernetes 对象。
在 Spring Boot 应用程序中,我们可以使用环境变量轻松注入它。这里是一个带有 URI 配置的 application.yml 文件的片段。
spring: data: mongodb: uri:mongodb://${MONGO_USERNAME}:${MONGO_PASSWORD}@mongodb/${MONGO_DATABASE}
复制代码
虽然用户名和密码是敏感字段,但数据库名不是,因此我们可以将将其放在 config map 中。
apiVersion: v1 kind: ConfigMap metadata: name: mongodb data: database-name: microservices
复制代码
当然,用户名和密码被定义在 secrets 中。
apiVersion: v1 kind: Secret metadata: name: mongodb type: Opaque data: database-password: MTIzNDU2 database-user: cGlvdHI=
复制代码
要将配置应用于 Kubernetes 集群,我们运行以下命令。
$ kubectl apply -f kubernetes/mongodb-configmap.yaml$ kubectl apply -f kubernetes/mongodb-secret.yaml
复制代码
完成之后,我们应该将配置属性注入到应用程序的 pod 中。在 Deployment YAML 文件中定义容器配置时,我们必须包含对环境变量和 secrets 的引用,如下所示。
apiVersion: apps/v1 kind: Deployment metadata: name: employee labels: app: employee spec: replicas: 1 selector: matchLabels: app: employee template: metadata: labels: app: employee spec: containers: - name: employee image: piomin/employee:1.0 ports: - containerPort: 8080 env: - name: MONGO_DATABASE valueFrom: configMapKeyRef: name: mongodb key: database-name - name: MONGO_USERNAME valueFrom: secretKeyRef: name: mongodb key: database-user - name: MONGO_PASSWORD valueFrom: secretKeyRef: name: mongodb key: database-password
复制代码
2. 用 Kubernetes 构建服务发现
我们通常在 Kubernetes 上用 Docker 容器运行微服务。一个或多个容器按 pod 分组,也是 Kubernetes 中可被创建和管理的最小可部署单元。一个好的做法时在一个 pod 中只运行一个容器。如果你想扩展你的微服务,你只需要增加运行的 pod 数量。一个独立微服务的所有运行中的 pod 在逻辑上都被 Kubernetes Service 组合在一起。此服务可能在集群外可见,并且能够在所有运行中的 pod 之间对传入的请求进行负载均衡。下面的服务所有的 pod 组定义标记字段 app 等于 employee。
apiVersion: v1kind: Servicemetadata: name: employee labels: app: employeespec: ports: - port: 8080 protocol: TCP selector: app: employee
复制代码
服务可用于访问 Kubernetes 集群外的应用程序或用于集群内的服务间通信。但是,使用 Spring Cloud Kubernetes 可以更轻松的实现微服务之间的通信。首先,我们需要在项目 pom.xml 引入下面依赖。
<dependency> <groupId>org.springframework.cloud</groupId> <artifactId>spring-cloud-starter-kubernetes</artifactId> <version>0.3.0.BUILD-SNAPSHOT</version></dependency>
复制代码
然后我们为应用程序启用客户端发现,就像我们在 Spring Cloud Netflix Eureka 中一直做的发现一样。这允许你按名称查询 Kubernetes endpoit(服务)。这种发现功能也被 Spring Cloud Kubernetes Ribbon 或 Zipkin 项目用来分别为需要负载均衡的微服务获取已定义的 pod 列表,或者可用于追踪或聚合的 Zipkin 服务器。
@SpringBootApplication@EnableDiscoveryClient@EnableMongoRepositories@EnableSwagger2public class EmployeeApplication { public static void main(String[] args) { SpringApplication.run(EmployeeApplication.class, args); } // ... }
复制代码
本节最后一个重要事项是保证 Spring 应用程序名与 Kubernetes 服务名完全相同。对于应用程序 employee-service 就是 employee。
spring: application: name: employee
复制代码
使用 Docker 构建微服务并在 Kubernetes 上部署
在我们的示例微服务中没有任何不正常。我们已经包含了一些用于构建基于 REST 的微服务、集成 MongoDB 和使用 Swagger2 生成 API 文档的标准 Spring 依赖。
<dependency> <groupId>org.springframework.boot</groupId> <artifactId>spring-boot-starter-web</artifactId> </dependency> <dependency> <groupId>org.springframework.boot</groupId> <artifactId>spring-boot-starter-actuator</artifactId> </dependency> <dependency> <groupId>io.springfox</groupId> <artifactId>springfox-swagger2</artifactId> <version>2.9.2</version> </dependency> <dependency> <groupId>org.springframework.boot</groupId> <artifactId>spring-boot-starter-data-mongodb</artifactId> </dependency>
复制代码
为了与 MongoDB 集成,我们应该创建一个继承了标准 Spring Data CrudRepository 的接口。
public interface EmployeeRepository extends CrudRepository { List findByDepartmentId(Long departmentId); List findByOrganizationId(Long organizationId); }
复制代码
实体类应该用 Mongo 的注解 @Document,主键字段用 @Id。
@Document(collection = "employee")public class Employee { @Id private String id; private Long organizationId; private Long departmentId; private String name; private int age; private String position; // ... }
复制代码
该 repository bean 已经被注入到 controller 类中。以下是我们 employee-service 中 REST API 的完整实现。
@RestControllerpublic class EmployeeController { private static final Logger LOGGER = LoggerFactory.getLogger(EmployeeController.class); @Autowired EmployeeRepository repository; @PostMapping("/") public Employee add(@RequestBody Employee employee) { LOGGER.info("Employee add: {}", employee); return repository.save(employee); } @GetMapping("/{id}") public Employee findById(@PathVariable("id") String id) { LOGGER.info("Employee find: id={}", id); return repository.findById(id).get(); } @GetMapping("/") public Iterable findAll() { LOGGER.info("Employee find"); return repository.findAll(); } @GetMapping("/department/{departmentId}") public List findByDepartment(@PathVariable("departmentId") Long departmentId) { LOGGER.info("Employee find: departmentId={}", departmentId); return repository.findByDepartmentId(departmentId); } @GetMapping("/organization/{organizationId}") public List findByOrganization(@PathVariable("organizationId") Long organizationId) { LOGGER.info("Employee find: organizationId={}", organizationId); return repository.findByOrganizationId(organizationId); } }
复制代码
为了在 Kubernetes 上运行我们的微服务,我们首先应该用 mvn clean install 命令构建整个 Maven 项目。每个微服务都有一个放在根目录中的 Dockerfile。这是为 employee-service 定义的 Dockerfile。
FROM openjdk:8-jre-alpineENV APP_FILE employee-service-1.0-SNAPSHOT.jarENV APP_HOME /usr/appsEXPOSE 8080COPY target/$APP_FILE $APP_HOME/WORKDIR $APP_HOMEENTRYPOINT ["sh", "-c"]CMD ["exec java -jar $APP_FILE"]
复制代码
让我们为所有三个示例微服务构建 Docker 镜像。
$ cd employee-service$ docker build -t piomin/employee:1.0 .$ cd department-service$ docker build -t piomin/department:1.0 .$ cd organization-service$ docker build -t piomin/organization:1.0 .
复制代码
最后一步是在 Kubernetes 上部署有应用程序的 Docker 容器。为此,只需在 YAML 配置文件上执行 kubectl apply 命令。 employee-service 的示例部署文件已经在步骤 1 中演示了。所有需要的部署字段都可以在项目 repository 的 kubernetes 目录中找到。
$ kubectl apply -f kubernetes\employee-deployment.yaml$ kubectl apply -f kubernetes\department-deployment.yaml$ kubectl apply -f kubernetes\organization-deployment.yaml
复制代码
使用 Spring Cloud Kubernetes Ribbon 进行微服务之间的通信
所有微服务都部署在 Kubernetes 上。现在,讨论服务间的通信相关的一些方面是值得的。应用程序 employee-service 和其他微服务相比,它没有调用任何其他微服务。让我们看一下其他微服务调用由 employee-servic 公开的 API 并与其他微服务进行通信( organization-service 调用 department-service API)。
首先,我们需要在项目中引入一些额外的依赖。我们使用 Spring Cloud Ribbon 和 OpenFeign。或者,你也可以使用 Spring 的 @LoadBalancedRestTemplate。
<dependency> <groupId>org.springframework.cloud</groupId> <artifactId>spring-cloud-starter-netflix-ribbon</artifactId></dependency><dependency> <groupId>org.springframework.cloud</groupId> <artifactId>spring-cloud-starter-kubernetes-ribbon</artifactId> <version>0.3.0.BUILD-SNAPSHOT</version> </dependency> <dependency> <groupId>org.springframework.cloud</groupId> <artifactId>spring-cloud-starter-openfeign</artifactId></dependency>
复制代码
下面是 department-service 的主类。它使用 @EnableFeignClients 注解启用 Feign 客户端。它的工作原理与基于 Spring Cloud Netflix Eureka 的服务发现相同。OpenFeign 为客户端使用 Ribbon 进行负载均衡。Spring Cloud Kubernetes Ribbon 提供了一些 bean,通过 Fabric8 的 KubernetesClient 强制 Ribbon 使用 Kubernetes API 进行通信。
@SpringBootApplication@EnableDiscoveryClient@EnableFeignClients@EnableMongoRepositories@EnableSwagger2public class DepartmentApplication { public static void main(String[] args) { SpringApplication.run(DepartmentApplication.class, args); } // ...}
复制代码
下面是用于调用 employee-service 公开的方法的 Feign 客户端实现。
@FeignClient(name = "employee")public interface EmployeeClient { @GetMapping("/department/{departmentId}") List findByDepartment(@PathVariable("departmentId") String departmentId);}
复制代码
最后,我们必须将 Feign 客户端的 bean 注入到 REST controller。现在,我们可以调用 EmployeeClient 内部定义的方法,这相当于调用 REST endpoint。
@RestControllerpublic class DepartmentController { private static final Logger LOGGER = LoggerFactory.getLogger(DepartmentController.class); @Autowired DepartmentRepository repository; @Autowired EmployeeClient employeeClient; // ... @GetMapping("/organization/{organizationId}/with-employees") public List findByOrganizationWithEmployees(@PathVariable("organizationId") Long organizationId) { LOGGER.info("Department find: organizationId={}", organizationId); List departments = repository.findByOrganizationId(organizationId); departments.forEach(d -> d.setEmployees(employeeClient.findByDepartment(d.getId()))); return departments; }}
复制代码
5. 使用 Kubernetes Ingress 构建 API 网关
Ingress 是允许传入请求到达下游服务的一组规则。在我们的微服务架构中,ingress 扮演 API 网关的角色。要创建它,我们应该首先准备一个 YAML 描述文件。描述文件应该包含网关可用的主机名和到达下游服务的映射规则。
apiVersion: extensions/v1beta1kind: Ingressmetadata: name: gateway-ingress annotations: nginx.ingress.kubernetes.io/rewrite-target: /spec: backend: serviceName: default-http-backend servicePort: 80 rules: - host: microservices.info http: paths: - path: /employee backend: serviceName: employee servicePort: 8080 - path: /department backend: serviceName: department servicePort: 8080 - path: /organization backend: serviceName: organization servicePort: 8080
复制代码
你必须执行下面命令才能将该配置应用于 Kubernetes 集群。
$ kubectl apply -f kubernetes\ingress.yaml
复制代码
要在本地测试本解决方案,我们必须在 hosts 文件里的 ingress 定义中插入 IP 地址和主机名之间的映射设置,如下所示。之后,我们可以使用自定义主机名通过 ingress 测试服务,如下所示:
http://microservices.info/employee
192.168.99.100 microservices.info
复制代码
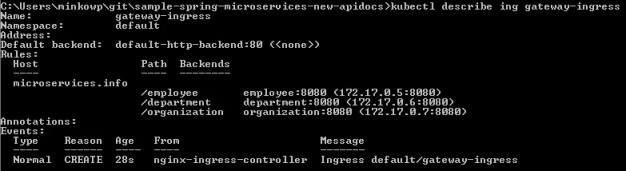
你可以通过执行 kubectl describe ing gateway-ingress 命令检查创建的 ingress 的详情。
使用 Swagger2 在网关上启用 API 规范
如果我们想为 Kubernetes 上部署的所有微服务公开一个 Swagger 文档该怎么做?好吧,这里的事情变复杂了。我们可以运行一个有 Swagger UI 的容器,并通过手动公开 ingress 映射所有路径,但是这不是一个好的解决方案。
在这种情况下,我们可以再次使用 Spring Cloud Kubernetes Ribbon,这次是与 Spring Cloud Netflix Zuul 一起使用。Zuul 将作为只为 Swagger API 服务的网关。
下面是在我的 gateway-service 项目中使用的依赖列表。
<dependency> <groupId>org.springframework.cloud</groupId> <artifactId>spring-cloud-starter-netflix-zuul</artifactId> </dependency><dependency> <groupId>org.springframework.cloud</groupId> <artifactId>spring-cloud-starter-kubernetes</artifactId> <version>0.3.0.BUILD-SNAPSHOT</version></dependency> <dependency> <groupId>org.springframework.cloud</groupId> <artifactId>spring-cloud-starter-netflix-ribbon</artifactId> </dependency> <dependency> <groupId>org.springframework.cloud</groupId> <artifactId>spring-cloud-starter-kubernetes-ribbon</artifactId> <version>0.3.0.BUILD-SNAPSHOT</version></dependency><dependency> <groupId>io.springfox</groupId> <artifactId>springfox-swagger-ui</artifactId> <version>2.9.2</version></dependency><dependency> <groupId>io.springfox</groupId> <artifactId>springfox-swagger2</artifactId> <version>2.9.2</version></dependency>
复制代码
Kubernetes discovery 客户端将检测集群上公开的所有服务。我们只想显示三个微服务的文档。这就是我为什么为 Zuul 定义以下 route。
zuul: routes: department: path: /department/** employee: path: /employee/** organization: path: /organization/**
复制代码
现在我们可以使用 ZuulProperties bean 从 Kubernetes discovery 中获取 route 的地址,并将他们配置为 Swagger 的资源,如下所示。
@Configurationpublic class GatewayApi { @Autowired ZuulProperties properties; @Primary @Bean public SwaggerResourcesProvider swaggerResourcesProvider() { return () -> { List resources = new ArrayList(); properties.getRoutes().values().stream() .forEach(route -> resources.add(createResource(route.getId(), "2.0"))); return resources; }; } private SwaggerResource createResource(String location, String version) { SwaggerResource swaggerResource = new SwaggerResource(); swaggerResource.setName(location); swaggerResource.setLocation("/" + location + "/v2/api-docs"); swaggerResource.setSwaggerVersion(version); return swaggerResource; }}
复制代码
应用程序 gateway-service 应该和其他应用程序一样部署在集群上。你可以通过执行 kubectlgetsvc 命令来查看运行中的服务列表。Swagger 文档在地址 http://192.168.99.100:31237/swagger-ui.html 可以看见。
总结
实际上我正在为 Spring Cloud Kubernetes 项目做准备,该项目仍处于孵化阶段。Kubernetes 作为一个平台的受欢迎程度在过去几个月中迅速增长,但是它仍有一些弱点。其中之一就是服务间通信。Kubernetes 没有给我们许多允许我们配置更高级规则的开箱即用的机制。这是 Kubernetes 上为服务网格创建如 Istio 或 Linkered 等框架的原因。这些项目仍然是相对较新的解决方案,但 Spring Cloud 是一个稳定坚固的框架。为什么不用它来提供服务发现、服务间通信或者负载均衡呢?感谢 Spring Cloud Kubernetes,这是可能的。


评论