前言
文中软件版本及官方文档:
如何使用 Spring 配置
@Value 声明所需的配置 key
@Component public class MovieRecommender { private final String catalog; public MovieRecommender(@Value("${catalog.name}") String catalog) { this.catalog = catalog; } }
复制代码
@PropertySource 声明配置来源
@Configuration @PropertySource("classpath:application.properties") public class AppConfig { }
复制代码
如上述的一个实例。在 MovieRecommender 中声明需要注入一个 key 为 catalog.name 的配置。而该配置的值在 AppConfig 中通过 @PropertySource("classpath:application.properties") 声明,这里的 classpath:application.properties 指向 classpath 下的 application.properties 配置文件,也就是该配置文件配置了 catalog.name 这个 key 的具体指。
Spring 配置源
配置源集合
org.springframework.core.env.PropertySources
Spring 中的配置集合,该接口实现了 Iterable<PropertySource<?>> 也就是内部其实是多个 PropertySource<?>,该接口提供的主要方法:
注解 - org.springframework.context.annotation.PropertySources
在 Spring 4.0 以后提供 @PropertySources 注解,可以通过注解的方式使用 org.springframework.core.env.PropertySources
主要实现 - org.springframework.core.env.MutablePropertySources
PropertySources 的主要实现有 org.springframework.core.env.MutablePropertySources
public class MutablePropertySources implements PropertySources {
  private final Log logger;
  private final List<PropertySource<?>> propertySourceList = new CopyOnWriteArrayList<>();                ... 省略部分代码}
复制代码
该方法内部维护了一个 List<PropertySource<?>> 数组,底层采用 CopyOnWriteArrayList;List<PropertySource<?>> 是可以有序的:
相对顺序:
绝对顺序:
单个配置 org.springframework.core.env.PropertySource
public abstract class PropertySource<T> {
  protected final Log logger = LogFactory.getLog(getClass());
  protected final String name;
  protected final T source;                ... 省略部分代码}
复制代码
注解 @org.springframework.context.annotation.PropertySources
配置源中主要有两个属性:
public MapPropertySource(String name, Map<String, Object> source) { super(name, source); }
复制代码
* Properties: `org.springframework.core.env.PropertiesPropertySource`
复制代码
public PropertiesPropertySource(String name, Properties source) { super(name, (Map) source); }
复制代码
* 命令行参数: `org.springframework.core.env.JOptCommandLinePropertySource`
复制代码
public JOptCommandLinePropertySource(String name, OptionSet options) { super(name, options); }
复制代码
配置源的主要行为:getProperty(String name)
这里以 Map 为例,在调用接口的 PropertySource 接口的 getProperty(String name) 方式时,调用到具体实现 org.springframework.core.env.MapPropertySource:
public MapPropertySource(String name, Map<String, Object> source) {    super(name, source);}
@Override@Nullablepublic Object getProperty(String name) {    return this.source.get(name);}
复制代码
这里我们看到 MapPropertySource 中的 getProperty 直接返回了 this.source.get(name) ,而这里的 source 是在构造方法中传入的一个 Map<String, Object> source。 其实这里就是根据配置项的 key (如例子中的 catalog.name) 从 map 中获取对应的 value。
配置解析
org.springframework.core.env.Environment
Spring Framework 3.1 开始引入 Environment 抽象,它统一 Spring 配 置属性的存储,包括占位符处理和类型转换,不仅完整地替换 PropertyPlaceholderConfigurer,而且还支持更丰富的配置属性源 (PropertySource)。使用场景:
核心接口及实现
核心接口
org.springframework.core.env.Environment
org.springframework.core.env.ConfigurableEnvironment
标准实现
org.springframework.core.env.StandardEnvironment
@Override protected void customizePropertySources(MutablePropertySources propertySources) { propertySources.addLast( new PropertiesPropertySource(SYSTEM_PROPERTIES_PROPERTY_SOURCE_NAME, getSystemProperties())); propertySources.addLast( new SystemEnvironmentPropertySource(SYSTEM_ENVIRONMENT_PROPERTY_SOURCE_NAME, getSystemEnvironment())); }
复制代码
在 StandardEnvironment 类的 customizePropertySources 方法中,会添加系统相关的配置源到 propertySources 配置源集合中。而 customizePropertySources 方法是在父类的构造方法中创建的,在构造方法中,一起创建的还有 propertyResolver:
protected AbstractEnvironment(MutablePropertySources propertySources) { this.propertySources = propertySources; // 新建一个 配置解析器。方法返回: new PropertySourcesPropertyResolver(propertySources); this.propertyResolver = createPropertyResolver(propertySources); customizePropertySources(propertySources);}
复制代码
Environment 的初始化
Environment 基本是伴随了 Spring 容器的整个生命周期,这块也是在 Spring 容器初始化阶段完成 Environment 的初始化。已 main 方法启动 Spring 容器为例:
public static void main(String[] args) { SpringApplication.run(NacosConsumerApplication.class, args);}
复制代码
一般是通过 SpringApplication.run 方法完成对 Spring 容器的初始化操作,最终会调用 org.springframework.boot.SpringApplication#run(java.lang.String...) :
public ConfigurableApplicationContext run(String... args) {    StopWatch stopWatch = new StopWatch();    stopWatch.start();    ConfigurableApplicationContext context = null;    Collection<SpringBootExceptionReporter> exceptionReporters = new ArrayList<>();    configureHeadlessProperty();    SpringApplicationRunListeners listeners = getRunListeners(args);    listeners.starting();    try {            ApplicationArguments applicationArguments = new DefaultApplicationArguments(                            args);            // 预处理 Environment,如果没有的话,会新建一个。            ConfigurableEnvironment environment = prepareEnvironment(listeners,                            applicationArguments);            configureIgnoreBeanInfo(environment);            Banner printedBanner = printBanner(environment);            context = createApplicationContext();            exceptionReporters = getSpringFactoriesInstances(                            SpringBootExceptionReporter.class,                            new Class[] { ConfigurableApplicationContext.class }, context);            prepareContext(context, environment, listeners, applicationArguments,                            printedBanner);            refreshContext(context);            afterRefresh(context, applicationArguments);            stopWatch.stop();            if (this.logStartupInfo) {                    new StartupInfoLogger(this.mainApplicationClass)                                    .logStarted(getApplicationLog(), stopWatch);            }            listeners.started(context);            callRunners(context, applicationArguments);    }    catch (Throwable ex) {            handleRunFailure(context, ex, exceptionReporters, listeners);            throw new IllegalStateException(ex);    }
    try {            listeners.running(context);    }    catch (Throwable ex) {            handleRunFailure(context, ex, exceptionReporters, null);            throw new IllegalStateException(ex);    }    return context;}
复制代码
org.springframework.boot.SpringApplication#prepareEnvironment
private ConfigurableEnvironment prepareEnvironment( SpringApplicationRunListeners listeners, ApplicationArguments applicationArguments) { // Create and configure the environment ConfigurableEnvironment environment = getOrCreateEnvironment(); configureEnvironment(environment, applicationArguments.getSourceArgs()); listeners.environmentPrepared(environment); bindToSpringApplication(environment); if (this.webApplicationType == WebApplicationType.NONE) { environment = new EnvironmentConverter(getClassLoader()) .convertToStandardEnvironmentIfNecessary(environment); } ConfigurationPropertySources.attach(environment); return environment;}
复制代码
其中的 getOrCreateEnvironment 方法则是根据当前的环境,返回对应的 Environment,一般为 org.springframework.core.env.StandardEnvironment;
看到这里,我们大搞有了一个流程:
通过 @PropertySource("classpath:application.properties") 获取 classpath 下的 application.properties 文件,并存储在 PropertySources 中。
将 PropertySources 注入到 Environment 中。
在 @Value 需要注入某个 key 的时候,调用 org.springframework.core.env.PropertySourcesPropertyResolver#getProperty(java.lang.String) 解析 @Value 中的表达式并返回正确的值。
@Value 的实现原理
@org.springframework.beans.factory.annotation.Value
/** * Annotation used at the field or method/constructor parameter level * that indicates a default value expression for the annotated element. * * <p>Typically used for expression-driven or property-driven dependency injection. * Also supported for dynamic resolution of handler method arguments — for * example, in Spring MVC. * * <p>A common use case is to inject values using * <code>#{systemProperties.myProp}</code> style SpEL (Spring Expression Language) * expressions. Alternatively, values may be injected using * <code>${my.app.myProp}</code> style property placeholders. * * <p>Note that actual processing of the {@code @Value} annotation is performed * by a {@link org.springframework.beans.factory.config.BeanPostProcessor * BeanPostProcessor} which in turn means that you <em>cannot</em> use * {@code @Value} within * {@link org.springframework.beans.factory.config.BeanPostProcessor * BeanPostProcessor} or * {@link org.springframework.beans.factory.config.BeanFactoryPostProcessor BeanFactoryPostProcessor} * types. Please consult the javadoc for the {@link AutowiredAnnotationBeanPostProcessor} * class (which, by default, checks for the presence of this annotation). * * @author Juergen Hoeller * @since 3.0 * @see AutowiredAnnotationBeanPostProcessor * @see Autowired * @see org.springframework.beans.factory.config.BeanExpressionResolver * @see org.springframework.beans.factory.support.AutowireCandidateResolver#getSuggestedValue */@Target({ElementType.FIELD, ElementType.METHOD, ElementType.PARAMETER, ElementType.ANNOTATION_TYPE})@Retention(RetentionPolicy.RUNTIME)@Documentedpublic @interface Value {
/** * The actual value expression such as <code>#{systemProperties.myProp}</code> * or property placeholder such as <code>${my.app.myProp}</code>. */ String value();
}
复制代码
通过 @Value 注解的 javadoc 文档,我们大概知道。这个注解的主要实现是在 org.springframework.beans.factory.annotation.AutowiredAnnotationBeanPostProcessor 类中。
org.springframework.beans.factory.annotation.AutowiredAnnotationBeanPostProcessor
public class AutowiredAnnotationBeanPostProcessor implements SmartInstantiationAwareBeanPostProcessor, MergedBeanDefinitionPostProcessor, PriorityOrdered, BeanFactoryAware {}
复制代码
而在类的定义上,我们看到他实现了 org.springframework.beans.factory.config.SmartInstantiationAwareBeanPostProcessor 接口,并复写了 org.springframework.beans.factory.annotation.AutowiredAnnotationBeanPostProcessor#postProcessProperties 方法:
@Overridepublic PropertyValues postProcessProperties(PropertyValues pvs, Object bean, String beanName) { InjectionMetadata metadata = findAutowiringMetadata(beanName, bean.getClass(), pvs); try { metadata.inject(bean, beanName, pvs); } catch (BeanCreationException ex) { throw ex; } catch (Throwable ex) { throw new BeanCreationException(beanName, "Injection of autowired dependencies failed", ex); } return pvs;}
复制代码
org.springframework.beans.factory.annotation.AutowiredAnnotationBeanPostProcessor#findAutowiringMetadata
private InjectionMetadata findAutowiringMetadata(String beanName, Class<?> clazz, @Nullable PropertyValues pvs) { // Fall back to class name as cache key, for backwards compatibility with custom callers. String cacheKey = (StringUtils.hasLength(beanName) ? beanName : clazz.getName()); // Quick check on the concurrent map first, with minimal locking. InjectionMetadata metadata = this.injectionMetadataCache.get(cacheKey); if (InjectionMetadata.needsRefresh(metadata, clazz)) { synchronized (this.injectionMetadataCache) { metadata = this.injectionMetadataCache.get(cacheKey); if (InjectionMetadata.needsRefresh(metadata, clazz)) { if (metadata != null) { metadata.clear(pvs); } metadata = buildAutowiringMetadata(clazz); this.injectionMetadataCache.put(cacheKey, metadata); } } } return metadata;}
复制代码
这里大概就是两个步骤:
org.springframework.beans.factory.annotation.AutowiredAnnotationBeanPostProcessor#buildAutowiringMetadata
private InjectionMetadata buildAutowiringMetadata(final Class<?> clazz) {    // 判断 clazz 是否标注有待处理的注解    if (!AnnotationUtils.isCandidateClass(clazz, this.autowiredAnnotationTypes)) {            return InjectionMetadata.EMPTY;    }
    List<InjectionMetadata.InjectedElement> elements = new ArrayList<>();    Class<?> targetClass = clazz;
    // 循环对当前类及父类的字段和方法做处理。    do {            final List<InjectionMetadata.InjectedElement> currElements = new ArrayList<>();
            ReflectionUtils.doWithLocalFields(targetClass, field -> {                    MergedAnnotation<?> ann = findAutowiredAnnotation(field);                    if (ann != null) {                            if (Modifier.isStatic(field.getModifiers())) {                                    if (logger.isInfoEnabled()) {                                            logger.info("Autowired annotation is not supported on static fields: " + field);                                    }                                    return;                            }                            boolean required = determineRequiredStatus(ann);                            currElements.add(new AutowiredFieldElement(field, required));                    }            });
            ReflectionUtils.doWithLocalMethods(targetClass, method -> {                    Method bridgedMethod = BridgeMethodResolver.findBridgedMethod(method);                    if (!BridgeMethodResolver.isVisibilityBridgeMethodPair(method, bridgedMethod)) {                            return;                    }                    MergedAnnotation<?> ann = findAutowiredAnnotation(bridgedMethod);                    if (ann != null && method.equals(ClassUtils.getMostSpecificMethod(method, clazz))) {                            if (Modifier.isStatic(method.getModifiers())) {                                    if (logger.isInfoEnabled()) {                                            logger.info("Autowired annotation is not supported on static methods: " + method);                                    }                                    return;                            }                            if (method.getParameterCount() == 0) {                                    if (logger.isInfoEnabled()) {                                            logger.info("Autowired annotation should only be used on methods with parameters: " +                                                            method);                                    }                            }                            boolean required = determineRequiredStatus(ann);                            PropertyDescriptor pd = BeanUtils.findPropertyForMethod(bridgedMethod, clazz);                            currElements.add(new AutowiredMethodElement(method, required, pd));                    }            });
            elements.addAll(0, currElements);            targetClass = targetClass.getSuperclass();    }    while (targetClass != null && targetClass != Object.class);
    // 返回最终的 InjectionMetadata    return InjectionMetadata.forElements(elements, clazz);}
复制代码
这个方法的大概逻辑:
而解析方法及字段的方法:
ReflectionUtils.doWithLocalFields(targetClass, field -> { // 寻找 autowire 的注解 MergedAnnotation<?> ann = findAutowiredAnnotation(field); // 如果没有对应注解则不处理 if (ann != null) { // 如果是静态字段则不处理 if (Modifier.isStatic(field.getModifiers())) { if (logger.isInfoEnabled()) { logger.info("Autowired annotation is not supported on static fields: " + field); } return; } boolean required = determineRequiredStatus(ann); currElements.add(new AutowiredFieldElement(field, required)); }});
复制代码
org.springframework.beans.factory.annotation.AutowiredAnnotationBeanPostProcessor#findAutowiredAnnotation
@Nullableprivate MergedAnnotation<?> findAutowiredAnnotation(AccessibleObject ao) { MergedAnnotations annotations = MergedAnnotations.from(ao); for (Class<? extends Annotation> type : this.autowiredAnnotationTypes) { MergedAnnotation<?> annotation = annotations.get(type); if (annotation.isPresent()) { return annotation; } } return null;}
复制代码
这里就是确认类型中是否有 this.autowiredAnnotationTypes 中的注解
org.springframework.beans.factory.annotation.AutowiredAnnotationBeanPostProcessor#AutowiredAnnotationBeanPostProcessor
public AutowiredAnnotationBeanPostProcessor() { this.autowiredAnnotationTypes.add(Autowired.class); this.autowiredAnnotationTypes.add(Value.class); try { this.autowiredAnnotationTypes.add((Class<? extends Annotation>) ClassUtils.forName("javax.inject.Inject", AutowiredAnnotationBeanPostProcessor.class.getClassLoader())); logger.trace("JSR-330 'javax.inject.Inject' annotation found and supported for autowiring"); } catch (ClassNotFoundException ex) { // JSR-330 API not available - simply skip. }}
复制代码
在 AutowiredAnnotationBeanPostProcessor 的构造方法中可以看到,this.autowiredAnnotationTypes 中添加了三种类型的注解,分别是 @Autowired、@Value 以及支持 JSR-330 规范的 @Inject。
再回到 org.springframework.beans.factory.annotation.AutowiredAnnotationBeanPostProcessor#postProcessProperties 方法,这里已经获取到了 InjectionMetadata 了,之后就是对 metadata 进行依赖注入:metadata.inject(bean, beanName, pvs);
最终的调用其实就是通过反射,给对应的字段或者方法赋值。
@Value 注入特性
由此,我们可以看出 @Value 依赖的一些特性:
递归遍历所有父类,父类可通过 @Value 注入。
静态字段无法注入。
支持 @Autowired、@Value 以及支持 JSR-330 规范的 @Inject 三种方式注入。
@Autowired 优先级最高(this.autowiredAnnotationTypes 先加入的 @Autowired 注解)。
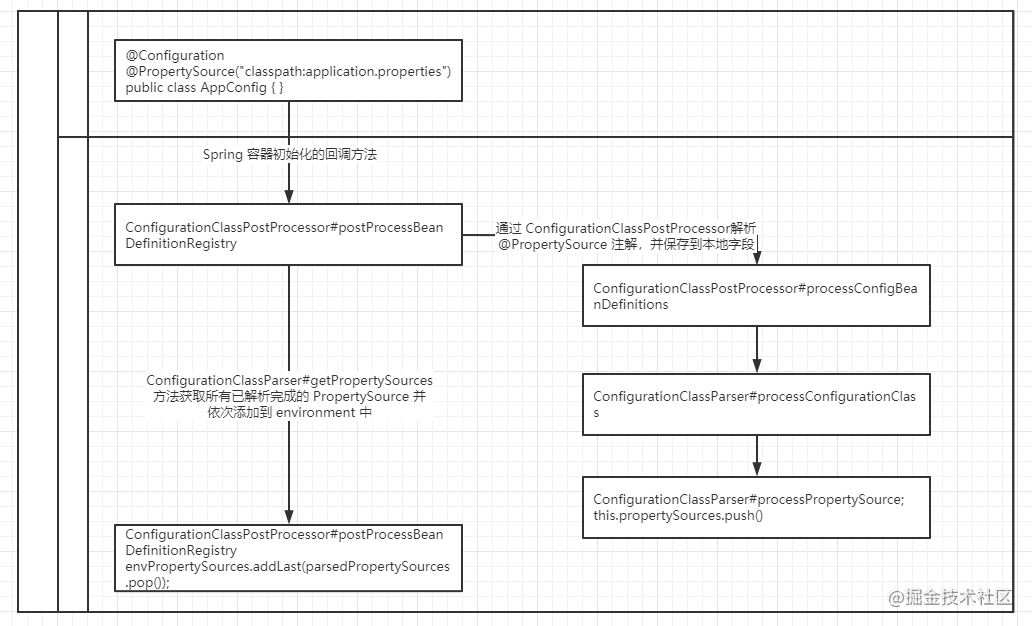
Spring 配置图解
@PropertySource
@Value
总结
本小节主要探讨了 Spring @Value 的配置依赖注入。通过源码的方式了解 Spring 核心的配置实现 PropertySource 及 Environment。 以及 @PropertySource 及 @Value 的原理。
@PropertySource 简单的说,是将注解的 value 内容,转换为 PropertySources 并存储到 Environment 中。
@Value 是在 bean 初始化的阶段,解析到指定的注解 @Autowired、@Value 以及支持 JSR-330 规范的 @Inject 后,从 Environment 获取到对应的配置,并通过反射注入到 bean 的方法或属性中。


评论