前言
今年 2 月,Amazon CodePipeline 已经由光环新网运营的中国(北京)区域和由西云数据运营的中国(宁夏)区域提供。
Amazon CodePipeline 是一项完全托管式持续交付服务,可帮助对您的发布管道进行自动化,以实现快速而可靠的应用程序及基础设施更新。每当有代码变更时,Amazon CodePipeline 都会根据您所定义的发布模型对发布流程的构建、测试及部署阶段进行自动化。
目前中国区的 Amazon CodePipeline 内置支持 Amazon CodeCommit, Amazon ECR 和 Amazon S3 作为 Source Provider. 但还不支持直接与 GitHub, GitLab, BitBucket 等源代码管理服务集成。
GitHub 作为全球最大的源代码管理服务,要将 Amazon CodePipeline 与 GitHub 集成主要面临以下两个问题:
目前 GitHub 并没有被 Amazon CodePipeline 提供开箱即用的支持。
网络连接的不稳定导致有时连接 GitHub 失败。
本文将介绍如何解决上面两个问题的技巧,实现 GitHub 与 Amazon CodePipeline 在亚马逊云科技中国区集成。
问题一:如何将 GitHub 作为 Amazon CodePipeline 的 Source Provider
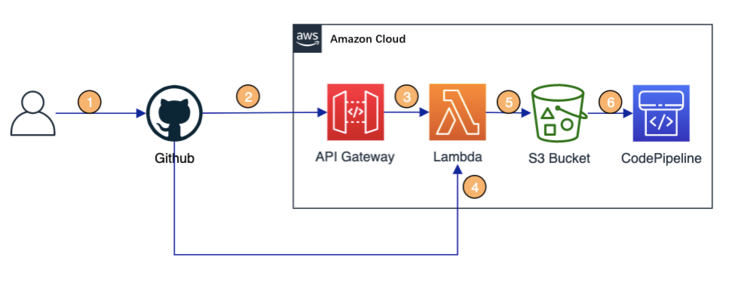
我们可以利用 Amazon API Gateway 对外提供接口,与 GitHub 的 webhook 集成,通过 API Gateway 将 GitHub webhook event 转发给 Amazon Lambda Function. 在 Amazon Lambda Function 里获取 GitHub repository 的源代码,并将源码上传到 S3 Bucket。创建一个以 Amazon S3 Bucket 为 Source Provider 的 CodePipeline project,以此实现将 GitHub 作为 CodePipeline 的 Source Provider。
如下图所示:
步骤一:创建 Amazon S3 Bucket
通过 S3 console 创建 Amazon S3 Bucket, 注意选择 “Enable Bucket Versioning”
步骤二:创建 Amazon Lambda Function
我们以 nodejs 为例,创建 index.js 文件,主要完成以下几个功能:
对 webhook event 中的签名信息进行验证
从 webhook event 中获取 GitHub repository
将获取的源代码上传到 S3 Bucket 中
下面给出源码例子:
const AWS = require('aws-sdk');const axios = require('axios');const s3 = new AWS.S3();const crypto = require('crypto');
exports.handler = async (event) => {    try {        console.log(`Incoming event: ${JSON.stringify(event)}`);        const eventBody = JSON.parse(event.body);        const normalizedHeaders = normalizeObject(event.headers);
        // Validate message signature        if (!(checkSignature(process.env.GITHUB_SECRET, normalizedHeaders['x-hub-signature-256'], event.body))) {            console.log('Invalid webhook message signature');            return responseToApiGw(401, 'Signature is not valid');        }        console.log('Signature validated successfully');
        const repoConfig = {            repoFullName: eventBody.repository.full_name,            branch: eventBody.ref.split('/')[2],        };
        // Download the repository package from GitHub Server        const file = await downloadFile(repoConfig);
        // Upload the repository package to S3 bucket        const s3Upload = await s3.upload({            Bucket: process.env.S3BUCKET,            ServerSideEncryption: 'AES256',            Key: `${repoConfig.repoFullName}/${repoConfig.branch}.zip`,            Body: file        }).promise();        console.log(s3Upload);
        console.log('Exiting successfully');        return responseToApiGw(200, 'success');    }    catch (err) {        console.log('Exiting with error', err);        return responseToApiGw(500, 'Some weird thing happened');    }};
/** * Convert an object keys to lowercase * @param {object} request - this is a object to convert the keys to lowercase * @returns {object} - return a new object with keys in lower case */function normalizeObject(inputObject) {    console.log('info', '>>> normalizeObject()');    const requestKeys = Object.keys(inputObject);    let outputObject = {};    for (let i = 0; i < requestKeys.length; i++) {        outputObject[requestKeys[i].toLowerCase()] = inputObject[requestKeys[i]];    }    console.log('info', '<<< normalizeObject()');    return outputObject;}
/** * Download the repository content as a zip file * @param {object} repoConfig - this is a object containing the config for the repository * @returns {stream} - return a stream containing the repository zip file */async function downloadFile(repoConfig) {    console.log('info', '>>> downloadFile()');    const params = {        method: 'get',        url: `https://github.com/${repoConfig.repoFullName}/archive/refs/heads/${repoConfig.branch}.zip`,        responseType: 'stream'    };
    try {        const resp = await axios.request(params);        console.log('info', '<<< downloadFile()');        return resp.data;    }    catch (err) {        console.log('error', err);        throw new Error(err);    }}
/** * Check GitHub Server Signature * @param {string} signingSecret - this is the signing secret for the GitHub Server webhook * @param {string} signature - this is the signatured applied by GitHub to the message * @param {object} body - this is the message body * @returns {boolean} - return true or false */function checkSignature(signingSecret, signature, body) {    console.log('info', '>>> signingSecret()');    const hash = crypto.createHmac('sha256', signingSecret).update(body).digest('hex');
    const signatureHash = signature.split('=');    if (signatureHash[1] === hash) {        console.log('info', '<<< signingSecret()');        return true;    }    console.log('info', '<<< signingSecret()');    return false;}
/** * Generate a response for API Gateway * @param {string} statusCode - HTTP status code to return * @param {string} detail - this is message detail to return * @returns {object} - return the formatted response object */function responseToApiGw(statusCode, detail) {    if (!statusCode) {        throw new TypeError('responseToApiGw() expects at least argument statusCode');    }    if (statusCode !== '200' && !detail) {        throw new TypeError('responseToApiGw() expects at least arguments statusCode and detail');    }
    let body = {};    if (statusCode === '200' && detail) {        body = {            statusCode: statusCode,            message: detail        };    } else if (statusCode === '200' && !detail) {        body = {            statusCode: statusCode        };    } else {        body = {            statusCode: statusCode,            fault: detail        };    }    let response = {        statusCode: statusCode,        body: JSON.stringify(body),        headers: {            'Content-Type': 'application/json',            'Access-Control-Allow-Origin': '*',            'Access-Control-Allow-Methods': 'POST, GET',            'Access-Control-Allow-Headers': 'Origin, X-Requested-With, Content-Type, Accept'        }    };    return response;}
复制代码
左滑查看更多
GITHUB_SECRET: 创建 GitHub webhook 的时设定的 “Secret”
S3BUCKET: 保存源码的 S3 Bucket
因为使用了 axios 和 crypto,需要将这些依赖提前下载到本地。执行下面的命令:
npm install axiosnpm install crypto
复制代码
左滑查看更多
你会得到类似下面截图的文件结构:
将这些文件打包成 ZIP 包。
创建 Amazon Lambda Function.
通过 Amazon Lambda Function Console 创建一个 Amazon Lambda Function 主要配置如下:
Function name: codepipeline-github-integrationRuntime:Node.js 14.x
创建两个 Environment variables GITHUB_SECRET 和 S3BUCKET。
Code source: 将上一步骤生成 ZIP 包作为 code source, 上传到此 Amazon Lambda Function。
步骤三:创建 API Gateway
通过 Amazon API Gateway Console 创建 API Gateway,提供对外的 Rest 接口,用于接收 GitHub webhook event request,并且转发给上面创建的 Amazon Lambda Function。
主要配置如下:
Method: POST
Integration Request -> Integration type: Lambda Function
Integration Request -> Use Lambda Proxy integration: Checked
Integration Request -> Lambda Function: codepipeline-github-integration
创建完成之后点击”Actions”->”Deploy API” 将创建的 Resources 部署到一个 Stage。
步骤四:创建 GitHub webhook
进入到我们需要集成的 GitHub repository,选择 “Settings”->”Webhooks”->”Add webhook”
输入主要参数:
Payload URL: API Gateway Invoke URL //上面步骤三创建的 API 的 Invoke URL, 可以通过”API Gateway console” -> “API” -> “Stages” -> “Invoke URL”得到。Content type: application/json
Secret: 设定一个 Webhook 的密码,与上面 Lambda 的 GITHUB_SECRET 一致
创建完成后我们可以尝试 push 一个 commit 到 repo 中,查看 Amazon S3 Bucket 中是否有 .zip 文件上传,如果有就说明搭建成功了。
步骤五:创建 CodePipeline project
通过 Amazon CodePipeline Console 创建 CodePipeline project. 在 “Add source stage” 选择 Amazon S3 作为 Source Provider
主要配置:
Source provider: 选择 Amazon S3
Bucket: 前面步骤创建的保存源码的 S3 Bucket
S3 object key: S3 Bucket 中保存的源码的 key
自此,使 GitHub 成为 Amazon CodePipeline 的 Source Provider 的操作就完成了。
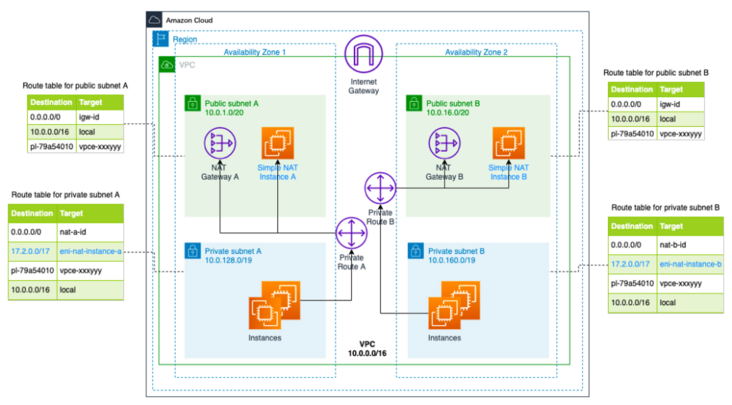
问题二:网络的原因导致有时北京/宁夏区域连接 GitHub 失败
目前,从北京/宁夏区域连接 GitHub 会遇到一些网络问题,导致上面步骤创建的 Lambda Function 连接 GitHub 失败,下面给出一个解决此类问题的办法。
在您的 VPC 内创建 NAT 实例,NAT 实例可以通过企业的专线或已备案的 VPN 服务连接源代码托管服务器(譬如 github git server),同时将指定的 IP CIDRs(譬如 github git server)添加到 VPC 的路由表,访问这些 IP CIDRs 的网络流量都会被转发到 NAT 服务器,通过稳定且合规的连接请求源代码服务器。
通过自定义的 NAT 实例,网络请求路由如下图所示,
社区的 Simple NAT https://github.com/zxkane/sna... 项目基于基础设施即代码(Amazon CDK)的实现,可以协助您在 VPC 内快速的创建 NAT 实例,您可以作为实现参考。
总结
通过上面介绍的两个技巧,可以实现北京/宁夏区域的 Amazon CodePipeline 与 GitHub 稳定无缝的集成。如果有需要与 Gitlab,BitBucket 甚至 Gitee 等其他源代码管理服务集成,也可以参考本文介绍的技巧来实现。
本篇作者
邓明通
亚马逊云科技创新解决方案架构师
曾任职于 NEC,Lucent,亚马逊电商等公司,超过十五年软件开发及架构设计的经验,在微服务,容器,DevOps 等领域有丰富的经验。


评论