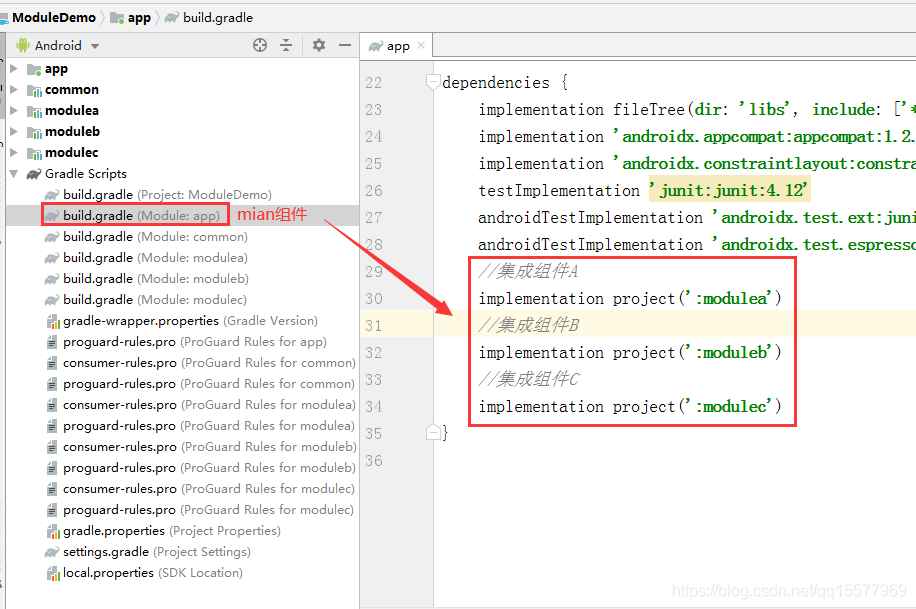
Android 组件化开发简单示例,android 底层开发教程
implementation project(':moduleb')
//集成组件 C
implementation project(':modulec')
}
如下图:?
五、组件资源共享
1、在 common 组件的 build.gradle 文件中,添加 android?配置,如下:
android {
//省略前面的代码...
repositories {
flatDir {
dirs 'libs'
}
}
}
在各个需要调用公共 common 组件的组件 build.gradle 文件中,也添加 android?配置,如下:
android {
//省略前面的代码..
repositories {
flatDir {
dirs '../common/libs/', 'libs'
}
}
}
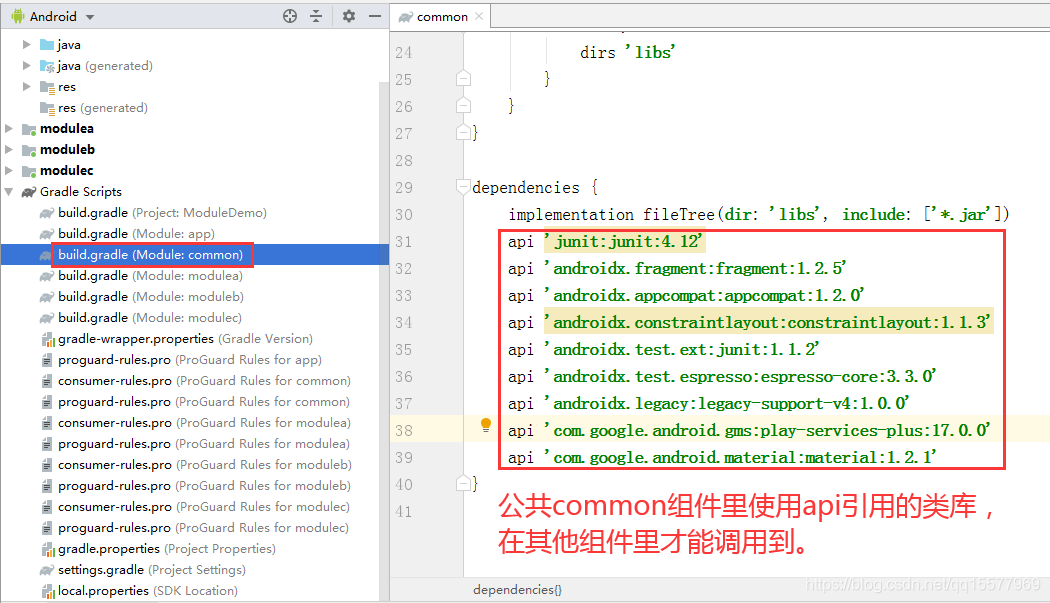
2、common 组件里引入各种类库的时候必须用 api,而不是用 implementation,原因:
implementation 编译的依赖只作用于当前的 module,即 common 组件模块中使用 implementation 编译的三方库只对 common 模块起作用,main 组件模块中无法使用该三方库。
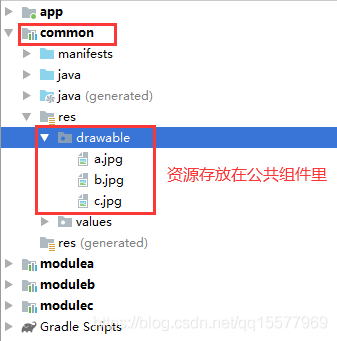
3、关于组件资源共享,举个简单示例:例如图片都是存放到公共的 common 组件的 res 里,那么如何在组件 A、组件 B、组件 C 里使用呢?
使用方法如下:
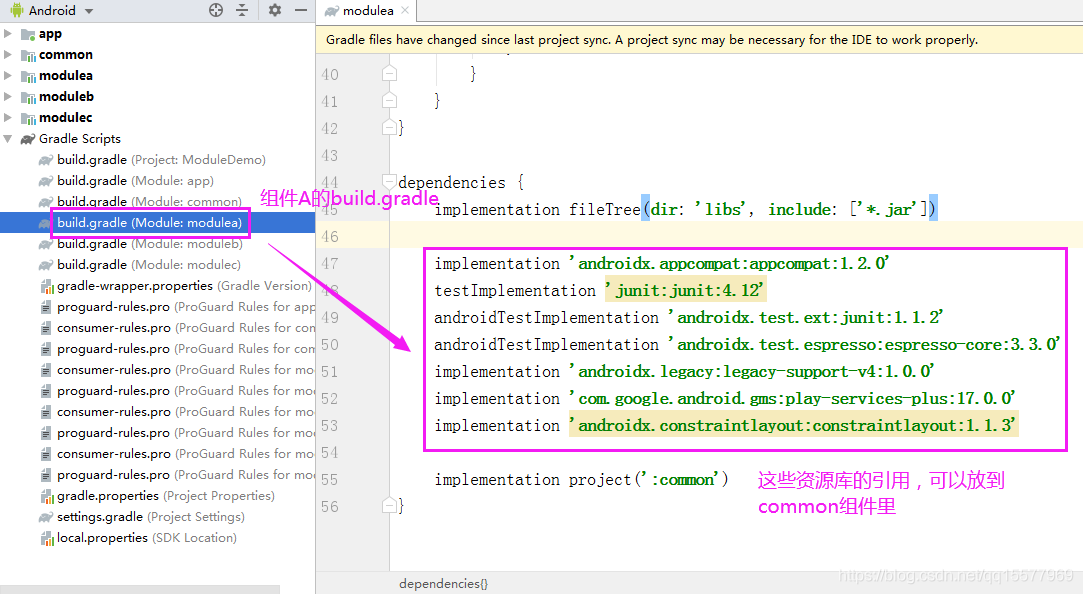
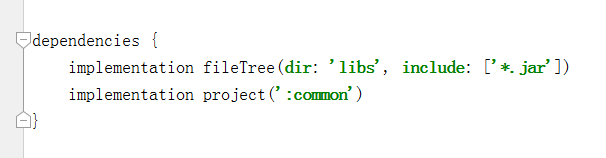
打开各组件的 build.gradle 文件,在 dependencies{}里添加如下代码即可:
dependencies {
...
implementation project(':common')
}
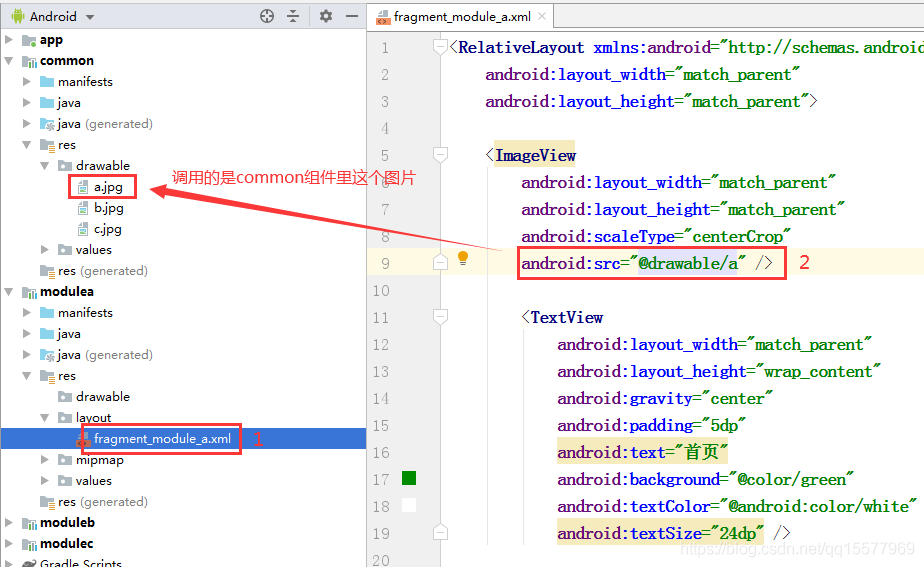
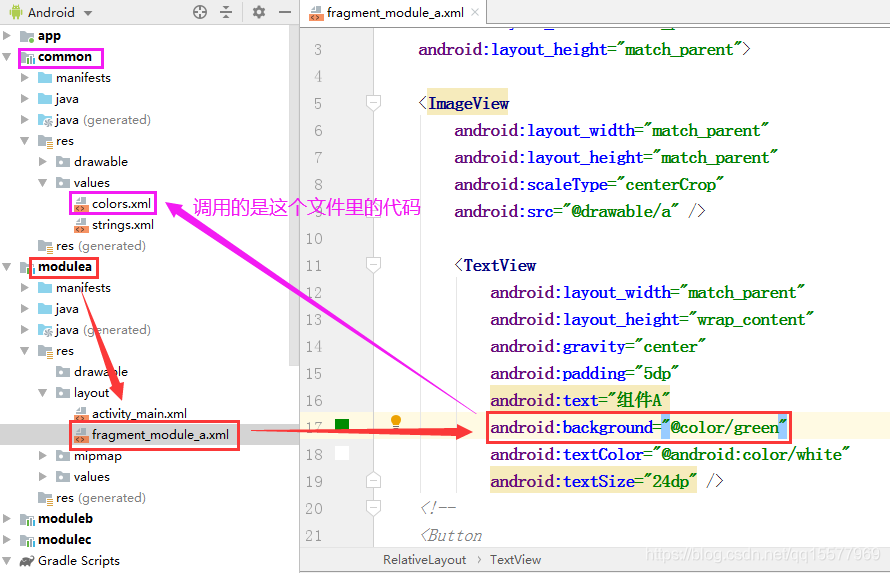
如此一来,就能在组件 A 里调用 common 组件的图片资源了
4、同样的道理, 组件 A、 组件 B、 组件 C 的颜色代码也可以直接调用公共 common 组件里 colors.xml 的代码
5、我们可以把其他第三方库、自定义 view、工具类、公用资源都放进公共 common 组件里,也就是说组件 A、组件 B、组件 C 里 build.gradle 所引入的类库,都可以放到 common 组件里的 dependencies{}里
6、所以各个业务组件里面的 build.gradle 文件的 dependencies{}配置简化后,就变成了下面这样:
7、通过以上解说,大家应该都明白了吧,图片、xml 这些(value 目录下的各种 xml 文件),都可以放到公共 common 组件里,然后再被其他组件引用。对于全局共用的 style.xml 文件,我们更应该把它放在 common 组件中,例如我们的项目 theme,本来是放在 main 组件的 style 里面,我们可以把它移到 common 中,这样其他组件调试时,作为一个单独的项目,也能和主项目有一样的主题。总而言之,所有你认为可以被各个组件共享的资源,都可以放在 common 组件中。
六、往组件里添加 Fragment
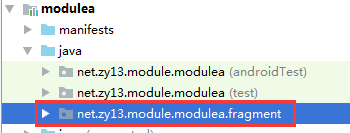
1、以组件 A 为例,在组件 A 里添加一个包 fragment
2、在 fragment 包右键?? →? New???→??Fragment???→Fragment(Blank)

3、 填写 Fragment 碎片名称,勾选创建 xml 文件,如下:
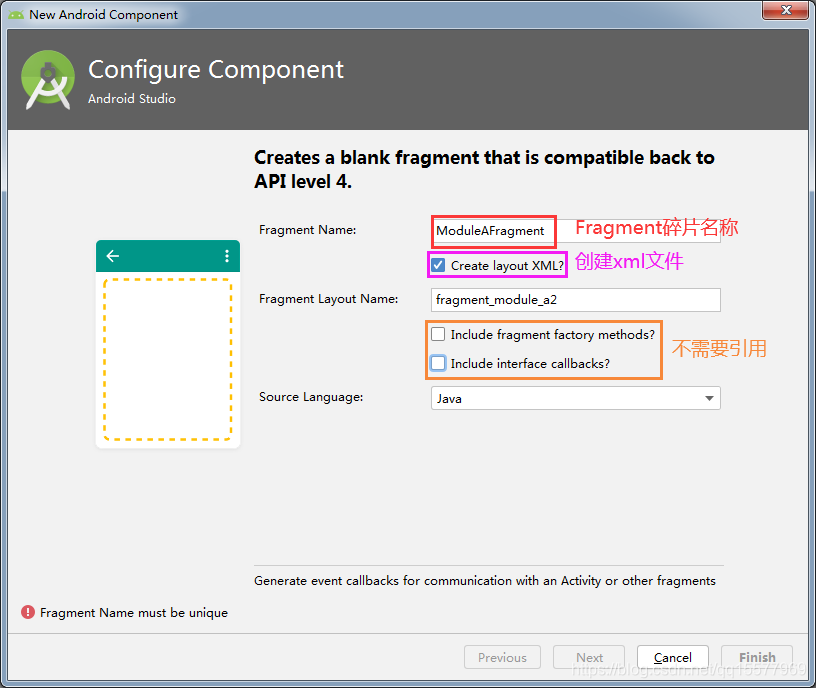
4、对应的 fragment_module_a.xml 文件代码:
<FrameLayout xmlns:android="http://schemas.android.com/apk/res/android"
android:layout_width="match_parent"
android:layout_height="match_parent">
<ImageView
android:layout_width="match_parent"
android:layout_height="match_parent"
android:scaleType="centerCrop"
android:src="@drawable/a" />
<TextView
android:layout_width="match_parent"
android:layout_height="wrap_content"
android:gravity="center"
android:padding="5dp"
android:text="组件 A"
android:background="@color/green"
android:textColor="@android:color/white"
android:textSize="24dp" />
</FrameLayout>
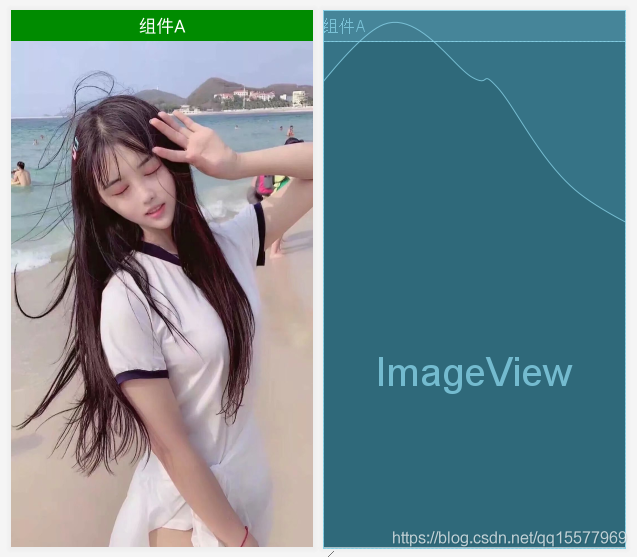
5、其他组件也类似组件 A 一样,创建一个 Fragment 碎片,然后添加不同的背景图片即可。
6、main 组件里添加导航和 Fragment 容器,main 组件里 activity_main.xml 的代码如下:
<?xml version="1.0" encoding="utf-8"?>
<LinearLayout xmlns:android="http://schemas.android.com/apk/res/android"
xmlns:app="http://schemas.android.com/apk/res-auto"
android:layout_width="match_parent"
android:layout_height="match_parent"
android:id="@+id/container"
android:orientation="vertical">
<FrameLayout
android:id="@+id/content"
android:layout_width="match_parent"
android:layout_height="0dp"
android:layout_weight="1">
</FrameLayout>
<com.google.android.material.bottomnavigation.BottomNavigationView
android:id="@+id/navigation"
android:layout_width="match_parent"
android:layout_height="wrap_content"
android:layout_gravity="bottom"
android:background="?android:attr/windowBackground"
app:menu="@menu/navigation" />
</LinearLayout>
7、res 下创建一个 menu 目录,里面添加一个 navigation.xml 文件,代码如下:
<?xml version="1.0" encoding="utf-8"?>
<menu xmlns:android="http://schemas.android.com/apk/res/android">
<item
android:id="@+id/navigation_a"
android:icon="@drawable/home"
android:title="组件 A" />
<item
android:id="@+id/navigation_b"
android:icon="@drawable/video"
android:title="组件 B" />
<item
android:id="@+id/navigation_c"
android:icon="@drawable/me"
android:title="组件 C" />
</menu>
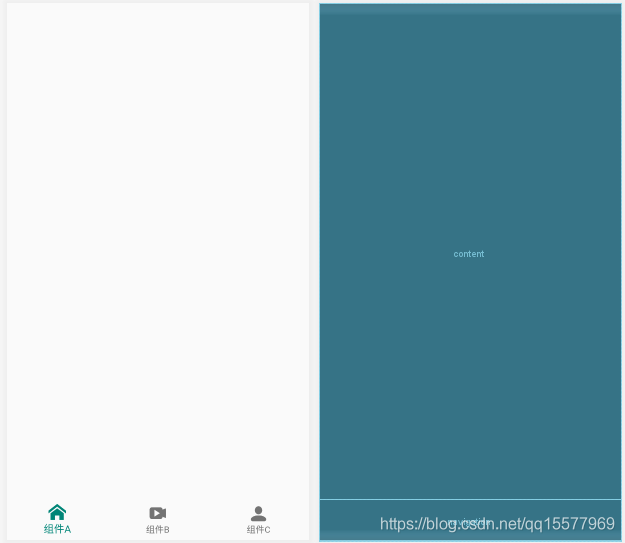
navigation.xml 里调用的 icon 图片分别放到 drawable 和 drawable-24 目录里,最终主 APP 的 MainActivity 界面如下图:
8、MainActivity.java 的代码如下:
package net.zy13.module.demo;
import androidx.annotation.NonNull;
import androidx.appcompat.app.AppCompatActivity;
import androidx.fragment.app.Fragment;
import androidx.fragment.app.FragmentTransaction;
import android.os.Bundle;
import android.view.MenuItem;
import com.google.android.material.bottomnavigation.BottomNavigationView;
import net.zy13.module.modulea.fragment.ModuleAFragment;
import net.zy13.module.moduleb.fragment.ModuleBFragment;
import net.zy13.module.modulec.fragment.ModuleCFragment;
public class MainActivity extends AppCompatActivity implements BottomNavigationView.OnNavigationItemSelectedListener {
//定义碎片集合
private Fragment[] fragments = new Fragment[3];
//当前显示的 fragment 的索引位置
private int currentIndex = 0;
@Override
protected void onCreate(Bundle savedInstanceState) {
super.onCreate(savedInstanceState);
setContentView(R.layout.activity_main);
initFragment();
BottomNavigationView navigation = (BottomNavigationView) findViewById(R.id.navigation);
navigation.setOnNavigationItemSelectedListener(this);
}
/**
初始化 Fragment 碎片
*/
private void initFragment() {
if (fragments[0] == null) {
fragments[0] = new ModuleAFragment();
getSupportFragmentManager().beginTransaction().add(R.id.content, fragments[0], "moduleA").commit();
} else {
getSupportFragmentManager().beginTransaction().show(fragments[0]);
}
}
/**
导航选择事件
@param item
@return
*/
@Override
public boolean onNavigationItemSelected(@NonNull MenuItem item) {
switch (item.getItemId()) {
case R.id.navigation_a:
if (currentIndex == 0) return true;//如果已经是当前的 fragment,不用切换
FragmentTransaction transition0 = getSupportFragmentManager().beginTransaction();
hideAndShow(0,transition0);
return true;
case R.id.navigation_b:
if (currentIndex == 1) return true;//如果已经是当前的 fragment,不用切换
FragmentTransaction transition1 = getSupportFragmentManager().beginTransaction();
if (fragments[1] == null) {
fragments[1] = new ModuleBFragment();
transition1.add(R.id.content, fragments[1], "moduleB");
}
hideAndShow(1,transition1);
return true;
case R.id.navigation_c:
if (currentIndex == 2) return true;//如果已经是当前的 fragment,不用切换
FragmentTransaction transition2 = getSupportFragmentManager().beginTransaction();
if (fragments[2] == null) {
fragments[2] = new ModuleCFragment();
transition2.add(R.id.content, fragments[2], "modulec");
}
hideAndShow(2,transition2);
return true;
}
return false;
}
/**
除了指定的 fragment 不 hide,其他 fragment 全 hide
@param expectIndex 指定的 fragment 在 fragments 中的位置
@param transition
*/
private void hideAndShow(int expectIndex,FragmentTransaction transition) {
for (int i = 0; i < fragments.length; i++) {
if (i != expectIndex && fragments[i] != null) {
transition.hide(fragments[i]);
}
}
transition.show(fragments[expectIndex]);
transition.commit();
currentIndex = expectIndex;
}
}
9、Run 运行项目,最终效果如下图,点击导航,可以切换到对应的组件上:

七、各个组件单独开发(测试)
前面我们把各个组件集成到 main 组件中,现在我们把组件拆分出来,单独开发,开发测试完成后,再把组件集成到 main 组件中,最后发布。组件单独出来开发的方法就是:在 build.gradle 文件中,把 apply plugin: 'com.android.library',改成 apply plugin: 'com.android.application',也就是把其 library 模式改为 application 模式,因为只有 application 才
《Android 学习笔记总结+最新移动架构视频+大厂安卓面试真题+项目实战源码讲义》
【docs.qq.com/doc/DSkNLaERkbnFoS0ZF】 完整内容开源分享
可以单独运行,library 必须依靠 application 才能运行。
那么问题来了?
组件单独开发时,我们需要改 build.gradle 的 apply plugin 模式,等要集成到 main 组件时,又得改回来,如果这样子手工去改,组件一多,修改起来比较麻烦,也不优雅。优雅的解决办法就是设置一个开关,打开时,就是 application 模式,可以单独开发;关闭时,就是 library 模式,可以集成到 main 组件中。现在按我下面的步骤来实现:
1、在项目根目录下,有一个 build.gradle 文件,在这个文件最末尾添加一个 ext {}配置,然后在 ext 配置里设定一个常量 isDebug,值设为 true
ext {
/**
组件调试模式
isDebug = true 是组件模块,说明是单独的 App
isDebug = false 是集成模式,说明是依赖 Lib
每次更改“isDebug”的值后,需要点击 "Sync Project" 按钮
*/
isDebug = true
}

2、build.gradle 里设置了 isDebug 常量后,我们项目中的其他 build.gradle 文件都可以把这个常量读取出来,所以我们可以在其他组件的 build.gradle 文件中,读取该常量的值,动态设置 apply plugin,代码如下:
if(isDebug){
apply plugin: 'com.android.application'
}else{
apply plugin: 'com.android.library'
}
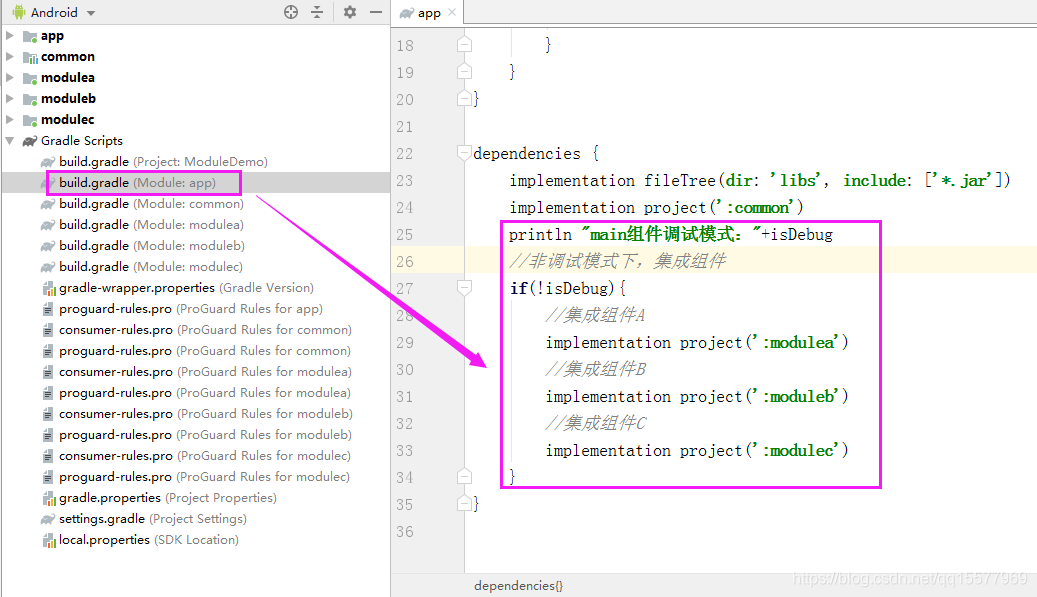
3、这样子设置之后,当我们需要切换模式时,只需要修改项目根目录下 build.gradle 文件中 isDebug 常量的值,修改完成之后,点击 Project sync 按钮同步一下即可。如果有报错,那么还有个地方需要修改一下,就是 main 组件的 build.gradle 文件,我们把 module 的模式改成了 application,main 组件就不能引入 application,引入的话就会报错,所以当是 debug 调试模式时,这里就不引入该组件,以免报错。所以在集成组件前,要先判断是什么模式,如下图:
4、接下来还得修改?AndroidManifest.xml,当把一个 module 设置为 application 时,AndroidManifest.xml 需要包含一个 app 所需要的属性,例如 app 的 icon、theme、launch Activity 这些属性设置,而当 module 为 library 时,这些属性就都不需要用到,所以当我们处于不同模式时,AndroidManifest.xml 文件的配置也得不同。方法如下:
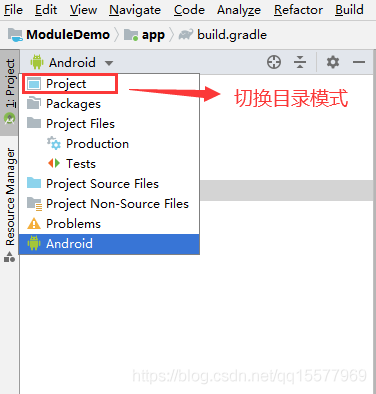
(1)、Android 目录模式切换到 Project 目录模式
(2)、?在各个组件的 src 文件夹中新创建一个 debug 目录,再把我们用于 debug 调试的 AndroidManifest.xml 文件放进去
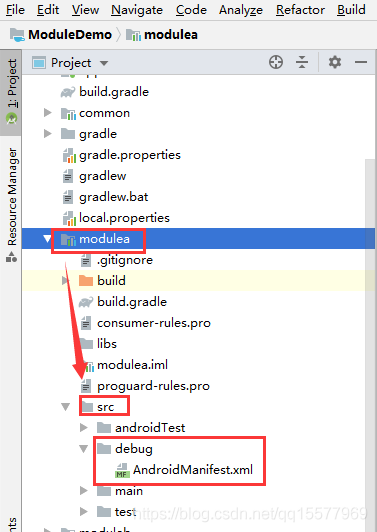
(3)、调试用的 AndroidManifest.xml 文件可以直接复制 manifests 目录里的,然后添加 application 的基本信息,如下:
<?xml version="1.0" encoding="utf-8"?>
<manifest xmlns:android="http://schemas.android.com/apk/res/android"
package="net.zy13.module.modulea">
<application
android:allowBackup="true"
android:icon="@mipmap/ic_launcher"
android:label="@string/app_name"
android:roundIcon="@mipmap/ic_launcher_round"
android:supportsRtl="true"
android:theme="@style/AppTheme">
</application>
</manifest>
以上内容会有很多错误提示,其实提示的无非就是资源找不到,既然前面我们已经创建了公共的 common 组件,那么我们只需要把 main 组件中相应的资源移动到 common 组件中就可以了。
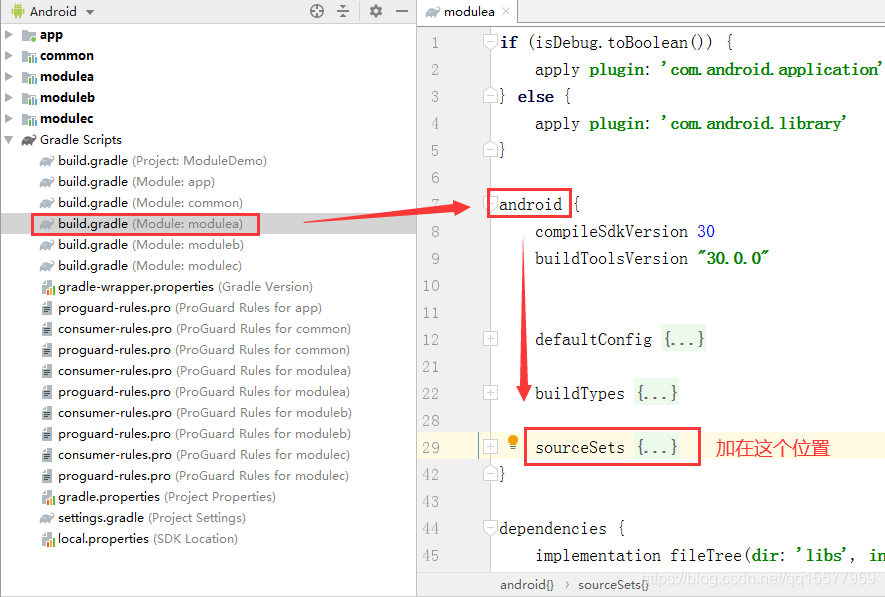
5、接下来在各个组件的 build.gradle 文件中,指定不同模式下使用的 AndroidManifest.xml 文件,在 android {}里添加如下代码:
sourceSets {
main {
if (isDebug) {
manifest.srcFile 'src/debug/AndroidManifest.xml'
}else{
manifest.srcFile 'src/main/AndroidManifest.xml'
//集成开发模式下排除 debug 文件夹中的所有 Java 文件
java {
exclude 'debug/**'
}
}
}
}
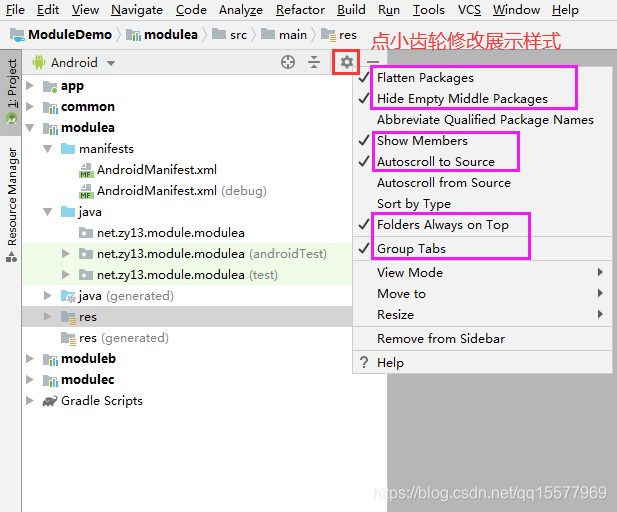
6、以上设置完成,并且 sync project(同步项目)之后,各个组件会是这样的目录结构:
7、在各个组件里创建一个用于调试启动的 MainActivity 活动,然后把 fragment 加载到 activity_main.xml 里,所对应的 activity_main.xml 布局文件如下:
<?xml version="1.0" encoding="utf-8"?>
<fragment xmlns:android="http://schemas.android.com/apk/res/android"
android:name="net.zy13.module.modulea.fragment.ModuleAFragment"
android:layout_width="match_parent"
android:layout_height="match_parent">
</fragment>
8、添加 MainActivity 活动后,我们还需要手动设置该活动为入口,打开 src/debug/目录下的 AndroidManifest.xml 文件,修改 MainActivity 的配置如下:
<activity
android:name=".MainActivity">
<intent-filter>
<action android:name="android.intent.action.MAIN" />
<category android:name="android.intent.category.LAUNCHER" />
</intent-filter>
</activity>
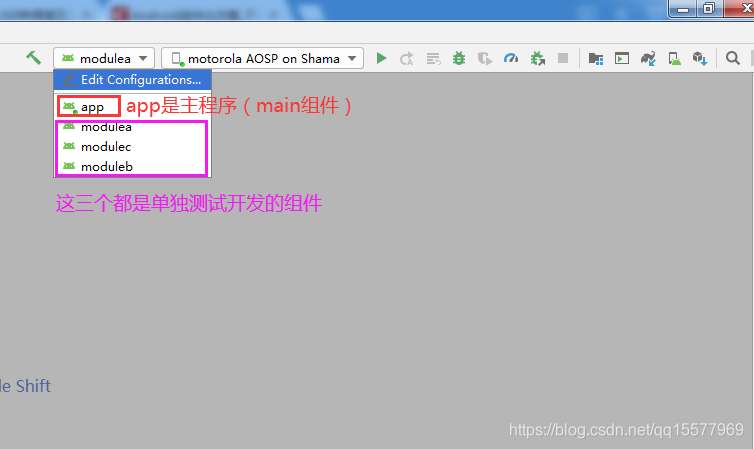
9、以上步骤完成之后,组件就可以单独作为一个 app 来开发测试了,android studio 的运行 app 里面,同时多了几个可运行的项目,如下图:
八、统一项目版本号
最后
如果你看到了这里,觉得文章写得不错就给个赞呗?如果你觉得那里值得改进的,请给我留言。一定会认真查询,修正不足。谢谢。

最后针对 Android 程序员,我这边给大家整理了一些资料,包括不限于高级 UI、性能优化、移动架构师、NDK、混合式开发(ReactNative+Weex)微信小程序、Flutter 等全方面的 Android 进阶实践技术;希望能帮助到大家,也节省大家在网上搜索资料的时间来学习,也可以分享动态给身边好友一起学习!

还未添加个人签名 2021.03.19 加入
还未添加个人简介


评论