太厉害了,终于有人能把 Ansible 讲的明明白白了,建议收藏

太厉害了,终于有人能把 Ansible 讲的明明白白了,建议收藏 30/100 发布文章 xinshuzhan
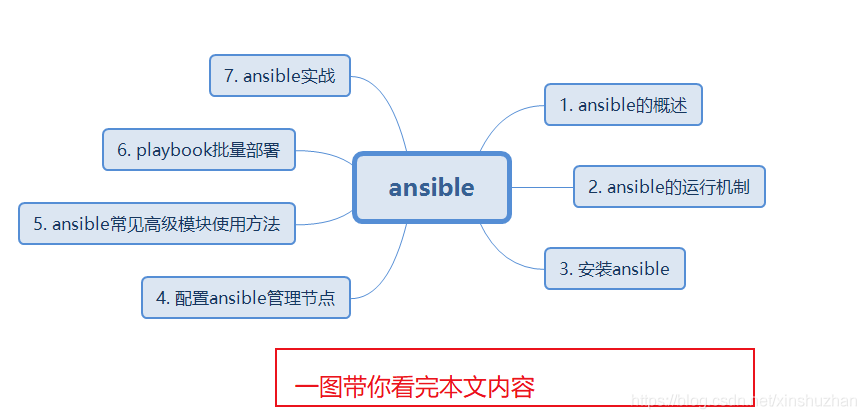
太厉害了,终于有人能把 Ansible 讲的明明白白了,建议收藏 @[toc]
一: ansible 的概述
1. ansible 简介
Ansible 是一款为类 Unix 系统开发的自由开源的配置和自动化工具。
它用 Python 写成,类似于 saltstack 和 Puppet,但是有一个不同和优点是我们不需要在节点中安装任何客户端。
它使用 SSH 来和节点进行通信。Ansible 基于 Python paramiko 开发,分布式,无需客户端,轻量级,配置语法使用 YMAL 及 Jinja2 模板语言,更强的远程命令执行操作。
2. 官方网站

我们可以看到上面的红帽标志,红帽公司于 2015 年 10 月收购了 ansible,而 ansible 成立于 2013 年。
3. ansible 的特点
1、部署简单,没有客户端,只需在主控端部署 Ansible 环境,被控端无需做任何操作;2. 模块化:调用特定的模块,完成特定任务 3. 默认使用 SSH 协议对设备进行管理;4. 主从集中化管理;5、配置简单、功能强大、扩展性强;6、支持 API 及自定义模块,可通过 Python 轻松扩展;7、通过 Playbooks 来定制强大的配置、状态管理 8. 对云计算平台、大数据都有很好的支持;9. 具有幂等性:一个操作在一个主机上执行一遍和执行 N 遍的结果是一样的
ansible 是基于模块工作的,本身没有批量部署的能力。真正具有批量部署的是 ansible 所运行的模块,ansible 只是提供一种框架。主要包括:(1)、连接插件 connection plugins:负责和被监控端实现通信;(2)、host inventory:指定操作的主机,是一个配置文件里面定义监控的主机;(3)、各种模块核心模块、command 模块、自定义模块;(4)、借助于插件完成记录日志邮件等功能;(5)、playbook:剧本执行多个任务时,非必需可以让节点一次性运行多个任务
4. ansible 的工作机制
Ansible 在管理节点将 Ansible 模块通过 SSH 协议推送到被管理端执行,执行完之后自动删除,可以使用 SVN 等来管理自定义模块及编排
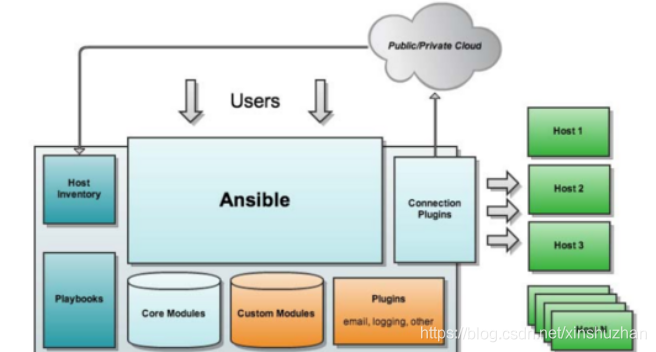
由图可以看出 Ansible 的组成由一下模块组成:
二. Asible 的安装
1. 设置 EPEL 仓库
Ansible 仓库默认不在 yum 仓库中,因此我们需要使用下面的命令启用 epel 仓库
2. 使用 yum 安装 Ansible
3. 查看 ansible 的版本
ansible 的命令参数
anisble 命令语法: ansible [-i 主机文件] [-f 批次] [组名] [-m 模块名称] [-a 模块参数]
ansible-doc 详细参数[root@itlaoxin162 ~]# ansible-doc -l 列出所有模块列表
三. ansible 的使用
1. 基于端口,用户,密码定义主机清单
格式:
ansible 基于 ssh 连接-i (inventory)参数后指定的远程主机时,也可以写端口,用户,密码。如:ansible_ssh_port: 指定 ssh 端口 ansible_ssh_user:指定 ssh 用户 ansible_ssh_pass: 指定 ssh 用户登录是认证密码(明文密码不安全) ansible_sudo_pass: 指明 sudo 时候的密码
添加的内容如下:
直接添加到文件文末就可以;
测试主机的连通性
查看组下所有的 IP:
2. 基于 ssh 密钥来访问定义主机清单
设置密钥
拷贝密钥并测试
71 服务器也发送密钥[root@itlaoxin162 ~]# ssh-copy-id root@192.168.1.71
修改 hosts
vim /etc/ansible/hosts

查看配置文件中刚刚修改的内容
ansible 远程执行命令测试
ping 模块 主要用来检测网络的连通性 command 模块,执行 shell 命令
使用 ping 检查‘web-servers’或者 ansible 节点的连通性。
这条命令我们也可以不指定 hosts,效果是一样的,我们只要指定组即可
有时候我们为了方便阅读也把主机组名写在最后面 web-servers 这个组名,放在最后面
案例 1: 检查节点的内存情况
案例 2:给节点增加用户
查看是否创建用户成功
四. ansible 的高级用法
1. ansible 的常用模块
1) ansible 的 3 个远程模块的区别
command : ansible 的默认模块,不指定-m 参数的时候,使用的就是 command 模块; 常见的命令都可以使用,但命令的执行不是通过 shell 来执行的,所以< > | and & z 这些操作都不可以,不支持管道,没法批量执行命令
shell 模块: 使用 shell 模块的时候默认是通过/bin/sh 来执行的,所以在终端输入的各种命令都可以使用
scripts 模块使用 scripts 模块可以在本地写一个脚本,在远程服务器上执行
案例 1:使用 shell 模块的案例
注意: shell 也可以把一个脚本 copy 到远程端然后再执行,但这样的话就需要调用两次 ansible,所以 script 的出现就解决了这个问题;
案例 2:使用 script 模块
先写一个脚本:
执行查看结果:
可以看到已经执行成功
2) copy 模块的使用
copy 模块:实现主控端向目标主机拷贝文件,类似 scp 功能
案例 1: 把 ansible 主机的/etc/hosts 拷贝到主机组机器中的/root/下
查看是否执行成功:
注意: command 不能使用 ll 命令,但可以使用 ls -l 的命令
3. file 模块
案例 5 给文件设置权限
查看权限:
4. stat 模块获取远程文件信息
案例 6 获取文件信息
5. get_url 模块
实现远程主机下载指定的 url 地址,支持 sha256sum 文件校验
案例 7
注:url=https://xxx 的等号=前后不能有空格扩展:查看 force=yes 的作用
6. yum 模块
yum 模块 linux 平台软件包管理。yum 模块可以提供的 status 状态: latest ,present,installed #这三个代表安装;removed, absent #这两个是卸载
案例 8 使用 yum 模块安装 httpd
ansible -i /etc/ansible/hosts web-servers -m yum -a "name=httpd state=latest"
7. cron 模块远程管理主机 crontab 配置
案例 9: 增加每 30 分钟执行 echo"我是互联网老辛"
ansible -i /etc/ansible/hosts web-servers -m cron -a "name='list dir' minute='*/30' job='echo 我是互联网老辛”'"
8. service 远程管理主机系统服务模块
service 模块常用参数:(1)、name 参数:此参数用于指定需要操作的服务名称,比如 nginx,httpd。(2)、state 参数:此参数用于指定服务的状态
比如,我们想要启动远程主机中的 httpd,则可以将 state 的值设置为 started;如果想要停止远程主机中的服务,则可以将 state 的值设置为 stopped。此参数的可用值有 started、stopped、restarted(重启)、reloaded。
enabled 参数:此参数用于指定是否将服务设置为开机 启动项,设置为 yes 表示将对应服务设置为开机启动,设置为 no 表示不会开机启动。
注:想使用 service 模块启动服务,被启动的服务,必须可以使用 service 命令启动或关闭
案例 10 使用 service 模块重启 httpd
9. user 模块 管理远程主机的用户
案例 11: 使用 user 模块创建一个用户 itlaoxin
五. ansible 实战案例
playbooks 的介绍 1) 在 playbooks 中定义任务:- name: task description #任务描述信息 module_name: module_args #需要使用的模块名字: 模块参数 2) ansible-playbook 执行 命令:ansible-playbook site.yml
playbook 是由一个或多个"play"组成的列表。play 的主要功能在于将事先归为一组的主机装扮成事先通过 ansible 中的 task 定义好的角色。
github 上提供了大量的实例供大家参考: https://github.com/ansible/ansible-examples
实战一: 使用 playbook 批量部署多台 LAMP 环境
先介绍下: Playbook 常用文件夹作用:
files:存放需要同步到异地服务器的源码文件及配置文件;
handlers:当服务的配置文件发生变化时需要进行的操作,比如:重启服务,重新加载配置文件,handlers ['hændləz] 处理程序
meta:角色定义,可留空;
tasks:需要进行的执行的任务;
templates:用于执行 lamp 安装的模板文件,一般为脚本;
vars:本次安装定义的变量
搭建思路
思路:我们搭建 lanp 架构,大概需要:
yum 安装服务
service 启动
copy 把网站拷贝过去
在 playbooks 中定义任务:name: task description #任务描述信息 module_name: module_args #需要使用的模块名字:
github 上提供了大量的实例供大家参考:https://github.com/ansible/ansible-examples 4.2
使用 Playbook 批量部署多台 LAMP 环境步骤我们可以在 ansible 服务器上安装 LAMP 环境,然后,再将配置文件通过 ansible 拷贝到远程主机上
第一步:安装 httpd 软件
[root@ansible ~]# yum -y install httpd -y
第二部:安装 MySQL
第三步:安装 PHP 和 php-mysql 模块
第四步:提供 php 的测试页
[root@ansible ~]# systemctl reload httpd #启动 httpd 服务
httpd 测试:http://192.168.43.162
确保已经出现上面的测试页,而且,要看到 MySQL 已经被整合进来了,才能进行下一步操作
第五;定义组名
[root@ansible ~]# vim /etc/ansible/hosts #还使用之前定义好的,这里不用修改
然后,将公钥信息复制到被控制节点,ansible 和两个节点间通过 ssh 进行连接。下面 3 个命令之前已经做过,不用执行了。
第六:使用 playbook 创建一个 LAMP 构建的任务
1、创建相关文件
我们将上面搭建成功的 LAMP 环境的 httpd 和 MySQL 的配置文件拷贝到对应目录下
2、构建 httpd 的任务
3、构建 httpd 的 handlers
4、部署我们的 MariaDB 数据库
创建 MySQL 服务的任务,需要安装 MySQL 服务,改变属主信息,启动 MySQL
5、构建 PHP 的任务
6、定义整个的任务
注:所有 yml 的配置文件中,空格必须严格对
开始部署:
然后,在浏览器中访问这两台节点主机,可以直接访问成功.
总结:做此实验室,需要准备干净环境,selinux、防火墙都要关闭
实战二: 使用 ansible 部署 k8s 及集群
安装 git 命令[root@itlaoxin162 ~]# yum install git
使用 git 下载相应的 ansible-k8s-insatall 包:
进入到 ansbile-install-k8s 目录修改 hosts 文件,根据规划修改对应 IP 和名称。
部署命令:
单 Master 版
多 master 版 ansible-playbook -i hosts multi-master-deploy.yml -uroot -k
总结
ansible 入门很简单,需要反复练习,才能熟练。
我是互联网老辛,欢迎点赞收藏,关注我,后期更多精彩内容;在这里插入图片描述太厉害了,终于有人能把 Ansible 讲的明明白白了,建议收藏文章目录一: ansible 的概述
ansible 简介
官方网站
ansible 的特点
ansible 的工作机制二. Asible 的安装
设置 EPEL 仓库
使用 yum 安装 Ansible
查看 ansible 的版本 ansible 的命令参数三. ansible 的使用
基于端口,用户,密码定义主机清单测试主机的连通性
基于 ssh 密钥来访问定义主机清单设置密钥拷贝密钥并测试修改 hostsansible 远程执行命令测试案例 1: 检查节点的内存情况案例 2:给节点增加用户四. ansible 的高级用法
ansible 的常用模块 1) ansible 的 3 个远程模块的区别案例 1:使用 shell 模块的案例案例 2:使用 script 模块 2) copy 模块的使用案例 1: 把 ansible 主机的/etc/hosts 拷贝到主机组机器中的/root/下
file 模块案例 5 给文件设置权限
stat 模块获取远程文件信息案例 6 获取文件信息
get_url 模块案例 7
yum 模块案例 8 使用 yum 模块安装 httpd
cron 模块远程管理主机 crontab 配置案例 9: 增加每 30 分钟执行 echo"我是互联网老辛"
service 远程管理主机系统服务模块案例 10 使用 service 模块重启 httpd
user 模块 管理远程主机的用户案例 11: 使用 user 模块创建一个用户 itlaoxin 五. ansible 实战案例实战一: 使用 playbook 批量部署多台 LAMP 环境搭建思路第一步:安装 httpd 软件第二部:安装 MySQL 第三步:安装 PHP 和 php-mysql 模块第四步:提供 php 的测试页第五;定义组名第六:使用 playbook 创建一个 LAMP 构建的任务实战二: 使用 ansible 部署 k8s 及集群总结一: ansible 的概述
ansible 简介 Ansible 是一款为类 Unix 系统开发的自由开源的配置和自动化工具。
它用 Python 写成,类似于 saltstack 和 Puppet,但是有一个不同和优点是我们不需要在节点中安装任何客户端。
它使用 SSH 来和节点进行通信。Ansible 基于 Python paramiko 开发,分布式,无需客户端,轻量级,配置语法使用 YMAL 及 Jinja2 模板语言,更强的远程命令执行操作。
官方网站 https://www.ansible.com/
在这里插入图片描述我们可以看到上面的红帽标志,红帽公司于 2015 年 10 月收购了 ansible,而 ansible 成立于 2013 年。
ansible 的特点 1、部署简单,没有客户端,只需在主控端部署 Ansible 环境,被控端无需做任何操作;
模块化:调用特定的模块,完成特定任务
默认使用 SSH 协议对设备进行管理;
主从集中化管理;5、配置简单、功能强大、扩展性强;6、支持 API 及自定义模块,可通过 Python 轻松扩展;7、通过 Playbooks 来定制强大的配置、状态管理
对云计算平台、大数据都有很好的支持;
具有幂等性:一个操作在一个主机上执行一遍和执行 N 遍的结果是一样的
ansible 是基于模块工作的,本身没有批量部署的能力。真正具有批量部署的是 ansible 所运行的模块,ansible 只是提供一种框架。主要包括:(1)、连接插件 connection plugins:负责和被监控端实现通信;(2)、host inventory:指定操作的主机,是一个配置文件里面定义监控的主机;(3)、各种模块核心模块、command 模块、自定义模块;(4)、借助于插件完成记录日志邮件等功能;(5)、playbook:剧本执行多个任务时,非必需可以让节点一次性运行多个任务
ansible 的工作机制 Ansible 在管理节点将 Ansible 模块通过 SSH 协议推送到被管理端执行,执行完之后自动删除,可以使用 SVN 等来管理自定义模块及编排
在这里插入图片描述由图可以看出 Ansible 的组成由一下模块组成:
Ansible: ansible 的核心模块 Host Inventory:主机清单,也就是被管理的主机列表 Playbooks:ansible 的剧本,可想象为将多个任务放置在一起,一块执行 Core Modules:ansible 的核心模块 Custom Modules:自定义模块 Connection Plugins:连接插件,用于与被管控主机之间基于 SSH 建立连接关系 Plugins:其他插件,包括记录日志等二. Asible 的安装
设置 EPEL 仓库 Ansible 仓库默认不在 yum 仓库中,因此我们需要使用下面的命令启用 epel 仓库
[root@itlaoxin162 ~]# yum install epel-release -y2. 使用 yum 安装 Ansible[root@itlaoxin162 ~]# yum install ansible3. 查看 ansible 的版本[root@itlaoxin162 ~]# ansible --versionansible 2.9.18
ansible 的命令参数 anisble 命令语法: ansible [-i 主机文件] [-f 批次] [组名] [-m 模块名称] [-a 模块参数]
参数 功能-v 详细模式,如果执行成功,输出详细结果-i 指定 host 文件路径,默认在/etc/ansible/hosts-f,-forks=NUM NUM 默认是整数 5,指定 fork 开启同步进程的个数-m 指定使用的 module 名称,默认 command 模块-a 指定模块的参数-k 提示输入 SSH 密码,而不是使用基于 ssh 密钥认证-sudo 指定使用 sudo 获取 root 权限-K 提示输入 sudo 密码-u 指定移动端的执行用户-C 测试命令执行会改变什么内容,不会真正的去执行 ansible-doc 详细参数[root@itlaoxin162 ~]# ansible-doc -l 列出所有模块列表
指定查看某个模块的参数 ansible-doc -s 模块名字
[root@itlaoxin162 ~]# ansible-doc -s onyx_ospf
name: Manage OSPF protocol on Mellanox ONYX network devicesonyx_ospf:interfaces: # List of interfaces and areas. Required if
state=present'. ospf: # (required) OSPF instance number 1-65535 router_id: # OSPF router ID. Required ifstate=present'.state: # OSPF state.
[root@itlaoxin162 ~]# ansible-doc -s service
name: Manage servicesservice:arguments: # Additional arguments provided on the command line.enabled: # Whether the service should start on boot. At least one ofstate and enabled arerequired.name: # (required) Name of the service.pattern: # If the service does not respond to the status command,name a substring to lookfor as would be found inthe output of the
ps' command as a stand-in for a status result. If the string is found, the service will be assumed to be started. runlevel: # For OpenRC init scripts (e.g. Gentoo) only. The runlevel that this service belongs to. sleep: # If the service is beingrestarted' then sleep this manyseconds between the stop
三. ansible 的使用
基于端口,用户,密码定义主机清单格式:
ansible 基于 ssh 连接-i (inventory)参数后指定的远程主机时,也可以写端口,用户,密码。如:ansible_ssh_port: 指定 ssh 端口 ansible_ssh_user:指定 ssh 用户 ansible_ssh_pass: 指定 ssh 用户登录是认证密码(明文密码不安全) ansible_sudo_pass: 指明 sudo 时候的密码
添加的内容如下:
[root@itlaoxin162 ~]# grep -v ^# /etc/ansible/hosts |grep -v ^$[web-servers]192.168.1.163 ansible_ssh_port=22 ansible_ssh_user=root ansible_ssh_pass=12345678[root@itlaoxin16 直接添加到文件文末就可以;
测试主机的连通性[root@itlaoxin162 ~]# ansible -i /etc/ansible/hosts web-servers -m ping[WARNING]: Invalid characters were found in group names but not replaced, ussee details192.168.1.163 | SUCCESS => {"ansible_facts": {"discovered_interpreter_python": "/usr/bin/python"},"changed": false,"ping": "pong"}查看组下所有的 IP:
[root@itlaoxin162 ~]# ansible all --list[WARNING]: Invalid characters were found in group names but not replaced, use-vvvv to see detailshosts (1):192.168.1.163[root@itlaoxin162 ~]#2. 基于 ssh 密钥来访问定义主机清单设置密钥[root@itlaoxin162 ~]# ssh-keygenGenerating public/private rsa key pair.Enter file in which to save the key (/root/.ssh/id_rsa):Enter passphrase (empty for no passphrase):Enter same passphrase again:Your identification has been saved in /root/.ssh/id_rsa.Your public key has been saved in /root/.ssh/id_rsa.pub.The key fingerprint is:SHA256:CWdEZJbtzH4+ypeXe80jPnBr9UX/0yChZtX5DCjKckg root@itlaoxin162The key's randomart image is:+---[RSA 2048]----+| oo || +. . || . o+ o . || E+ .= + + .|| . oSo + . =.|| o + =.o...=|| o o oooo+|| . ==ooB|| ooo++oo|+----[SHA256]-----+[root@itlaoxin162 ~]#拷贝密钥并测试[root@itlaoxin162 ~]# ssh-copy-id root@192.168.1.163/usr/bin/ssh-copy-id: INFO: Source of key(s) to be installed: "/root/.ssh/id_rsa.pub"/usr/bin/ssh-copy-id: INFO: attempting to log in with the new key(s), to filter out any that are already installed/usr/bin/ssh-copy-id: INFO: 1 key(s) remain to be installed -- if you are prompted now it is to install the new keys
root@192.168.1.163's password:
Number of key(s) added: 1
Now try logging into the machine, with: "ssh 'root@192.168.1.163'"and check to make sure that only the key(s) you wanted were added.
登陆测试:[root@itlaoxin162 ~]# ssh 192.168.1.163
Last login: Wed Apr 21 08:13:14 2021 from 192.168.1.16271 服务器也发送密钥[root@itlaoxin162 ~]# ssh-copy-id root@192.168.1.71
修改 hostsvim /etc/ansible/hosts 在这里插入图片描述查看配置文件中刚刚修改的内容
[root@itlaoxin162 ~]# grep -v "^#" /etc/ansible/hosts |grep -v "^$"[web-servers]192.168.1.163192.168.1.71ansible 远程执行命令测试 ping 模块 主要用来检测网络的连通性 command 模块,执行 shell 命令
使用 ping 检查‘web-servers’或者 ansible 节点的连通性。
[root@itlaoxin162 ~]# ansible -i /etc/ansible/hosts 'web-servers' -m ping[WARNING]: Invalid characters were found in group names but not replaced, use-vvvv to see details192.168.1.163 | SUCCESS => {"ansible_facts": {"discovered_interpreter_python": "/usr/bin/python"},"changed": false,"ping": "pong"}192.168.1.71 | SUCCESS => {"ansible_facts": {"discovered_interpreter_python": "/usr/bin/python"},"changed": false,"ping": "pong"}[root@itlaoxin162 ~]#
这条命令我们也可以不指定 hosts,效果是一样的,我们只要指定组即可
[root@itlaoxin162 ~]# ansible 'web-servers' -m ping[WARNING]: Invalid characters were found in group names but not replaced, use-vvvv to see details192.168.1.71 | SUCCESS => {"ansible_facts": {"discovered_interpreter_python": "/usr/bin/python"},"changed": false,"ping": "pong"}192.168.1.163 | SUCCESS => {"ansible_facts": {"discovered_interpreter_python": "/usr/bin/python"},"changed": false,"ping": "pong"}[root@itlaoxin162 ~]#
有时候我们为了方便阅读也把主机组名写在最后面 web-servers 这个组名,放在最后面
[root@itlaoxin162 ~]# ansible -m command -a "uptime" 'web-servers'[WARNING]: Invalid characters were found in group names but not replaced, use-vvvv to see details192.168.1.71 | CHANGED | rc=0 >>08:37:28 up 11 min, 3 users, load average: 0.02, 0.15, 0.17192.168.1.163 | CHANGED | rc=0 >>08:37:28 up 1:58, 5 users, load average: 0.00, 0.01, 0.05[root@itlaoxin162 ~]#
案例 1: 检查节点的内存情况[root@itlaoxin162 ~]# ansible -m command -a "free -m " 'web-servers'[WARNING]: Invalid characters were found in group names but not replaced, use-vvvv to see details192.168.1.71 | CHANGED | rc=0 >>total used free shared buff/cache availableMem: 3770 826 2283 15 661 2709Swap: 2047 0 2047192.168.1.163 | CHANGED | rc=0 >>total used free shared buff/cache availableMem: 3770 892 1076 38 1802 2588Swap: 2047 0 2047[root@itlaoxin162 ~]#
案例 2:给节点增加用户[root@itlaoxin162 ~]# ansible -m command -a "useradd itoldxin" 'web-servers'[WARNING]: Invalid characters were found in group names but not replaced, use-vvvv to see details192.168.1.71 | CHANGED | rc=0 >>
192.168.1.163 | CHANGED | rc=0 >>
[root@itlaoxin162 ~]#
查看是否创建用户成功
[root@itlaoxin162 ~]# ansible -m command -a "id itoldxin" 'web-servers'[WARNING]: Invalid characters were found in group names but not replaced, use-vvvv to see details192.168.1.71 | CHANGED | rc=0 >>uid=1001(itoldxin) gid=1001(itoldxin) 组=1001(itoldxin)192.168.1.163 | CHANGED | rc=0 >>uid=1001(itoldxin) gid=1001(itoldxin) 组=1001(itoldxin)[root@itlaoxin162 ~]#
四. ansible 的高级用法
ansible 的常用模块 1) ansible 的 3 个远程模块的区别 command : ansible 的默认模块,不指定-m 参数的时候,使用的就是 command 模块; 常见的命令都可以使用,但命令的执行不是通过 shell 来执行的,所以< > | and & z 这些操作都不可以,不支持管道,没法批量执行命令
shell 模块: 使用 shell 模块的时候默认是通过/bin/sh 来执行的,所以在终端输入的各种命令都可以使用
scripts 模块使用 scripts 模块可以在本地写一个脚本,在远程服务器上执行
案例 1:使用 shell 模块的案例[root@itlaoxin162 ~]# ansible -i /etc/ansible/hosts web-servers -m shell -a "source ~/.bash_profile && df -h|head -n 1"[WARNING]: Invalid characters were found in group names but not replaced, use-vvvv to see details192.168.1.71 | CHANGED | rc=0 >>文件系统 容量 已用 可用 已用 % 挂载点 192.168.1.163 | CHANGED | rc=0 >>文件系统 容量 已用 可用 已用 % 挂载点[root@itlaoxin162 ~]#
注意: shell 也可以把一个脚本 copy 到远程端然后再执行,但这样的话就需要调用两次 ansible,所以 script 的出现就解决了这个问题;
案例 2:使用 script 模块先写一个脚本:
[root@itlaoxin162 ~]# cat !$cat /etc/ansible/test.sh#!/bin/bashdatehostnameecho "大家好,我是互联网老辛,脚本执行成功"[root@itlaoxin162 ~]#执行查看结果:
[root@itlaoxin162 ~]# ansible -i /etc/ansible/hosts web-servers -m script -a "/etc/ansible/test.sh"[WARNING]: Invalid characters were found in group names but not replaced, use-vvvv to see details192.168.1.71 | CHANGED => {"changed": true,"rc": 0,"stderr": "Shared connection to 192.168.1.71 closed.\r\n","stderr_lines": ["Shared connection to 192.168.1.71 closed."],"stdout": "2021 年 04 月 21 日 星期三 08:59:33 CST\r\nk8s-master\r\n 大家好,我是互联网老辛,脚本执行成功\r\n","stdout_lines": ["2021 年 04 月 21 日 星期三 08:59:33 CST","k8s-master","大家好,我是互联网老辛,脚本执行成功"]}192.168.1.163 | CHANGED => {"changed": true,"rc": 0,"stderr": "Shared connection to 192.168.1.163 closed.\r\n","stderr_lines": ["Shared connection to 192.168.1.163 closed."],"stdout": "2021 年 04 月 21 日 星期三 08:59:33 CST\r\nitlaoxin-163\r\n 大家好,我是互联网老辛,脚本执行成功\r\n","stdout_lines": ["2021 年 04 月 21 日 星期三 08:59:33 CST","itlaoxin-163","大家好,我是互联网老辛,脚本执行成功"]}[root@itlaoxin162 ~]#
可以看到已经执行成功
2) copy 模块的使用 copy 模块:实现主控端向目标主机拷贝文件,类似 scp 功能
案例 1: 把 ansible 主机的/etc/hosts 拷贝到主机组机器中的/root/下[root@itlaoxin162 ~]# ansible -i /etc/ansible/hosts web-servers -m copy -a "src=/etc/hosts dest=/root owner=root group=root mode=0777"[WARNING]: Invalid characters were found in group names but not replaced, use-vvvv to see details192.168.1.71 | CHANGED => {"ansible_facts": {"discovered_interpreter_python": "/usr/bin/python"},"changed": true,"checksum": "700a03c76a37e929d448b3be6419f4289d9314e6","dest": "/root/hosts","gid": 0,"group": "root","md5sum": "138004edd9d16f2818e20842fc1f273d","mode": "0777","owner": "root","secontext": "system_u:object_r:admin_home_t:s0","size": 183,"src": "/root/.ansible/tmp/ansible-tmp-1618966980.44-20046-203314294949142/source","state": "file","uid": 0}192.168.1.163 | CHANGED => {"ansible_facts": {"discovered_interpreter_python": "/usr/bin/python"},"changed": true,"checksum": "700a03c76a37e929d448b3be6419f4289d9314e6","dest": "/root/hosts","gid": 0,"group": "root","md5sum": "138004edd9d16f2818e20842fc1f273d","mode": "0777","owner": "root","secontext": "system_u:object_r:admin_home_t:s0","size": 183,"src": "/root/.ansible/tmp/ansible-tmp-1618966980.45-20045-254958397204815/source","state": "file","uid": 0}[root@itlaoxin162 ~]#
查看是否执行成功:
[root@itlaoxin162 ~]# ansible -m command -a "ls /root/hosts" 'web-servers'[WARNING]: Invalid characters were found in group names but not replaced, use-vvvv to see details192.168.1.71 | CHANGED | rc=0 >>/root/hosts192.168.1.163 | CHANGED | rc=0 >>/root/hosts[root@itlaoxin162 ~]#注意: command 不能使用 ll 命令,但可以使用 ls -l 的命令
[root@itlaoxin162 ~]# ansible -m command -a "ls -l /root/hosts" 'web-servers'[WARNING]: Invalid characters were found in group names but not replaced, use-vvvv to see details192.168.1.71 | CHANGED | rc=0 >>-rwxrwxrwx. 1 root root 183 4 月 21 09:03 /root/hosts192.168.1.163 | CHANGED | rc=0 >>-rwxrwxrwx. 1 root root 183 4 月 21 09:03 /root/hosts[root@itlaoxin162 ~]#
file 模块案例 5 给文件设置权限[root@itlaoxin162 ~]# ansible -i /etc/ansible/hosts web-servers -m file -a "path=/root/hosts mode=0755"[WARNING]: Invalid characters were found in group names but not replaced, use-vvvv to see details192.168.1.71 | CHANGED => {"ansible_facts": {"discovered_interpreter_python": "/usr/bin/python"},"changed": true,"gid": 0,"group": "root","mode": "0755","owner": "root","path": "/root/hosts","secontext": "system_u:object_r:admin_home_t:s0","size": 183,"state": "file","uid": 0}192.168.1.163 | CHANGED => {"ansible_facts": {"discovered_interpreter_python": "/usr/bin/python"},"changed": true,"gid": 0,"group": "root","mode": "0755","owner": "root","path": "/root/hosts","secontext": "system_u:object_r:admin_home_t:s0","size": 183,"state": "file","uid": 0}[root@itlaoxin162 ~]#
查看权限:
[root@itlaoxin162 ~]# ansible -m command -a "ls -l /root/hosts" 'web-servers'[WARNING]: Invalid characters were found in group names but not replaced, use-vvvv to see details192.168.1.71 | CHANGED | rc=0 >>-rwxr-xr-x. 1 root root 183 4 月 21 09:03 /root/hosts192.168.1.163 | CHANGED | rc=0 >>-rwxr-xr-x. 1 root root 183 4 月 21 09:03 /root/hosts[root@itlaoxin162 ~]#
stat 模块获取远程文件信息案例 6 获取文件信息[root@itlaoxin162 ~]# ansible -i /etc/ansible/hosts web-servers -m stat -a "path=/root/hosts"[WARNING]: Invalid characters were found in group names but not replaced, use-vvvv to see details192.168.1.71 | SUCCESS => {"ansible_facts": {"discovered_interpreter_python": "/usr/bin/python"},"changed": false,"stat": {"atime": 1618966982.400622,"attr_flags": "","attributes": [],"block_size": 4096,"blocks": 8,"charset": "us-ascii","checksum": "700a03c76a37e929d448b3be6419f4289d9314e6","ctime": 1618967480.9315438,"dev": 64768,"device_type": 0,"executable": true,"exists": true,"gid": 0,"gr_name": "root","inode": 78337,"isblk": false,"ischr": false,"isdir": false,"isfifo": false,"isgid": false,"islnk": false,"isreg": true,"issock": false,"isuid": false,"mimetype": "text/plain","mode": "0755","mtime": 1618966981.7806218,"nlink": 1,"path": "/root/hosts","pw_name": "root","readable": true,"rgrp": true,"roth": true,"rusr": true,"size": 183,"uid": 0,"version": "693378940","wgrp": false,"woth": false,"writeable": true,"wusr": true,"xgrp": true,"xoth": true,"xusr": true}}192.168.1.163 | SUCCESS => {"ansible_facts": {"discovered_interpreter_python": "/usr/bin/python"},"changed": false,"stat": {"atime": 1618966982.6472814,"attr_flags": "","attributes": [],"block_size": 4096,"blocks": 8,"charset": "us-ascii","checksum": "700a03c76a37e929d448b3be6419f4289d9314e6","ctime": 1618967481.0644567,"dev": 64768,"device_type": 0,"executable": true,"exists": true,"gid": 0,"gr_name": "root","inode": 33662547,"isblk": false,"ischr": false,"isdir": false,"isfifo": false,"isgid": false,"islnk": false,"isreg": true,"issock": false,"isuid": false,"mimetype": "text/plain","mode": "0755","mtime": 1618966982.176287,"nlink": 1,"path": "/root/hosts","pw_name": "root","readable": true,"rgrp": true,"roth": true,"rusr": true,"size": 183,"uid": 0,"version": "1103139934","wgrp": false,"woth": false,"writeable": true,"wusr": true,"xgrp": true,"xoth": true,"xusr": true}}
get_url 模块实现远程主机下载指定的 url 地址,支持 sha256sum 文件校验
案例 7ansible -i /etc/ansible/hosts web-servers -m get_url -a "url=https://dl.fedoraproject.org/pub/epel/epel-release-latest-7.noarch.rpm dest=/tmp/ mode=0440 force=yes"注:url=https://xxx 的等号=前后不能有空格扩展:查看 force=yes 的作用
yum 模块 yum 模块 linux 平台软件包管理。yum 模块可以提供的 status 状态: latest ,present,installed #这三个代表安装;removed, absent #这两个是卸载
案例 8 使用 yum 模块安装 httpdansible -i /etc/ansible/hosts web-servers -m yum -a “name=httpd state=latest”
cron 模块远程管理主机 crontab 配置案例 9: 增加每 30 分钟执行 echo"我是互联网老辛"ansible -i /etc/ansible/hosts web-servers -m cron -a “name=‘list dir’ minute=’*/30’ job=‘echo 我是互联网老辛”’”
service 远程管理主机系统服务模块 service 模块常用参数:(1)、name 参数:此参数用于指定需要操作的服务名称,比如 nginx,httpd。(2)、state 参数:此参数用于指定服务的状态
比如,我们想要启动远程主机中的 httpd,则可以将 state 的值设置为 started;如果想要停止远程主机中的服务,则可以将 state 的值设置为 stopped。此参数的可用值有 started、stopped、restarted(重启)、reloaded。
enabled 参数:此参数用于指定是否将服务设置为开机 启动项,设置为 yes 表示将对应服务设置为开机启动,设置为 no 表示不会开机启动。
注:想使用 service 模块启动服务,被启动的服务,必须可以使用 service 命令启动或关闭
案例 10 使用 service 模块重启 httpd[root@itlaoxin162 ~]# ansible -i /etc/ansible/hosts web-servers -m service -a "name=httpd state=restarted"9. user 模块 管理远程主机的用户案例 11: 使用 user 模块创建一个用户 itlaoxin[root@itlaoxin162 ~]# ansible -i /etc/ansible/hosts web-servers -m user -a "name=itlaoxin state=present"[WARNING]: Invalid characters were found in group names but not replaced, use-vvvv to see details192.168.1.71 | CHANGED => {"ansible_facts": {"discovered_interpreter_python": "/usr/bin/python"},"changed": true,"comment": "","create_home": true,"group": 1002,"home": "/home/itlaoxin","name": "itlaoxin","shell": "/bin/bash","state": "present","system": false,"uid": 1002}192.168.1.163 | CHANGED => {"ansible_facts": {"discovered_interpreter_python": "/usr/bin/python"},"changed": true,"comment": "","create_home": true,"group": 1002,"home": "/home/itlaoxin","name": "itlaoxin","shell": "/bin/bash","state": "present","system": false,"uid": 1002}[root@itlaoxin162 ~]#
五. ansible 实战案例 playbooks 的介绍 1) 在 playbooks 中定义任务:
name: task description #任务描述信息 module_name: module_args #需要使用的模块名字: 模块参数 2) ansible-playbook 执行 命令:ansible-playbook site.yml
playbook 是由一个或多个"play"组成的列表。play 的主要功能在于将事先归为一组的主机装扮成事先通过 ansible 中的 task 定义好的角色。github 上提供了大量的实例供大家参考: https://github.com/ansible/ansible-examples
实战一: 使用 playbook 批量部署多台 LAMP 环境先介绍下: Playbook 常用文件夹作用:
files:存放需要同步到异地服务器的源码文件及配置文件;handlers:当服务的配置文件发生变化时需要进行的操作,比如:重启服务,重新加载配置文件,handlers ['hændləz] 处理程序 meta:角色定义,可留空;tasks:需要进行的执行的任务;templates:用于执行 lamp 安装的模板文件,一般为脚本;vars:本次安装定义的变量搭建思路思路:我们搭建 lanp 架构,大概需要:
yum 安装服务
service 启动
copy 把网站拷贝过去
在 playbooks 中定义任务:name: task description #任务描述信息 module_name: module_args #需要使用的模块名字:
github 上提供了大量的实例供大家参考:https://github.com/ansible/ansible-examples 4.2
使用 Playbook 批量部署多台 LAMP 环境步骤我们可以在 ansible 服务器上安装 LAMP 环境,然后,再将配置文件通过 ansible 拷贝到远程主机上
第一步:安装 httpd 软件[root@ansible ~]# yum -y install httpd -y
第二部:安装 MySQL[root@ansible ~]# yum install mariadb-server mariadb -y #安装 mysql 服务
[root@ansible ~]# mkdir -p /mysqldata/data/ #创建目录作为数据存放的位置
[root@ansible ~]# chown -R mysql:mysql /mysqldata/ #授权
[root@ansible ~]# vim /etc/my.cnf #改变数据存放目录改:2 datadir=/var/lib/mysql
改为:2 datadir=/mydata/data/
[root@ansible data]# systemctl start mariadb 第三步:安装 PHP 和 php-mysql 模块[root@ansible ~]# yum -y install php php-mysql 第四步:提供 php 的测试页[root@ansible ~]# vim /var/www/html/index.php
[root@ansible ~]# cat /var/www/html/index.php
<?php
phpinfo();?>[root@ansible ~]# systemctl reload httpd #启动 httpd 服务
httpd 测试:http://192.168.43.162
确保已经出现上面的测试页,而且,要看到 MySQL 已经被整合进来了,才能进行下一步操作
第五;定义组名[root@ansible ~]# vim /etc/ansible/hosts #还使用之前定义好的,这里不用修改
[webservers]192.168.1.163192.168.1.71 然后,将公钥信息复制到被控制节点,ansible 和两个节点间通过 ssh 进行连接。下面 3 个命令之前已经做过,不用执行了。
[root@ansible ~]# ssh-keygen[root@ansible ~]# ssh-copy-id root@192.168.1.163[root@ansible ~]# ssh-copy-id root@192.168.1.71 第六:使用 playbook 创建一个 LAMP 构建的任务 1、创建相关文件
[root@ansible ~]# mkdir -pv /etc/ansible/lamp/roles/{prepare,httpd,mysql,php}/{tasks,files,templates,vars,meta,default,handlers}我们将上面搭建成功的 LAMP 环境的 httpd 和 MySQL 的配置文件拷贝到对应目录下
[root@ansible ~]# cd /etc/ansible/ [root@ansible ansible]# cp /etc/httpd/conf/httpd.conf lamp/roles/httpd/files/
[root@ansible ansible]# cp /etc/my.cnf lamp/roles/mysql/files/[root@ansible ansible]# 写 prepare(前期准备)角色的 playbooks
[root@ansible ansible]# vim lamp/roles/prepare/tasks/main.yml
[root@ansible ansible]# cat lamp/roles/prepare/tasks/main.yml
name: delete yum configshell: rm -rf /etc/yum.repos.d/* #删除原有的 yum 配置文件
name: provide yumrepo fileshell: wget -O /etc/yum.repos.d/CentOS-Base.repo http://mirrors.aliyun.com/repo/Centos-7.repo #下载新的 yum 配置文件
name: clean the yum reposhell: yum clean all #清除原有的 yum 缓存信息
name: clean the iptablesshell: iptables -F #清除原有防火墙规则,不然后可能上不了网[root@ansible ansible]#2、构建 httpd 的任务
[root@ansible ansible]# cd /etc/ansible/lamp/roles/
[root@ansible roles]# mv /var/www/html/index.php httpd/files/
[root@ansible roles]# vim httpd/tasks/main.yml
[root@ansible roles]# cat httpd/tasks/main.yml
[root@ansible roles]# cat httpd/tasks/main.yml
name: web server installyum: name=httpd state=present #安装 httpd 服务
name: provide test pagecopy: src=index.php dest=/var/www/html #提供测试页
name: delete apache config
shell: rm -rf /etc/httpd/conf/httpd.conf #删除原有的 apache 配置文件,如果不删除,下面的 copy 任务是不会执行的,因为当源文件 httpd.conf 和目标文件一样时,copy 命令是不执行的。如果 copy 命令不执行,那么 notify 将不调用 handler。
name: provide configuration filecopy: src=httpd.conf dest=/etc/httpd/conf/httpd.conf #提供 httpd 的配置文件 notify: restart httpd #当前面的 copy 复制成功后,通过 notify 通知名字为 restart httpd 的 handlers 运行 3、构建 httpd 的 handlers
[root@ansible roles]# vim httpd/handlers/main.yml
[root@ansible roles]# cat httpd/handlers/main.yml
name: restart httpdservice: name=httpd enabled=yes state=restarted[root@ansible roles]#4、部署我们的 MariaDB 数据库
创建 MySQL 服务的任务,需要安装 MySQL 服务,改变属主信息,启动 MySQL
[root@ansible roles]# cd /etc/ansible/lamp/roles/[root@ansible roles]# vim mysql/tasks/main.yml[root@ansible roles]# cat mysql/tasks/main.yml-name: install the mysqlyum: name=mariadb-server state=present #安装 mysql 服务
name: mkdir date directoryshell: mkdir -p /mydata/data #创建挂载点目录
name: provide configration filecopy: src=my.cnf dest=/etc/my.cnf #提供 mysql 的配置文件
name: chage the ownershell: chown -R mysql:mysql /mydata/ #更改属主和属组
name: start mariadbservice: name=mariadb enabled=yes state=started #启动 mysql 服务
5、构建 PHP 的任务
[root@ansible roles]# vim php/tasks/main.yml
name: install phpyum: name=php state=present #安装 php
name: install php-mysqlyum: name=php-mysql state=present #安装 php 与 mysql 交互的插件 6、定义整个的任务
[root@ansible roles]# cd /etc/ansible/lamp/roles/[root@ansible roles]# vim site.yml[root@ansible roles]# cat site.yml
name: LAMP buildremote_user: roothosts: web-serversroles:
prepare
mysql
php
httpd 注:所有 yml 的配置文件中,空格必须严格对
开始部署:
[root@ansible roles]# ansible-playbook -i /etc/ansible/hosts /etc/ansible/lamp/roles/site.yml 然后,在浏览器中访问这两台节点主机,可以直接访问成功.
总结:做此实验室,需要准备干净环境,selinux、防火墙都要关闭
实战二: 使用 ansible 部署 k8s 及集群安装 git 命令[root@itlaoxin162 ~]# yum install git
使用 git 下载相应的 ansible-k8s-insatall 包:
[root@itlaoxin162 ~]# git clone https://github.com/lizhenliang/ansible-install-k8s正克隆到 'ansible-install-k8s'...remote: Enumerating objects: 157, done.remote: Counting objects: 100% (157/157), done.remote: Compressing objects: 100% (123/123), done.remote: Total 157 (delta 46), reused 114 (delta 20), pack-reused 0 接收对象中: 100% (157/157), 150.68 KiB | 110.00 KiB/s, done.处理 delta 中: 100 进入到 ansbile-install-k8s 目录修改 hosts 文件,根据规划修改对应 IP 和名称。
cd ansible-install-k8s[root@itlaoxin162 ansible-install-k8s]# vim hosts[root@itlaoxin162 ansible-install-k8s]# vim group_vars/all.yml 部署命令:
单 Master 版
ansible-playbook -i hosts single-master-deploy.yml -uroot -k 多 master 版 ansible-playbook -i hosts multi-master-deploy.yml -uroot -k
总结 ansible 入门很简单,需要反复练习,才能熟练。
我是互联网老辛,欢迎点赞收藏,关注我,后期更多精彩内容;
导出 Markdown 21740 字数 1025 行数 当前行 1, 当前列 0 HTML 21056 字数 755 段落
版权声明: 本文为 InfoQ 作者【互联网老辛】的原创文章。
原文链接:【http://xie.infoq.cn/article/1b7b96ec6e86f9f7a681f5ad3】。文章转载请联系作者。

还未添加个人签名 2018.02.09 加入
还未添加个人简介


评论