本文分享自华为云社区《多模态对比语言图像预训练CLIP:打破语言与视觉的界限》,作者:汀丶。
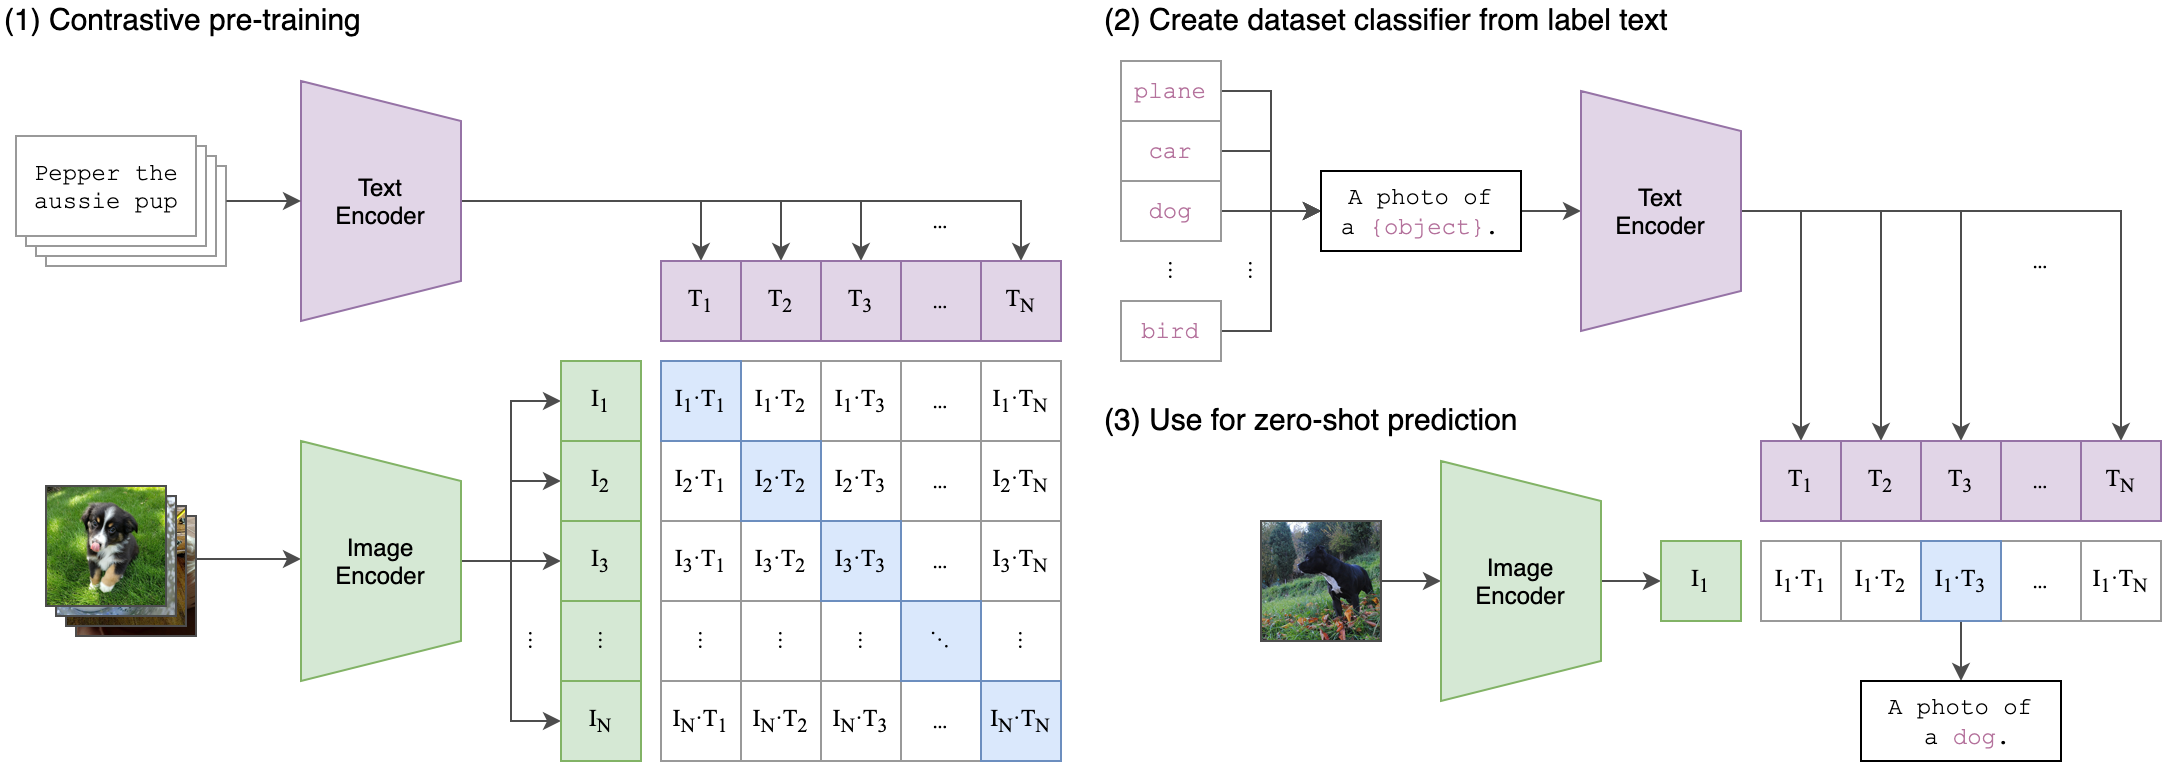
一种基于多模态(图像、文本)对比训练的神经网络。它可以在给定图像的情况下,使用自然语言来预测最相关的文本片段,而无需为特定任务进行优化。CLIP 的设计类似于 GPT-2 和 GPT-3,具备出色的零射击能力,可以应用于多种多模态任务。
多模态对比语言图像预训练(CLIP)是一种神经网络模型,它通过多模态对比训练来学习图像和文本之间的关联。与传统的单模态预训练模型不同,CLIP 能够同时处理图像和文本,从而更好地理解它们之间的语义关系。
CLIP 的设计类似于 GPT-2 和 GPT-3,是一种自回归语言模型。它通过对比学习来学习图像和文本之间的映射关系。在训练过程中,CLIP 会接收一张图像和一个与之相关的文本片段,并学习如何将这两个模态的信息进行关联。通过这种方式,CLIP 可以学会将图像与相应的文本片段进行匹配,从而在给定图像的情况下,使用自然语言来预测最相关的文本片段。
由于 CLIP 采用了对比学习的方法,它可以在无需为特定任务进行优化的前提下,表现出色地完成多种多模态任务。这使得 CLIP 成为了一种通用的多模态预训练模型,可以广泛应用于图像标注、视觉问答、图像生成等领域。
CLIP(对比语言图像预训练)是一种基于多种(图像、文本)对进行训练的神经网络。在给定图像的情况下,它可以用自然语言来预测最相关的文本片段,而无需直接针对任务进行优化,类似于 GPT-2 和 gpt - 3 的零射击能力。我们发现 CLIP 在不使用任何原始的 1.28M 标记示例的情况下,在 ImageNet“零射击”上匹配原始 ResNet50 的性能,克服了计算机视觉中的几个主要挑战。
1.安装
ftfy
regex
tqdm
torch
torchvision
复制代码
$ conda install --yes -c pytorch pytorch=1.7.1 torchvision cudatoolkit=11.0
$ pip install ftfy regex tqdm
$ pip install git+https://github.com/openai/CLIP.git
复制代码
Replace cudatoolkit=11.0 above with the appropriate CUDA version on your machine or cpuonly when installing on a machine without a GPU.
import torch
import clip
from PIL import Image
device = "cuda" if torch.cuda.is_available() else "cpu"
model, preprocess = clip.load("ViT-B/32", device=device)
image = preprocess(Image.open("CLIP.png")).unsqueeze(0).to(device)
text = clip.tokenize(["a diagram", "a dog", "a cat"]).to(device)
with torch.no_grad():
image_features = model.encode_image(image)
text_features = model.encode_text(text)


logits_per_image, logits_per_text = model(image, text)
probs = logits_per_image.softmax(dim=-1).cpu().numpy()
print("Label probs:", probs) # prints: [[0.9927937 0.00421068 0.00299572]]
复制代码
The CLIP module clip provides the following methods:
Returns the names of the available CLIP models.
返回模型和模型所需的 TorchVision 转换,由’ clip.available_models() ‘返回的模型名指定。它将根据需要下载模型。’ name '参数也可以是本地检查点的路径。
可以选择性地指定运行模型的设备,默认是使用第一个 CUDA 设备(如果有的话),否则使用 CPU。当’ jit ‘为’ False '时,将加载模型的非 jit 版本。
返回一个 LongTensor,其中包含给定文本输入的标记化序列。这可以用作模型的输入
’ clip.load() '返回的模型支持以下方法:
给定一批图像,返回由 CLIP 模型的视觉部分编码的图像特征。
给定一批文本 tokens,返回由 CLIP 模型的语言部分编码的文本特征。
给定一批图像和一批文本标记,返回两个张量,包含对应于每个图像和文本输入的 logit 分数。其值是对应图像和文本特征之间的相似度的余弦值,乘以 100。
2.案例介绍
2.1 零样本能力
下面的代码使用 CLIP 执行零样本预测,如本文附录 B 所示。本例从 CIFAR-100 数据集获取图像,并在数据集的 100 个文本标签中预测最可能的标签。
import os
import clip
import torch
from torchvision.datasets import CIFAR100
#Load the model
device = "cuda" if torch.cuda.is_available() else "cpu"
model, preprocess = clip.load('ViT-B/32', device)
#Download the dataset
cifar100 = CIFAR100(root=os.path.expanduser("~/.cache"), download=True, train=False)
#Prepare the inputs
image, class_id = cifar100[3637]
image_input = preprocess(image).unsqueeze(0).to(device)
text_inputs = torch.cat([clip.tokenize(f"a photo of a {c}") for c in cifar100.classes]).to(device)
#Calculate features
with torch.no_grad():
image_features = model.encode_image(image_input)
text_features = model.encode_text(text_inputs)
#Pick the top 5 most similar labels for the image
image_features /= image_features.norm(dim=-1, keepdim=True)
text_features /= text_features.norm(dim=-1, keepdim=True)
similarity = (100.0 * image_features @ text_features.T).softmax(dim=-1)
values, indices = similarity[0].topk(5)
#Print the result
print("\nTop predictions:\n")
for value, index in zip(values, indices):
print(f"{cifar100.classes[index]:>16s}: {100 * value.item():.2f}%")
复制代码
输出将如下所示(具体数字可能因计算设备的不同而略有不同):
Top predictions:
snake: 65.31%
turtle: 12.29%
sweet_pepper: 3.83%
lizard: 1.88%
crocodile: 1.75%
复制代码
Note that this example uses the encode_image() and encode_text() methods that return the encoded features of given inputs.
2.2 Linear-probe 评估
The example below uses scikit-learn to perform logistic regression on image features.
import os
import clip
import torch
import numpy as np
from sklearn.linear_model import LogisticRegression
from torch.utils.data import DataLoader
from torchvision.datasets import CIFAR100
from tqdm import tqdm
#Load the model
device = "cuda" if torch.cuda.is_available() else "cpu"
model, preprocess = clip.load('ViT-B/32', device)
#Load the dataset
root = os.path.expanduser("~/.cache")
train = CIFAR100(root, download=True, train=True, transform=preprocess)
test = CIFAR100(root, download=True, train=False, transform=preprocess)
def get_features(dataset):
all_features = []
all_labels = []


with torch.no_grad():
for images, labels in tqdm(DataLoader(dataset, batch_size=100)):
features = model.encode_image(images.to(device))
all_features.append(features)
all_labels.append(labels)
return torch.cat(all_features).cpu().numpy(), torch.cat(all_labels).cpu().numpy()
#Calculate the image features
train_features, train_labels = get_features(train)
test_features, test_labels = get_features(test)
#Perform logistic regression
classifier = LogisticRegression(random_state=0, C=0.316, max_iter=1000, verbose=1)
classifier.fit(train_features, train_labels)
#Evaluate using the logistic regression classifier
predictions = classifier.predict(test_features)
accuracy = np.mean((test_labels == predictions).astype(float)) * 100.
print(f"Accuracy = {accuracy:.3f}")
复制代码
Note that the C value should be determined via a hyperparameter sweep using a validation split.
3.更多资料参考
点击关注,第一时间了解华为云新鲜技术~


评论