一、 procfs 介绍
procfs 是类 UNIX 操作系统中进程文件系统(process file system)的缩写,主要用于通过内核访问进程信息和系统信息,以及可以修改内核参数改变系统行为。需要注意的是,procfs 文件系统是一个虚拟文件系统,不存在硬盘当中,而是系统启动时动态生成的文件系统,储存在内存中。procfs 文件系统通常挂载在/proc 目录下。
LiteOS-A 是 OpenAtom OpenHarmony(以下简称“OpenHarmony”)系统中使用的轻量系统内核,实现了 procfs 文件系统。本文主要对 LiteOS-A 内核中的 procfs 文件系统的设计、实现和使用进行介绍和分析。
procfs 文件系统是 LiteOS-A 内核文件系统的一个案例,通过了解 procfs 文件系统,能够熟悉 LiteOS-A 的文件系统框架,并很好地将内核信息通过文件系统反馈给使用者。
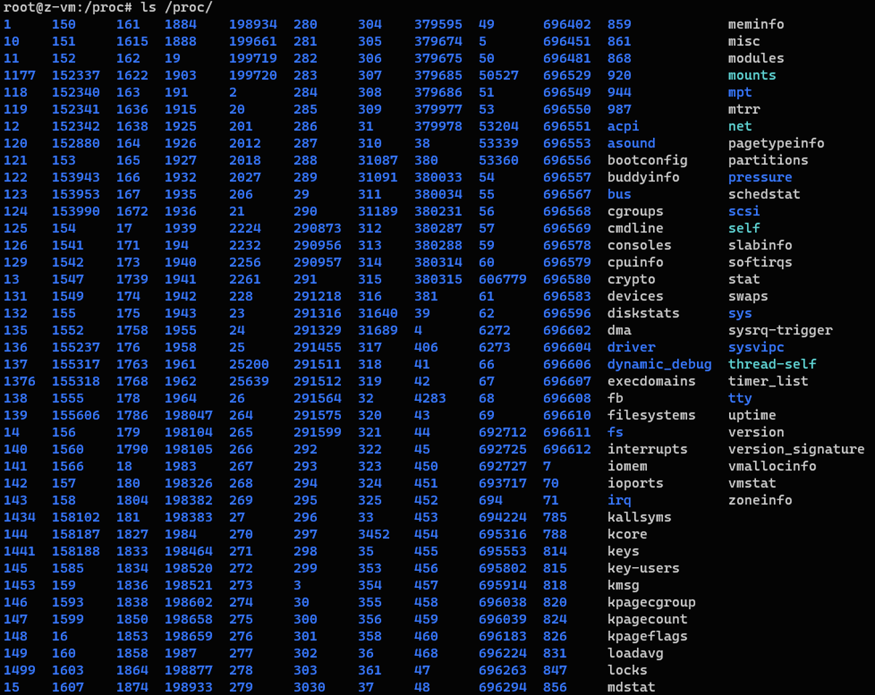
Linux 系统中的 procfs 文件系统包含的内容 Ubuntu 20.04 中的/proc 文件信息如下:
图 1:Ubuntu proc 目录信息
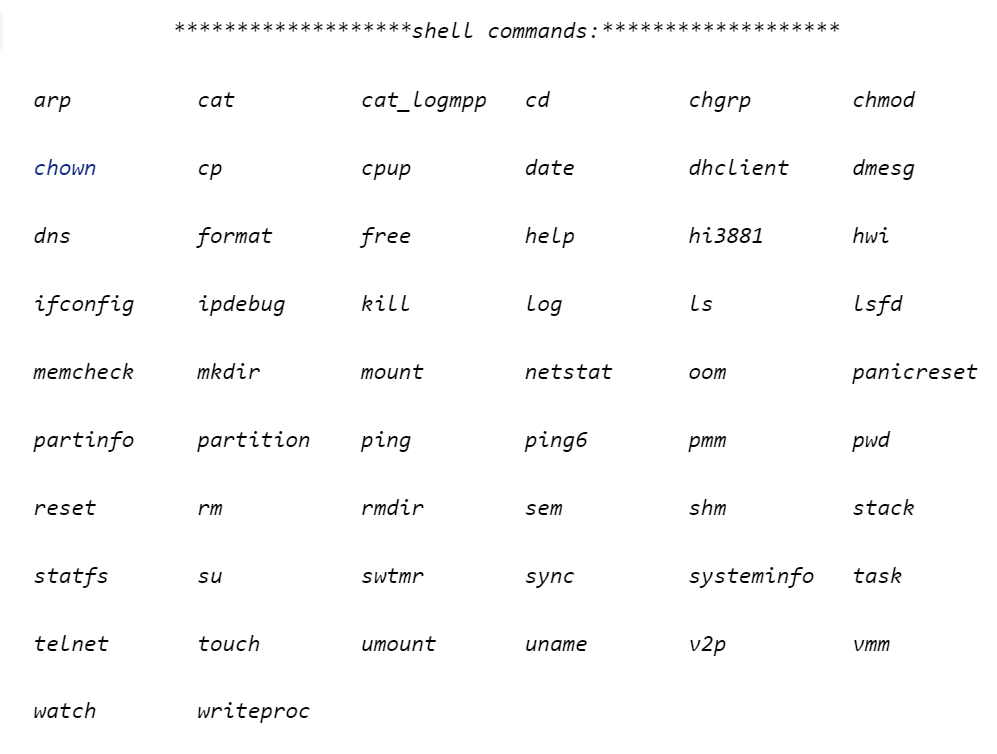
2.OS-A 系统的命令以及 procfs 文件系统的内容
LiteOS-A 的命令集:
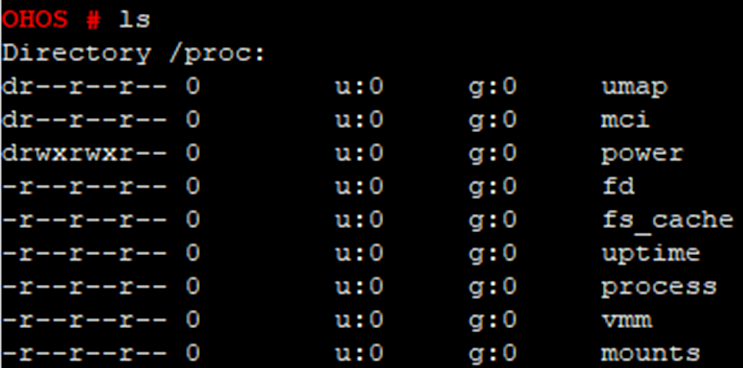
LiteOS-A 的 proc 目录信息如下:
图 2:liteOS-A proc 目录信息
二、 procfs 文件系统的设计
LiteOS-A 中使用 VFS 作为各个文件系统的粘合层,而 VFS 在 OpenHarmony 内核中采用树结构实现,树中的每一个节点都是 Vnode 结构体。VFS 提供统一的抽象接口用于屏蔽文件系统之间的差异,其提供三大操作接口用于统一不同文件系统调用不同接口的现状。
VFS 提供的三大操作接口:
• VnodeOps
• MountOps
• file_operations_vfs
VnodeOps 用于控制 Vnode 节点,MountOps 控制挂载点,file_operations_vfs 提供常用的文件接口。
文件系统各自需要实现 VFS 提供的这三大接口,即实现系统本身需要的接口方法,让 VFS 能够调用这些接口即可。procfs 文件系统虽作为一个伪文件系统 pseudo-file system,但其仍旧需要实现上述接口。
VFS 提供的重要接口
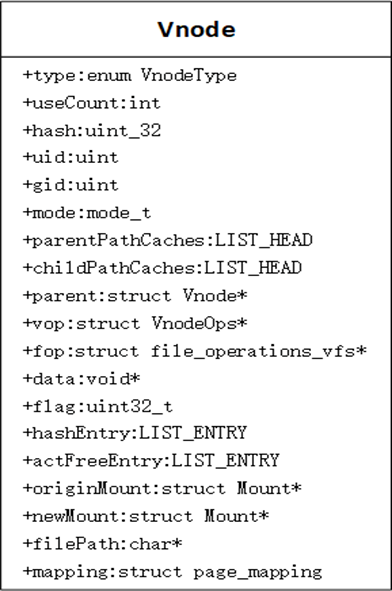
(1) Vnode 结构体:
struct Vnode { enum VnodeType type; /* Vnode节点类型 */ int useCount; /* 节点链接数 */ uint32_t hash; /* 哈希值 */ uint uid; /* 文件拥有者的user id */ uint gid; /* 文件群组id */ mode_t mode; /* 文件读写执行权限 */ LIST_HEAD parentPathCaches; /* 指向父节点的路径缓存 */ LIST_HEAD childPathCaches; /* 指向儿子节点的路径缓存 */ struct Vnode *parent; /* vnode父节点 */ struct VnodeOps *vop; /* vnode操作接口 */ struct file_operations_vfs *fop; /* 文件操作接口,即指定文件系统 */ void *data; /* 数据,指向内部数据的指针 */ uint32_t flag; /* 节点标签 */ LIST_ENTRY hashEntry; /* 挂入v_vnodeHashEntry[i]中 */ LIST_ENTRY actFreeEntry; /* 通过本节点挂载到空闲和使用链表中 */ struct Mount *originMount; /* 所在文件系统挂载信息 */ struct Mount *newMount; /* 其他挂载在这个节点中的文件系统信息 */ char *filePath; /* Vnode的路径信息 */ struct page_mapping mapping; /* page mapping of the vnode */};
复制代码
图 3:Vnode structure
Vnode 功能接口定义:
struct VnodeOps { int (*Create)(struct Vnode *parent, const char *name, int mode, struct Vnode **vnode);// 创建节点 int (*Lookup)(struct Vnode *parent, const char *name, int len, struct Vnode **vnode);// 查询节点 int (*Open)(struct Vnode *vnode, int fd, int mode, int flags);// 打开节点 ssize_t (*ReadPage)(struct Vnode *vnode, char *buffer, off_t pos); ssize_t (*WritePage)(struct Vnode *vnode, char *buffer, off_t pos, size_t buflen); int (*Close)(struct Vnode *vnode);// 关闭节点 int (*Reclaim)(struct Vnode *vnode);// 回收节点 int (*Unlink)(struct Vnode *parent, struct Vnode *vnode, const char *fileName);// 取消硬链接 int (*Rmdir)(struct Vnode *parent, struct Vnode *vnode, const char *dirName);// 删除目录节点 int (*Mkdir)(struct Vnode *parent, const char *dirName, mode_t mode, struct Vnode **vnode);// 创建目录节点 int (*Readdir)(struct Vnode *vnode, struct fs_dirent_s *dir);// 读目录节点信息 int (*Opendir)(struct Vnode *vnode, struct fs_dirent_s *dir);// 打开目录节点 int (*Rewinddir)(struct Vnode *vnode, struct fs_dirent_s *dir);// 定位目录节点 int (*Closedir)(struct Vnode *vnode, struct fs_dirent_s *dir);// 关闭目录节点 int (*Getattr)(struct Vnode *vnode, struct stat *st);// 获取节点属性 int (*Setattr)(struct Vnode *vnode, struct stat *st);// 设置节点属性 int (*Chattr)(struct Vnode *vnode, struct IATTR *attr);// 改变节点属性 int (*Rename)(struct Vnode *src, struct Vnode *dstParent, const char *srcName, const char *dstName); int (*Truncate)(struct Vnode *vnode, off_t len);// 缩小或扩大 int (*Truncate64)(struct Vnode *vnode, off64_t len); int (*Fscheck)(struct Vnode *vnode, struct fs_dirent_s *dir); int (*Link)(struct Vnode *src, struct Vnode *dstParent, struct Vnode **dst, const char *dstName); int (*Symlink)(struct Vnode *parentVnode, struct Vnode **newVnode, const char *path, const char *target); ssize_t (*Readlink)(struct Vnode *vnode, char *buffer, size_t bufLen);};
复制代码
Vnode 根节点的初始化操作:
将全局 Vnode 表进行初始化,开始节点指向根目录/,全局节点 g_rootVnode。
int VnodesInit(void){    int retval = LOS_MuxInit(&g_vnodeMux, NULL);    if (retval != LOS_OK) {        PRINT_ERR("Create mutex for vnode fail, status: %d", retval);        return retval;    }
    LOS_ListInit(&g_vnodeFreeList);    LOS_ListInit(&g_vnodeVirtualList);    LOS_ListInit(&g_vnodeActiveList);    retval = VnodeAlloc(NULL, &g_rootVnode);    if (retval != LOS_OK) {        PRINT_ERR("VnodeInit failed error %d\n", retval);        return retval;    }    g_rootVnode->mode = S_IRWXU | S_IRWXG | S_IRWXO | S_IFDIR;    g_rootVnode->type = VNODE_TYPE_DIR;    g_rootVnode->filePath = "/";
    return LOS_OK;}
复制代码
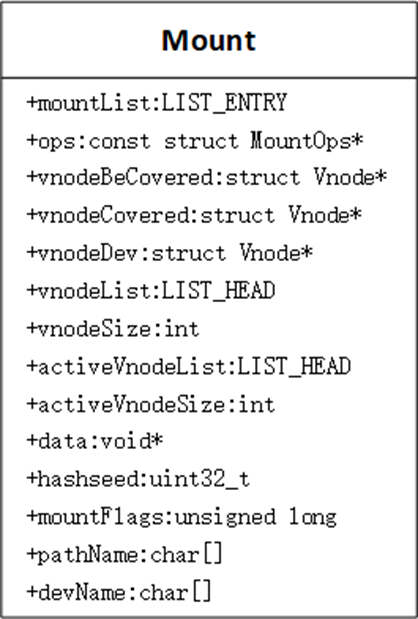
(2) Mount 结构体:
struct Mount { LIST_ENTRY mountList; /* 全局Mount链表 */ const struct MountOps *ops; /* Mount的功能函数 */ struct Vnode *vnodeBeCovered; /* 要被挂载的节点 */ struct Vnode *vnodeCovered; /* 要挂载的节点 */ struct Vnode *vnodeDev; /* 设备vnode */ LIST_HEAD vnodeList; /* Vnode表的表头 */ int vnodeSize; /* Vnode表的节点数量 */ LIST_HEAD activeVnodeList; /* 激活的节点链表 */ int activeVnodeSize; /* 激活的节点数量 */ void *data; /* 数据,指向内部数据的指针 */ uint32_t hashseed; /* Random seed for vfshash */ unsigned long mountFlags; /* 挂载标签 */ char pathName[PATH_MAX]; /* 挂载点路径 */ char devName[PATH_MAX]; /* 设备名称 /dev/sdb-1 */};
复制代码
图 4:Mount structure
挂载点的接口定义:
struct MountOps { int (*Mount)(struct Mount *mount, struct Vnode *vnode, const void *data); int (*Unmount)(struct Mount *mount, struct Vnode **blkdriver); int (*Statfs)(struct Mount *mount, struct statfs *sbp);//统计文件系统的信息,类型、大小等 int (*Sync)(struct Mount *mount);};
复制代码
(3)文件结构定义:
struct file{ unsigned int f_magicnum; /* file magic number. -- to be deleted */ int f_oflags; /* Open mode flags */ struct Vnode *f_vnode; /* Driver interface */ loff_t f_pos; /* File position */ unsigned long f_refcount; /* reference count */ char *f_path; /* File fullpath */ void *f_priv; /* Per file driver private data */ const char *f_relpath; /* realpath. -- to be deleted */ struct page_mapping *f_mapping; /* mapping file to memory */ void *f_dir; /* DIR struct for iterate the directory if open a directory */ const struct file_operations_vfs *ops; int fd;};
复制代码
文件接口功能定义:
struct file_operations_vfs{  /* The device driver open method differs from the mountpoint open method */
  int     (*open)(struct file *filep);  int     (*close)(struct file *filep);  ssize_t (*read)(struct file *filep, char *buffer, size_t buflen);  ssize_t (*write)(struct file *filep, const char *buffer, size_t buflen);  off_t   (*seek)(struct file *filep, off_t offset, int whence);  int     (*ioctl)(struct file *filep, int cmd, unsigned long arg);  int     (*mmap)(struct file* filep, struct VmMapRegion *region);  /* The two structures need not be common after this point */
  int     (*poll)(struct file *filep, poll_table *fds);  int     (*stat)(struct file *filep, struct stat* st);  int     (*fallocate)(struct file* filep, int mode, off_t offset, off_t len);  int     (*fallocate64)(struct file *filep, int mode, off64_t offset, off64_t len);  int     (*fsync)(struct file *filep);  ssize_t (*readpage)(struct file *filep, char *buffer, size_t buflen);  int     (*unlink)(struct Vnode *vnode);};
复制代码
2.文件系统的重要接口设计
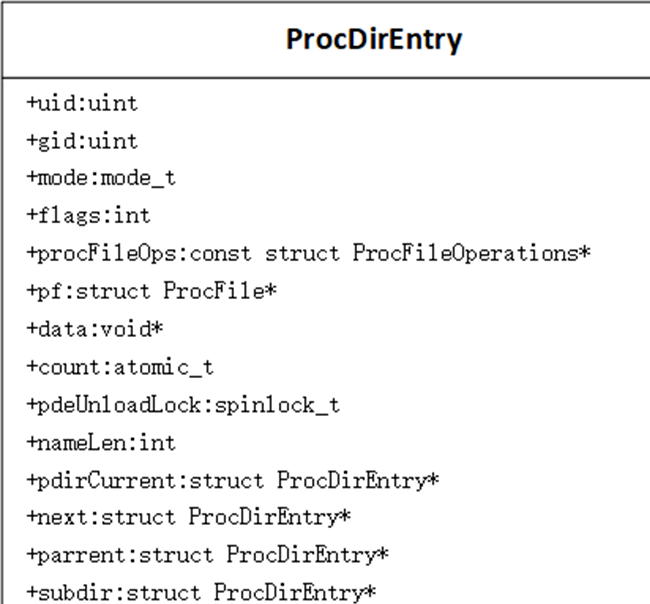
procfs 文件系统中每个目录或文件都是一个 Vnode,也可以理解为一个 entry。ProcDirEntry 中的 subdir 指向的目录中的一个子项,其本质是一个单向链表的形式,并且采用头插法的形式进行节点的插入。
图 5:DirEntry
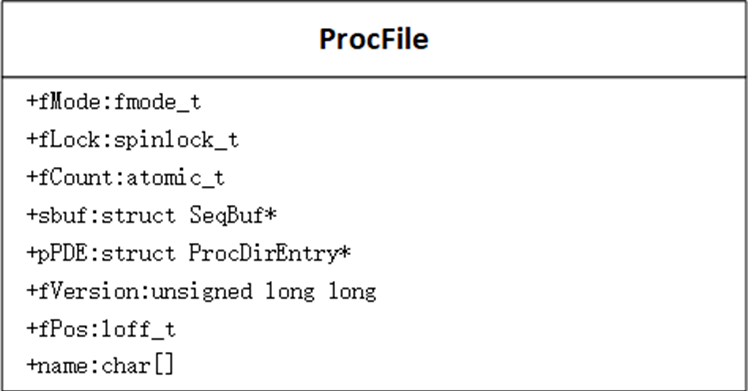
图 6:ProcFile
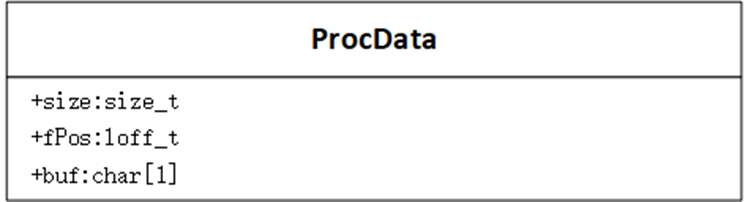
图 7:ProcData
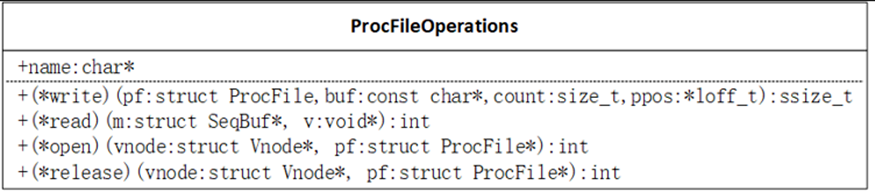
图 8: ProcFileOperations
三、 procfs 文件系统的实现
Procfs 的注册过程
(1)向系统注册文件系统入口函数:
LOS_MODULE_INIT(ProcFsInit, LOS_INIT_LEVEL_KMOD_EXTENDED);
(2)向 VFS 文件系统表注册系统名以及实现的接口等:
const struct MountOps procfs_operations = {    .Mount = VfsProcfsMount,    .Unmount = NULL,    .Statfs = VfsProcfsStatfs,};
static struct VnodeOps g_procfsVops = {    .Lookup = VfsProcfsLookup,    .Getattr = VfsProcfsStat,    .Readdir = VfsProcfsReaddir,    .Opendir = VfsProcfsOpendir,    .Closedir = VfsProcfsClosedir,    .Truncate = VfsProcfsTruncate};
static struct file_operations_vfs g_procfsFops = {    .read = VfsProcfsRead,    .write = VfsProcfsWrite,    .open = VfsProcfsOpen,    .close = VfsProcfsClose};
// 注册文件系统名字以及实现的接口方法等FSMAP_ENTRY(procfs_fsmap, "procfs", procfs_operations, FALSE, FALSE);
复制代码
Procfs 的初始化初始化
需要做的工作主要包括向 OS 注册 procfs 文件系统,生成 procfs 文件目录中的文件初始项,在 liteOS-A 具体包含目录 power、mounts 等。
procfs 文件系统的初始化流程大致如下:
// 系统的入口函数main(VOID)|-> OsMain() // ./liteos/kernel/liteos_a/kernel/common/main.c | // 进行系统的相关初始化工作 | -> EarliestInit() | -> ... | | -> KModInit() |-> ... | |-> OsInitCall(LOS_INIT_LEVEL_KMOD_EXTENDED) // 生成procfs文件系统并挂载到/proc目录 |-> InitLevelCall(level)//根据不同的级别进行相关初始化工作,procfs的级别是8,其级别是文件系统向OS注册的 | // ./liteos/kernel/liteos_a/fs/proc/os_adapt/proc_init.c | |-> ProcFsInit() // 进行procfs文件系统的具体初始化工作 | |-> mkdir(PROCFS_MOUNT_POINT, PROCFS_DEFAULT_MODE) // 先生成/proc目录,之后需要将procfs文件系统挂载到该目录下 | |-> mount(NULL, PROCFS_MOUNT_POINT, "procfs", 0, NULL) | | // 生成mount文件,包括分配Vnode和挂载Vnode | | | |-> ProcMountsInit() | | | // procfs具体项的初始化都写在一个独立的文件中,例如mounts在./liteos/kernel/liteos_a/fs/proc/os_adapt/mounts_proc.c | | | | | |-> ProcMountsInit(void) | | | // 创建mounts节点并挂载到该目录下,NULL位parent为父节点,若parent为NULL,则默认父节点为/proc | | | | | |-> CreateProcEntry("mounts", 0, NULL) | | | // 先判断节点是文件属性还是目录属性,后选择具体的节点创建函数,在这选择File节点 | | | | | |-> ProcCreateFile(parent, name, NULL, mode) | | |-> struct ProcDirEntry *pn = NULL | | |-> ProcAllocNode(&parent, name, S_IFREG | mode) // 具体的分配节点 | | |-> struct ProcDirEntry *pn = NULL; | | | // 首先对节点的合法性进行相关检查,例如parent是否NULL,name是否NULL等 | | | | | |-> pn = (struct ProcDirEntry *)malloc(sizeof(struct ProcDirEntry));//分配一个struct ProcDirEntry内存地址 | | | // 对生成的节点赋予一些属性,例如节点名字长度,权限,名字等,每个ProcDirEntry都需要指定一个ProcFile成员,里面含有具体信息 | | | | | |-> pn->nameLen = strlen(lastName); | | |-> pn->mode = mode; | | |-> ret = memcpy_s(pn->name, sizeof(pn->name), lastName, strlen(lastName) + 1); | | |-> pn->pf = (struct ProcFile *)malloc(sizeof(struct ProcFile)); | | |-> pn->pf->pPDE = pn;// ProcFile的parent是生成的pn节点 | | | // 生成对应的节点,对节点指定相应的函数接口后,需要挂载的父节点中 | | | | | |-> ProcAddNode(parent, pn) | | | // 先判断parent是否为NULL以及pn是否已经有parent,即判断是否已挂载 | | | | | | // 在这里可知一个目录下的子目录以及文件都是以一个单链表的形式存储的,且采用的是头插法,即最先生成的在最后面 | | |-> pn->parent = parent; | | |-> pn->next = parent->subdir; | | |-> parent->subdir = pn; | |->... | | | |->ProcPmInit() // 目录初始化工作 | | | // power目录下含有子目录,但是目录生成的过程都一样,在这以power文件夹为例 | | |-> struct ProcDirEntry *power = CreateProcEntry("power", S_IFDIR | S_IRWXU | S_IRWXG | S_IROTH, NULL); | | | |-> CreateProcEntry("power", S_IFDIR | S_IRWXU | S_IRWXG | S_IROTH, NULL) | | | | |-> // 先判断节点是文件属性还是目录属性,后选择具体的节点创建函数,在这选择目录节点 | | | | | | | | | |-> ProcCreateDir(parent, name, NULL, mode) | | | | | | // 这里节点创建和挂载和上述文件节点创建一样,不再赘述 | | | | | | | | | | | |-> ProcAllocNode(&parent, name, S_IFREG | mode) // 具体的分配节点 | | | | | |-> ProcAddNode(parent, pn) | | | | | | | | | | | |-> ... | | |...
复制代码
四、procfs 业务分析
procfs 挂载过程分析
在 procfs 文件系统的挂载过程中,若使用 qemu 进行调试,则挂载的命令大致如下: mount -R -t procfs [Dir_Path]
mount 的系统调用间接调用 procfs 的 mount 接口。
用户输入挂载命令后,引发系统调用 SysMount 开始逐层调用:
-> ... -> SysMount(const char *source, const char *target, const char *filesystemtype, unsigned long mountflags,const void *data) |--|-> 将路径,文件系统等转化之后调用mount | |-> mount(sourceRet, targetRet, (filesystemtype ? fstypeRet : NULL), mountflags, dataRet) | | |-> //找到指定的文件系统 | | |-> fsmap = mount_findfs(filesystemtype) | | |-> mops = fsmap->fs_mops // 为mount节点指定mount的接口函数 | | |-> //找到挂载目录对应的Vnode并且设置文件系统相关信息 | | |-> VnodeLookup(target, &mountpt_vnode, 0) | | | |->VnodeLookupAt(path, vnode, flags, NULL) | | | | |-> //对目录变成绝对路径并且从全局Vnode链表中开始找 | | | | |-> PreProcess(path, &startVnode, &normalizedPath) | | | | | |-> vfs_normalize_path(NULL, originPath, &absolutePath) | | |-> mnt = MountAlloc(mountpt_vnode, (struct MountOps*)mops) | | |-> mops->Mount(mnt, device, data)//进入具体的procfs文件系统的mount函数 | | | |-> VfsProcfsMount(struct Mount *mnt, struct Vnode *device, const void *data) | | | | |-> VnodeAlloc(&g_procfsVops, &vp);//生成一个Vnode用于挂载mount节点和procfs文件系统的root节点 | | | | |-> root = GetProcRootEntry(); //获取procfs文件系统的根节点 | | | | |-> vp->data = root; // | | | | |-> vp->originMount = mnt;// 将vp挂载在挂载目录所对应的mount节点上 | | | | |-> mnt->data = NULL; | | | | |-> mnt->vnodeCovered = vp;// mount节点挂载的Vnode是该文件系统,方便后续在mount链表中找挂载点 | | | | |-> vp->type = root->type; | | |...
复制代码
2.节点的增加过程分析
关键代码如下:
temp = ProcFindNode(parent, pn->name); if (temp != NULL) { PRINT_ERR("Error!ProcDirEntry '%s/%s' already registered\n", parent->name, pn->name); spin_unlock(&procfsLock); return -EEXIST; } pn->parent = parent; pn->next = parent->subdir; parent->subdir = pn;
复制代码
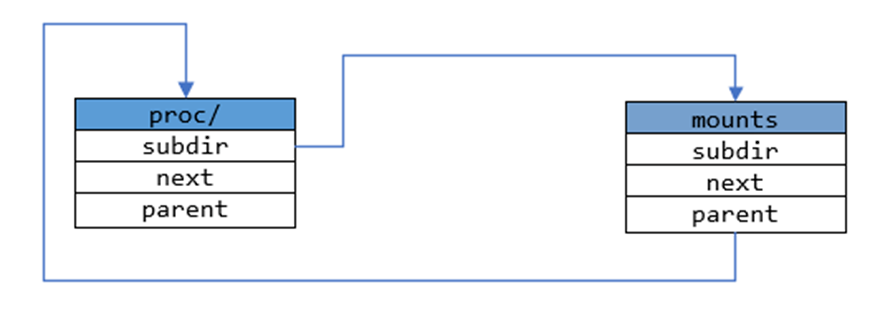
为了更好地说明,假设目前已经在系统中生成了 proc/和 mounts 节点,proc/节点就是该文件系统的根节点,此时两者的关系可以用下图表示:
图 9:层级目录的关系
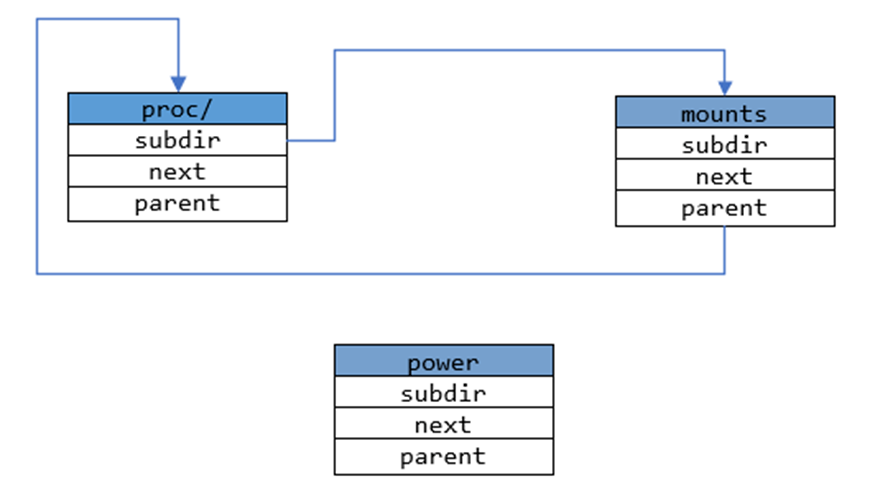
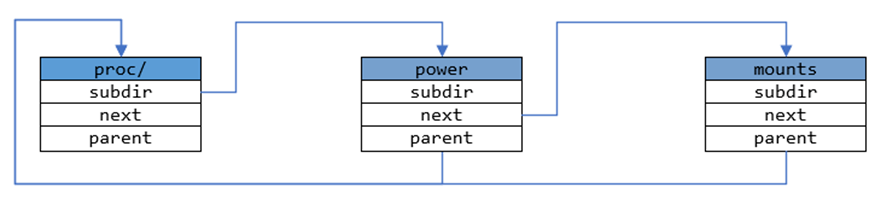
此时若需要在两者在插入一个 power 节点,则首先需要先生成一个 power 节点如下,再改变相应的指向即可,具体可以参考图 10,给出三者之间的关系,最终的节点效果如图 11。
图 10:生成一个新节点
图 11:重新组合
3、writeproc shell 命令的创建
liteOS-A 中含有一个叫 writeproc 的 shell 命令,使用格式如下:
writeproc value >> path
shell 命令的创建方式主要有两种,分静态注册和动态注册,writeproc 命令使用静态注册方式进行注册,在本文中也主要介绍静态注册。
shell 开发的流程如下:
① 定义一个新增命令所要调用的执行函数 xxx;
② 使用 SHELLCMD_ENTRY 函数添加新增命令项;
③ 在链接选项 liteos_tables_ldflags.mk 中添加链接该新增命令项参数;
④ 重新编译代码后运行。
writeproc 的注册如下:
// 定义一个具体的执行函数 int OsShellCmdWriteProc(int argc, char **argv); // 新增命令项 SHELLCMD_ENTRY(writeproc_shellcmd, CMD_TYPE_EX, "writeproc", XARGS, (CmdCallBackFunc)OsShellCmdWriteProc);
复制代码
writeproc 的具体流程分析:
①首先由用户按照命令格式进行输入;
②OsShellCmdWriteProc 函数对输入的命令进行分析,并采取相关的动作。
-> ... -> // 使用shell命令唤起writeproc注册函数 -> writeproc value >> path |-> // 进行初始化工作,主要用于判断输入路径是否合法,节点是否存在 |-> struct ProcDirEntry *handle = NULL; |-> const char *rootProcDir = "/proc/"; |-> handle = OpenProcFile(realPath, O_TRUNC) // 若路径合法则找到对应的Vnode | |-> pn = ProcFindEntry(fileName) | | |-> int leveltotal = 0;// leveltotal用于判定文件所对应的层级,一个/表示一层 | | | // 遍历Vnode找到对应的Vnode并返回 | |-> pn->flags = (unsigned int)(pn->flags) | (unsigned int)flags// 设置节点相应的权限 | |-> ... | WriteProcFile(handle, value, len) // 找到文件句柄之后开始写入数据 | | // 使用Vnode的文件接口对ProcFile数据成员进行写入 | |-> result = pde->procFileOps->write(pde->pf, (const char *)buf, len, &(pde->pf->fPos)) |...
复制代码
根据文件名查找 Vnode 的关键代码:
pn = &g_procRootDirEntry; while ((pn != NULL) && (levelcount < leveltotal)) { levelcount++; isfoundsub = 0; while (pn != NULL) { next = strchr(path, '/'); if (next == NULL) { while (pn != NULL) { if (strcmp(path, pn->name) == 0) { spin_unlock(&procfsLock); return pn; } pn = pn->next; } pn = NULL; spin_unlock(&procfsLock); return pn; } len = next - path; if (pn == &g_procRootDirEntry) { if (levelcount == leveltotal) { spin_unlock(&procfsLock); return pn; } len = g_procRootDirEntry.nameLen; } if (ProcMatch(len, path, pn)) { isfoundsub = 1; path += len + 1; break; } pn = pn->next; } }
复制代码
五、总结
本文介绍了 LiteOS-A 内核下 proc 相关目录信息,并且对 LiteOS-A 内核中 procfs 文件系统的原理和实现,结合源码进行了分析。同时,通过 writeproc shell 命令介绍了 procfs 的使用。希望读者可以掌握 LiteOS-A 文件系统的基本知识,更好地运用于基于 LiteOS-A 内核的系统移植工作。
关于 OpenHarmony 内核的内容,之前我还介绍了 LiteOS-A 内核之基础硬件——中断控制器、GIC400 内核对象队列的算法、OpenHarmony LiteOS-M 内核事件的运作机制,以及内核 IPC 机制数据结构、OpenHarmony Liteos-A 内核之 iperf3 移植方法,感兴趣的读者可以点击阅读:
《浅谈OpenHarmony LiteOS-A内核之基础硬件——中断控制器GIC400》、
《OpenHarmony——内核对象队列之算法详解(上)》、
《OpenHarmony——内核对象队列之算法详解(下)》、
《OpenHarmony——内核对象事件之源码详解》、
《OpenHarmony——内核IPC机制数据结构解析》、
《OpenHarmony Liteos_A内核之iperf3移植心得》。


评论