一、简介
媒体子系统为开发者提供了媒体相关的很多功能,本文针对其中的视频录制功能做个详细的介绍。首先,我将通过媒体子系统提供的视频录制 Test 代码作为切入点,给大家梳理一下整个录制的流程。
二、目录
foundation/multimedia/camera_framework
├── frameworks│ ├── js│ │ └── camera_napi #napi实现│ │ └── src│ │ ├── input #Camera输入│ │ ├── output #Camera输出│ │ └── session #会话管理│ └── native #native实现│ └── camera│ ├── BUILD.gn│ ├── src│ │ ├── input #Camera输入│ │ ├── output #Camera输出│ │ └── session #会话管理├── interfaces #接口定义│ ├── inner_api #内部native实现│ │ └── native│ │ ├── camera│ │ │ └── include│ │ │ ├── input│ │ │ ├── output│ │ │ └── session│ └── kits #napi接口│ └── js│ └── camera_napi│ ├── BUILD.gn│ ├── include│ │ ├── input│ │ ├── output│ │ └── session│ └── @ohos.multimedia.camera.d.ts└── services #服务端 └── camera_service ├── binder │ ├── base │ ├── client #IPC的客户端 │ │ └── src │ └── server #IPC的服务端 │ └── src └── src
复制代码
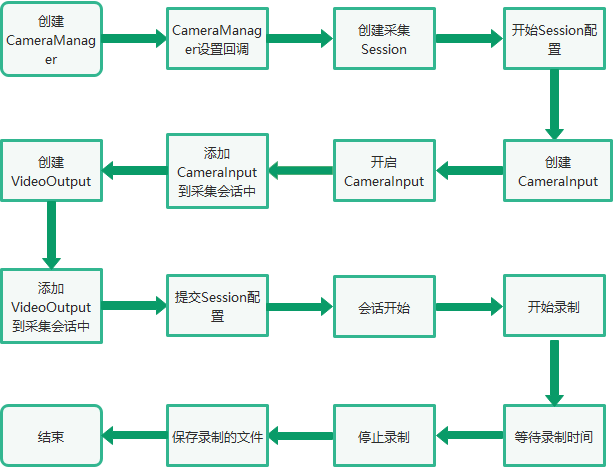
三、录制的总体流程
四、Native 接口使用
在 OpenAtom OpenHarmony(以下简称“OpenHarmony”)系统中,多媒体子系统通过 N-API 接口提供给上层 JS 调用,N-API 相当于是 JS 和 Native 之间的桥梁,在 OpenHarmony 源码中,提供了 C++直接调用视频录制功能的例子,foundation/multimedia/camera_framework/interfaces/inner_api/native/test 目录中。本文章主要参考了 camera_video.cpp 文件中的视频录制流程。
首先根据 camera_video.cpp 的 main 方法,了解下视频录制的主要流程代码。
int main(int argc, char **argv){......
// 创建CameraManager实例sptr<CameraManager> camManagerObj = CameraManager::GetInstance();
// 设置回调camManagerObj->SetCallback(std::make_shared<TestCameraMngerCallback>(testName));
// 获取支持的相机设备列表std::vector<sptr<CameraDevice>> cameraObjList = camManagerObj->GetSupportedCameras();
// 创建采集会话sptr<CaptureSession> captureSession = camManagerObj->CreateCaptureSession();
// 开始配置采集会话captureSession->BeginConfig();
// 创建CameraInputsptr<CaptureInput> captureInput = camManagerObj->CreateCameraInput(cameraObjList[0]);sptr<CameraInput> cameraInput = (sptr<CameraInput> &)captureInput;
// 开启CameraInputcameraInput->Open();
// 设置CameraInput的Error回调cameraInput->SetErrorCallback(std::make_shared<TestDeviceCallback>(testName));
// 添加CameraInput实例到采集会话中ret = captureSession->AddInput(cameraInput);
sptr<Surface> videoSurface = nullptr;std::shared_ptr<Recorder> recorder = nullptr;
// 创建Video的SurfacevideoSurface = Surface::CreateSurfaceAsConsumer();
sptr<SurfaceListener> videoListener = new SurfaceListener("Video", SurfaceType::VIDEO, g_videoFd, videoSurface);
// 注册Surface的事件监听videoSurface->RegisterConsumerListener((sptr<IBufferConsumerListener> &)videoListener);
// 视频的配置VideoProfile videoprofile = VideoProfile(static_cast<CameraFormat>(videoFormat), videosize, videoframerates);
// 创建VideoOutput实例sptr<CaptureOutput> videoOutput = camManagerObj->CreateVideoOutput(videoprofile, videoSurface);
// 设置VideoOutput的回调((sptr<VideoOutput> &)videoOutput)->SetCallback(std::make_shared<TestVideoOutputCallback>(testName));
// 添加videoOutput到采集会话中ret = captureSession->AddOutput(videoOutput);
// 提交会话配置ret = captureSession->CommitConfig();
// 开始录制ret = ((sptr<VideoOutput> &)videoOutput)->Start();

sleep(videoPauseDuration);MEDIA_DEBUG_LOG("Resume video recording");// 暂停录制ret = ((sptr<VideoOutput> &)videoOutput)->Resume();
MEDIA_DEBUG_LOG("Wait for 5 seconds before stop");sleep(videoCaptureDuration);MEDIA_DEBUG_LOG("Stop video recording");// 停止录制ret = ((sptr<VideoOutput> &)videoOutput)->Stop();
MEDIA_DEBUG_LOG("Closing the session");// 停止采集会话ret = captureSession->Stop();
MEDIA_DEBUG_LOG("Releasing the session");// 释放会话采集captureSession->Release();
// Close video fileTestUtils::SaveVideoFile(nullptr, 0, VideoSaveMode::CLOSE, g_videoFd);cameraInput->Release();camManagerObj->SetCallback(nullptr);return 0;
}
复制代码
以上是视频录制的整体流程,其过程主要通过 Camera 模块支持的能力来实现,其中涉及几个重要的类:CaptureSession、CameraInput、VideoOutput。CaptureSession 是整个过程的控制者,CameraInput 和 VideoOutput 相当于是设备的输入和输出。
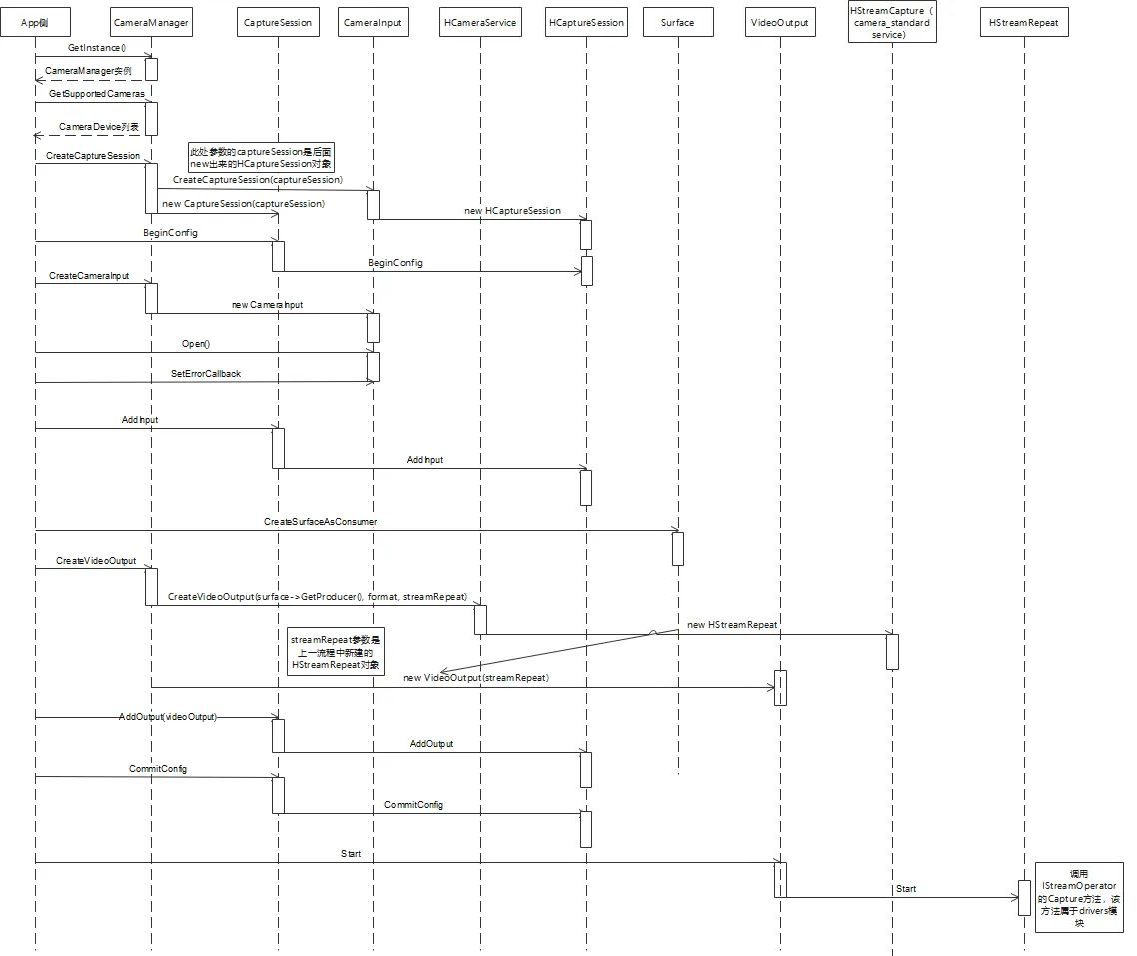
五、调用流程
后续主要针对上面的调用流程,梳理具体的调用流程,方便我们对了解视频录制的整理架构有一个更加深入的了解。
创建 CameraManager 实例
通过 CameraManager::GetInstance()获取 CameraManager 的实例,后续的一些接口都是通过该实例进行调用的。GetInstance 使用了单例模式,在 OpenHarmony 代码中这种方式很常见。
sptr<CameraManager> &CameraManager::GetInstance(){ if (CameraManager::cameraManager_ == nullptr) { MEDIA_INFO_LOG("Initializing camera manager for first time!"); CameraManager::cameraManager_ = new(std::nothrow) CameraManager(); if (CameraManager::cameraManager_ == nullptr) { MEDIA_ERR_LOG("CameraManager::GetInstance failed to new CameraManager"); } } return CameraManager::cameraManager_;}
复制代码
2.获取支持的相机设备列表
通过调用 CameraManager 的 GetSupportedCameras()接口,获取设备支持的 CameraDevice 列表。跟踪代码可以发现 serviceProxy_->GetCameras 最终会调用到 Camera 服务端的对应接口。
std::vector<sptr<CameraDevice>> CameraManager::GetSupportedCameras(){    CAMERA_SYNC_TRACE;
    std::lock_guard<std::mutex> lock(mutex_);    std::vector<std::string> cameraIds;    std::vector<std::shared_ptr<Camera::CameraMetadata>> cameraAbilityList;    int32_t retCode = -1;    sptr<CameraDevice> cameraObj = nullptr;    int32_t index = 0;
    if (cameraObjList.size() > 0) {        cameraObjList.clear();    }    if (serviceProxy_ == nullptr) {        MEDIA_ERR_LOG("CameraManager::GetCameras serviceProxy_ is null, returning empty list!");        return cameraObjList;    }    std::vector<sptr<CameraDevice>> supportedCameras;    retCode = serviceProxy_->GetCameras(cameraIds, cameraAbilityList);    if (retCode == CAMERA_OK) {        for (auto& it : cameraIds) {            cameraObj = new(std::nothrow) CameraDevice(it, cameraAbilityList[index++]);            if (cameraObj == nullptr) {                MEDIA_ERR_LOG("CameraManager::GetCameras new CameraDevice failed for id={public}%s", it.c_str());                continue;            }            supportedCameras.emplace_back(cameraObj);        }    } else {        MEDIA_ERR_LOG("CameraManager::GetCameras failed!, retCode: %{public}d", retCode);    }
    ChooseDeFaultCameras(supportedCameras);    return cameraObjList;}
复制代码
3.创建采集会话
下面是比较重要的环节,通过调用 CameraManager 的 CreateCaptureSession 接口创建采集会话。CameraManager 创建采集会话,是通过 serviceProxy_->CreateCaptureSession 方式进行调用,这里涉及到了 OpenHarmony 中的 IPC 的调用,serviceProxy_是远端服务在本地的代理,通过这个代理可以调用到具体的服务端,这里是 HCameraService。
std::vector<sptr<CameraDevice>> CameraManager::GetSupportedCameras(){    CAMERA_SYNC_TRACE;
    std::lock_guard<std::mutex> lock(mutex_);    std::vector<std::string> cameraIds;    std::vector<std::shared_ptr<Camera::CameraMetadata>> cameraAbilityList;    int32_t retCode = -1;    sptr<CameraDevice> cameraObj = nullptr;    int32_t index = 0;
    if (cameraObjList.size() > 0) {        cameraObjList.clear();    }    if (serviceProxy_ == nullptr) {        MEDIA_ERR_LOG("CameraManager::GetCameras serviceProxy_ is null, returning empty list!");        return cameraObjList;    }    std::vector<sptr<CameraDevice>> supportedCameras;    retCode = serviceProxy_->GetCameras(cameraIds, cameraAbilityList);    if (retCode == CAMERA_OK) {        for (auto& it : cameraIds) {            cameraObj = new(std::nothrow) CameraDevice(it, cameraAbilityList[index++]);            if (cameraObj == nullptr) {                MEDIA_ERR_LOG("CameraManager::GetCameras new CameraDevice failed for id={public}%s", it.c_str());                continue;            }            supportedCameras.emplace_back(cameraObj);        }    } else {        MEDIA_ERR_LOG("CameraManager::GetCameras failed!, retCode: %{public}d", retCode);    }
    ChooseDeFaultCameras(supportedCameras);    return cameraObjList;}
复制代码
代码最终来到 HCameraService::CreateCaptureSession 中,该方法中 new 了一个 HCaptureSession 对象,并且将该对象传递给了参数 session,所以前面的 captureSession 对象就是这里 new 出来的 HCaptureSession,前面的 CameraManager 的 CreateCaptureSession()方法中将 captureSession 封装成 CaptureSession 对象返回给应用层使用。
int32_t HCameraService::CreateCaptureSession(sptr<ICaptureSession> &session){    CAMERA_SYNC_TRACE;    sptr<HCaptureSession> captureSession;    if (streamOperatorCallback_ == nullptr) {        streamOperatorCallback_ = new(std::nothrow) StreamOperatorCallback();        if (streamOperatorCallback_ == nullptr) {            MEDIA_ERR_LOG("HCameraService::CreateCaptureSession streamOperatorCallback_ allocation failed");            return CAMERA_ALLOC_ERROR;        }    }
    std::lock_guard<std::mutex> lock(mutex_);    OHOS::Security::AccessToken::AccessTokenID callerToken = IPCSkeleton::GetCallingTokenID();    captureSession = new(std::nothrow) HCaptureSession(cameraHostManager_, streamOperatorCallback_, callerToken);    if (captureSession == nullptr) {        MEDIA_ERR_LOG("HCameraService::CreateCaptureSession HCaptureSession allocation failed");        return CAMERA_ALLOC_ERROR;    }    session = captureSession;    return CAMERA_OK;}
复制代码
开始配置采集会话
调用 CaptureSession 的 BeginConfig 进行采集会话的配置工作。这个工作最终调用到被封装的 HCaptureSession 中。
int32_t HCaptureSession::BeginConfig(){ CAMERA_SYNC_TRACE; if (curState_ == CaptureSessionState::SESSION_CONFIG_INPROGRESS) { MEDIA_ERR_LOG("HCaptureSession::BeginConfig Already in config inprogress state!"); return CAMERA_INVALID_STATE; } std::lock_guard<std::mutex> lock(sessionLock_); prevState_ = curState_; curState_ = CaptureSessionState::SESSION_CONFIG_INPROGRESS; tempCameraDevices_.clear(); tempStreams_.clear(); deletedStreamIds_.clear(); return CAMERA_OK;}
复制代码
5.创建 CameraInput
应用层通过 camManagerObj->CreateCameraInput(cameraObjList[0])的方式进行 CameraInput 的创建,cameraObjList[0]就是前面获取支持设备的第一个。根据 CameraDevice 创建对应的 CameraInput 对象。
sptr<CameraInput> CameraManager::CreateCameraInput(sptr<CameraDevice> &camera){    CAMERA_SYNC_TRACE;    sptr<CameraInput> cameraInput = nullptr;    sptr<ICameraDeviceService> deviceObj = nullptr;
    if (camera != nullptr) {        deviceObj = CreateCameraDevice(camera->GetID());        if (deviceObj != nullptr) {            cameraInput = new(std::nothrow) CameraInput(deviceObj, camera);            if (cameraInput == nullptr) {                MEDIA_ERR_LOG("failed to new CameraInput Returning null in CreateCameraInput");                return cameraInput;            }        } else {            MEDIA_ERR_LOG("Returning null in CreateCameraInput");        }    } else {        MEDIA_ERR_LOG("CameraManager::CreateCameraInput: Camera object is null");    }    return cameraInput;}
复制代码
6.开启 CameraInput
调用了 CameraInput 的 Open 方法,进行输入设备的启动打开。
void CameraInput::Open(){ int32_t retCode = deviceObj_->Open(); if (retCode != CAMERA_OK) { MEDIA_ERR_LOG("Failed to open Camera Input, retCode: %{public}d", retCode); }}
复制代码
7.添加 CameraInput 实例到采集会话中
通过调用 captureSession 的 AddInput 方法,将创建的 CameraInput 对象添加到采集会话的输入中,这样采集会话就知道采集输入的设备。
int32_t CaptureSession::AddInput(sptr<CaptureInput> &input){ CAMERA_SYNC_TRACE; if (input == nullptr) { MEDIA_ERR_LOG("CaptureSession::AddInput input is null"); return CAMERA_INVALID_ARG; } input->SetSession(this); inputDevice_ = input; return captureSession_->AddInput(((sptr<CameraInput> &)input)->GetCameraDevice());}
复制代码
最终调用到 HCaptureSession 的 AddInput 方法,该方法中核心的代码是 tempCameraDevices_.emplace_back(localCameraDevice),将需要添加的 CameraDevice 插入到 tempCameraDevices_容器中。
int32_t HCaptureSession::AddInput(sptr<ICameraDeviceService> cameraDevice){    CAMERA_SYNC_TRACE;    sptr<HCameraDevice> localCameraDevice = nullptr;
    if (cameraDevice == nullptr) {        MEDIA_ERR_LOG("HCaptureSession::AddInput cameraDevice is null");        return CAMERA_INVALID_ARG;    }    if (curState_ != CaptureSessionState::SESSION_CONFIG_INPROGRESS) {        MEDIA_ERR_LOG("HCaptureSession::AddInput Need to call BeginConfig before adding input");        return CAMERA_INVALID_STATE;    }    if (!tempCameraDevices_.empty() || (cameraDevice_ != nullptr && !cameraDevice_->IsReleaseCameraDevice())) {        MEDIA_ERR_LOG("HCaptureSession::AddInput Only one input is supported");        return CAMERA_INVALID_SESSION_CFG;    }    localCameraDevice = static_cast<HCameraDevice*>(cameraDevice.GetRefPtr());    if (cameraDevice_ == localCameraDevice) {        cameraDevice_->SetReleaseCameraDevice(false);    } else {        tempCameraDevices_.emplace_back(localCameraDevice);        CAMERA_SYSEVENT_STATISTIC(CreateMsg("CaptureSession::AddInput"));    }
    sptr<IStreamOperator> streamOperator;    int32_t rc = localCameraDevice->GetStreamOperator(streamOperatorCallback_, streamOperator);    if (rc != CAMERA_OK) {        MEDIA_ERR_LOG("HCaptureSession::GetCameraDevice GetStreamOperator returned %{public}d", rc);        localCameraDevice->Close();        return rc;    }    return CAMERA_OK;}
复制代码
创建 Video 的 Surface
通过 Surface::CreateSurfaceAsConsumer 创建 Surface。
sptr<Surface> Surface::CreateSurfaceAsConsumer(std::string name, bool isShared){ sptr<ConsumerSurface> surf = new ConsumerSurface(name, isShared); GSError ret = surf->Init(); if (ret != GSERROR_OK) { BLOGE("Failure, Reason: consumer surf init failed"); return nullptr; } return surf;}
复制代码
9.创建 VideoOutput 实例
通过调用 CameraManager 的 CreateVideoOutput 来创建 VideoOutput 实例。
sptr<VideoOutput> CameraManager::CreateVideoOutput(VideoProfile &profile, sptr<Surface> &surface){    CAMERA_SYNC_TRACE;    sptr<IStreamRepeat> streamRepeat = nullptr;    sptr<VideoOutput> result = nullptr;    int32_t retCode = CAMERA_OK;    camera_format_t metaFormat;
    metaFormat = GetCameraMetadataFormat(profile.GetCameraFormat());    retCode = serviceProxy_->CreateVideoOutput(surface->GetProducer(), metaFormat,                                               profile.GetSize().width, profile.GetSize().height, streamRepeat);    if (retCode == CAMERA_OK) {        result = new(std::nothrow) VideoOutput(streamRepeat);        if (result == nullptr) {            MEDIA_ERR_LOG("Failed to new VideoOutput");        } else {            std::vector<int32_t> videoFrameRates = profile.GetFrameRates();            if (videoFrameRates.size() >= 2) { // vaild frame rate range length is 2                result->SetFrameRateRange(videoFrameRates[0], videoFrameRates[1]);            }            POWERMGR_SYSEVENT_CAMERA_CONFIG(VIDEO,                                            profile.GetSize().width,                                            profile.GetSize().height);        }    } else {        MEDIA_ERR_LOG("VideoOutpout: Failed to get stream repeat object from hcamera service! %{public}d", retCode);    }    return result;}
复制代码
该方法中通过 IPC 的调用最终调用到了 HCameraService 的 CreateVideoOutput(surface->GetProducer(), format, streamRepeat)。
sptr<VideoOutput> CameraManager::CreateVideoOutput(VideoProfile &profile, sptr<Surface> &surface){    CAMERA_SYNC_TRACE;    sptr<IStreamRepeat> streamRepeat = nullptr;    sptr<VideoOutput> result = nullptr;    int32_t retCode = CAMERA_OK;    camera_format_t metaFormat;
    metaFormat = GetCameraMetadataFormat(profile.GetCameraFormat());    retCode = serviceProxy_->CreateVideoOutput(surface->GetProducer(), metaFormat,                                               profile.GetSize().width, profile.GetSize().height, streamRepeat);    if (retCode == CAMERA_OK) {        result = new(std::nothrow) VideoOutput(streamRepeat);        if (result == nullptr) {            MEDIA_ERR_LOG("Failed to new VideoOutput");        } else {            std::vector<int32_t> videoFrameRates = profile.GetFrameRates();            if (videoFrameRates.size() >= 2) { // vaild frame rate range length is 2                result->SetFrameRateRange(videoFrameRates[0], videoFrameRates[1]);            }            POWERMGR_SYSEVENT_CAMERA_CONFIG(VIDEO,                                            profile.GetSize().width,                                            profile.GetSize().height);        }    } else {        MEDIA_ERR_LOG("VideoOutpout: Failed to get stream repeat object from hcamera service! %{public}d", retCode);    }    return result;}
复制代码
HCameraService 的 CreateVideoOutput 方法中主要创建了 HStreamRepeat,并且通过参数传递给前面的 CameraManager 使用,CameraManager 通过传递的 HStreamRepeat 对象,进行封装,创建出 VideoOutput 对象。
10. 添加 videoOutput 到采集会话中,并且提交采集会话
该步骤类似添加 CameraInput 到采集会话的过程,可以参考前面的流程。
11. 开始录制
通过调用 VideoOutput 的 Start 进行录制的操作。
int32_t VideoOutput::Start(){ return static_cast<IStreamRepeat *>(GetStream().GetRefPtr())->Start();}
复制代码
该方法中会调用到 HStreamRepeat 的 Start 方法。
int32_t HStreamRepeat::Start(){CAMERA_SYNC_TRACE;
if (streamOperator_ == nullptr) {    return CAMERA_INVALID_STATE;}if (curCaptureID_ != 0) {    MEDIA_ERR_LOG("HStreamRepeat::Start, Already started with captureID: %{public}d", curCaptureID_);    return CAMERA_INVALID_STATE;}int32_t ret = AllocateCaptureId(curCaptureID_);if (ret != CAMERA_OK) {    MEDIA_ERR_LOG("HStreamRepeat::Start Failed to allocate a captureId");    return ret;}std::vector<uint8_t> ability;OHOS::Camera::MetadataUtils::ConvertMetadataToVec(cameraAbility_, ability);CaptureInfo captureInfo;captureInfo.streamIds_ = {streamId_};captureInfo.captureSetting_ = ability;captureInfo.enableShutterCallback_ = false;MEDIA_INFO_LOG("HStreamRepeat::Start Starting with capture ID: %{public}d", curCaptureID_);CamRetCode rc = (CamRetCode)(streamOperator_->Capture(curCaptureID_, captureInfo, true));if (rc != HDI::Camera::V1_0::NO_ERROR) {    ReleaseCaptureId(curCaptureID_);    curCaptureID_ = 0;    MEDIA_ERR_LOG("HStreamRepeat::Start Failed with error Code:%{public}d", rc);    ret = HdiToServiceError(rc);}return ret;}
复制代码
核心的代码是 streamOperator_->Capture,其中最后一个参数 true,表示采集连续数据。
12. 录制结束,保存录制文件
六、总结
本文主要对 OpenHarmony 3.2 Beta 多媒体子系统的视频录制进行介绍,首先梳理了整体的录制流程,然后对录制过程中的主要步骤进行了详细地分析。视频录制主要分为以下几个步骤:
(1) 获取 CameraManager 实例。
(2) 创建采集会话 CaptureSession。
(3) 创建 CameraInput 实例,并且将输入设备添加到 CaptureSession 中。
(4) 创建 Video 录制需要的 Surface。
(5) 创建 VideoOutput 实例,并且将输出添加到 CaptureSession 中。
(6) 提交采集会话的配置。
(7) 调用 VideoOutput 的 Start 方法,进行视频的录制。
(8) 录制结束,保存录制的文件。
关于 OpenHarmony 3.2 Beta 多媒体系列开发,我之前还分享过
《https://mp.weixin.qq.com/s?__biz=MzkzNTIyNTY3Mg==&mid=2247499613&idx=1&sn=73af29d87717531243f070e7e69dfbd3&scene=21#wechat_redirect》
《https://mp.weixin.qq.com/s?__biz=MzkzNTIyNTY3Mg==&mid=2247500816&idx=1&sn=953310bfa91f64f3b922bde5ef99c374&scene=21#wechat_redirect》
《https://mp.weixin.qq.com/s?__biz=MzkzNTIyNTY3Mg==&mid=2247500837&idx=1&sn=c0098dd2475aee364314428b7a1ed7e6&scene=21#wechat_redirect》
这几篇文章,欢迎感兴趣的开发者进行阅读。


评论