前言
很多同学将虚拟列表当做亮点写在简历上面,但是却不知道如何手写,那么这个就不是加分项而是减分项了。
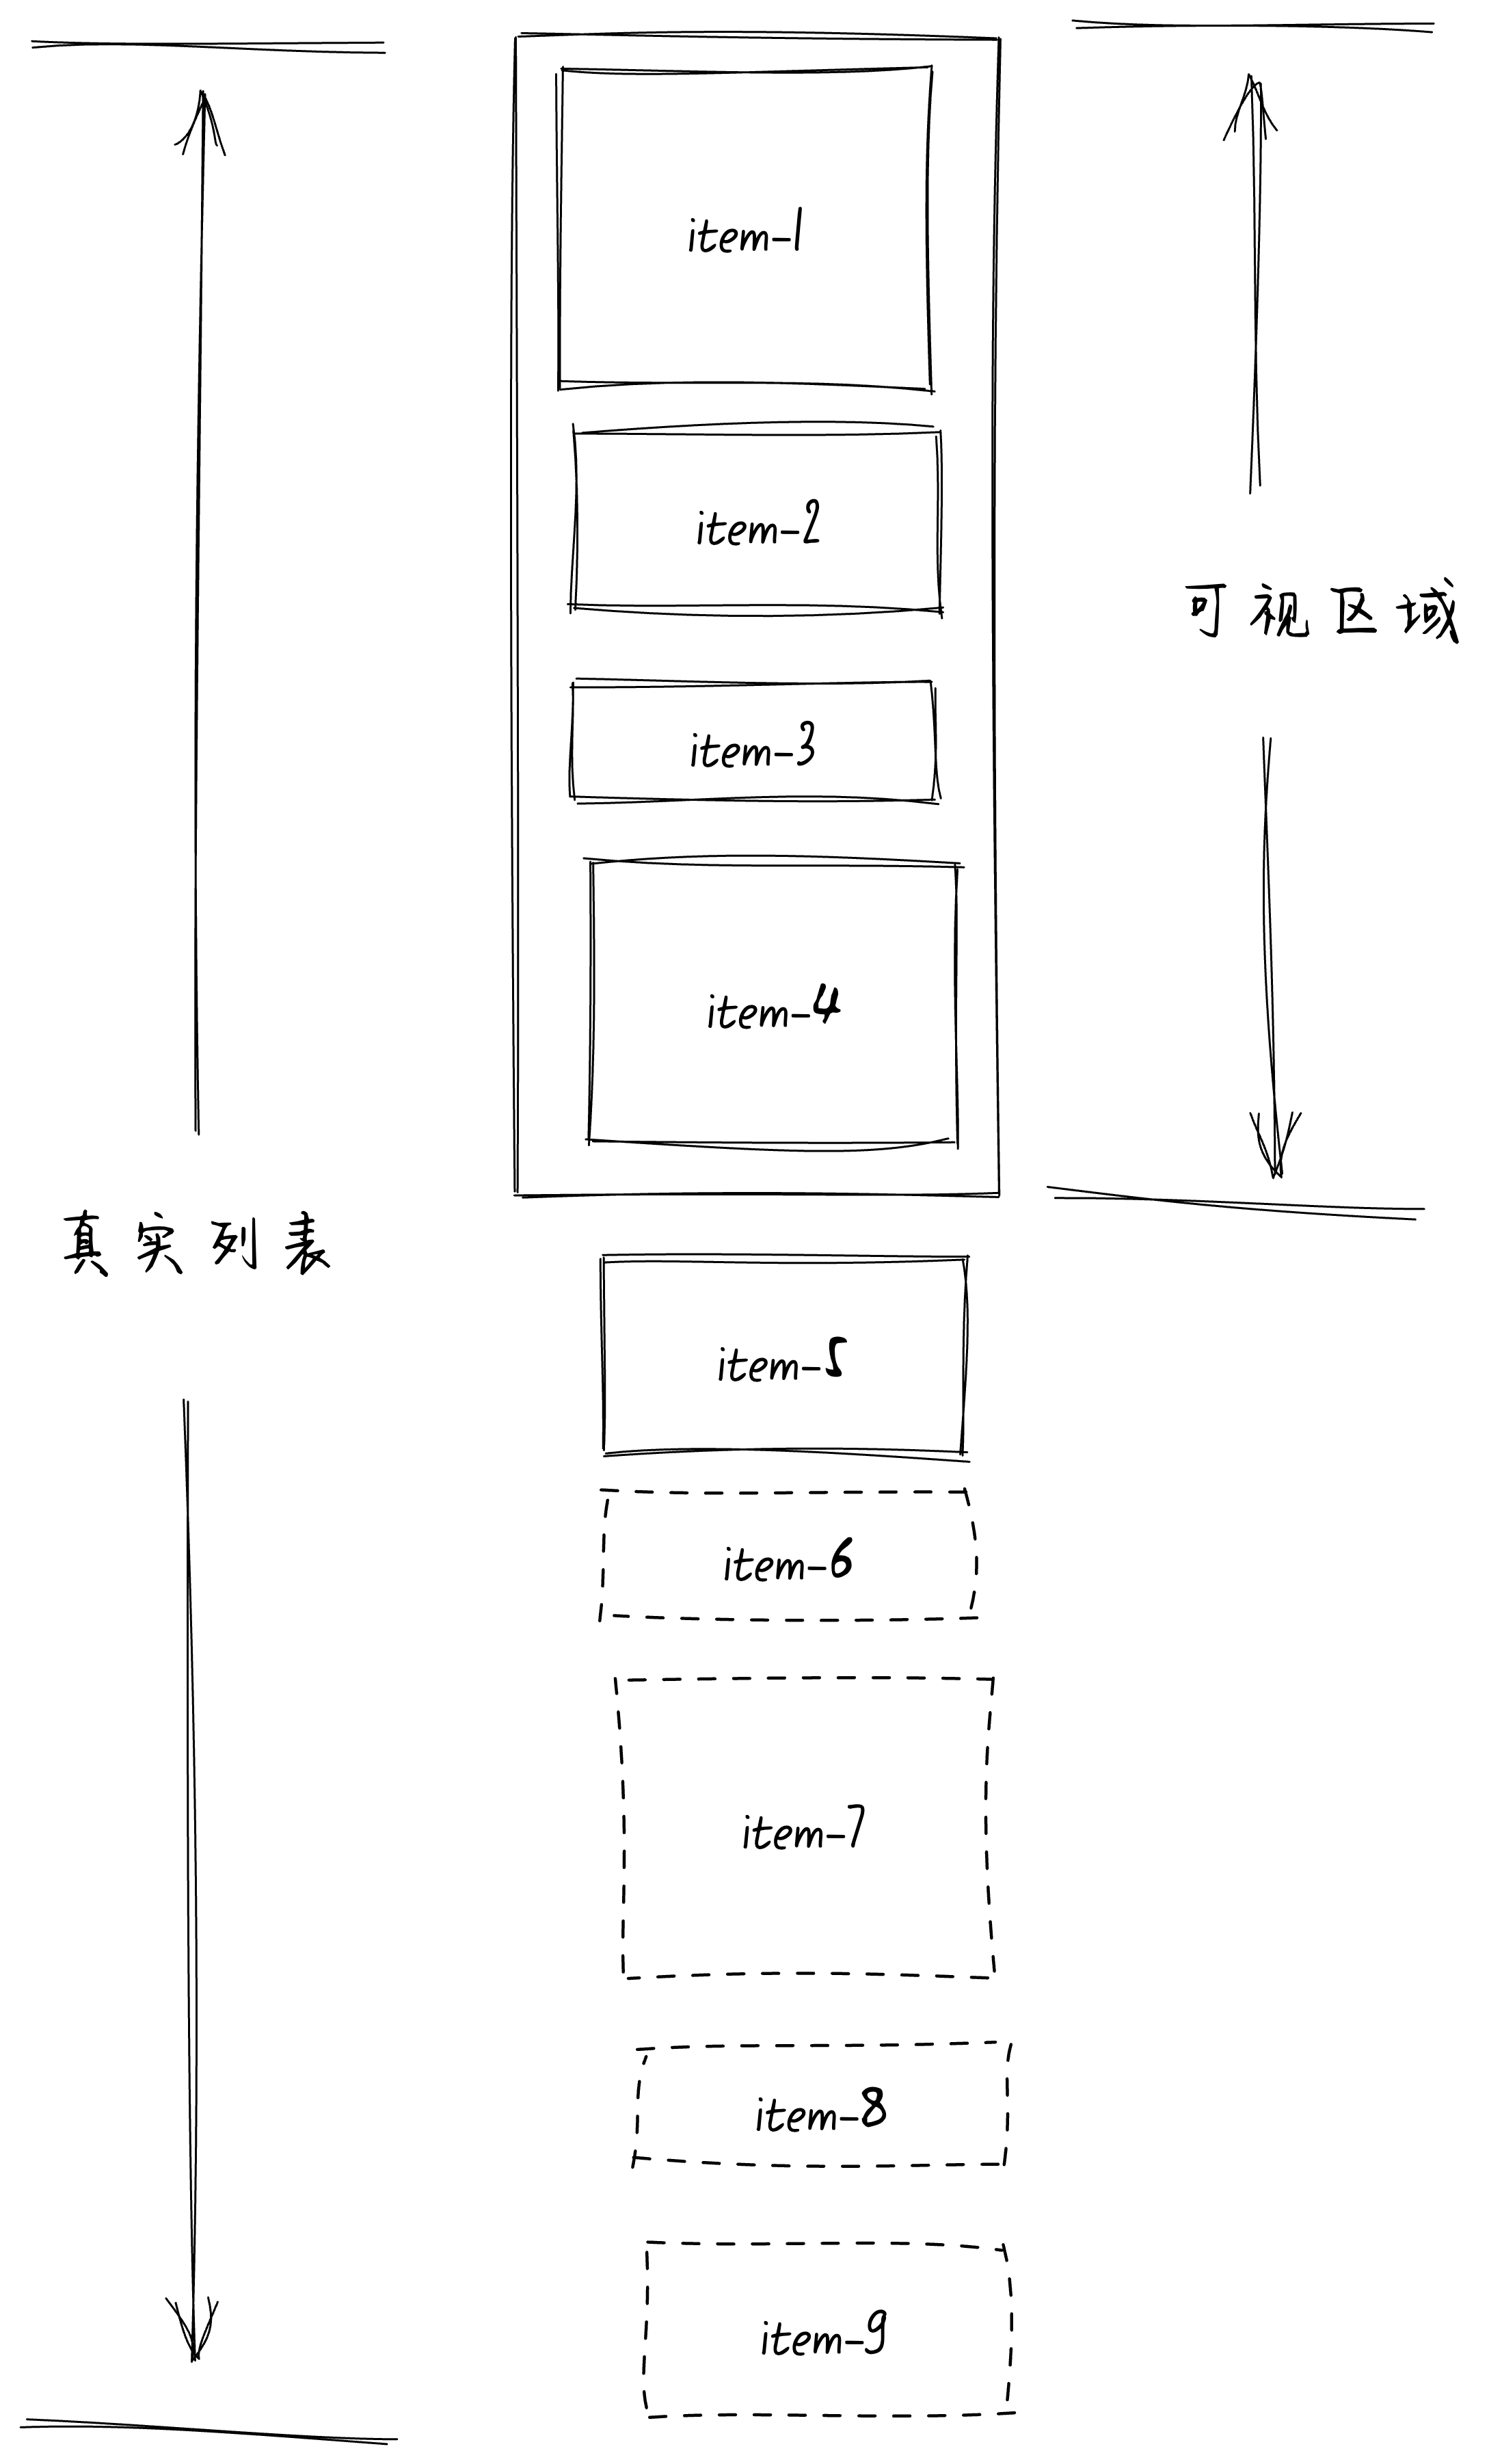
什么是不定高虚拟列表
不定高的意思很简单,就是不知道每一项 item 的具体高度,如下图:
现在我们有个问题,在不定高的情况下我们就不能根据当前滚动条的scrollTop去计算可视区域里面实际渲染的第一个 item 的 index 位置,也就是start的值。
没有start,那么就无法实现在滚动的时候只渲染可视区域的那几个 item 了。
预估高度
既然我们不知道每个 item 的高度,那么就采用预估高度的方式去实现。比如这样:
const { listData, itemSize } = defineProps({ // 列表数据 listData: { type: Array, default: () => [], }, // 预估item高度,不是真实item高度 itemSize: { type: Number, default: 300, },});
复制代码
还是和上一篇一样的套路,计算出当前可视区域的高度containerHeight,然后结合预估的itemSize就可以得到当前可视区域里面渲染的 item 数量。代码如下:
const renderCount = computed(() => Math.ceil(containerHeight.value / itemSize));
复制代码
注意:由于我们是预估的高度,所以这个renderCount的数量是不准的。
如果预估的高度比实际高太多,那么实际渲染的 item 数量就会不够,导致页面下方出现白屏的情况。
如果预估的高度太小,那么这里的 item 数量就会渲染的太多了,性能又没之前那么好。
所以预估 item 高度需要根据实际业务去给一个适当的值,理论上是宁可预估小点,也不预估的大了(大了会出现白屏)。
start 初始值为 0,并且算出了renderCount,此时我们也就知道了可视区域渲染的最后一个end的值。如下:
const end = computed(() => start.value + renderCount.value);
复制代码
和上一篇一样计算 end 时在下方多渲染了一个 item,第一个 item 有一部分滚出可视区域的情况时,如果不多渲染可能就会出现白屏的情况。
有了start和end,那么就知道了可视区域渲染的renderList,代码如下:
const renderList = computed(() => listData.slice(start.value, end.value + 1));
复制代码
这样我们就知道了,初始化时可视区域应该渲染哪些 item 了,但是因为我们之前是给每个 item 预估高度,所以我们应该将这些高度的值纠正过来。
更新高度
为了记录不定高的 list 里面的每个 item 的高度,所以我们需要一个数组来存每个 item 的高度。所以我们需要定义一个positions数组来存这些值。
既然都存了每个 item 的高度,那么同样可以使用top、bottom这两个字段去记录每个 item 在列表中的开始位置和结束位置。注意bottom - top的值肯定等于height的值。
还有一个index字段记录每个 item 的 index 的值。positions定义如下:
const positions = ref< { index: number; height: number; top: number; bottom: number; }[]>([]);
复制代码
positions的初始化值为空数组,那么什么时候给这个数组赋值呢?
答案很简单,虚拟列表渲染的是 props 传入进来的listData。所以我们 watch 监听listData,加上immediate: true。这样就可以实现初始化时给positions赋值,代码如下:
watch(() => listData, initPosition, {  immediate: true,});
function initPosition() {  positions.value = [];  listData.forEach((_item, index) => {    positions.value.push({      index,      height: itemSize,      top: index * itemSize,      bottom: (index + 1) * itemSize,    });  });}
复制代码
遍历listData结合预估的itemSize,我们就可以得出每一个 item 里面的height、top、bottom这几个字段的值。
还有一个问题,我们需要一个元素来撑开滚动条。在定高的虚拟列表中我们是通过itemSize * listData.length得到的。显然这里不能那样做了,由于positions数组中存的是所有 item 的位置,那么最后一个 item 的 bottom 的值就是列表的真实高度。前面也是不准的,会随着我们纠正positions中的值后他就是越来越准的了。
所以列表的真实高度为:
const listHeight = computed( () => positions.value[positions.value.length - 1].bottom);
复制代码
此时positions数组中就已经记录了每个 item 的具体位置,虽然这个位置是错的。接下来我们就需要将这些错误的值纠正过来,如何纠正呢?
答案很简单,使用 Vue 的onUpdated钩子函数,这个钩子函数会在响应式状态变更而更新其 DOM 树之后调用。也就是会在renderList渲染成 DOM 后触发!
此时这些 item 已经渲染成了 DOM 节点,那么我们就可以遍历这些 item 的 DOM 节点拿到每个 item 的真实高度。都知道每个 item 的真实高度了,那么也就能够更新里面所有 item 的top和bottom了。代码如下:
<template>  <div ref="container" class="container" @scroll="handleScroll($event)">    <div class="placeholder" :style="{ height: listHeight + 'px' }"></div>    <div class="list-wrapper" :style="{ transform: getTransform }">      <div        class="card-item"        v-for="item in renderList"        :key="item.index"        ref="itemRefs"        :data-index="item.index"      >        <span style="color: red"          >{{ item.index }}          <img width="200" :src="item.imgUrl" alt="" />        </span>        {{ item.value }}      </div>    </div>  </div></template>
<script setup>onUpdated(() => {  updatePosition();});
function updatePosition() {  itemRefs.value.forEach((el) => {    const index = +el.getAttribute("data-index");    const realHeight = el.getBoundingClientRect().height;    let diffVal = positions.value[index].height - realHeight;    const curItem = positions.value[index];    if (diffVal !== 0) {      // 说明item的高度不等于预估值      curItem.height = realHeight;      curItem.bottom = curItem.bottom - diffVal;      for (let i = index + 1; i < positions.value.length - 1; i++) {        positions.value[i].top = positions.value[i].top - diffVal;        positions.value[i].bottom = positions.value[i].bottom - diffVal;      }    }  });}</script>
复制代码
使用:data-index="item.index"将index绑定到 item 上面,更新时就可以通过+el.getAttribute("data-index")拿到对应 item 的index。
itemRefs中存的是所有 item 的 DOM 元素,遍历他就可以拿到每一个 item,然后拿到每个 item 在长列表中的index和真实高度realHeight。
diffVal的值是预估的高度比实际的高度大多少,如果diffVal的值不等于 0,说明预估的高度不准。此时就需要将当前 item 的高度height更新了,由于高度只会影响bottom的值,所以只需要更新当前 item 的height和bottom。
由于当前 item 的高度变了,假如diffVal的值为正值,说明我们预估的高度多了。此时我们需要从当前 item 的下一个元素开始遍历,直到遍历完整个长列表。我们预估多了,那么只需要将后面的所有 item 整体都向上移一移,移动的距离就是预估的差值diffVal。
所以这里需要从index + 1开始遍历,将遍历到的所有元素的top和bottom的值都减去diffVal。
将可视区域渲染的所有 item 都遍历一遍,将每个 item 的高度和位置都纠正过来,同时会将后面没有渲染到的 item 的top和bottom都纠正过来,这样就实现了高度的更新。理论上从头滚到尾,那么整个长列表里面的所有位置和高度都纠正完了。
开始滚动
通过前面我们已经实现了预估高度值的纠正,渲染过的 item 的高度和位置都是纠正过后的了。此时我们需要在滚动后如何计算出新的start的位置,以及offset偏移量的值。
还是和定高同样的套路,当滚动条在 item 中间滚动时复用浏览器的滚动条,从一个 item 滚到另外一个 item 时才需要更新 start 的值以及 offset 偏移量的值。
此时应该如何计算最新的start值呢?
很简单!在positions中存了两个字段分别是top和bottom,分别表示当前 item 的开始位置和结束位置。如果当前滚动条的scrollTop刚好在top和bottom之间,也就是scrollTop >= top && scrollTop < bottom,那么是不是就说明当前刚好滚到这个 item 的位置呢。
并且由于在positions数组中bottom的值是递增的,那么问题不就变成了查找第一个 item 的scrollTop < bottom。所以我们得出:
function getStart(scrollTop) { return positions.value.findIndex((item) => scrollTop < item.bottom);}
复制代码
每次 scroll 滚动都会触发一次这个查找,那么我们可以优化上面的算法吗?
positions数组中的bottom字段是递增的,这很符合二分查找的规律。不了解二分查找的同学可以看看 leetcode 上面的这道题: https://leetcode.cn/problems/search-insert-position/description/。
所以上面的代码可以优化成这样:
function getStart(scrollTop) { let left = 0; let right = positions.value.length - 1; while (left <= right) { const mid = Math.floor((left + right) / 2); if (positions.value[mid].bottom === scrollTop) { return mid + 1; } else if (positions.value[mid].bottom < scrollTop) { left = mid + 1; } else { right = mid - 1; } } return left;}
复制代码
和定高的虚拟列表一样,当在start的 item 中滚动时直接复用浏览器的滚动,无需做任何事情。所以此时的offset偏移量就应该等于当前start的 item 的top值,也就是start的 item 前面的所有 item 加起来的高度。所以得出offset的值为:
offset.value = positions.value[start.value].top;
复制代码
可能有的小伙伴会迷惑,在start的 item 中的滚动值为什么不算到offset偏移中去呢?
因为在start的 item 范围内滚动时都是直接使用的浏览器滚动,已经有了 scrollTop,所以无需加到offset偏移中去。
所以我们得出当 scroll 事件触发时代码如下:
function handleScroll(e) { const scrollTop = e.target.scrollTop; start.value = getStart(scrollTop); offset.value = positions.value[start.value].top;}
复制代码
同样offset偏移值使用translate3d应用到可视区域的 div 上面,代码如下:、
<template>  <div ref="container" class="container" @scroll="handleScroll($event)">    <div class="placeholder" :style="{ height: listHeight + 'px' }"></div>    <div class="list-wrapper" :style="{ transform: getTransform }">      ...省略    </div>  </div></template>
<script setup>const props = defineProps({  offset: {    type: Number,    default: 0,  },});const getTransform = computed(() => `translate3d(0,${props.offset}px,0)`);</script>
复制代码
完整的父组件代码如下:
<template>  <div style="height: 100vh; width: 100vw">    <VirtualList :listData="data" :itemSize="50" />  </div></template>
<script setup>import VirtualList from "./dynamic.vue";import { faker } from "@faker-js/faker";import { ref } from "vue";
const data = ref([]);for (let i = 0; i < 1000; i++) {  data.value.push({    index: i,    value: faker.lorem.sentences(),  });}</script>
<style>html {  height: 100%;}body {  height: 100%;  margin: 0;}#app {  height: 100%;}</style>
复制代码
完整的虚拟列表子组件代码如下:
<template>  <div ref="container" class="container" @scroll="handleScroll($event)">    <div class="placeholder" :style="{ height: listHeight + 'px' }"></div>    <div class="list-wrapper" :style="{ transform: getTransform }">      <div        class="card-item"        v-for="item in renderList"        :key="item.index"        ref="itemRefs"        :data-index="item.index"      >        <span style="color: red"          >{{ item.index }}          <img width="200" :src="item.imgUrl" alt="" />        </span>        {{ item.value }}      </div>    </div>  </div></template>
<script setup lang="ts">import { ref, computed, watch, onMounted, onUpdated } from "vue";const { listData, itemSize } = defineProps({  // 列表数据  listData: {    type: Array,    default: () => [],  },  // 预估item高度,不是真实item高度  itemSize: {    type: Number,    default: 300,  },});
const container = ref(null);const containerHeight = ref(0);const start = ref(0);const offset = ref(0);const itemRefs = ref();const positions = ref<  {    index: number;    height: number;    top: number;    bottom: number;  }[]>([]);
const end = computed(() => start.value + renderCount.value);const renderList = computed(() => listData.slice(start.value, end.value + 1));const renderCount = computed(() => Math.ceil(containerHeight.value / itemSize));const listHeight = computed(  () => positions.value[positions.value.length - 1].bottom);const getTransform = computed(() => `translate3d(0,${offset.value}px,0)`);
watch(() => listData, initPosition, {  immediate: true,});
function handleScroll(e) {  const scrollTop = e.target.scrollTop;  start.value = getStart(scrollTop);  offset.value = positions.value[start.value].top;}
function getStart(scrollTop) {  let left = 0;  let right = positions.value.length - 1;  while (left <= right) {    const mid = Math.floor((left + right) / 2);    if (positions.value[mid].bottom === scrollTop) {      return mid + 1;    } else if (positions.value[mid].bottom < scrollTop) {      left = mid + 1;    } else {      right = mid - 1;    }  }  return left;}
function initPosition() {  positions.value = [];  listData.forEach((_item, index) => {    positions.value.push({      index,      height: itemSize,      top: index * itemSize,      bottom: (index + 1) * itemSize,    });  });}
function updatePosition() {  itemRefs.value.forEach((el) => {    const index = +el.getAttribute("data-index");    const realHeight = el.getBoundingClientRect().height;    let diffVal = positions.value[index].height - realHeight;    const curItem = positions.value[index];    if (diffVal !== 0) {      // 说明item的高度不等于预估值      curItem.height = realHeight;      curItem.bottom = curItem.bottom - diffVal;      for (let i = index + 1; i < positions.value.length - 1; i++) {        positions.value[i].top = positions.value[i].top - diffVal;        positions.value[i].bottom = positions.value[i].bottom - diffVal;      }    }  });}
onMounted(() => {  containerHeight.value = container.value.clientHeight;});
onUpdated(() => {  updatePosition();});</script>
<style scoped>.container {  height: 100%;  overflow: auto;  position: relative;}
.placeholder {  position: absolute;  left: 0;  top: 0;  right: 0;  z-index: -1;}
.card-item {  padding: 10px;  color: #777;  box-sizing: border-box;  border-bottom: 1px solid #e1e1e1;}</style>
复制代码
总结
这篇文章我们讲了不定高的虚拟列表如何实现,首先给每个 item 设置一个预估高度itemSize。然后根据传入的长列表数据listData初始化一个positions数组,数组中的top、bottom、height等属性表示每个 item 的位置。然后根据可视区域的高度加上itemSize算出可视区域内可以渲染多少renderCount个 item。接着就是在onUpdated钩子函数中根据每个 item 的实际高度去修正positions数组中的值。
在滚动时查找第一个 item 的 bottom 大于 scrollTop,这个 item 就是start的值。offset偏移的值为start的top属性。
值得一提的是如果不定高的列表中有图片就不能在onUpdated钩子函数中修正positions数组中的值,而是应该监听图片加载完成后再去修正positions数组。可以使用 ResizeObserver 去监听渲染的这一堆 item,注意ResizeObserver的回调会触发两次,第一次为渲染 item 的时候,第二次为 item 中的图片加载完成后。
文章转载自:前端欧阳
原文链接:https://www.cnblogs.com/heavenYJJ/p/18634226
体验地址:http://www.jnpfsoft.com/?from=infoq


评论