
Spring Boot 中的 “依赖管理和自动配置” 详解透彻到底(附 + 详细代码流程)
1. 如何理解 “ 约定优于配置 ”
约定优于配置(Convention over Configuration / CoC),又称约定编程,是一种软件设计规范,本质上是对系统,类库或框架中一些东西。
一个大众化合理的默认值(缺省值)
例如在模型中存在一个名为 User 的类,那么对应到数据库会存在一个名为 user 的表,只有偏离这个约定时才需要做相关的配置(例如你想将表名命名为:t_user 等非 user 时才需要写关于这个名字的配置)
简单来说就是假如你所期待的配置 与 约定的配置 一致,那么就可以不做任何配置,约定不符合期待时,才需要对约定进行替换配置。
约定优于配置:为什么要搞一个“约定优于配置”约定其实就是一个规范,遵循了规范,那么就存在通用性。存在了通用性,那么事情就会变得相对简单 ,程序员之间的沟通成本就会降低,工作效率会提升,合作也会变得更加简单。
生活中,这样的情况,大量存在:比如:两个都是男生,你说一起去上厕所去,那么,他们两个人都是(默认,约定好的都是去男生厕所,而特意说明是:去女生厕所。)
注意:误区:默认是采用约定的,但是你配置了,还是采用你的配置的信息的。
2. Spring Boot 依赖管理 和 自动配置
2.1 Spring Boot 的依赖管理
2.1.1 什么是依赖管理
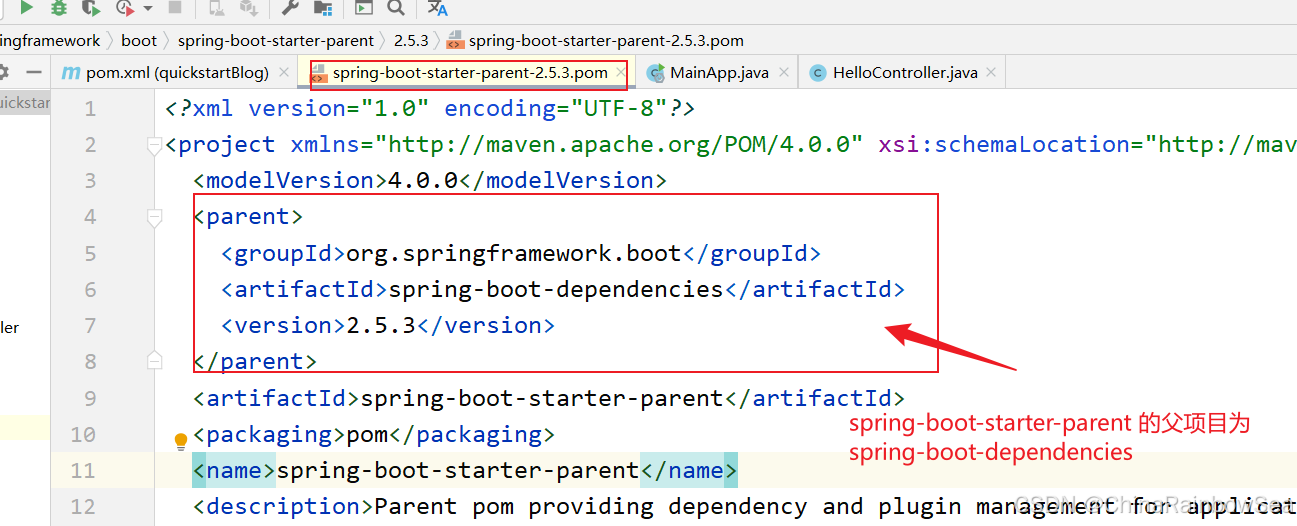
spring-boot-starter-parent 还有父项目,声明了开发中常用的依赖的版本号
并且进行 自动版本仲裁 ,即如果程序员没有指定某个 依赖的
jar的版本,则以父项目指定的版本为准。
2.1.2 修改自动仲裁 / 默认版本号
如果 Spring Boot 当中默认配置的 jar 依赖的版本,不是,我们所想要的该如何配置修改成我们自己想要的呢。
如何修改 Spring Boot 当中对应 jar。
演示: 将 SpringBoot mysql 驱动修改成 5.1.49 版本的。
首先,我们先要学会如何查看到对应我们所需的 jar 在 Spring Boot 的默认配置当中使用的是什么版本的。
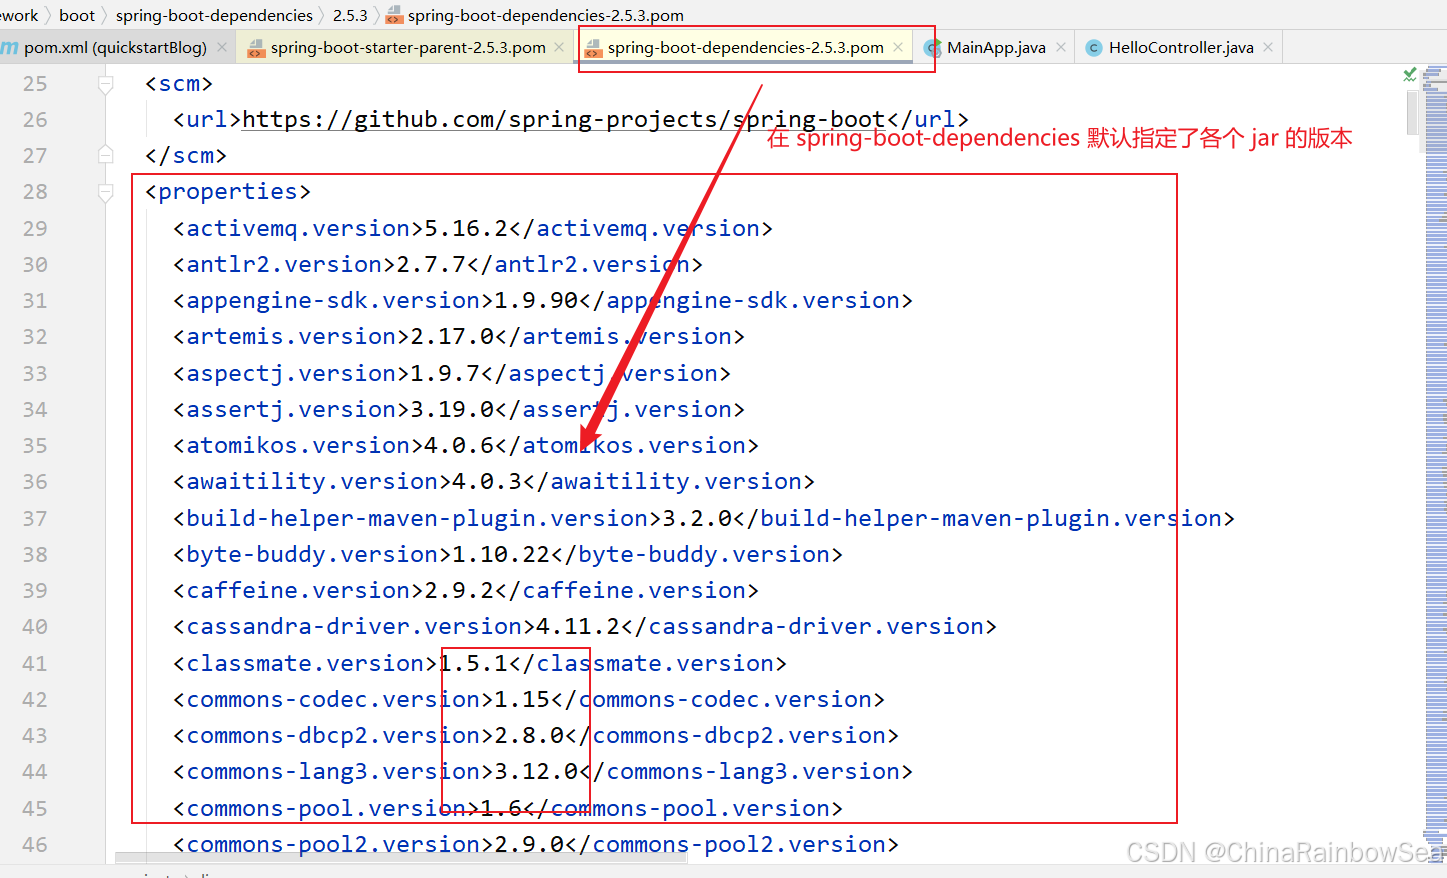
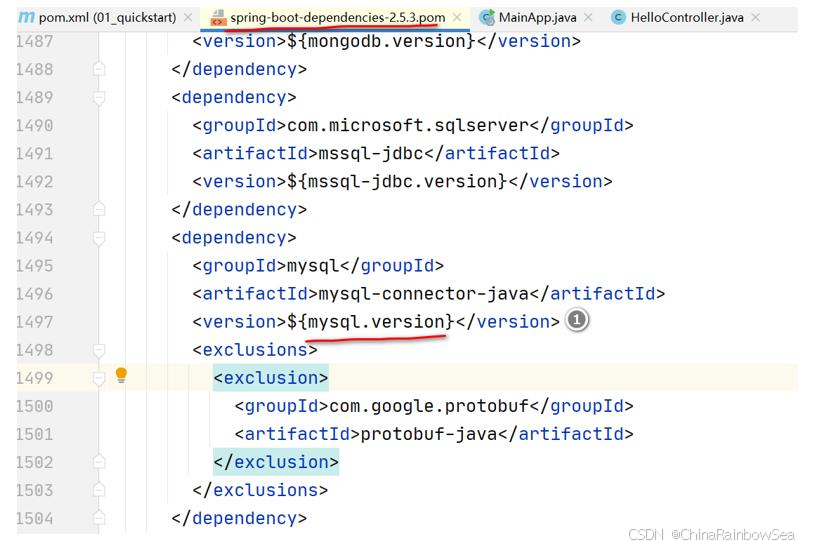
在 spring-boot-dependencies\2.5.3\spring-boot-dependencies-2.5.3.pom,中我们可以找到对应的
jar包的依赖版本,如下图所示:这里 Spring Boot 对于 MySQL 的依赖默认配置是8.0.26的
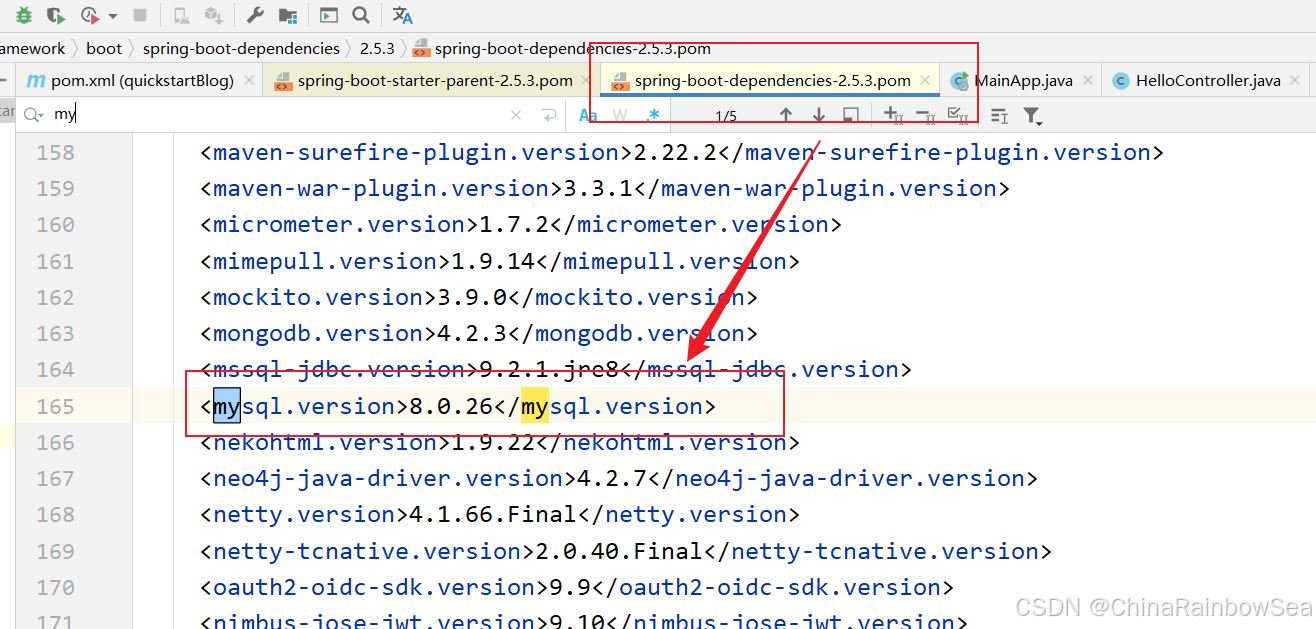
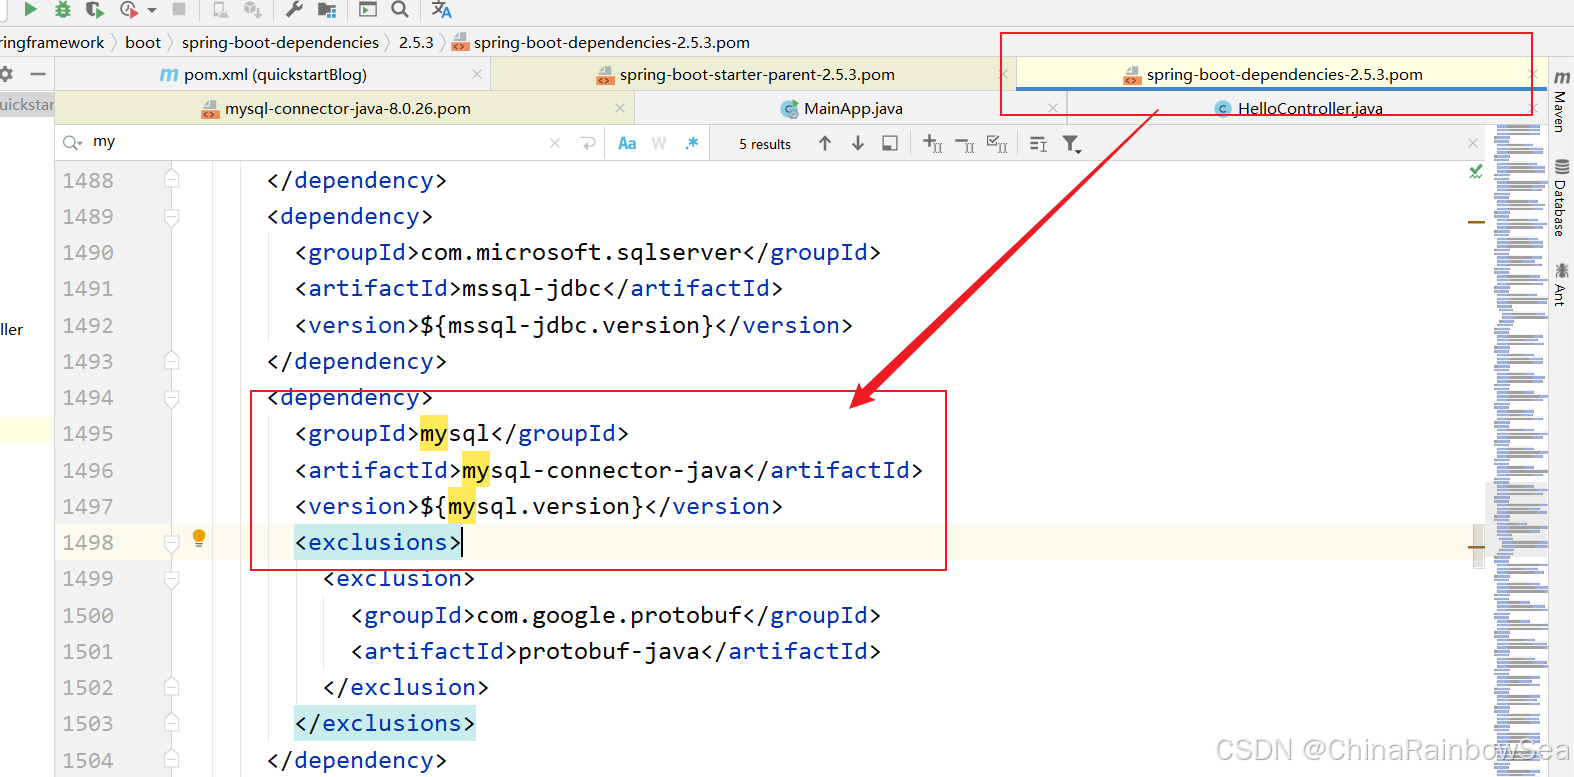
查 看 spring-boot-dependencies.pom 里 面 规 定 当前 依 赖 的 版 本 对 应 的 key , 这 里 是 mysql.version
修改 Spring Boot 当中对应 jar;有两种方式:
方式一: 直接在项目的
pom.xml文件当中直接导入,自己想要的jar的版本即可。方式二: 和方式一是一样的,不同的是编写方式,有所不同:“方式二:是将
jar信息和jar的版本信息分开来编写的了”。
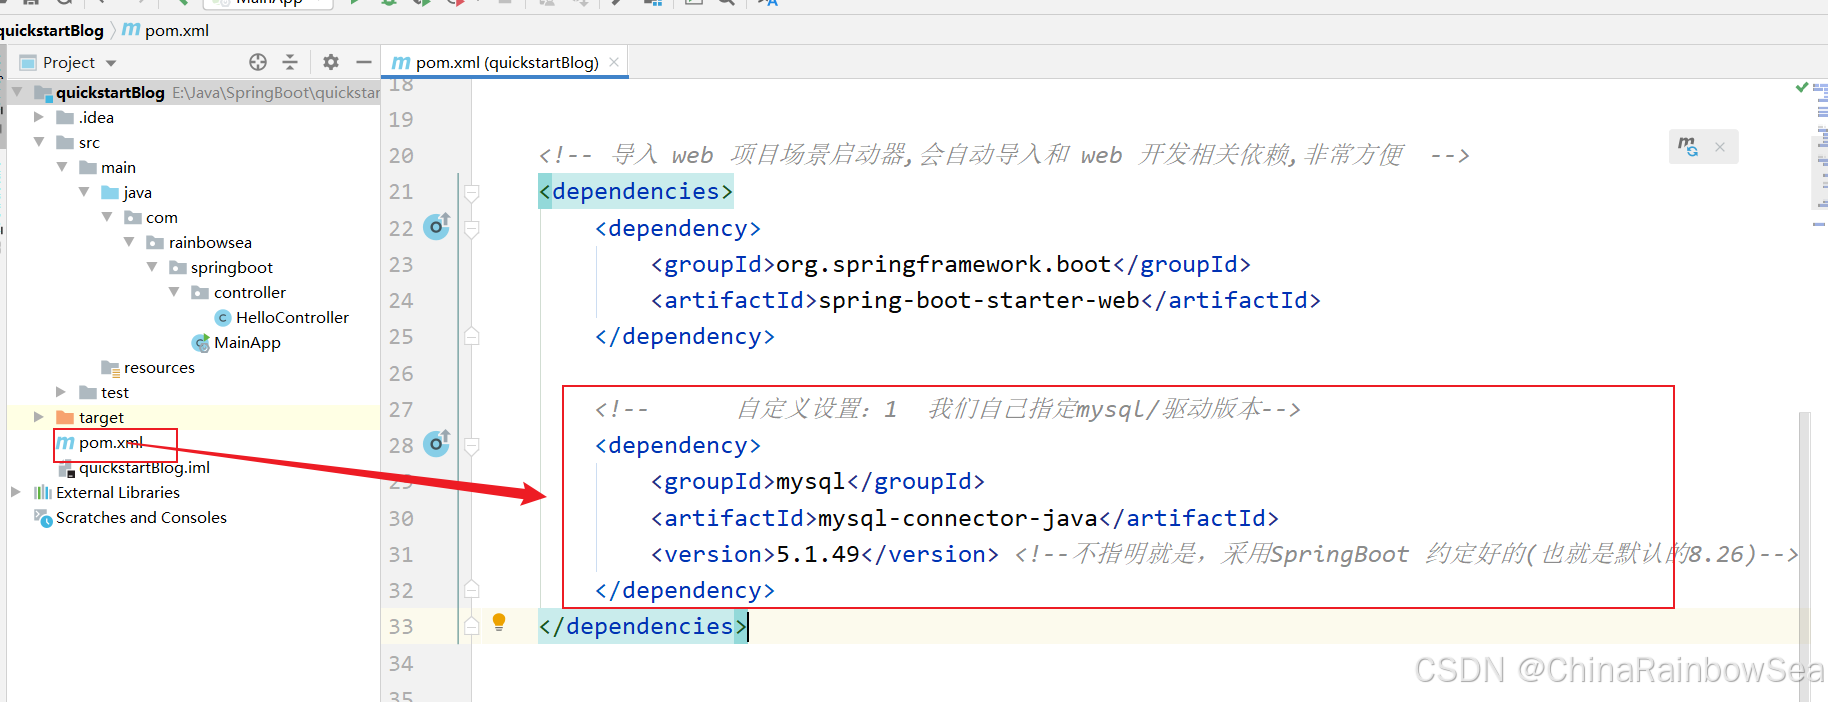
方式一: 修改 pom.xml 重写配置 当更新 Maven 时,就依赖到新的 ,mysql 驱动。
直接导入我们自己想要的 依赖的jar 的配置,然后,更新 Maven 即可。
然后,我们在刷新 Maven,重新加载 jar
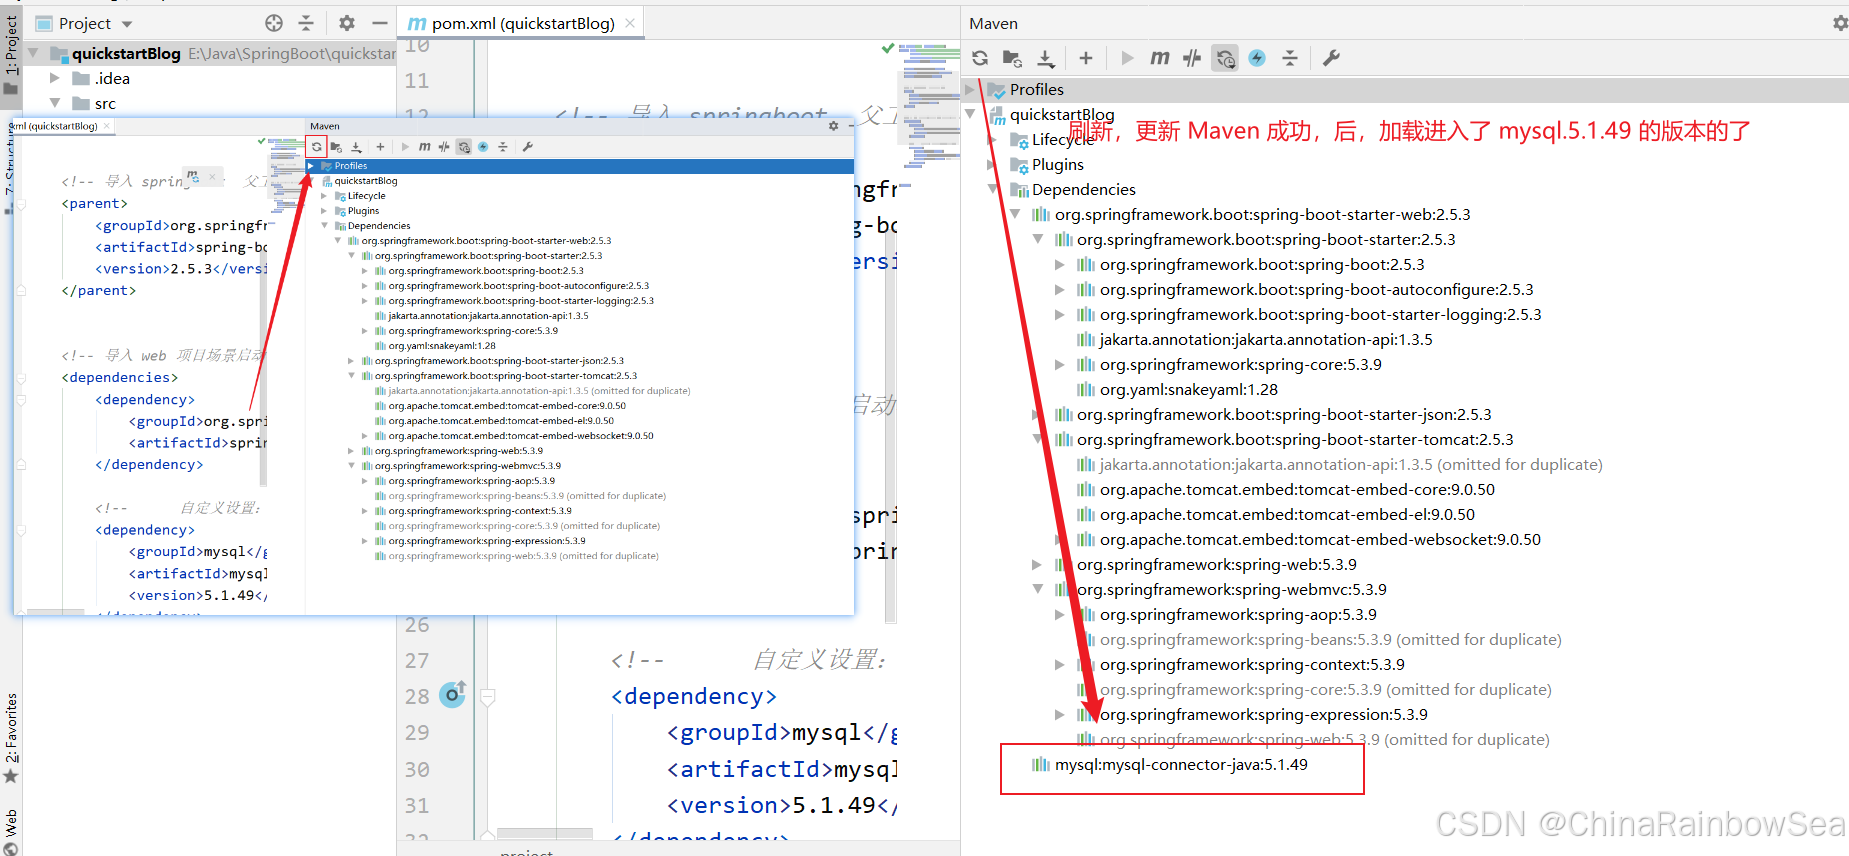
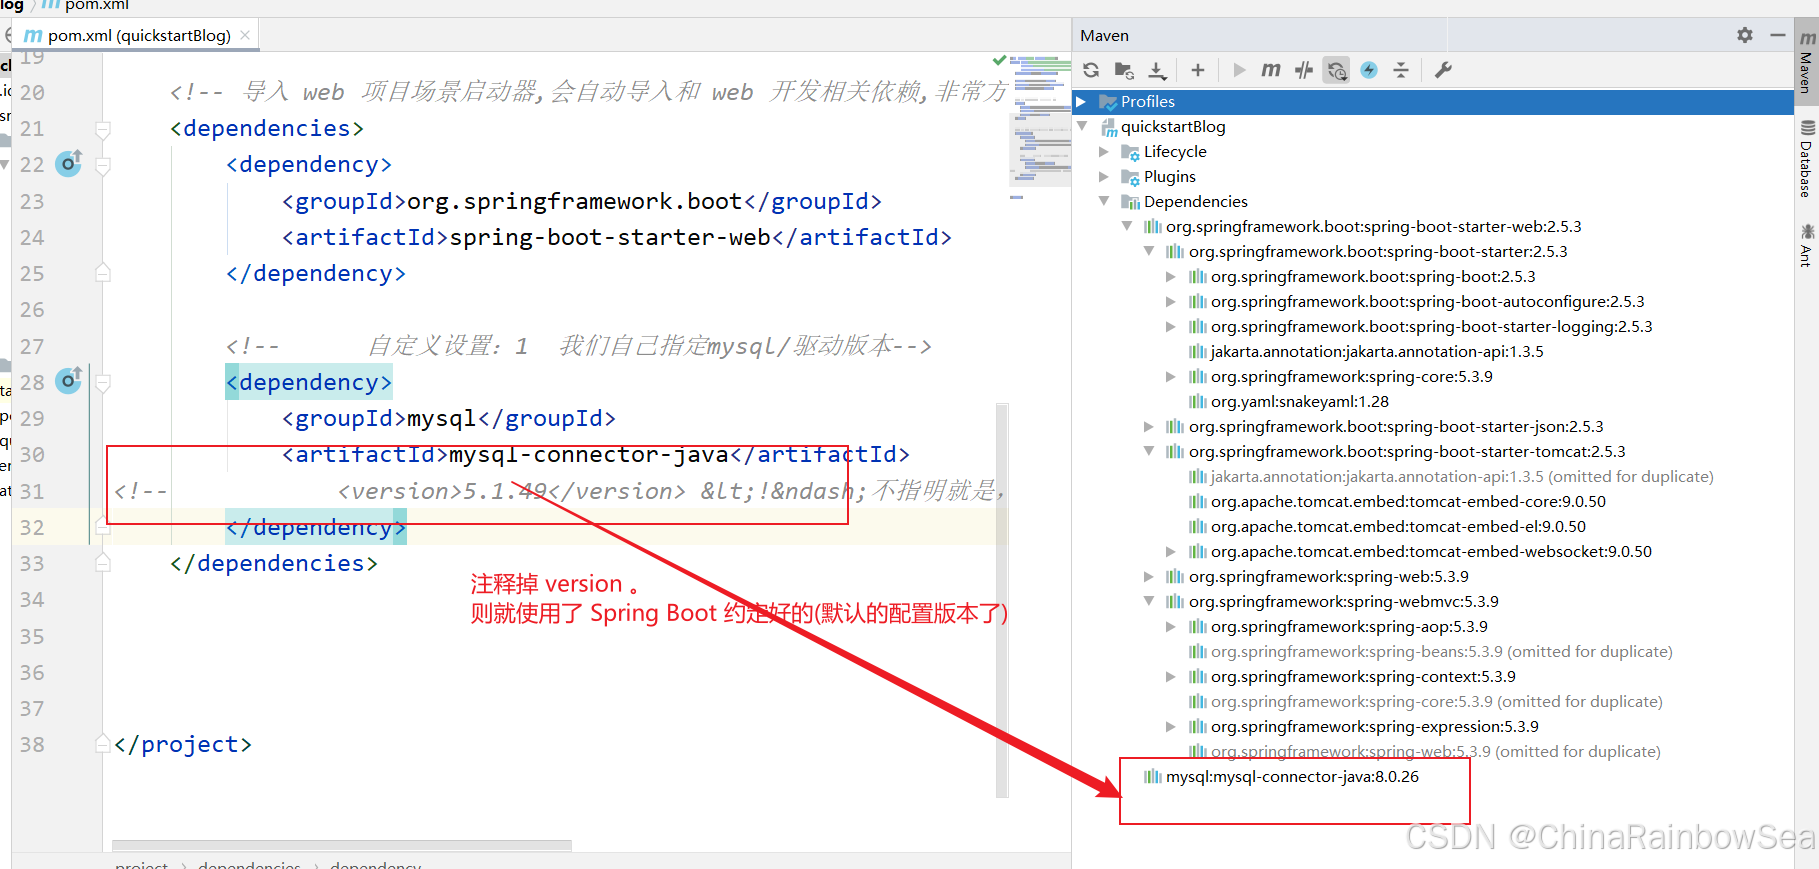
注意: 如果配置的依赖
jar包时,不指明就是 version 版本的话,就会采用 SpringBoot 约定好的(也就是默认的 8.26)版本的。如下:我们将指明的版本的 version 注释掉,再次更新,看看。
完整的 pom.xml 信息。
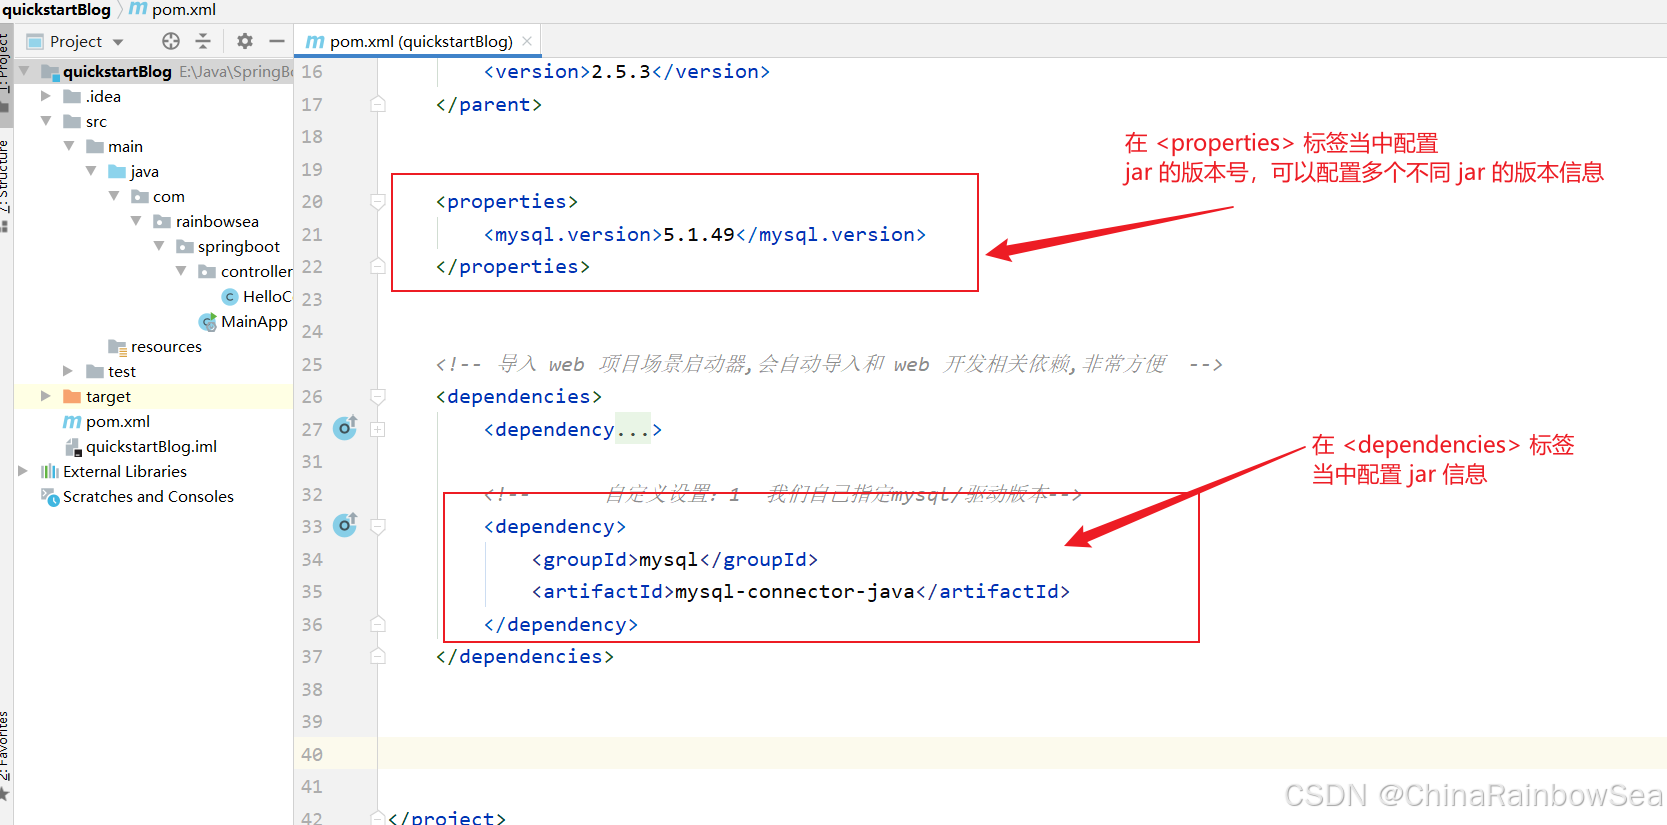
方式二: 将依赖jar 包的配置信息,和配置版本分开来编写。
在
<properties>标签中,配置 jar 的版本信息 ,可以配置多个不同的 jar 的版本信息。在
<dependencies>标签中,配置 jar 的 配置坐标信息 ,可以配置多个 jar
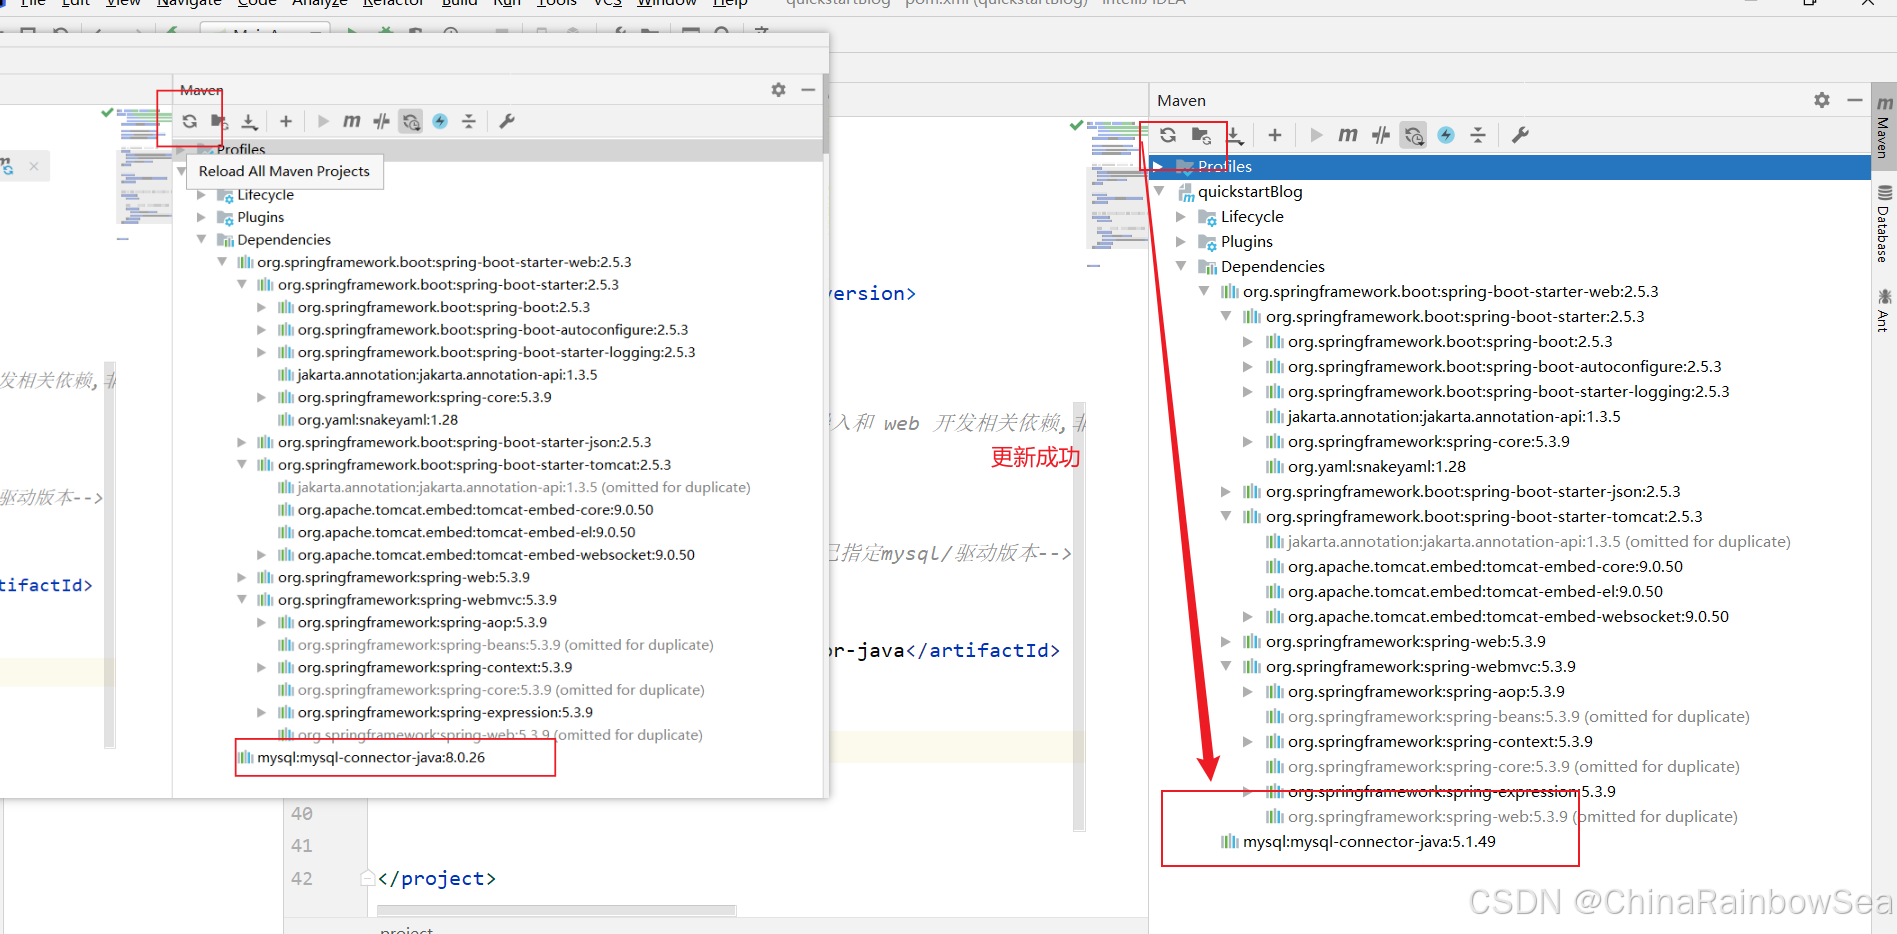
更新 Maven ,重新加载 jar 。
完整的 pom.xml 信息。
3.1 starter 场景启动器
3.1.1 starter 场景启动器的说明介绍
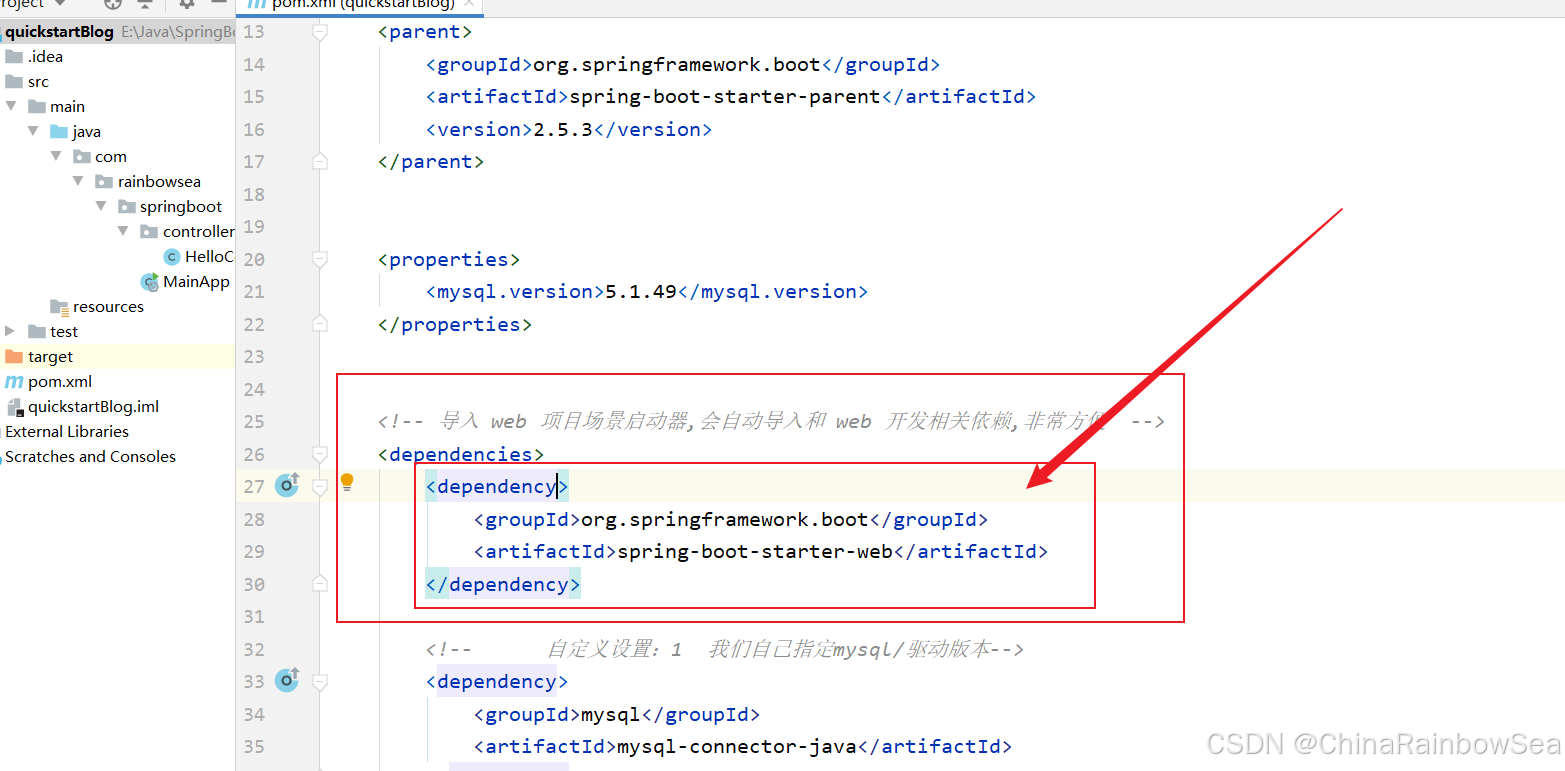
开发中我们引入了相关场景的 starter,这个场景中所有的相关依赖都引入进来了,比如:我们之前学习到的 web 开发引入了,该 starter 将导入与 web 开发相关的所有包。

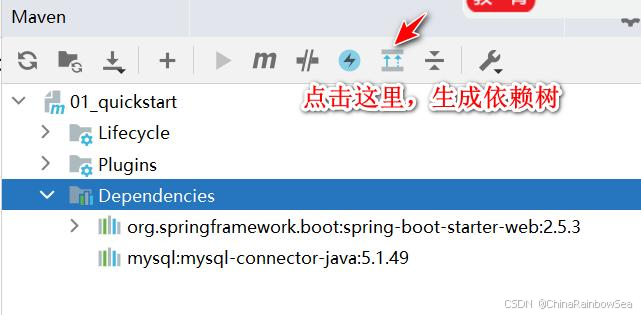
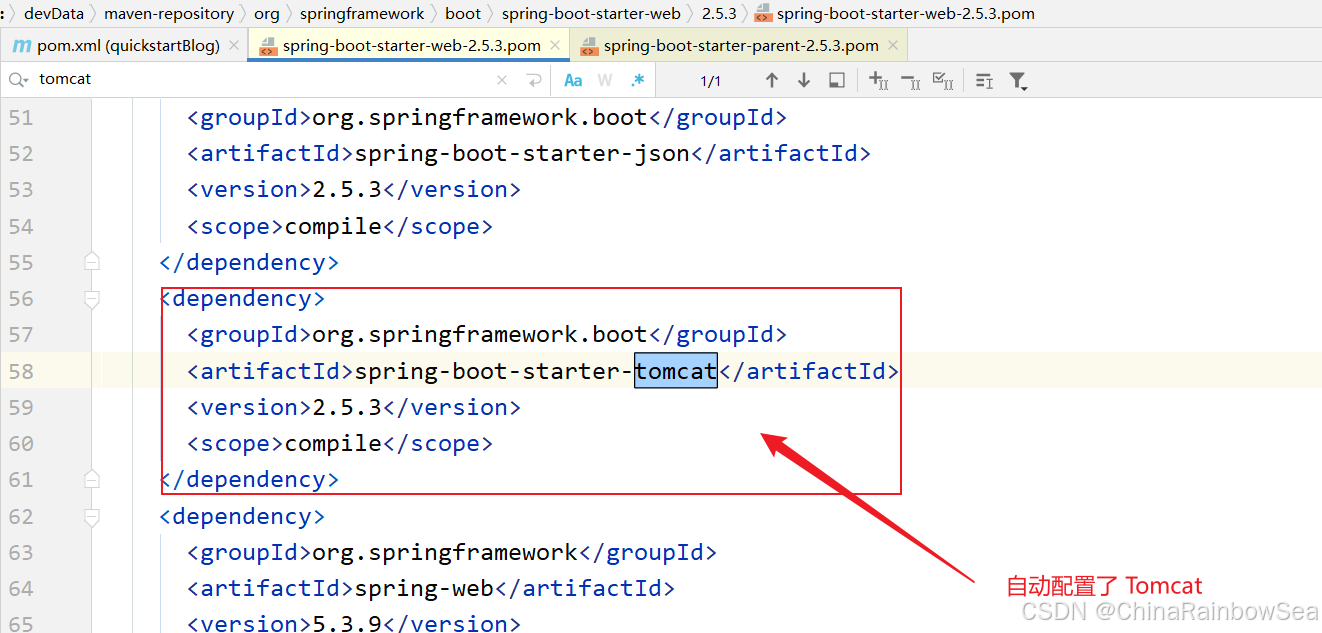
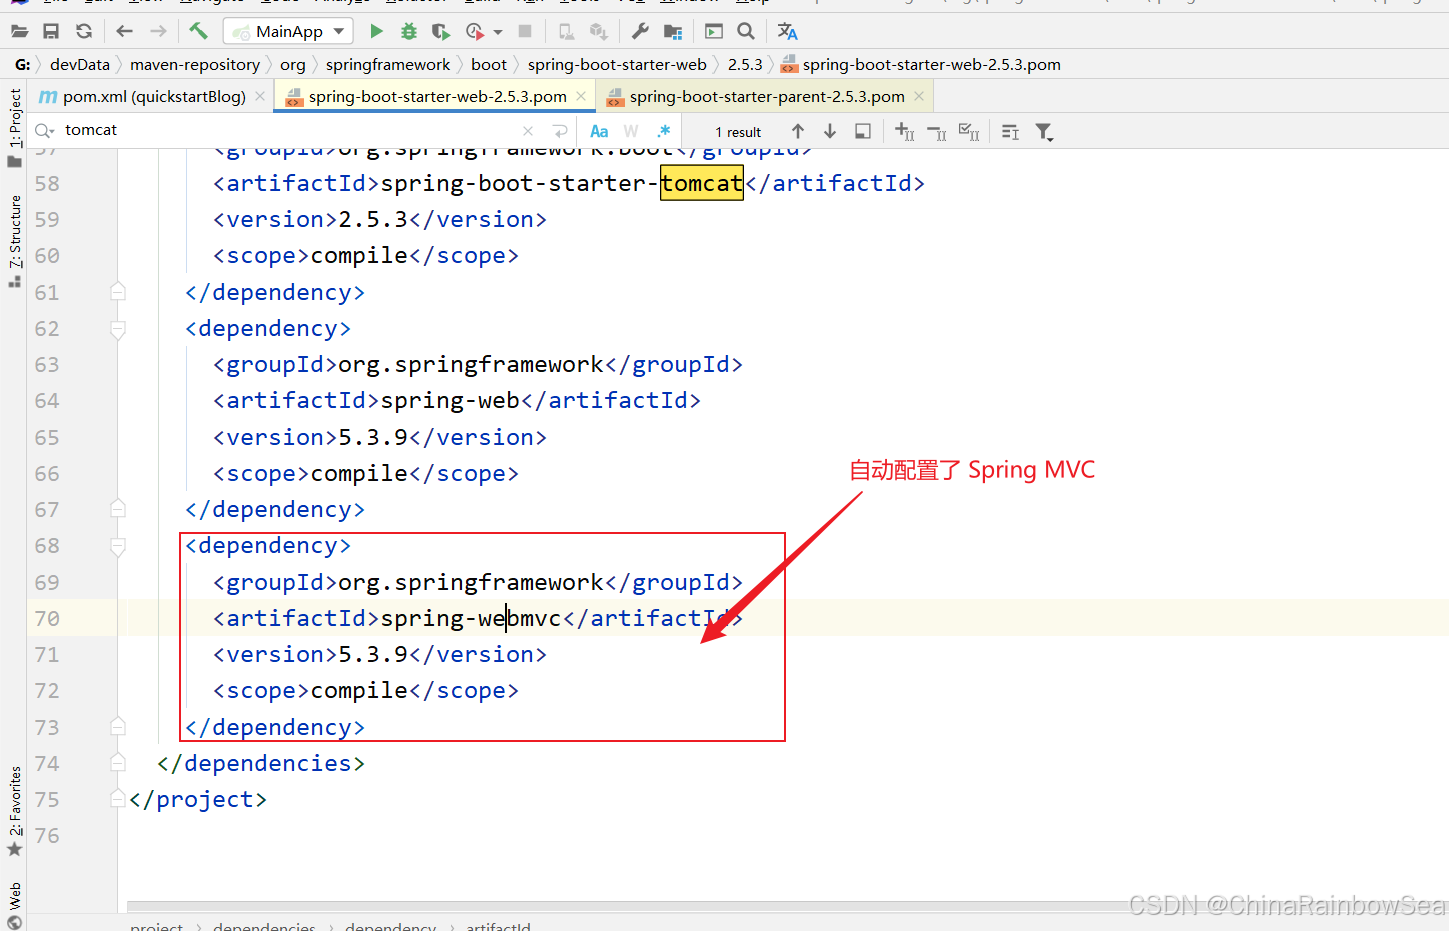
依赖树 : 可以看到 spring-boot-starter-web ,帮我们引入了 spring-web mvc,spring-web 开发模块,还引入了 spring-boot-starter-tomcat 场景,spring-boot-starter-json 场景,这些场景下面又引入了一大堆相关的包,这些依赖项可以快速启动和运行一个项目,提高开发效率.
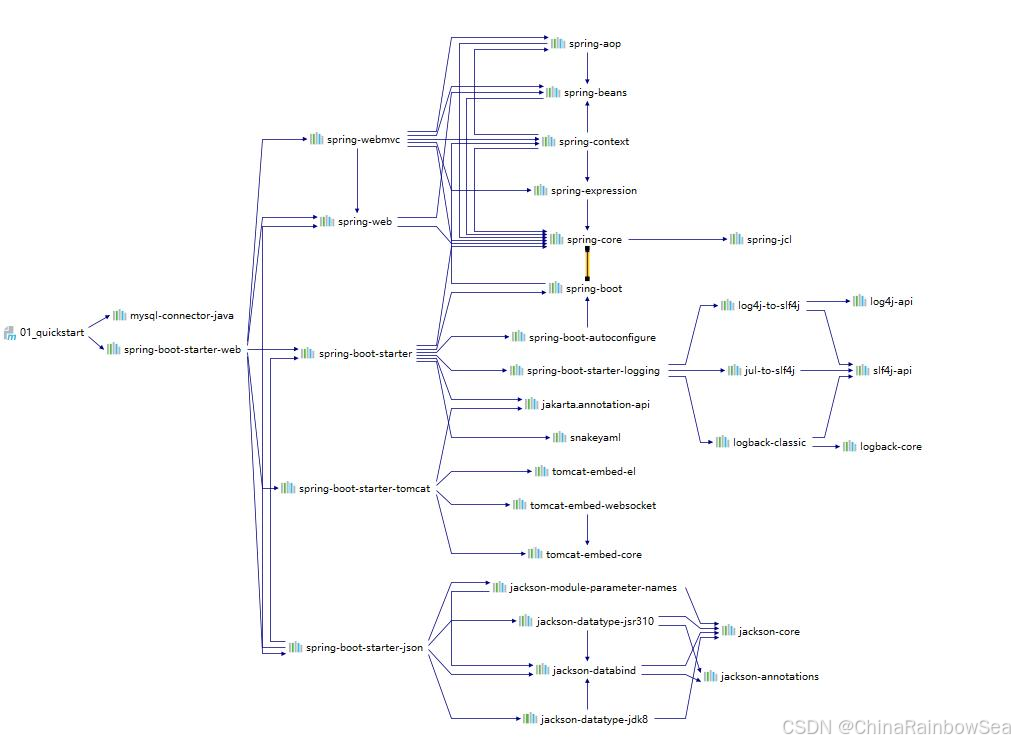
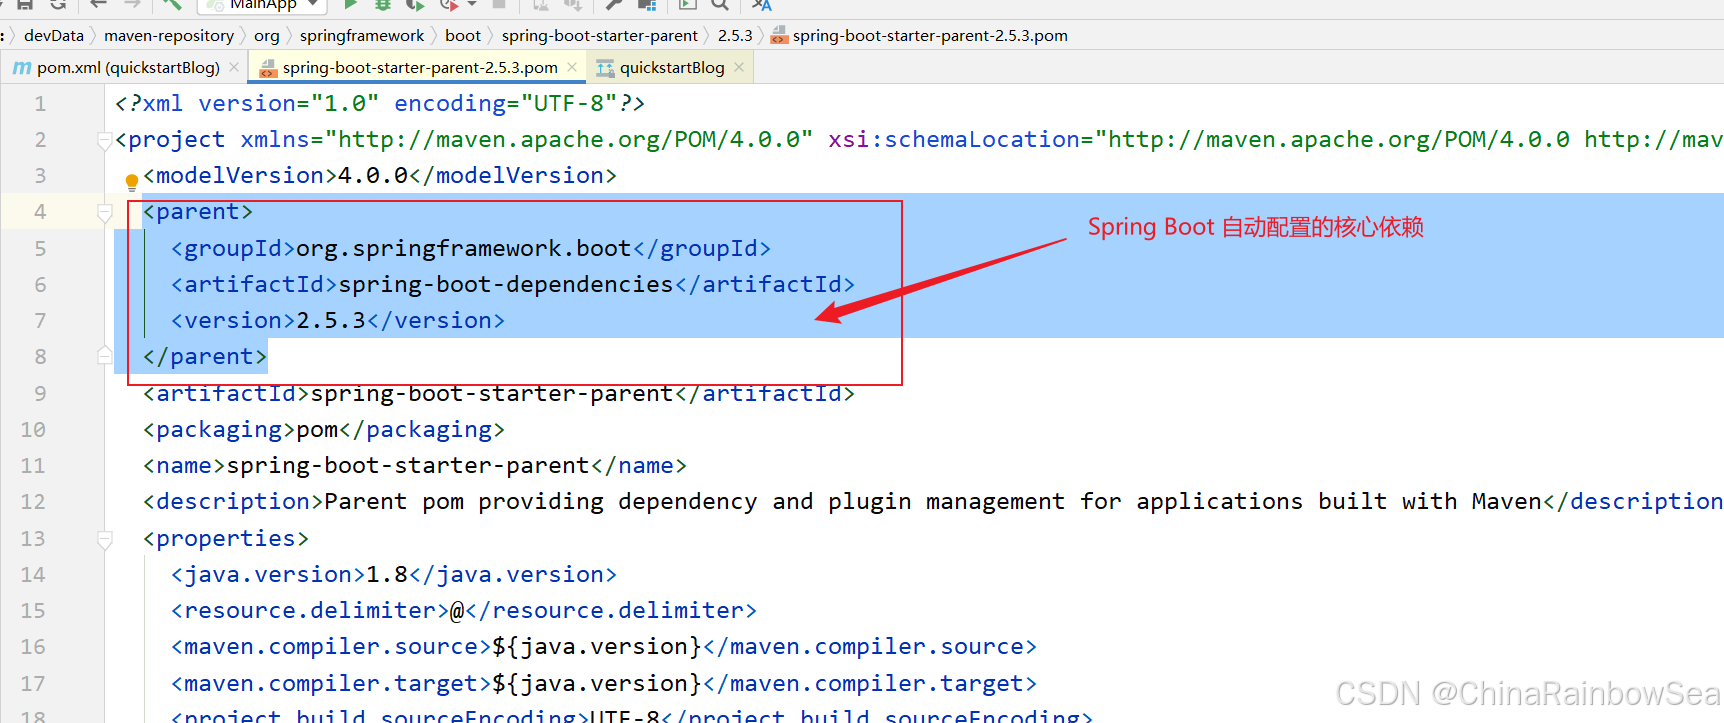
所有场景启动器最基本的依赖就是 spring-boot-starter, 前面的依赖树分析可以看到,
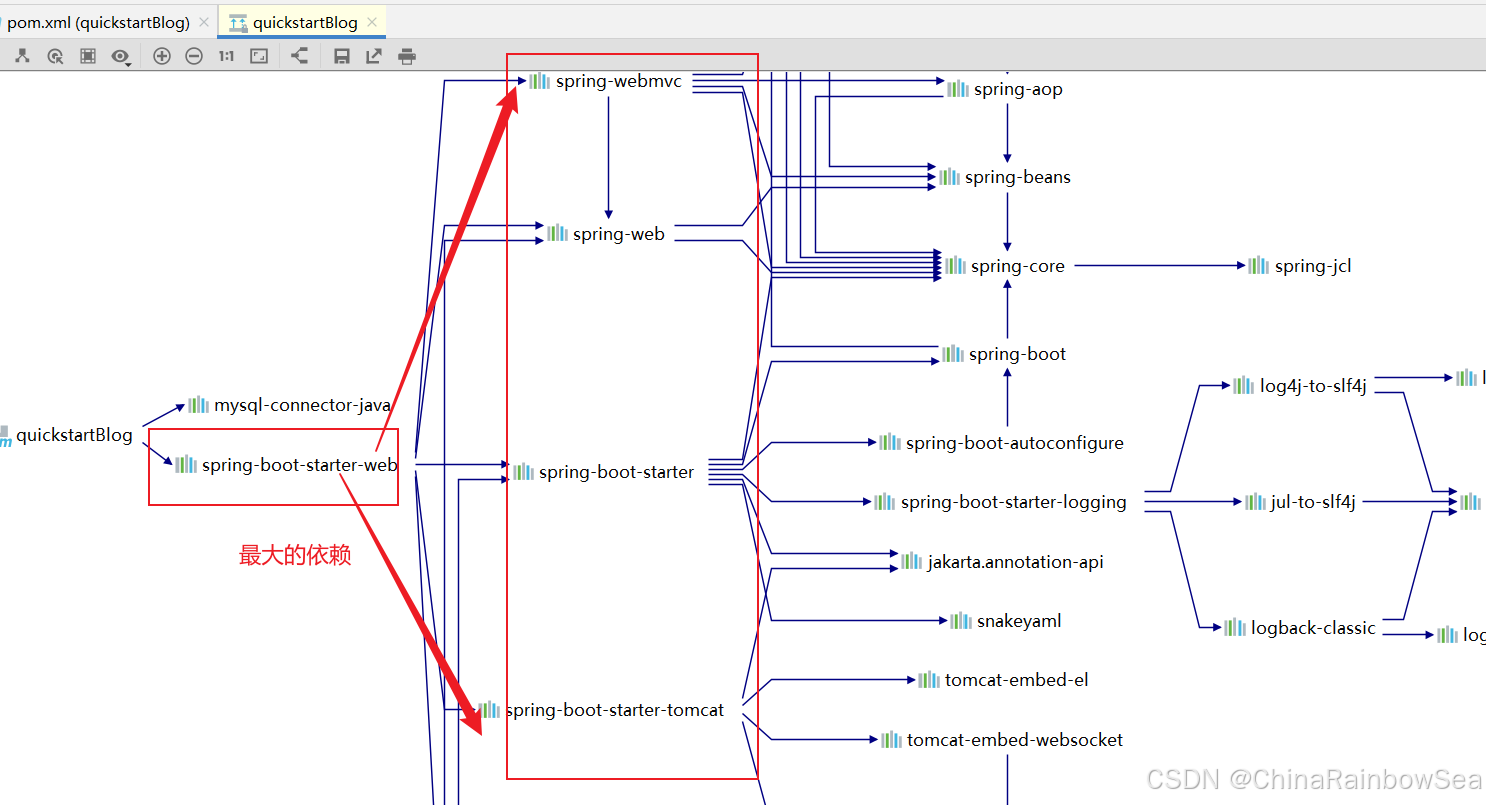

这个依赖也就是 SpringBoot 自动配置的核心依赖
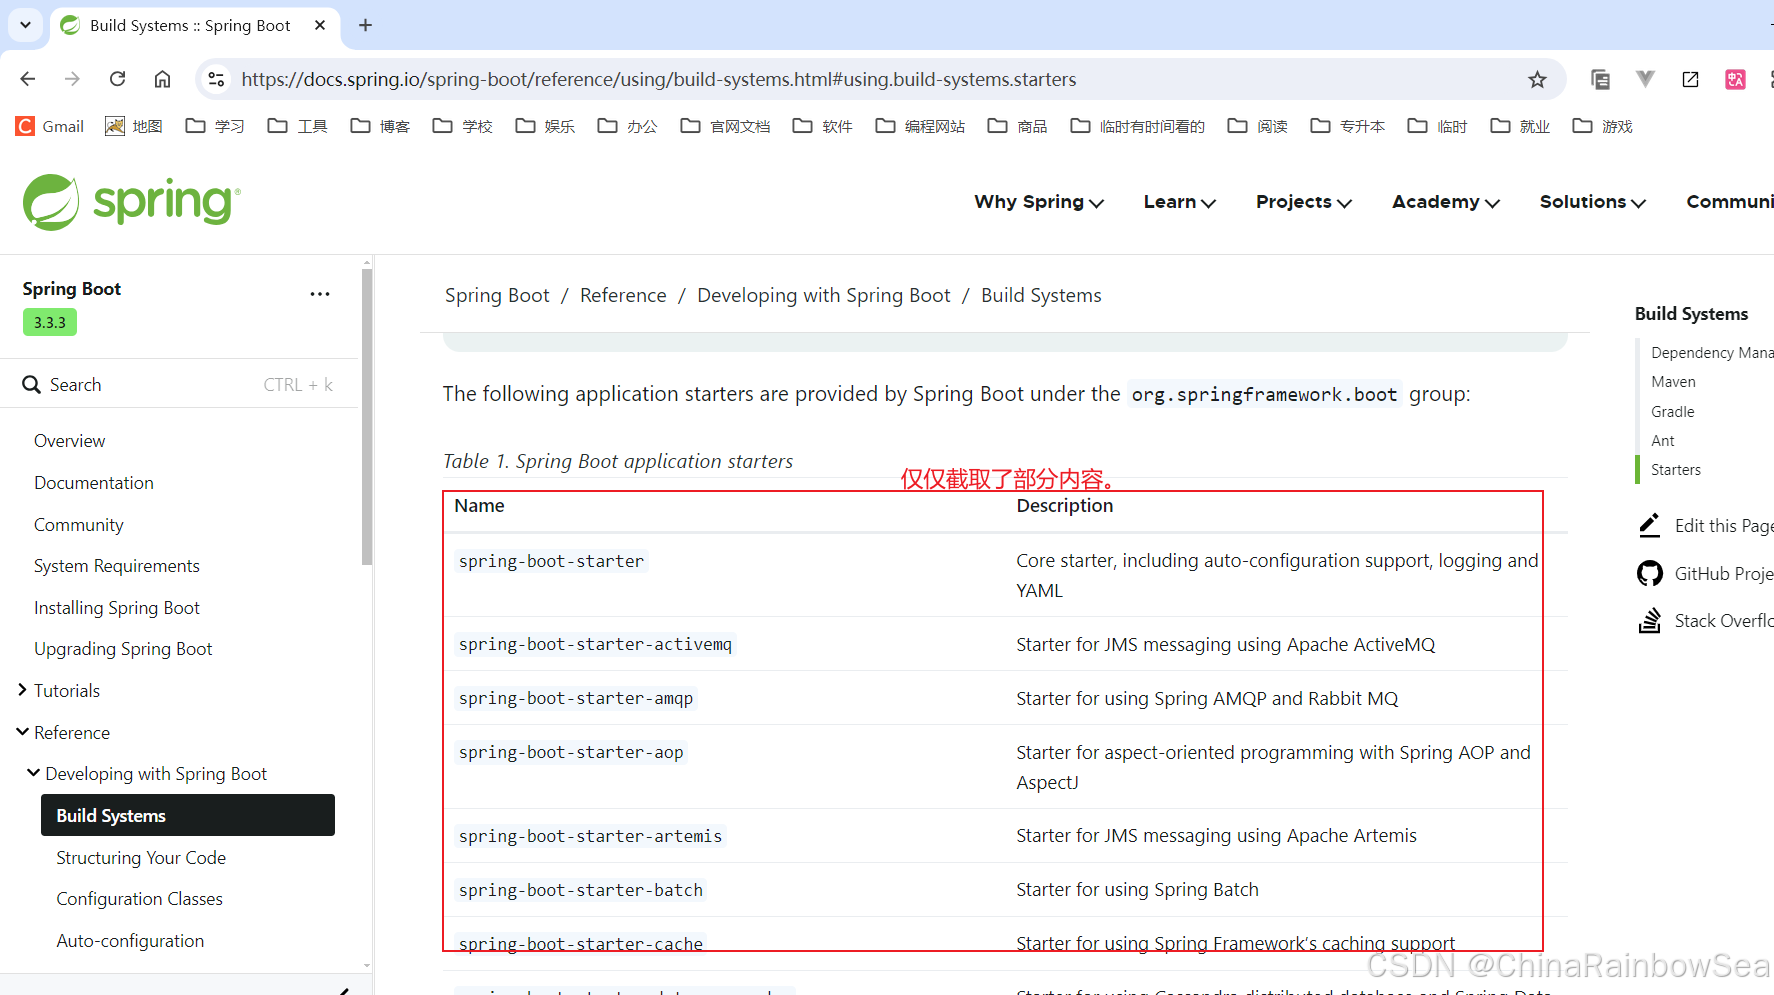
3.1.2 Spring Boot 官方提供的 starter 场景启动器
Spring Boot 官方提供的 starter 场景启动器的介绍说明:https://docs.spring.io/spring-boot/reference/using/build-systems.html#using.build-systems.starters 。
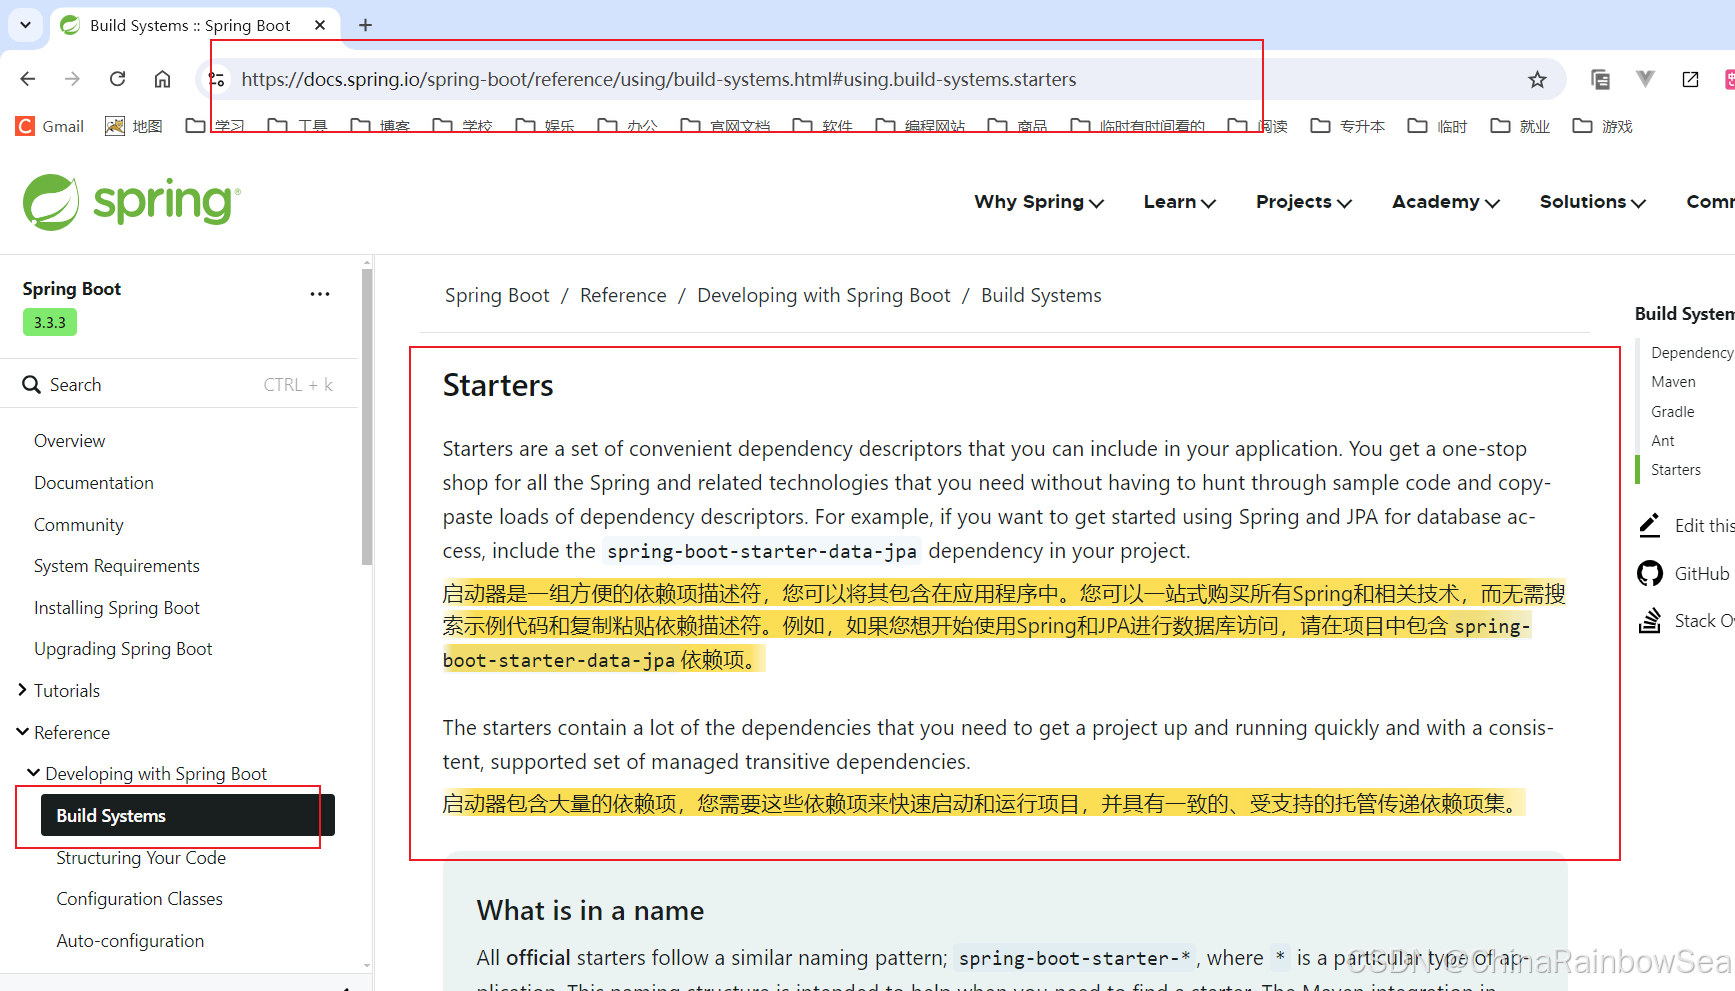
意思就是说:在开发中我们经常会用到 spring-boot-starter-xxx ,比如 spring-boot-starter-web,该场 景是用作 web 开发,也就是说 xxx 是某种开发场景。
这时候,我们只要引入 starter,这个场景的所有常规需要的依赖我们都自动引入。
Spring Boot3 支持的所有场景如下:官方地址:https://docs.spring.io/spring-boot/reference/using/build-systems.html#using.build-systems.starters
3.1.3 Spring Boot 支持的第三方 starter 场景启动器
Spring Boot 也支持第三方 starter。
第三方 starter 不要从 spring-boot 开始,因为这是官方 spring-boot 保留的命名方式的。第三方启动程序通常以项目名称开头,例如:名“XXx”的第三方启动程序项目通常被命名为:“XXx-spring-boot-stater”。
也就是说:xxx-spring-boot-starter 是第三方为我们提供的简化开发的场景启动器
4.1 Spring Boot 的自动配置
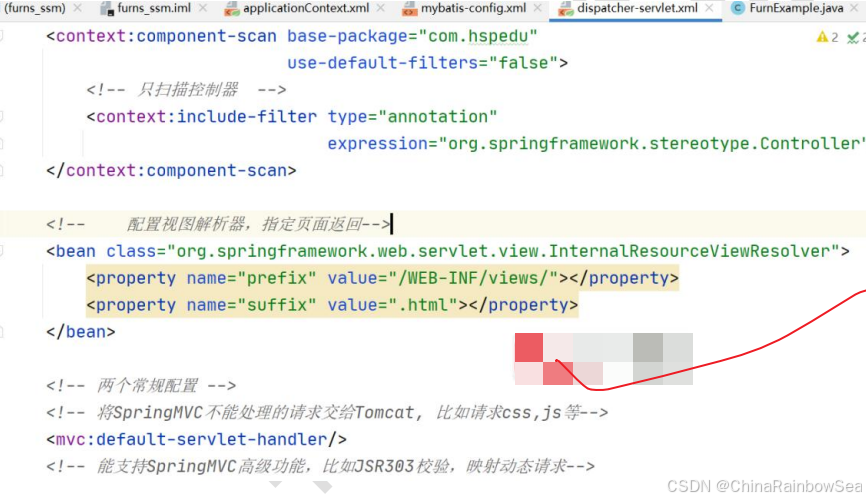
我们是否还记得,前面学习 SSM 整合时,需要配置 Tomcat ,配置 Spring MVC,以及配置如何扫描包,配置字符过滤器,配置视图解析器,文件上传等 ✏️✏️✏️ SSM 整合(Spring + MyBatis;Spring + Spring MVC)-CSDN博客 。非常麻烦。而在 Spring Boot 中,存在自动配置 机制,提高开发效率。
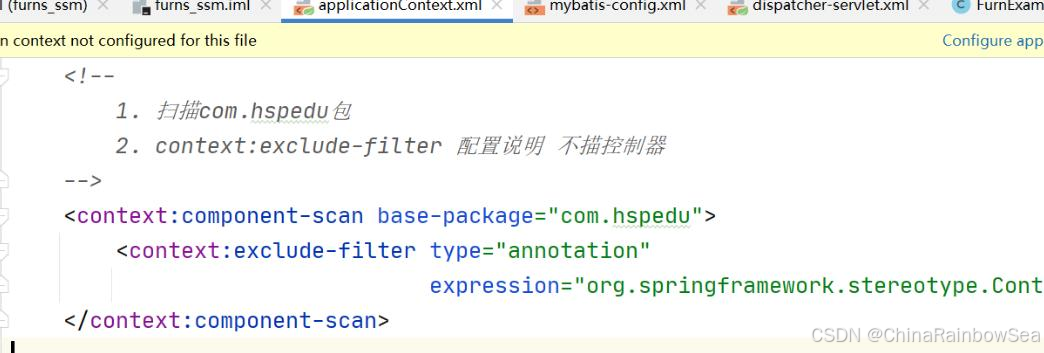
简单回顾以前 SSM 整合的配置:
4.1.1 Spring Boot 自动配置有哪些
自动配置 Tomcat
自动配置了 Spring MVC
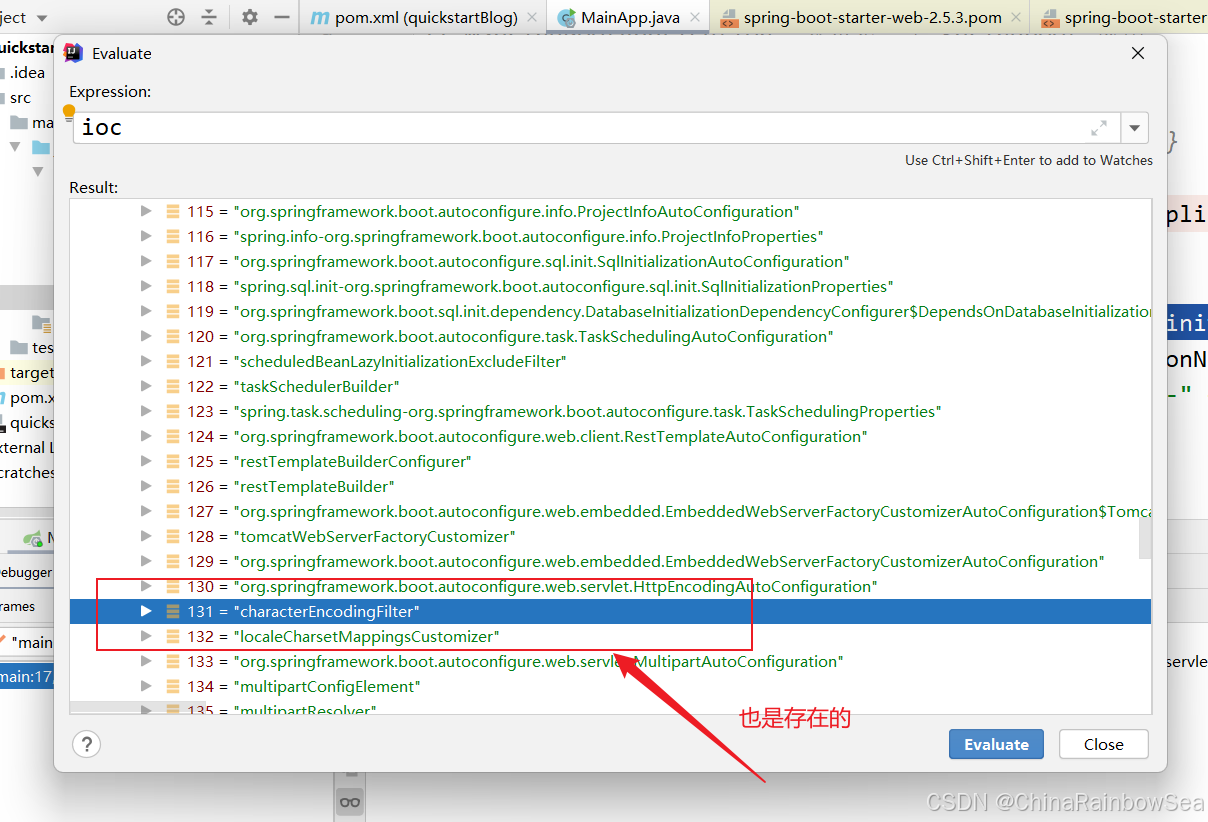
自动配置了 Web 常用功能: 比如 字符过滤器。
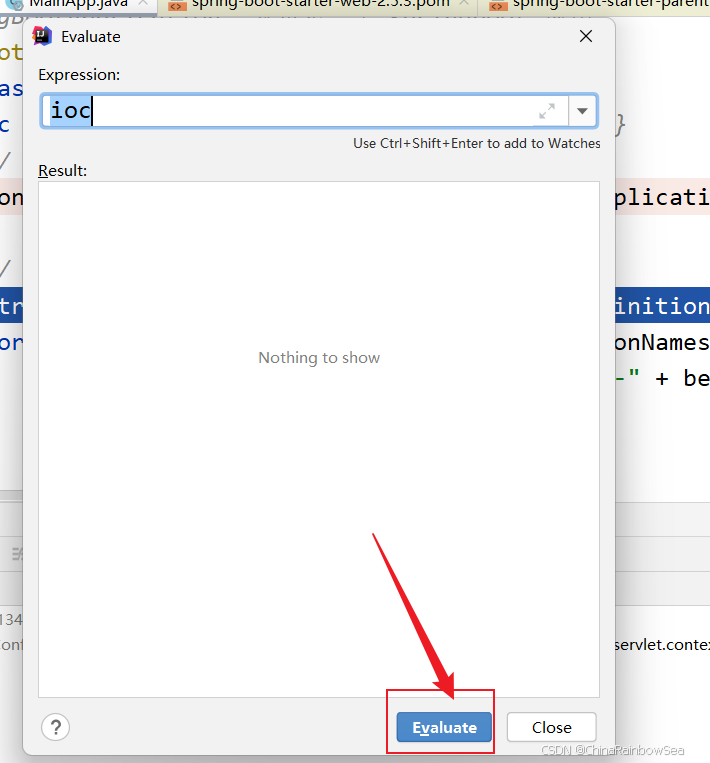
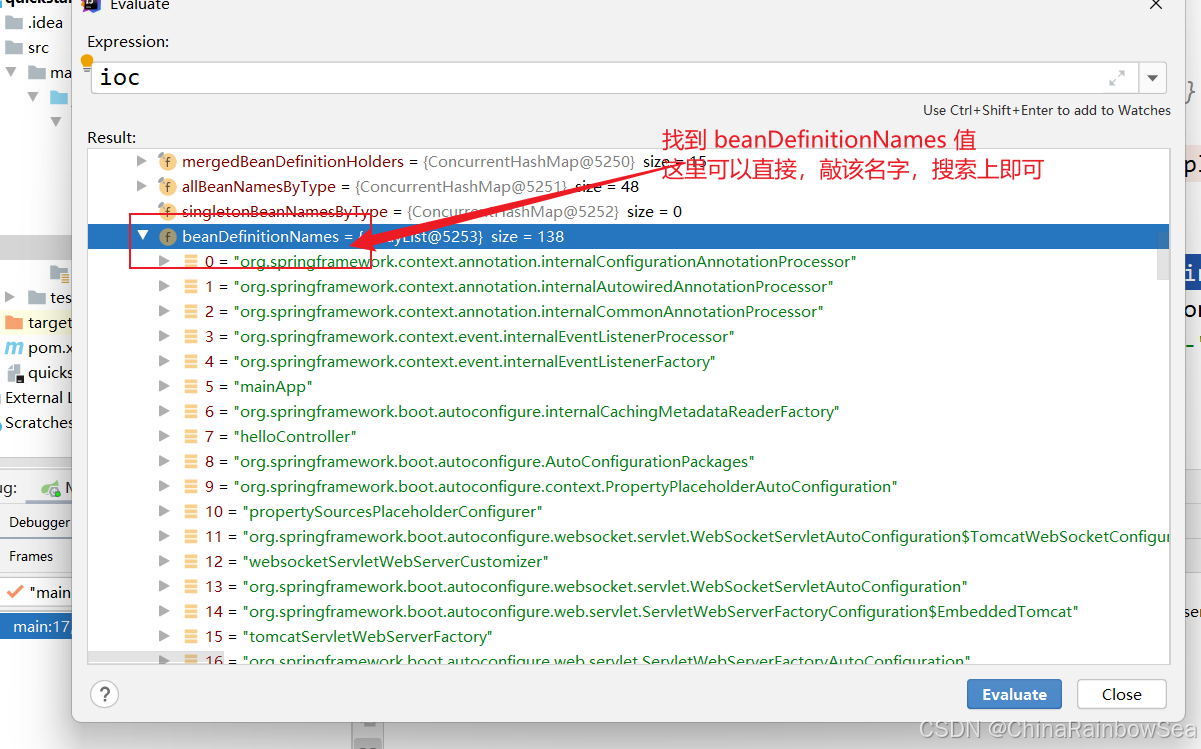
我们可以通过获取到的 ioc 容器,查看容器创建的组件来验证。
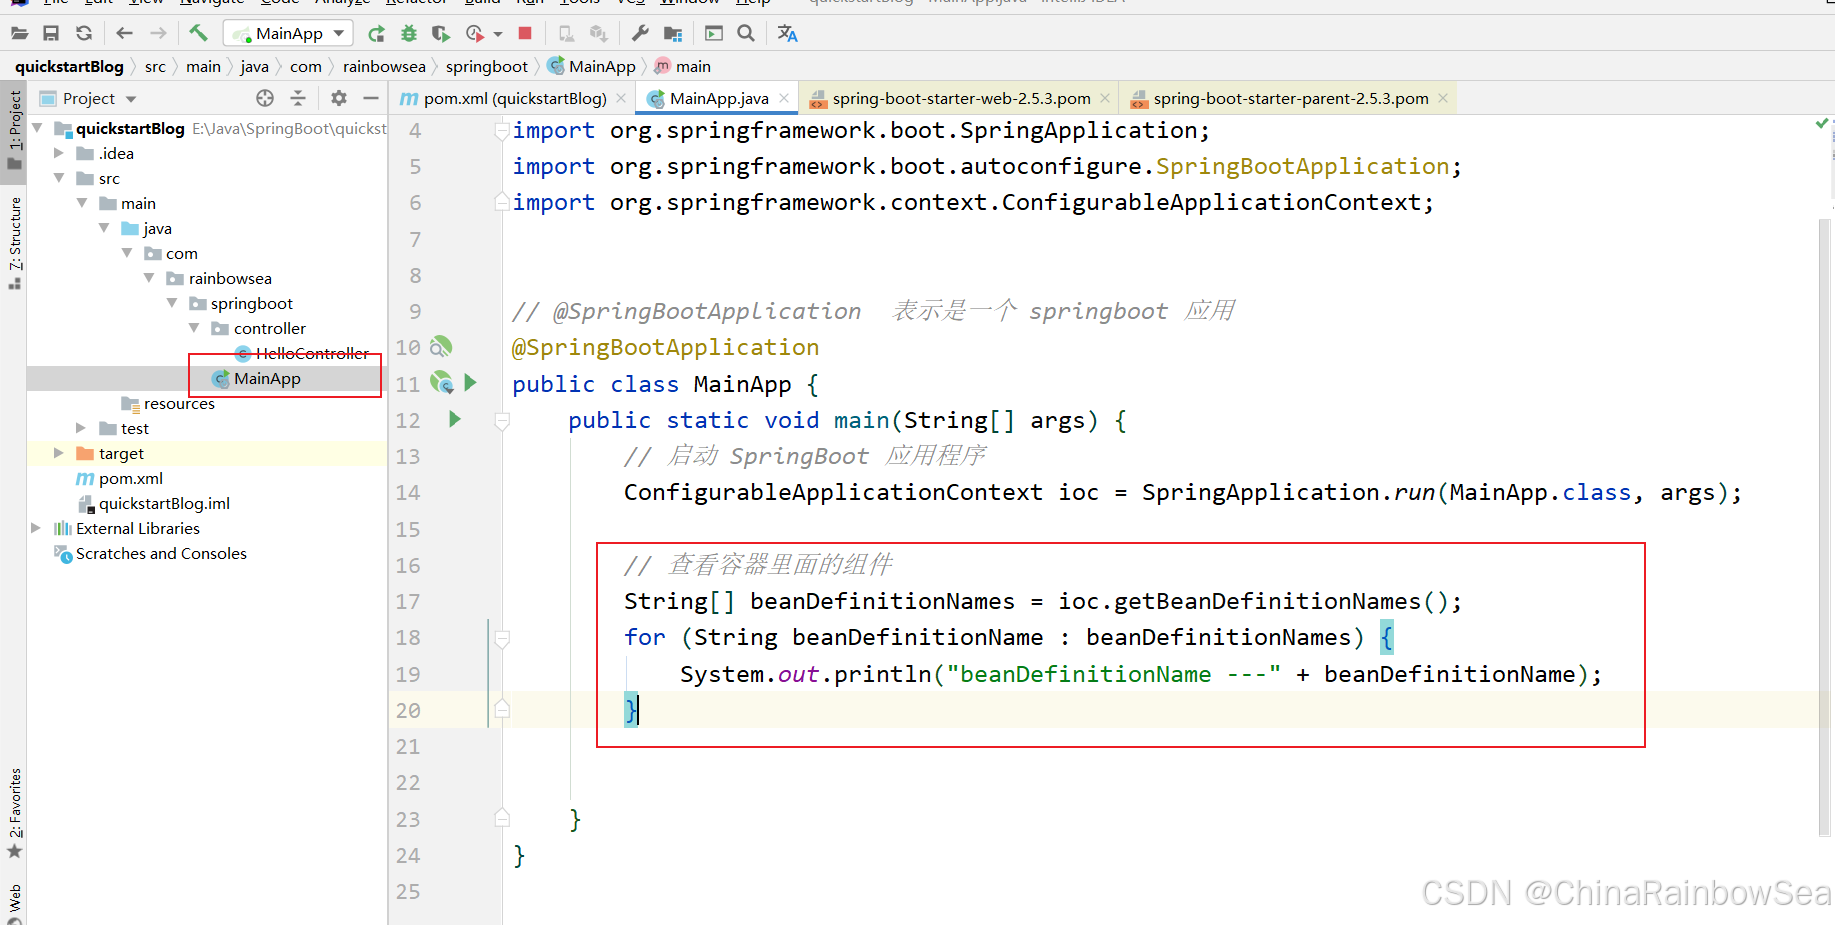

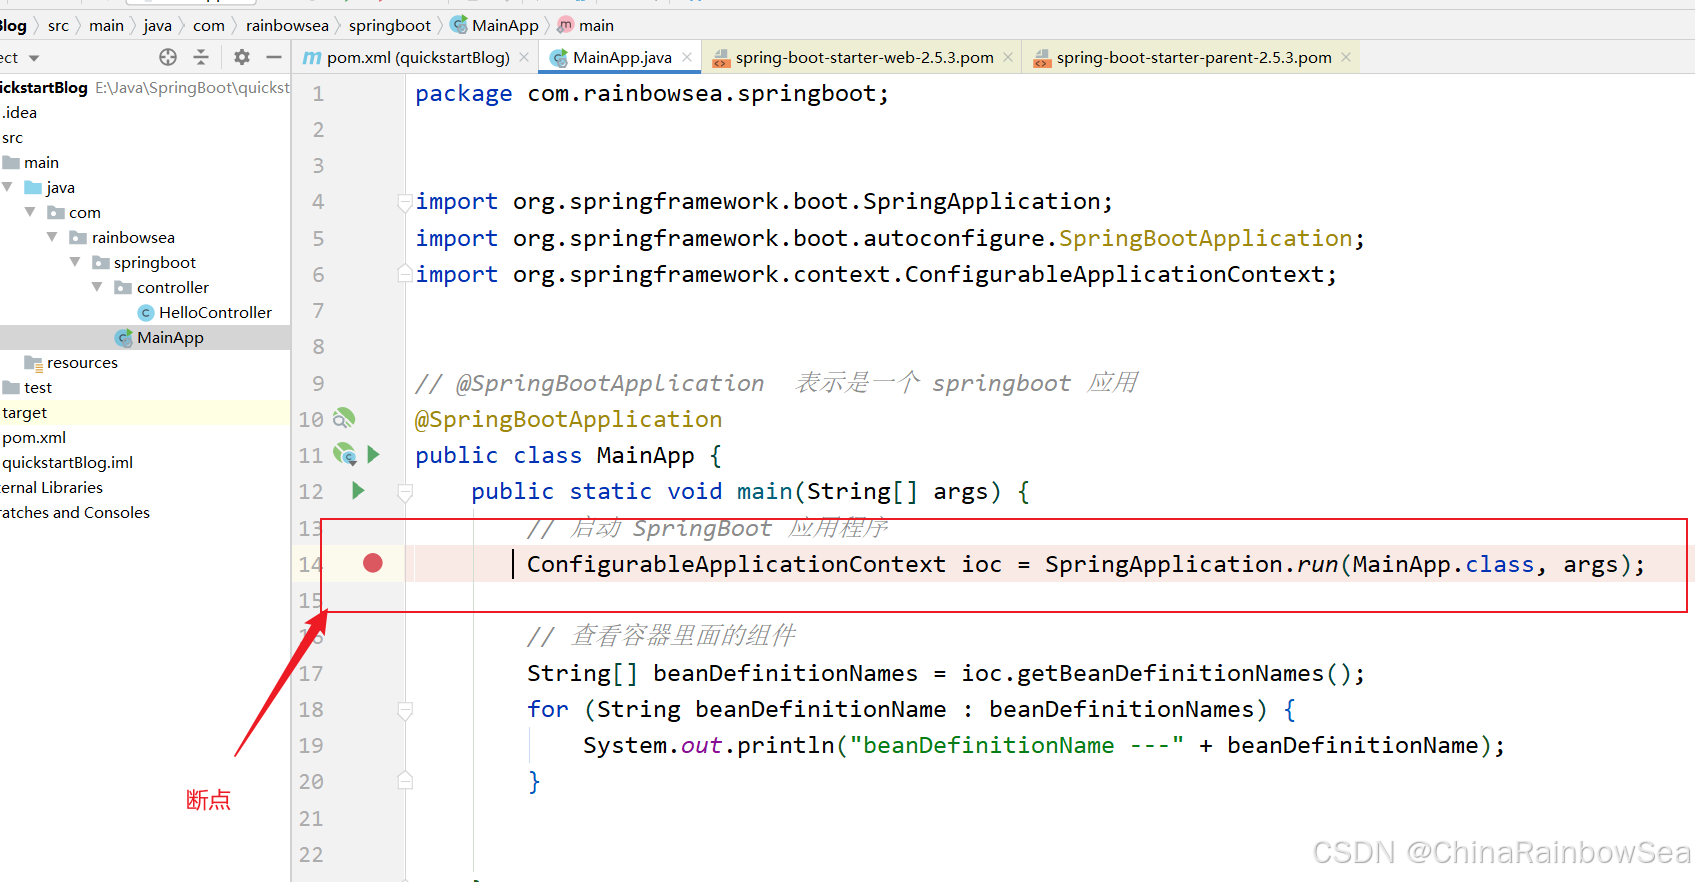
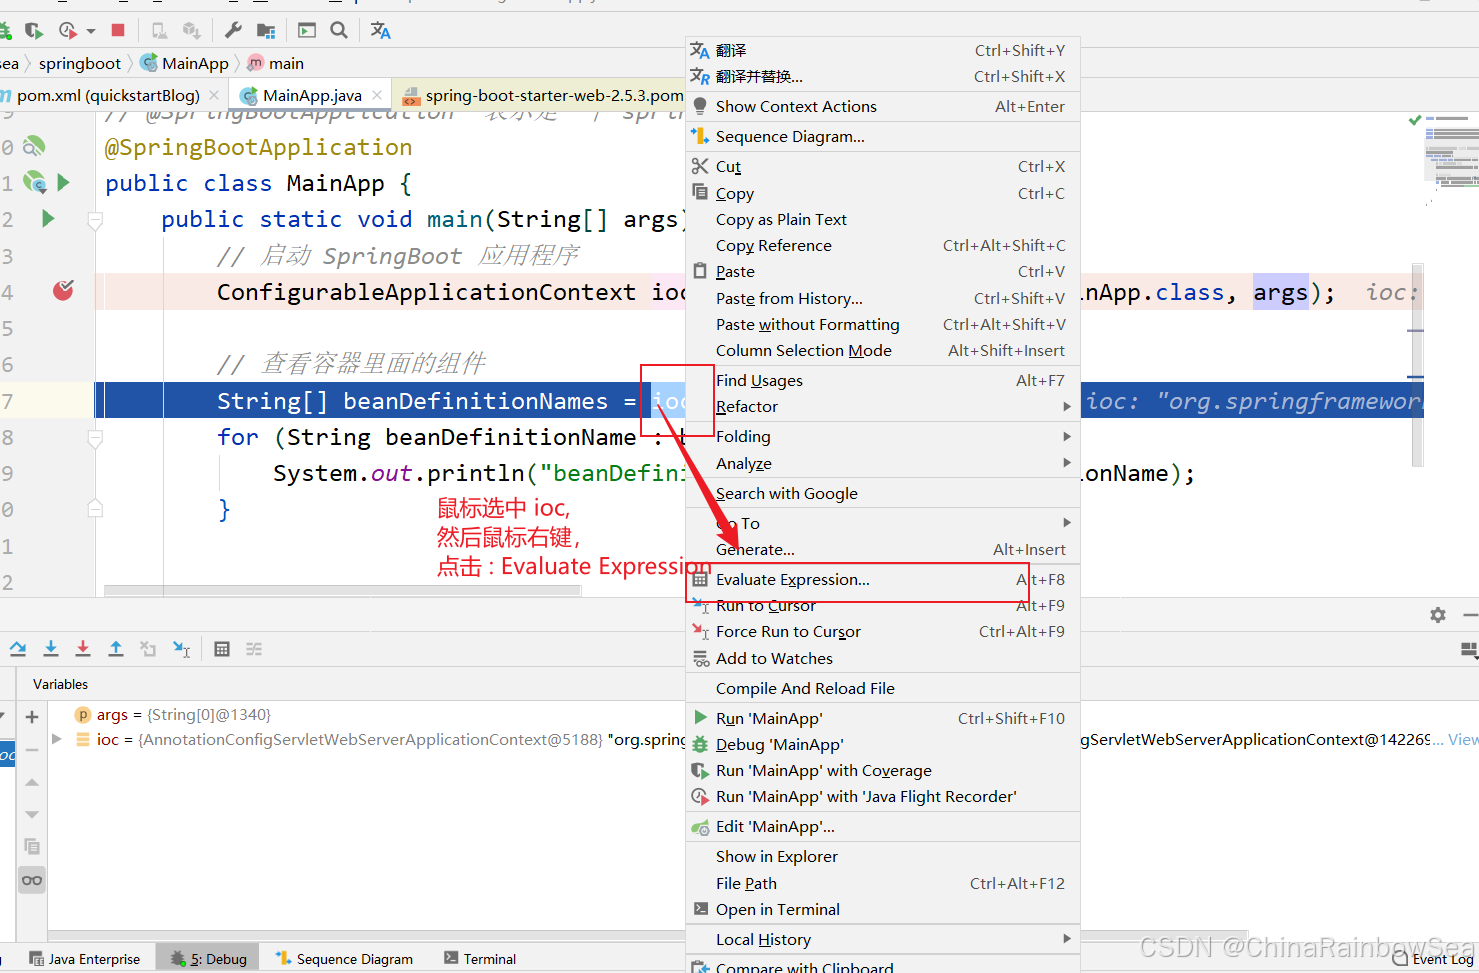
更加直接查看的方式:我们可以通过 Debug 的方式,在 ioc 打上断点,从而查看 ioc 容器中有哪些 Bean 对象被创建了。
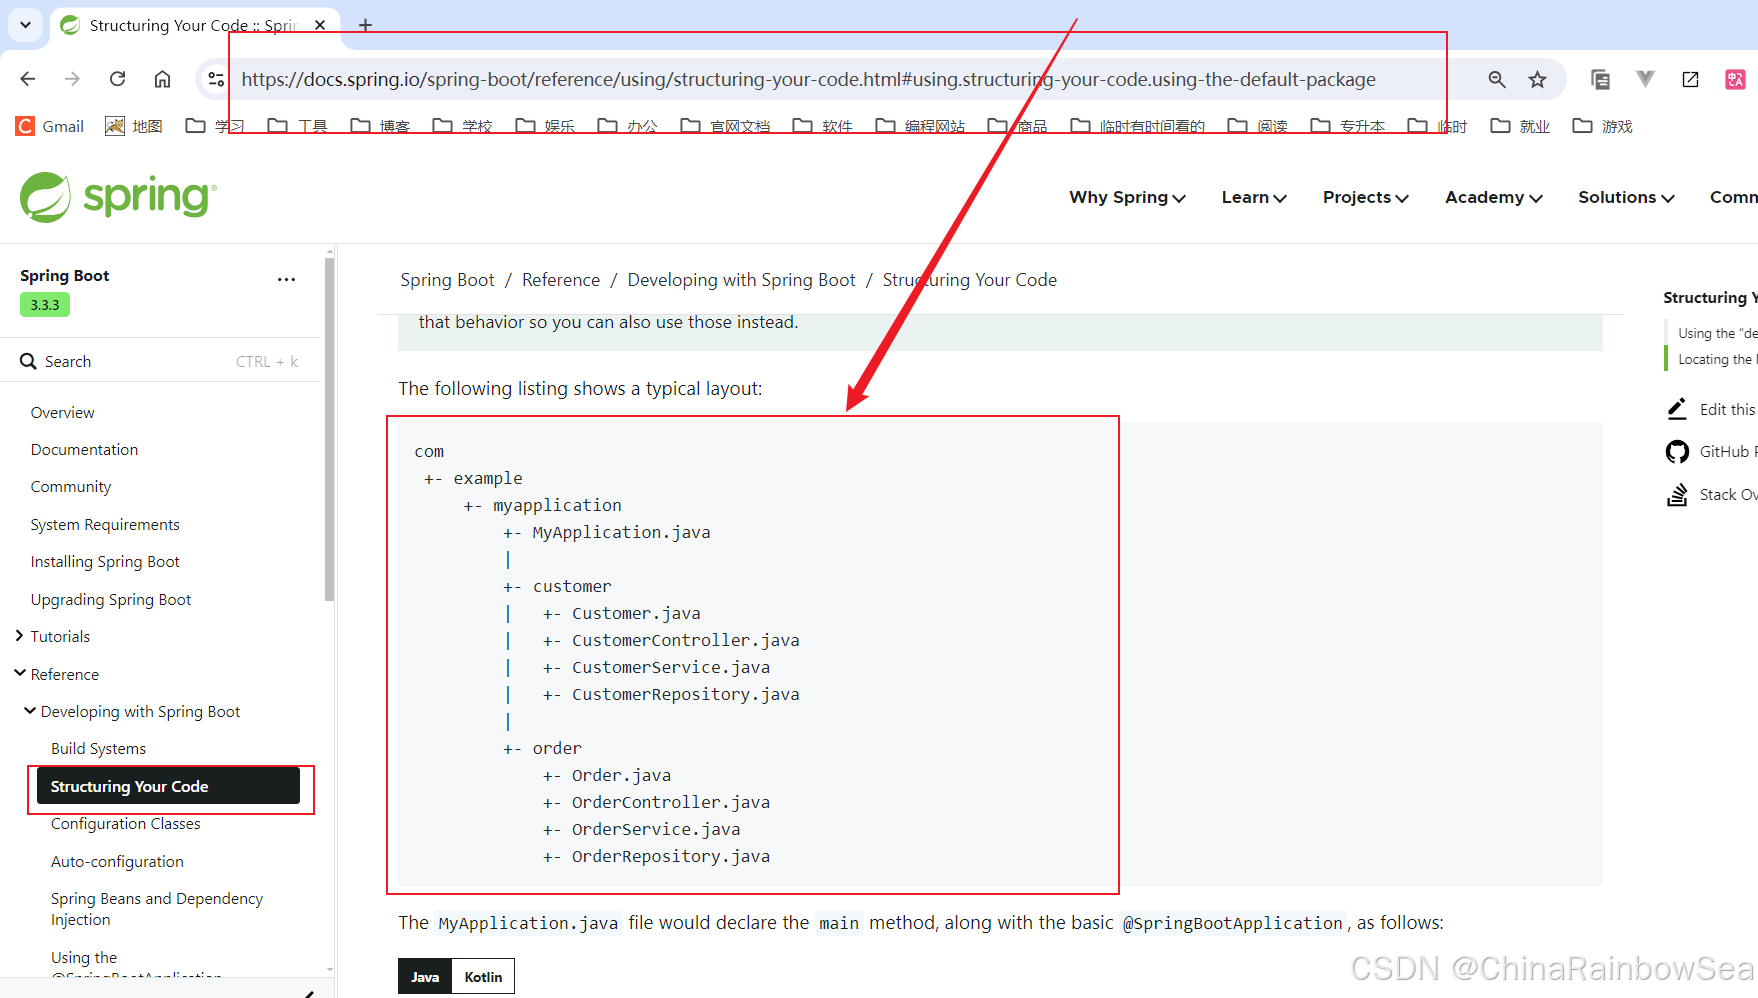
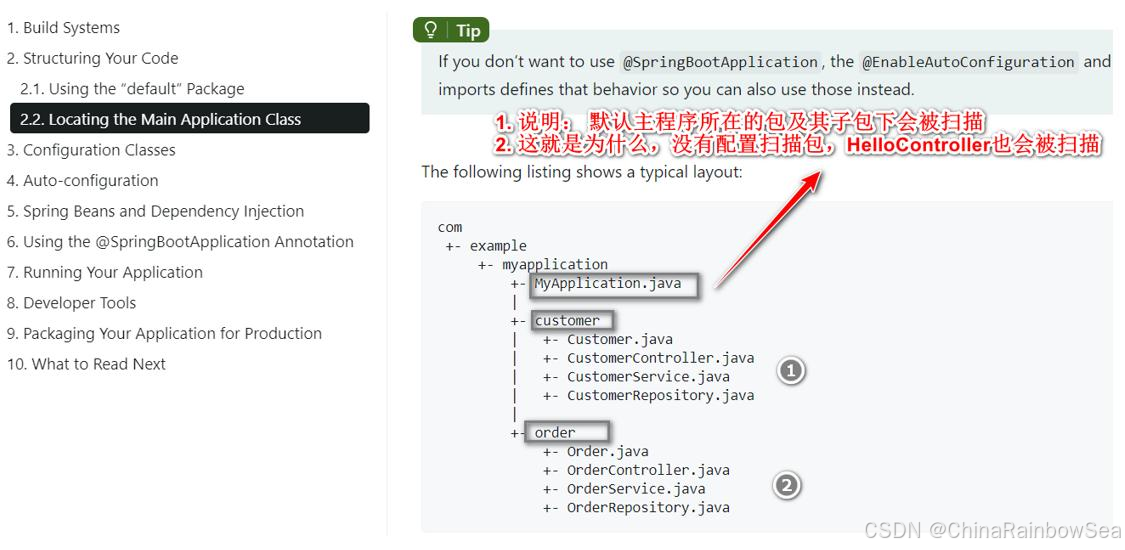
在 Spring Boot 的自动配置中,我们不需要像 Spring MVC 中一定要配置扫描包 。Spring Boot 有默认的扫描包结构。
如下是来自 Spring Boot 官方文档说明 【https://docs.spring.io/spring-boot/reference/using/structuring-your-code.html#using.structuring-your-code.using-the-default-package】的:自动扫描的包结构。你按照该“约定/自动扫描包结构”,开发项目,就不需要配置扫描包了,直接用 Spring Boot 约定的/默认的即可。
4.1.2 如何修改 Spring Boot 中的默认配置
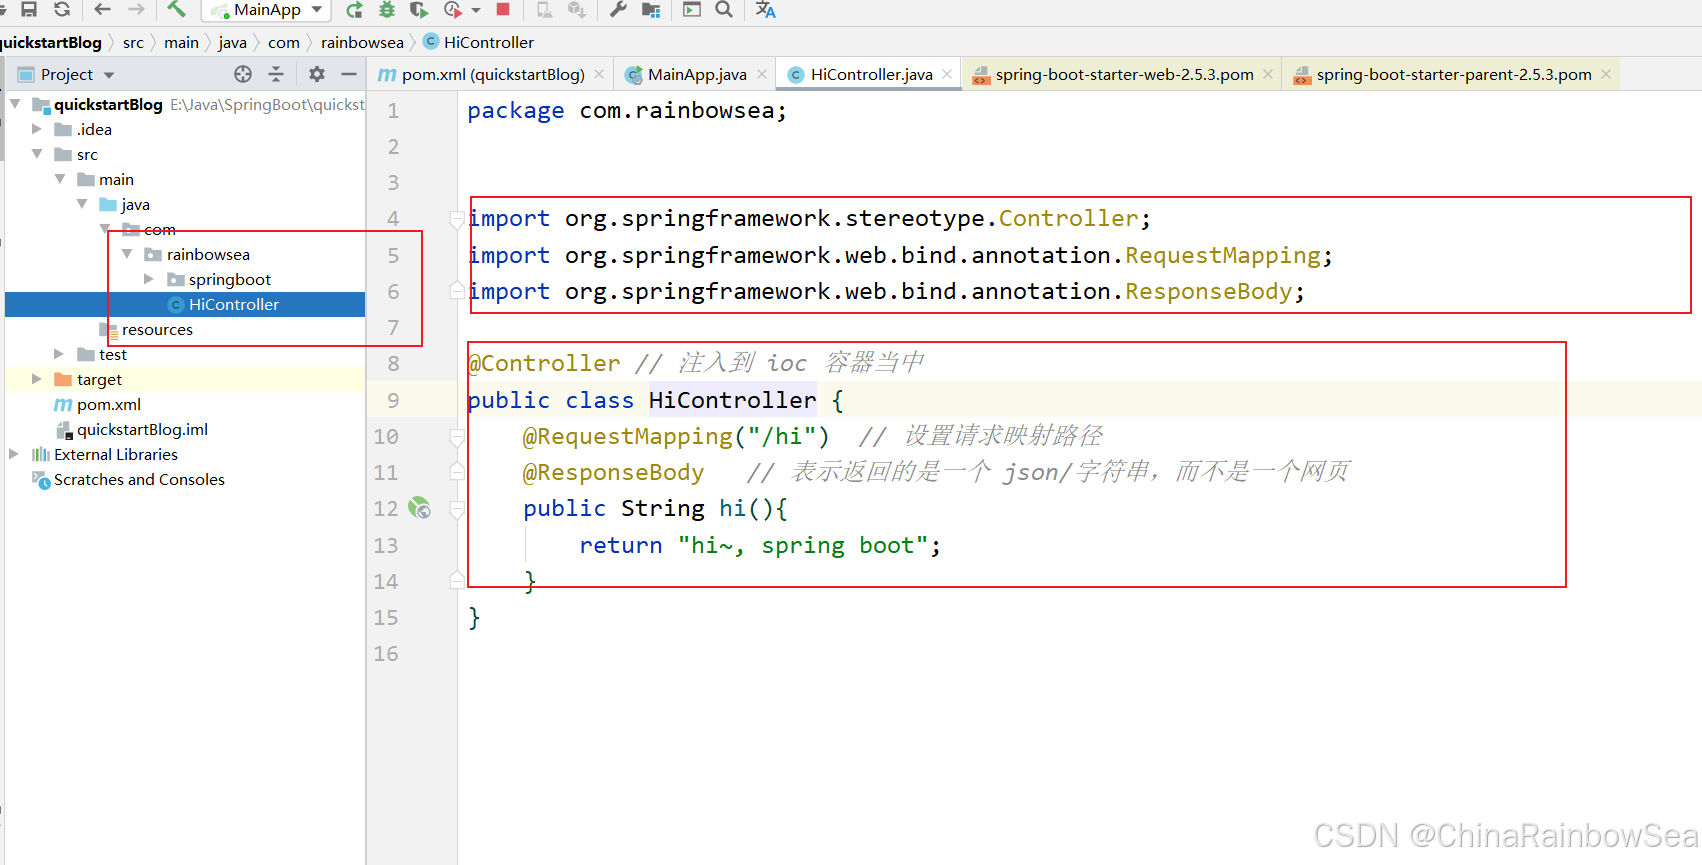
演示: 要求能扫描 com.rainbowsea 包下的 HiController.java 应该如何处理 ?
首先我们先测试一下,不按照 Spring Boot 默认的包结构创建的,主程序类。会怎么样。
在 quickstartBlog\src\main\java\com\rainbowsea\目录/包下创建一个,名为 HiController.java 主程序类。 并测试, 这时是访问不到的。
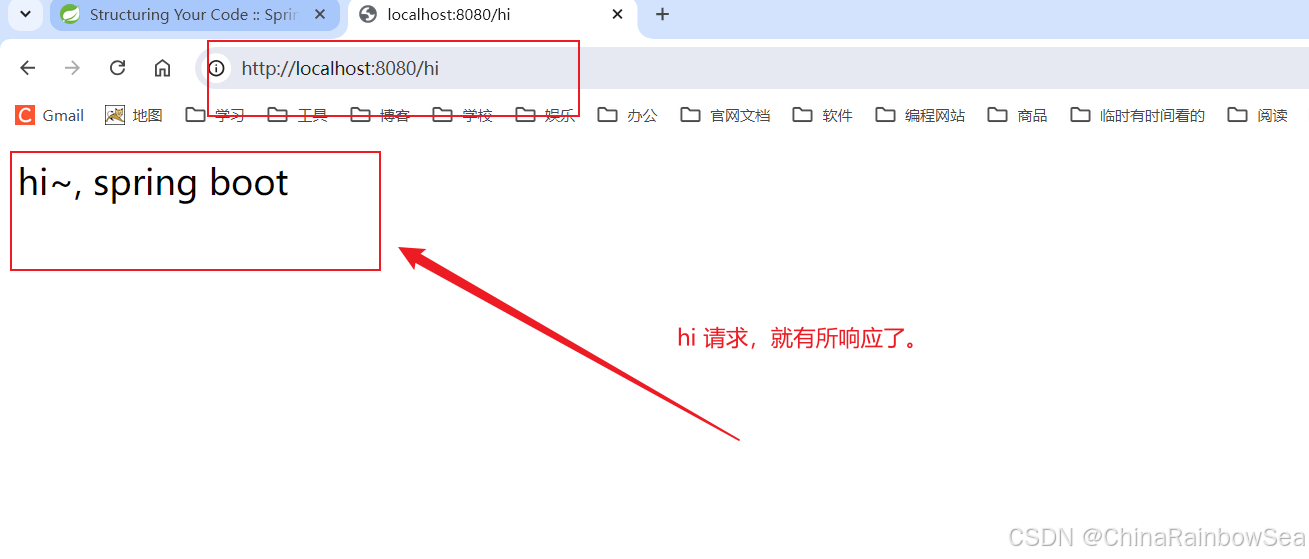
运行主程序,打开浏览器输入:http://localhost:8080/hi 测试。
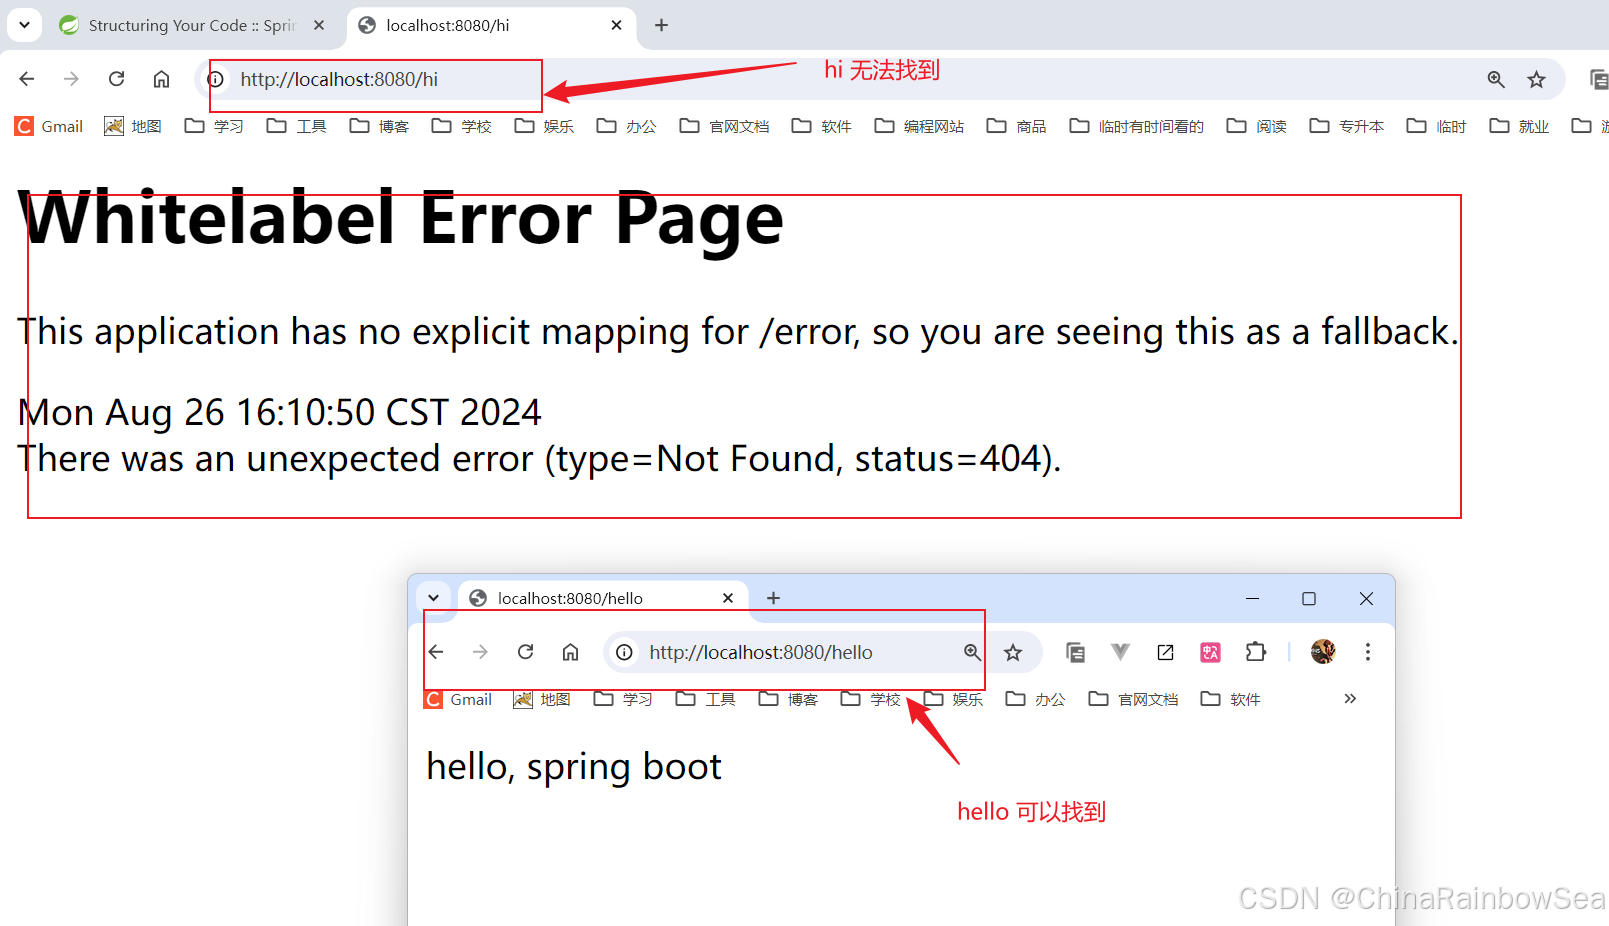
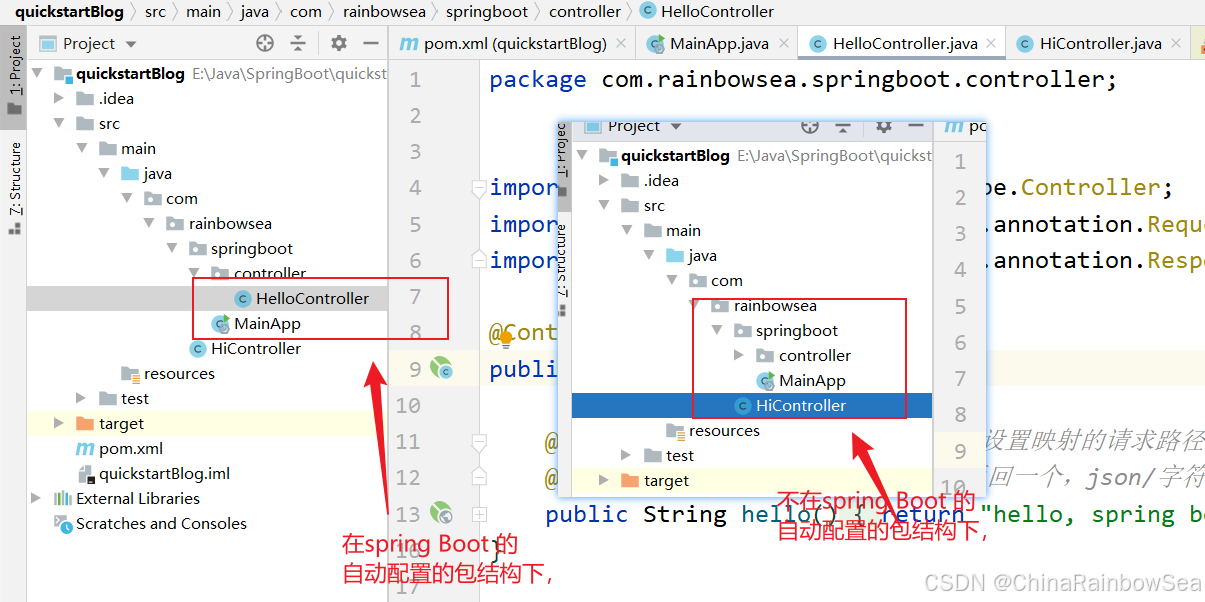
原因是:hello 配置的 HelloController 是在 Spring Boot 的默认自动配置的包结构下的,而我们的 hi 配置的 HiController 并不是在,Spring Boot 的自动配置打包结构下的,而我们自己有没有配置包扫描,Spring Boot 自然找不到了。
5.1 如何修改默认配置
5.1.1 如何修改默认扫描包结构
上面我们测试了,在 com.rianbowsea 包下的 HiController.java 是扫描不到了,扫描不到,也就无法加入到 ioc 容器当中被 Spring Boot 管理起来了,也就无法被访问到了。
所以想要,让 HiController.java 可以被扫描到,就解决了这个,无法访问找不到的问题了。
方法:
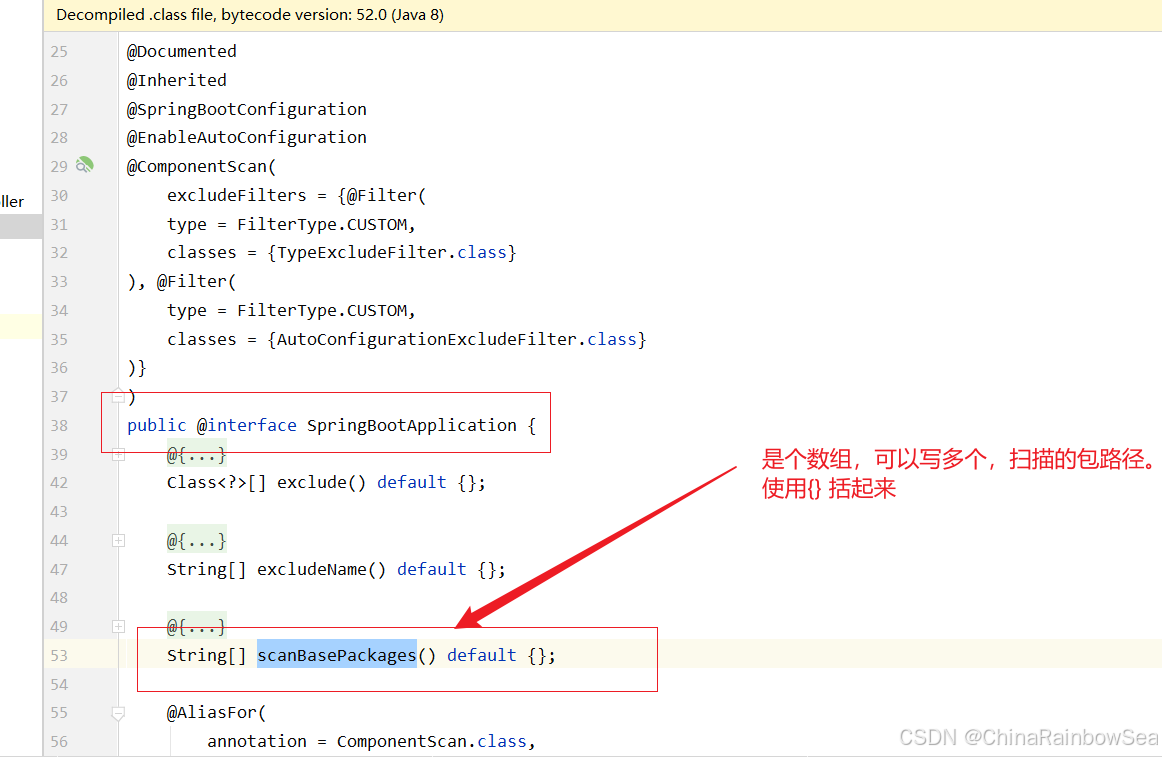
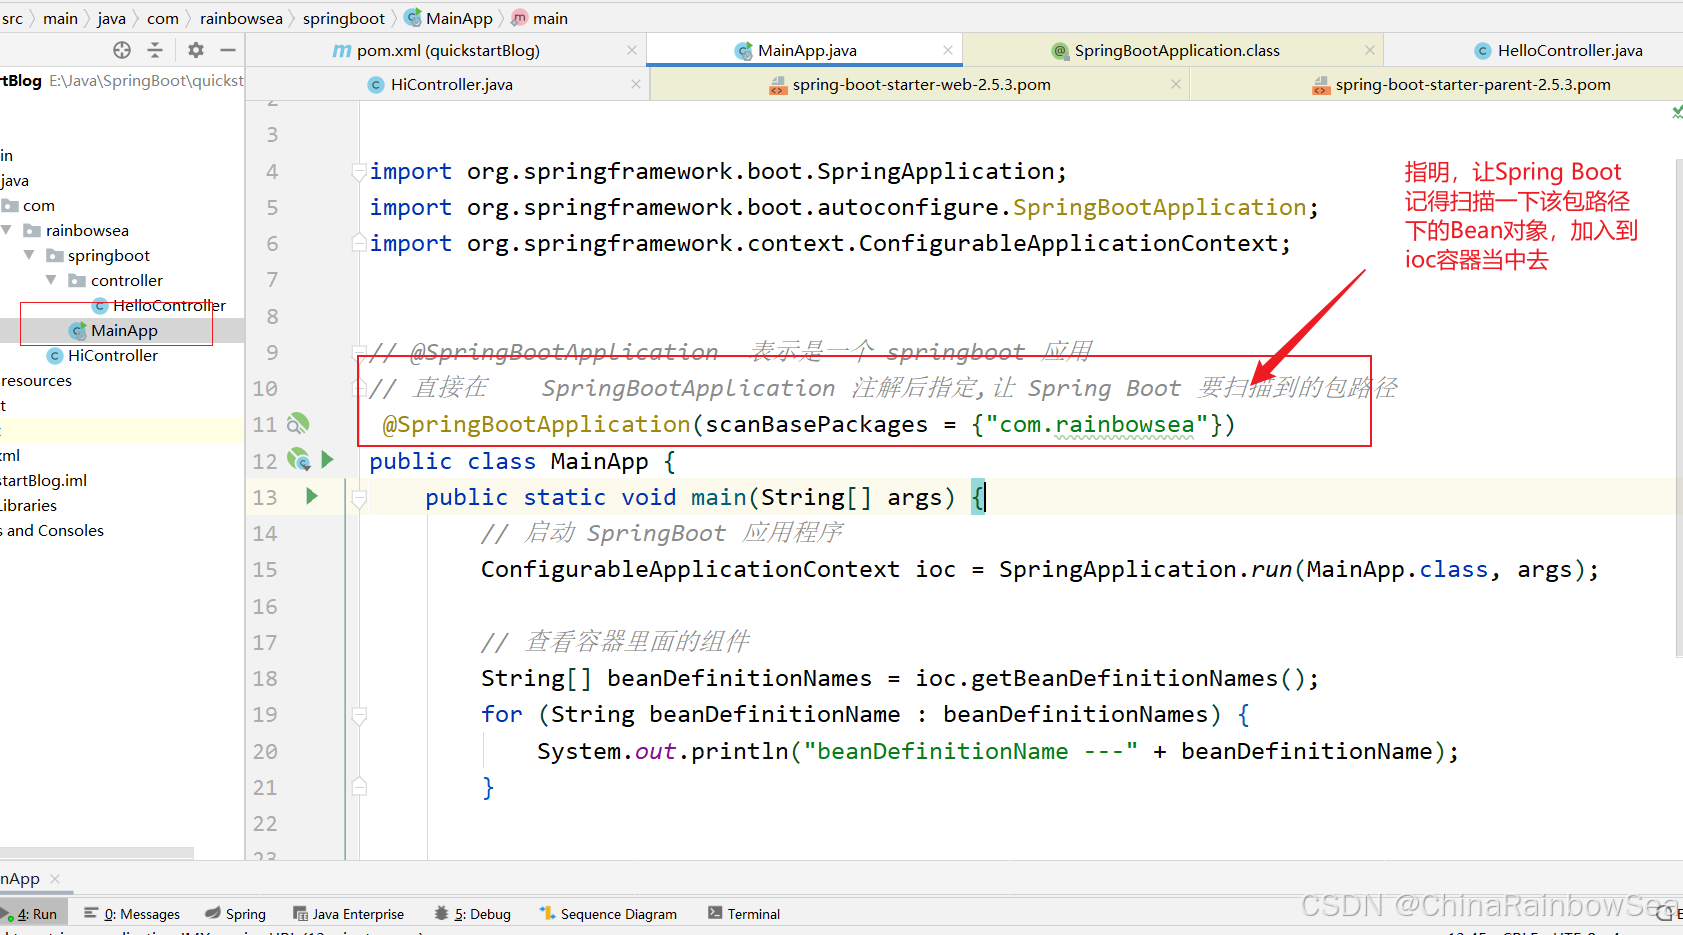
我们修改 MainApp.java, 增加扫描的包 。
使用 @SpringBootApplication 注解当中的 scanBasePackages 注解属性,该属性的值:就是让 Spring Boot 扫描的,包路径。
配置好之后,我们再次重启 ,运行试试。
5.1.2 Spring Boot 中的 resources(类路径下)\application.properties 配置大全
SpringBoot 项目最重要也是最核心的配置文件就是 application.properties,所有的框架配 置都可以在这个配置文件中说明 :Spring Boot 框架中配置文件 application.properties 当中的所有配置大全-CSDN博客
5.1.3 演示:使用一些常用的配置
在 Spring Boot 中各种配置都有默认,而想要修改配置的话, 可 以 在 resources\application.properties 文件中修改。至于application.properties文件是需要我们手动创建的。
特别注意:该文件名必须是
application.properties,后缀也不可以修改。强烈建议将其放到 类的根路径下(也就是resources目录下 )其次是,注意:在
.properties后缀的配置文件,当中编写,不要有空格,尽量不要有空格。
如下:
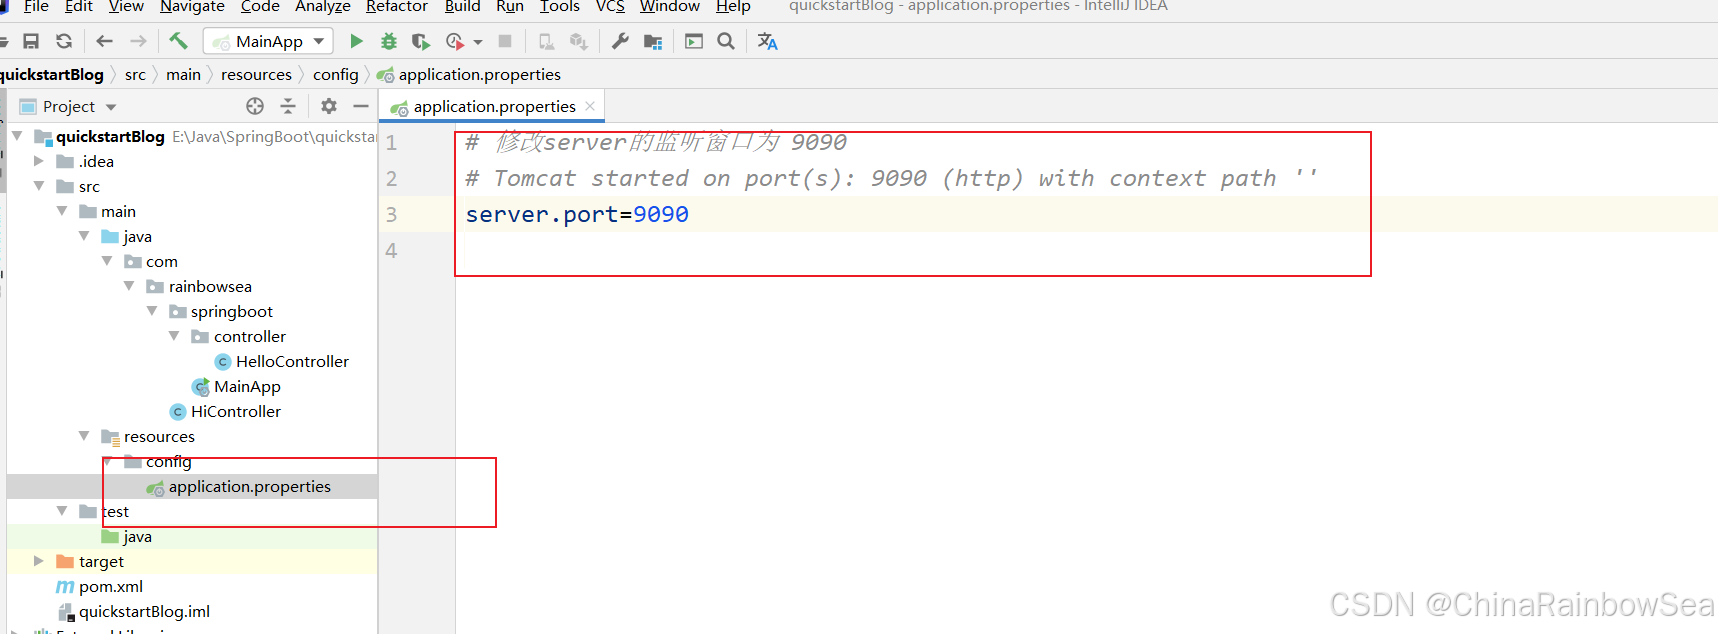
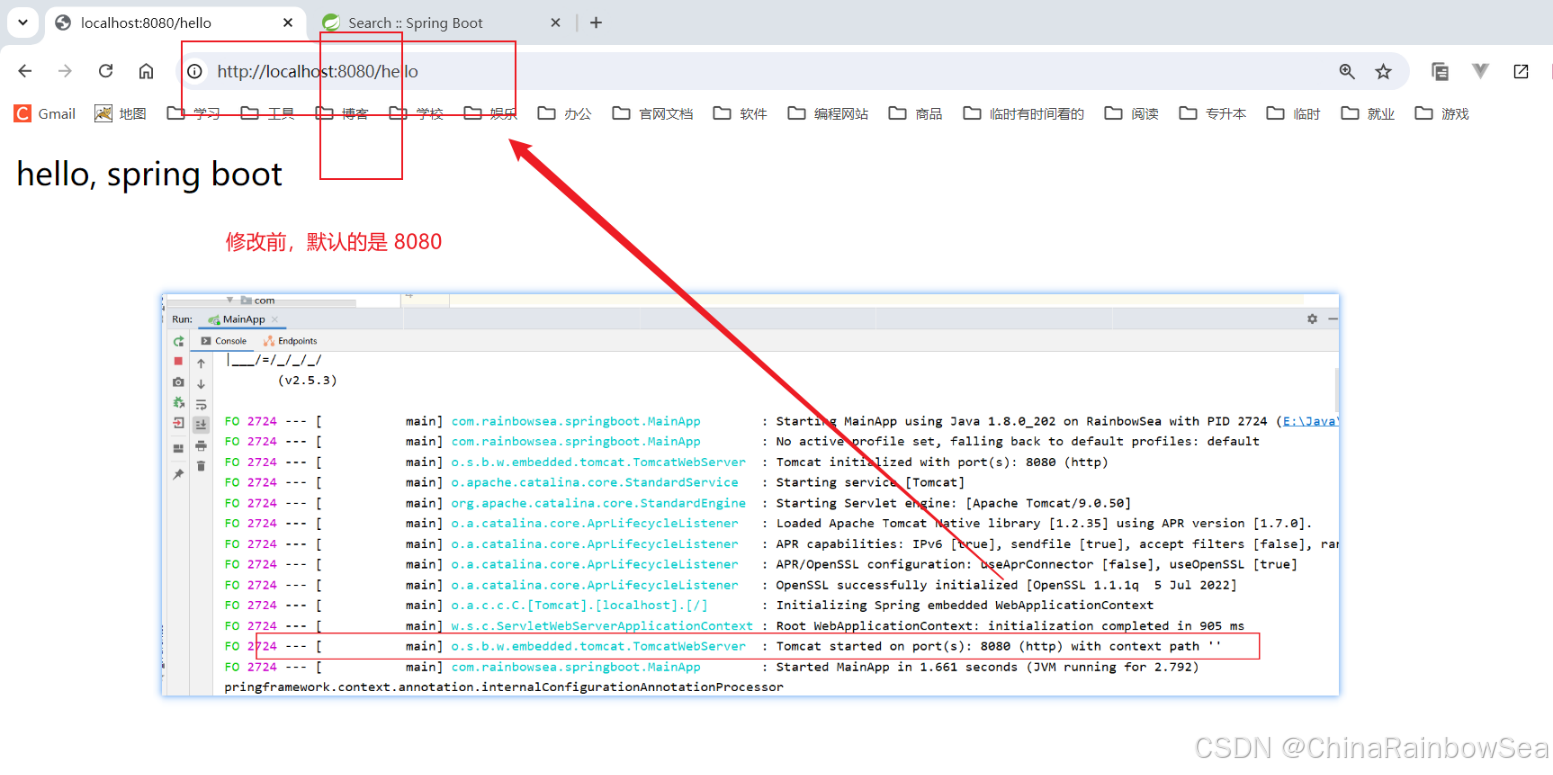
演示一:我们设置该服务器 Tomcat ,我们项目启动的端口,默认是 8080,这里我们设置为 9090。
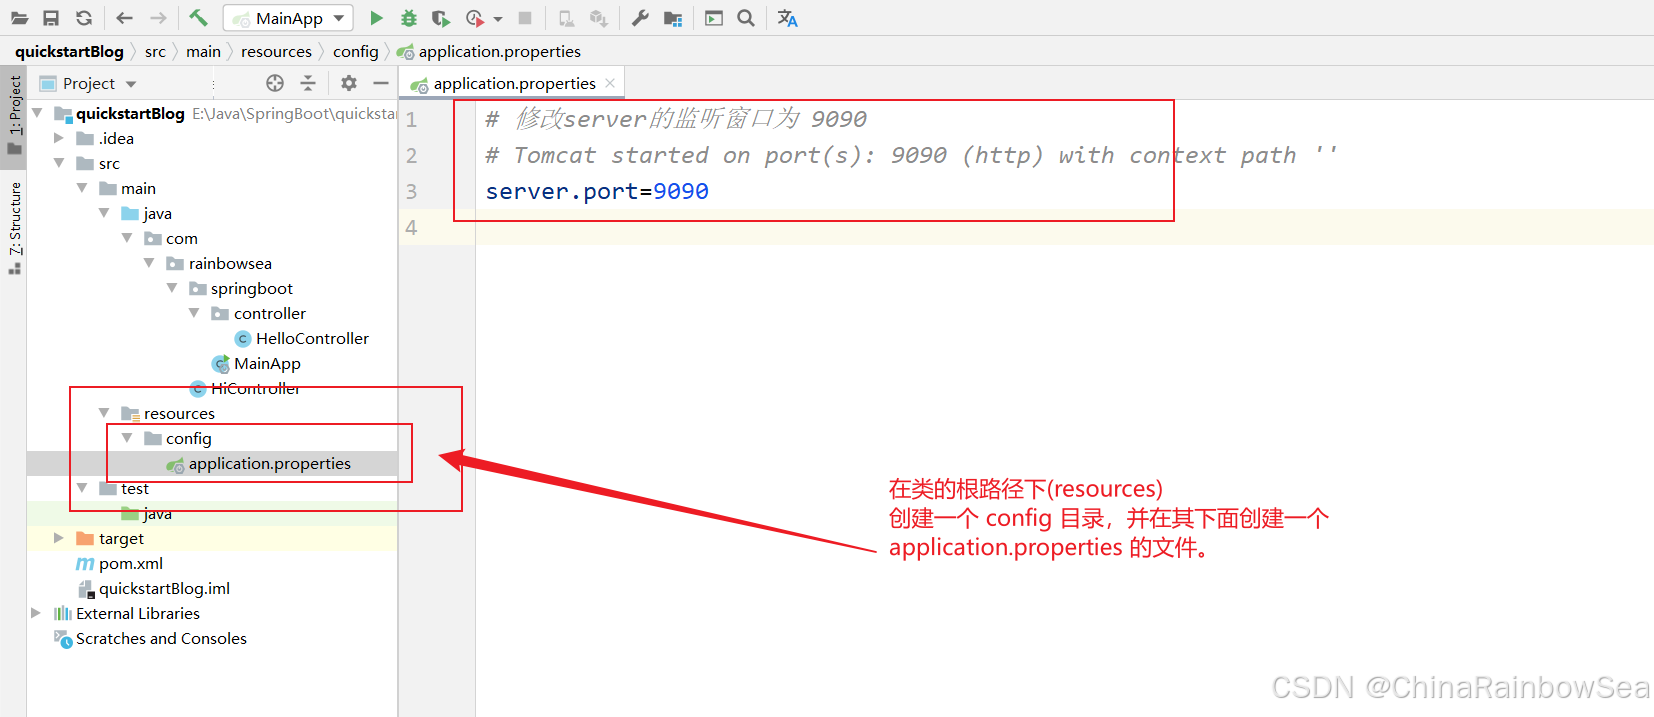
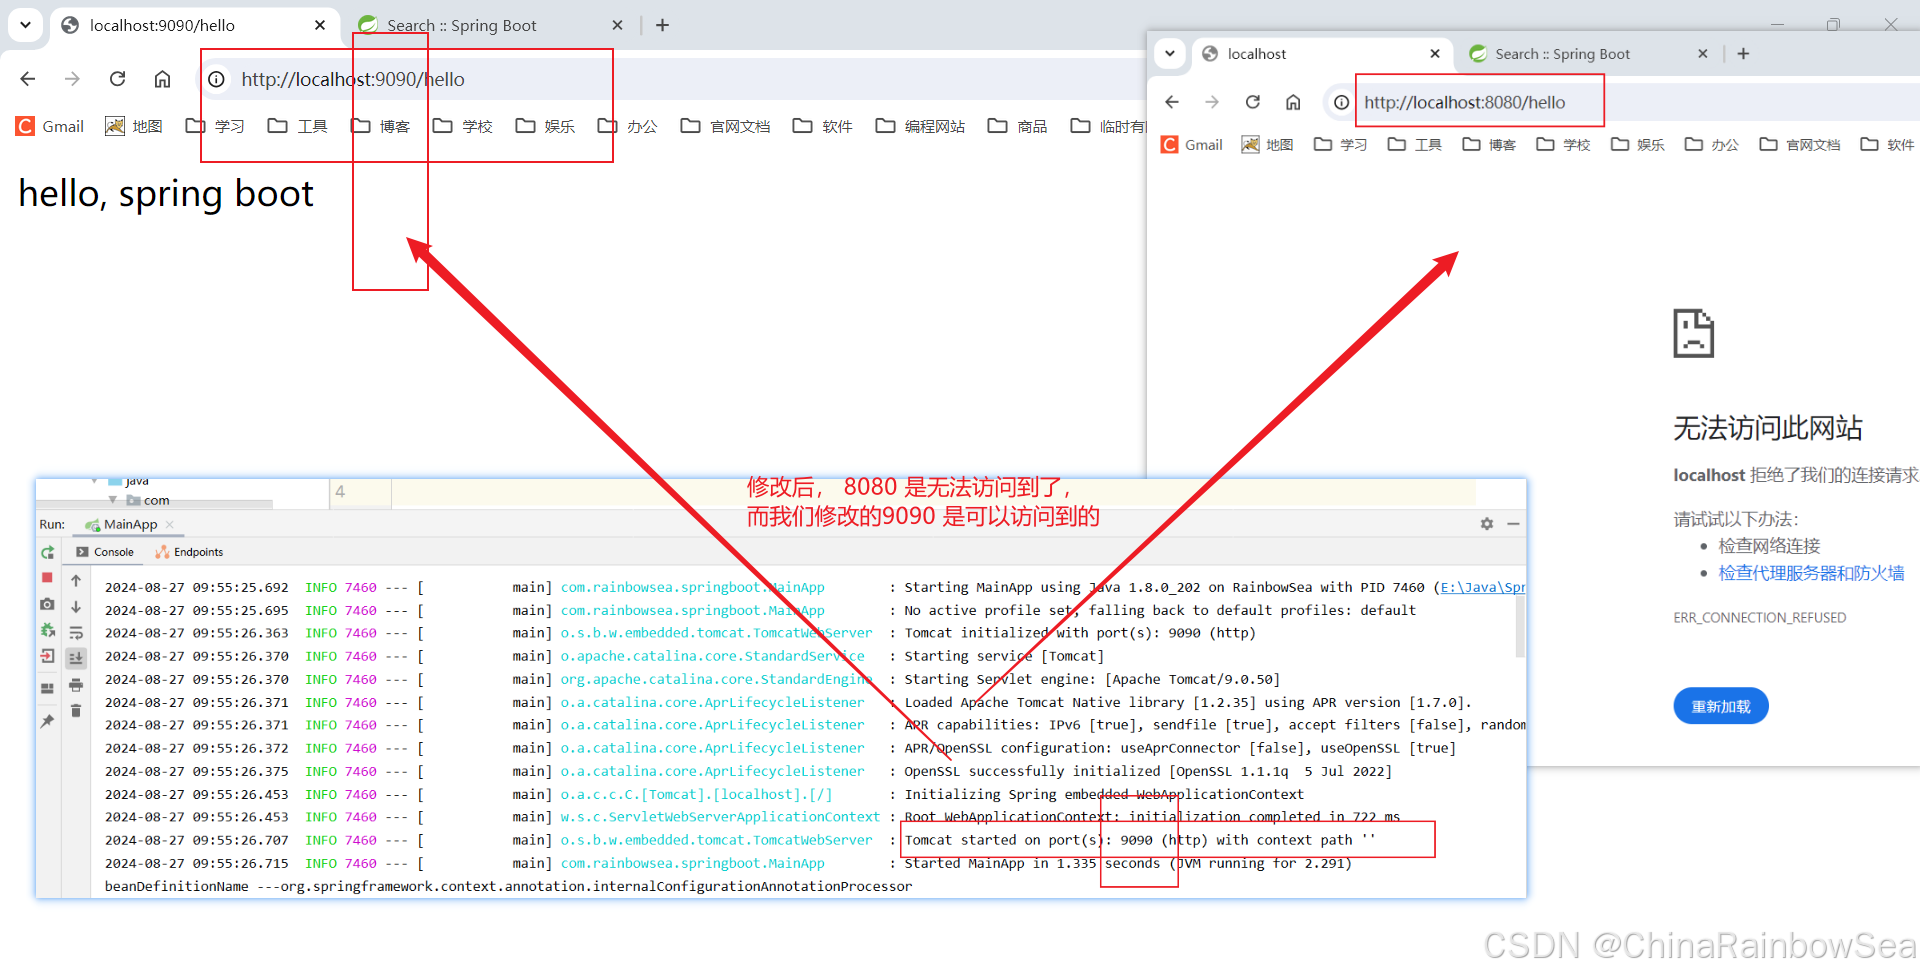
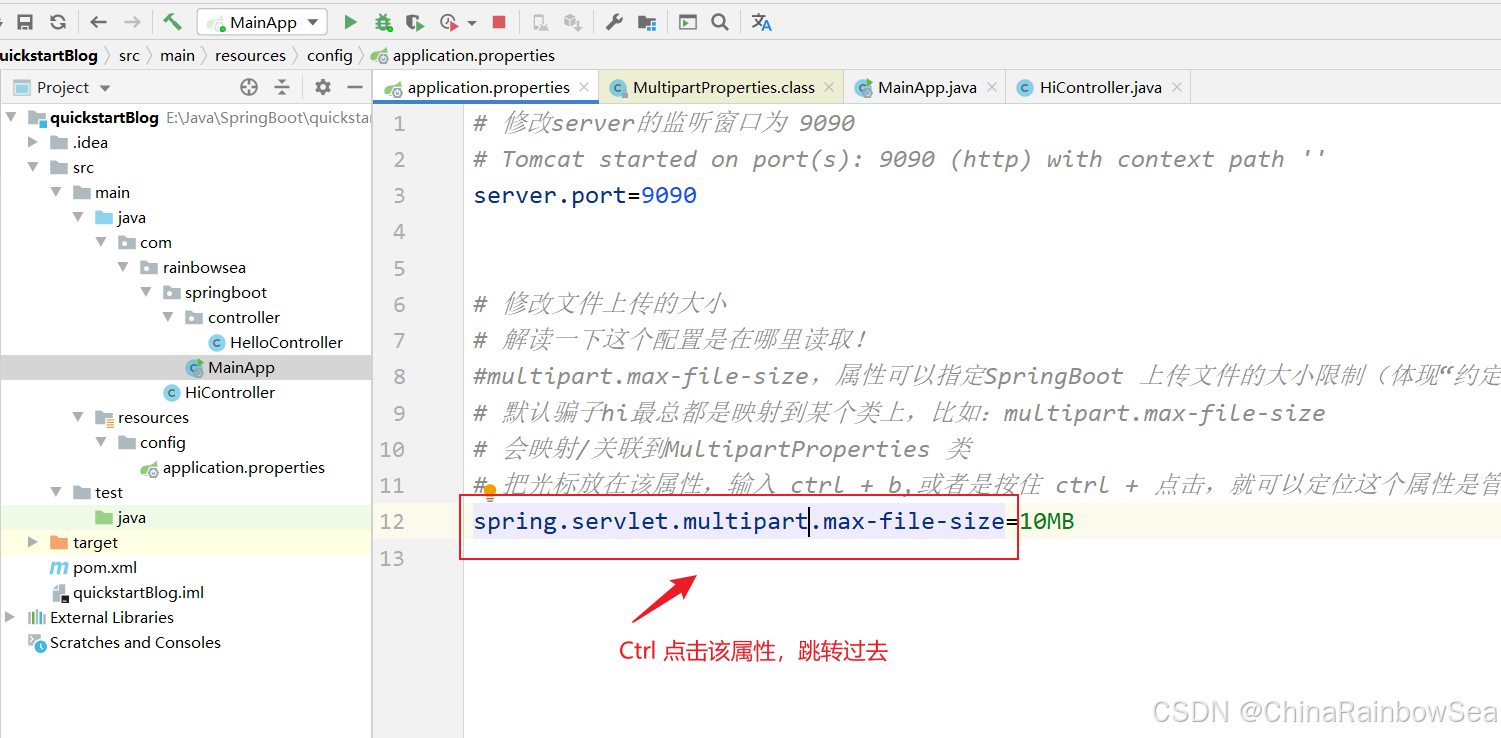
编写配置:设置修改 Server 的监听窗口为 9090
编写配置好后,运行主程序,重新加载程序,看看。
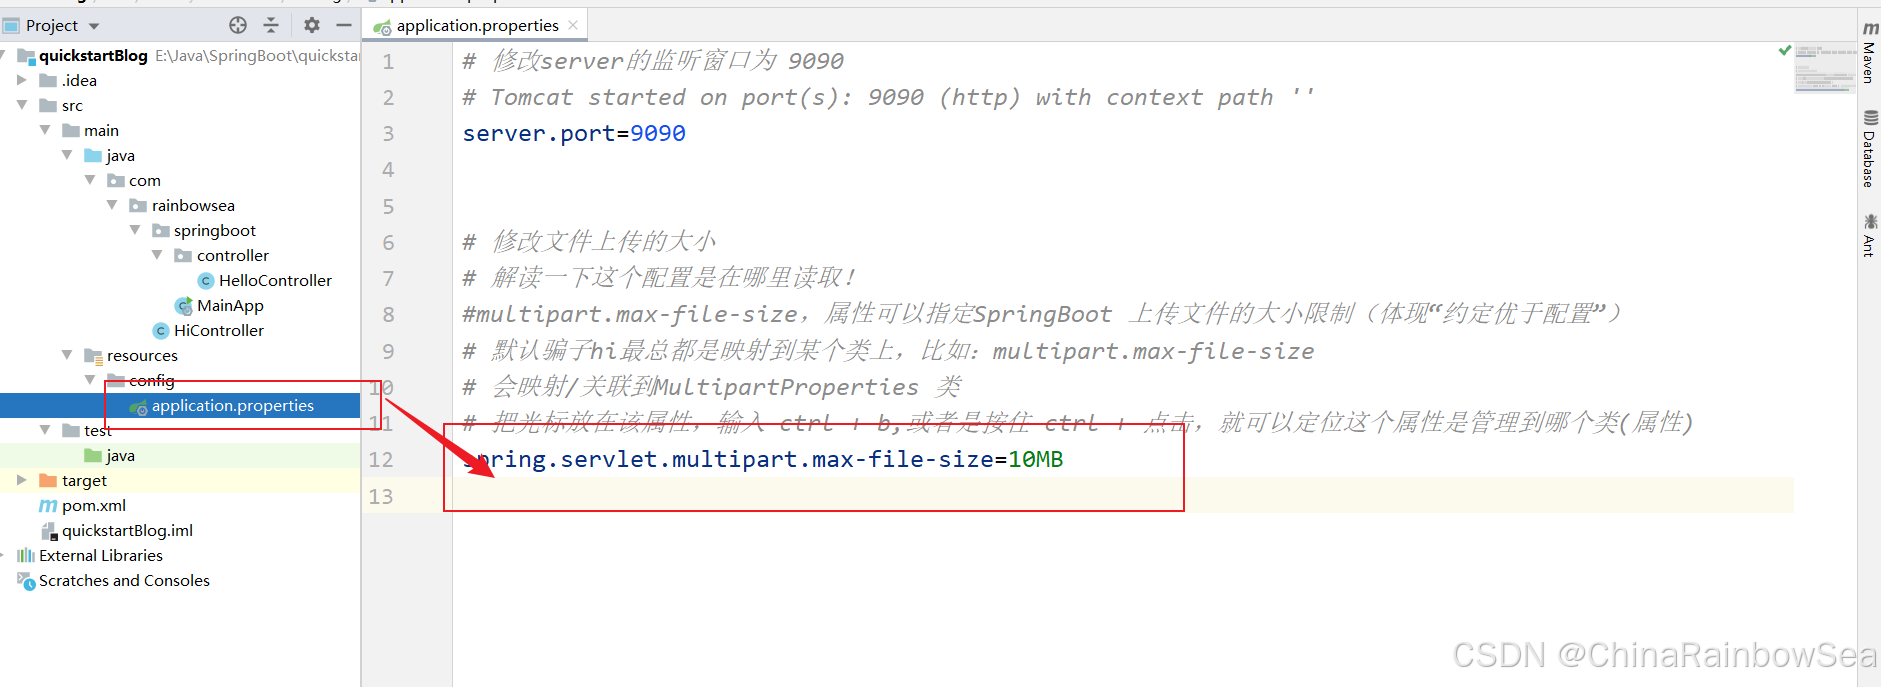
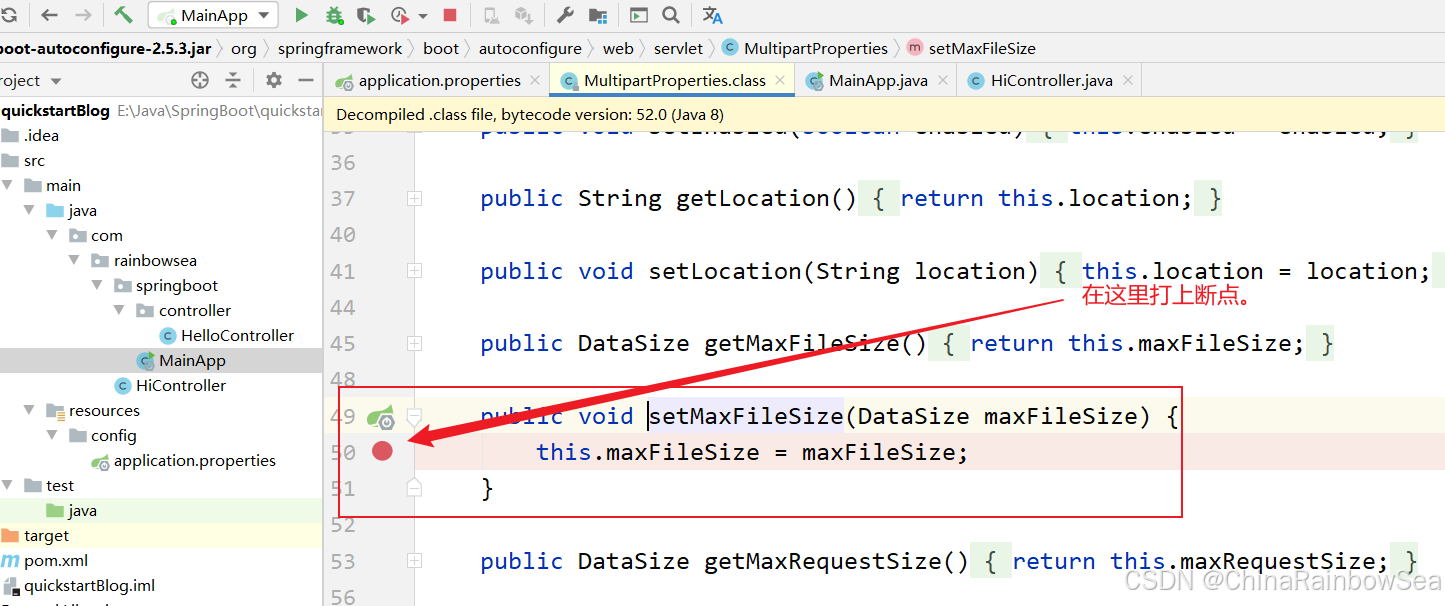
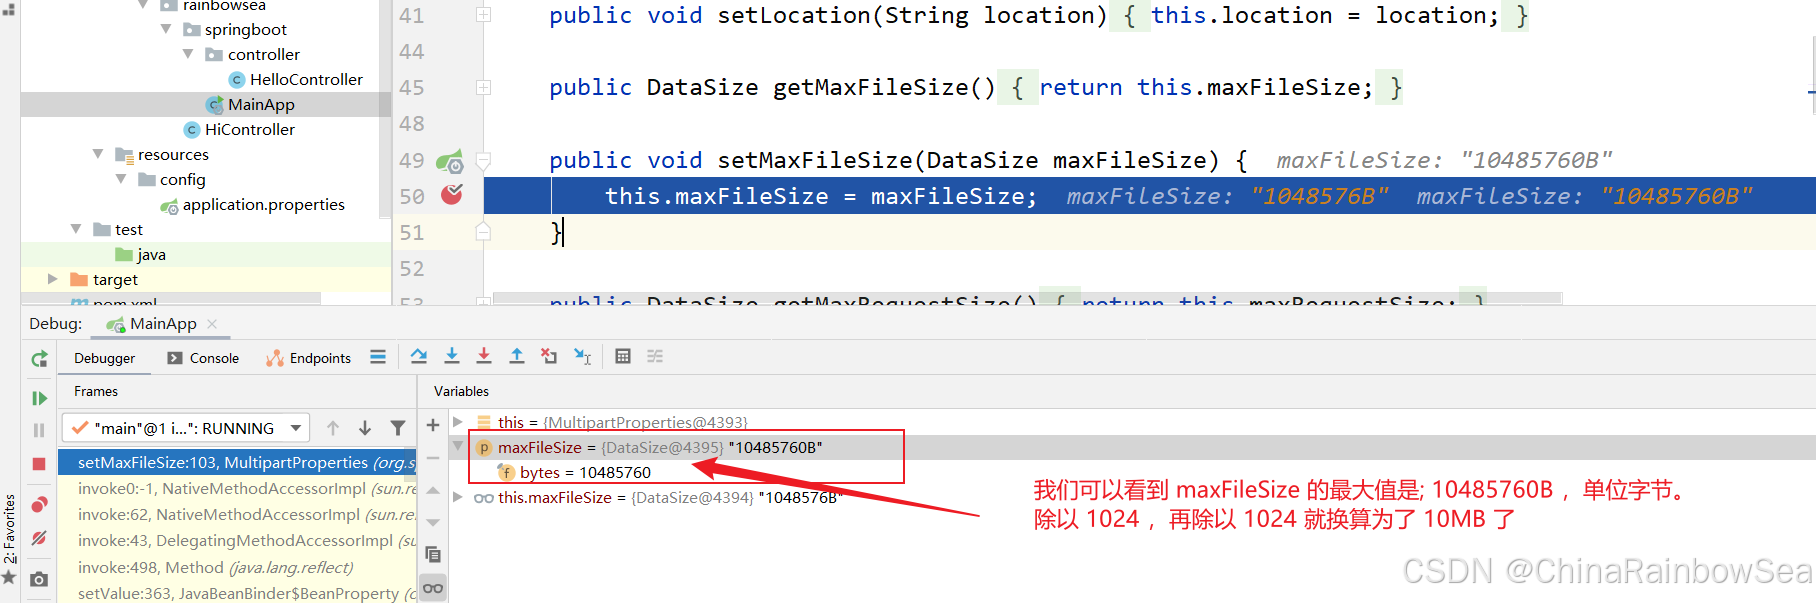
演示 2: 修改文件上传的大小;
这里,我们想要看到效果的话,需要 Debug,打上断点,进行 Debug 调试才可以比较清除的看到效果。
演示三: 配置开始的项目根的映射路径 .
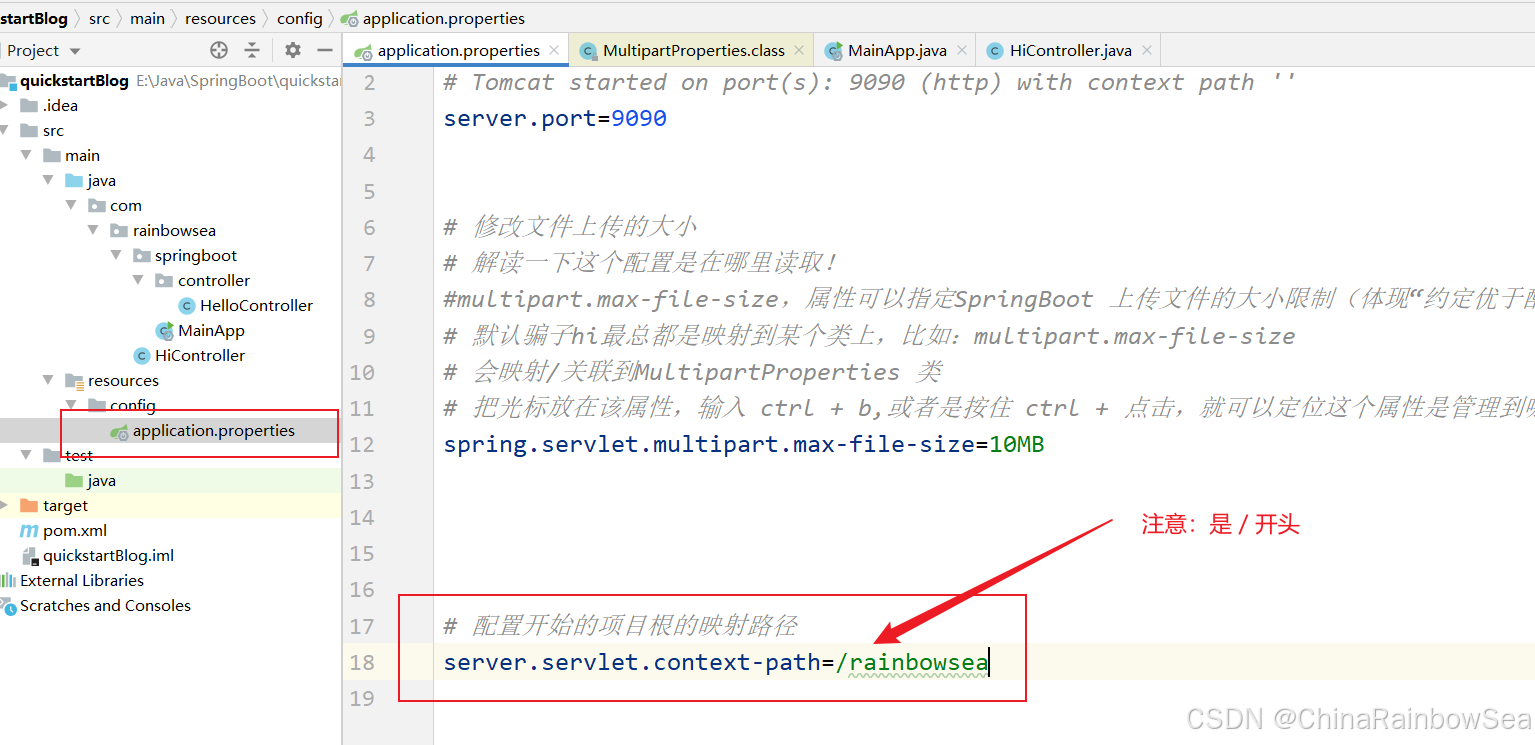
重新启动程序,测试:
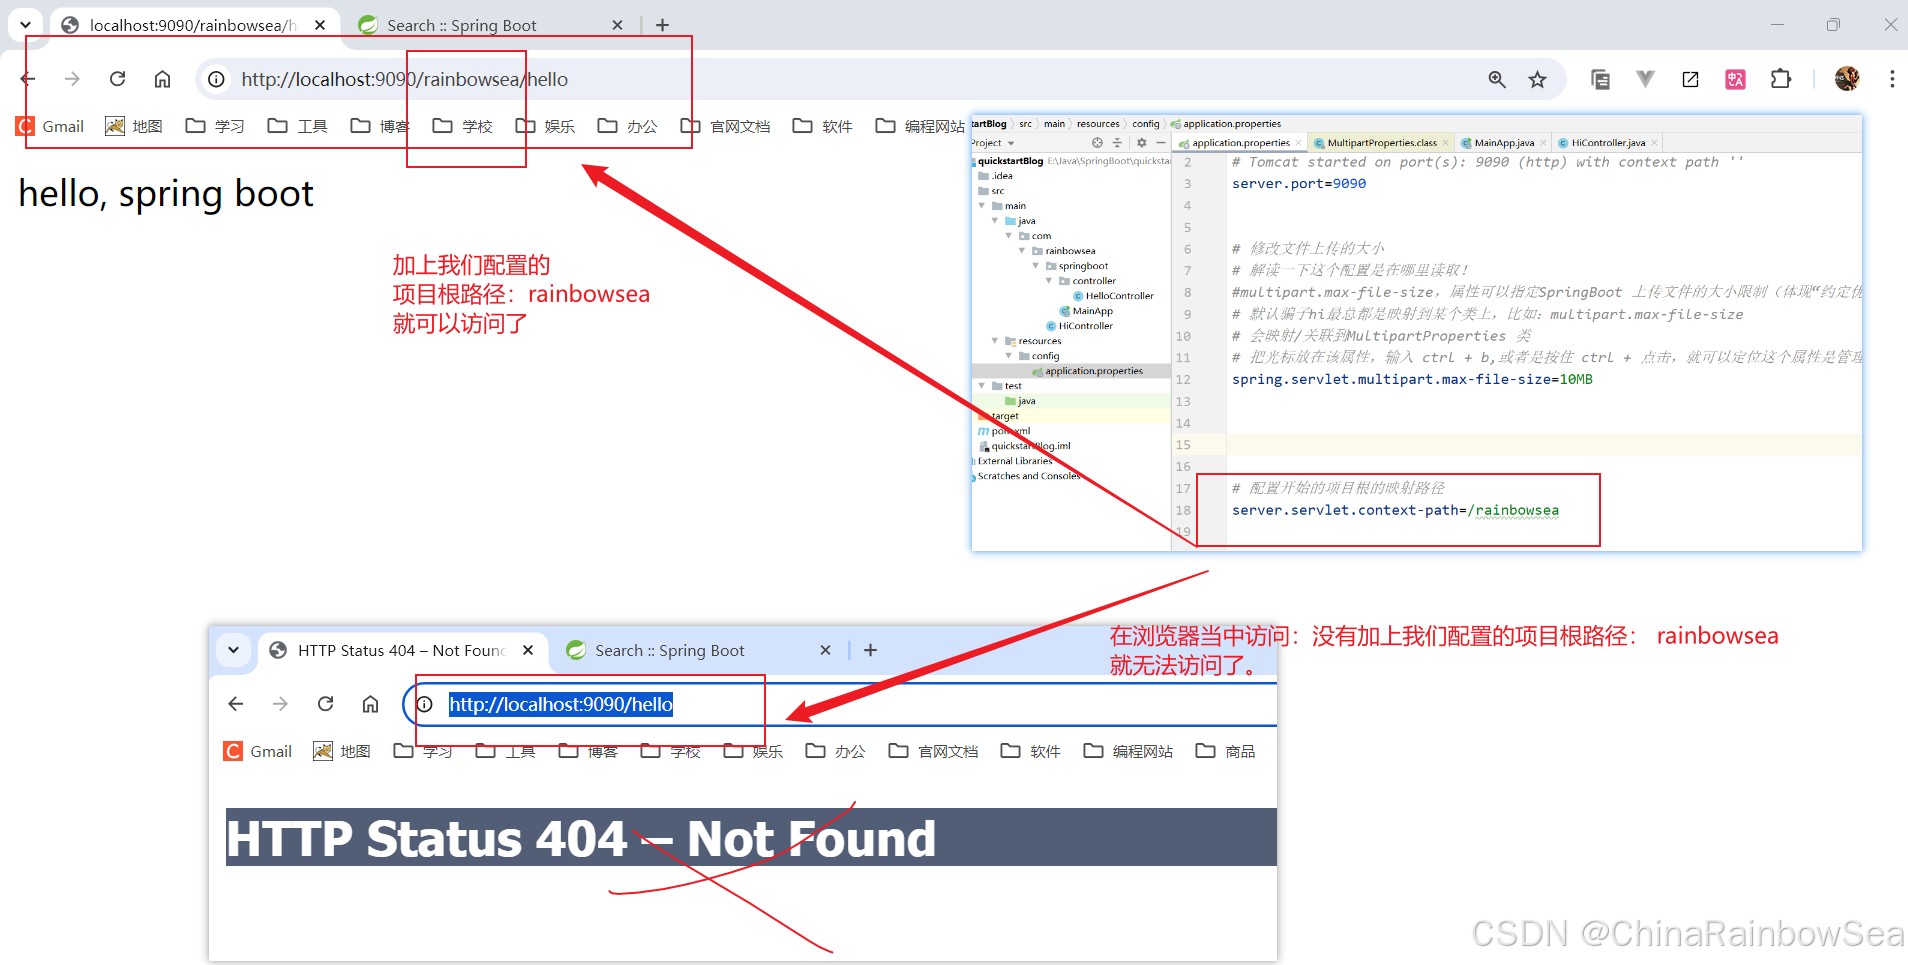
特别说明:讲解
上述的配置文件时在哪里读取的
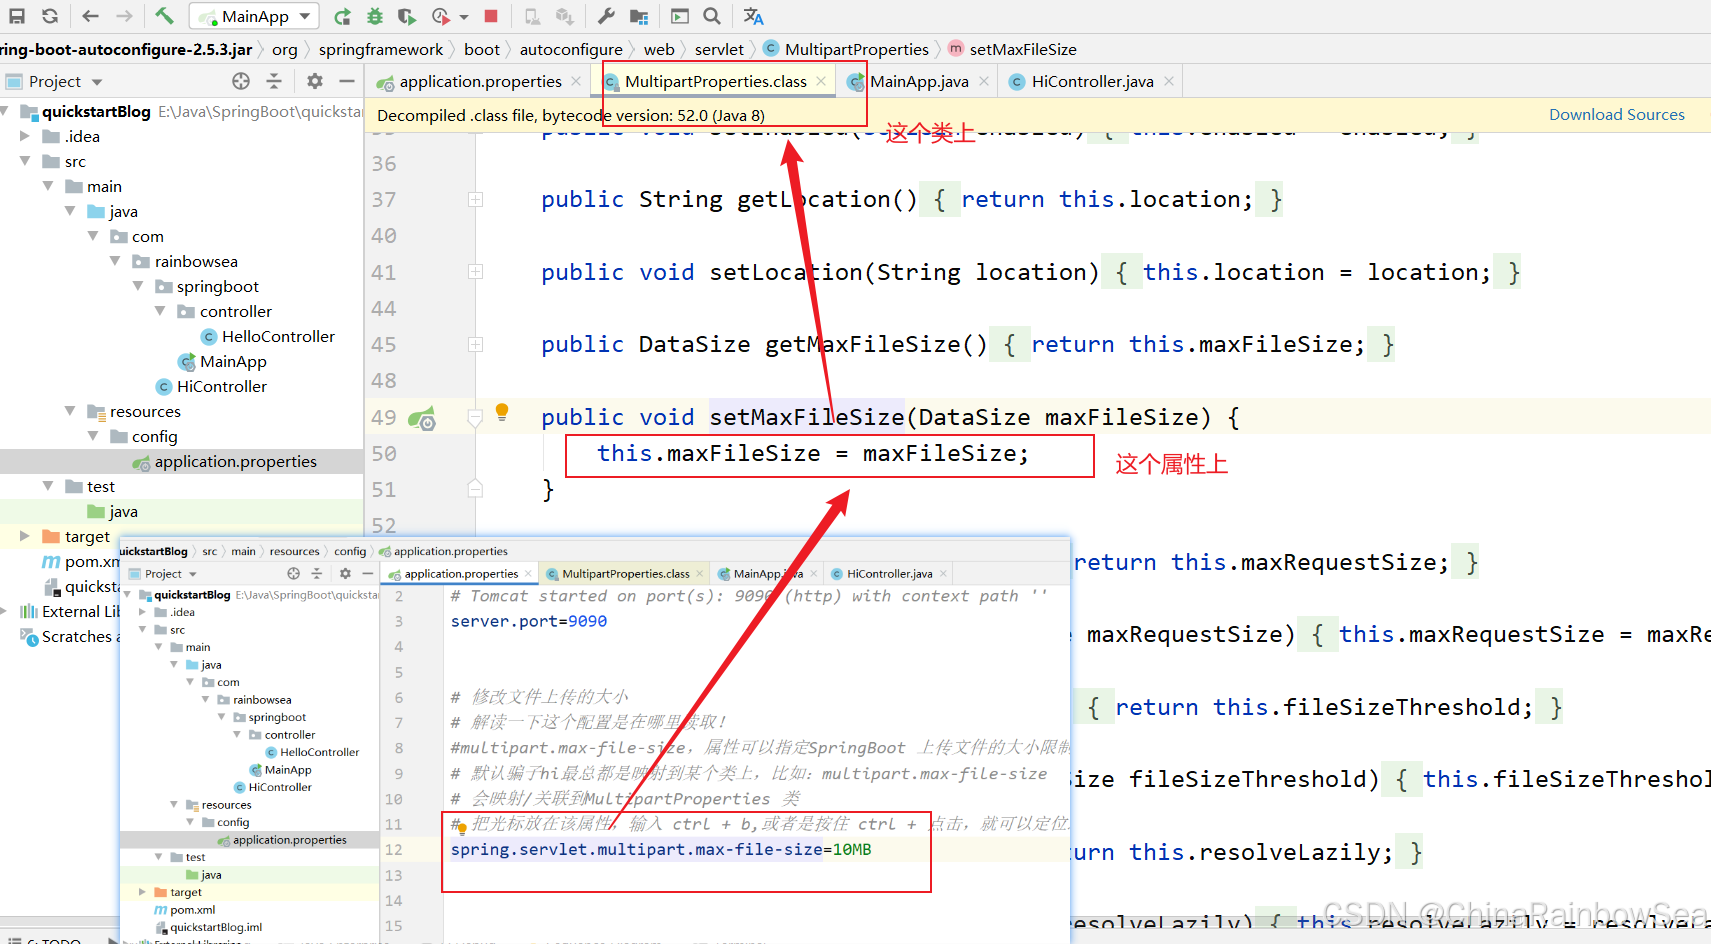
比如:multipart.max-file-size,属性可以指定 SpringBoot 上传文件的大小限制(体现“约定优于配置”)
默认 Spring Boot 都会将其映射到某个类上,比如:multipart.max-file-size,会映射/关联到 MultipartProperties 类。配置都会被映射到相对应的类上的。
而我们将光标放在该属性,输入 ctrl + b,或者是按住 ctrl + 点击,就可以定位这个属性是管理到哪个类(属性)
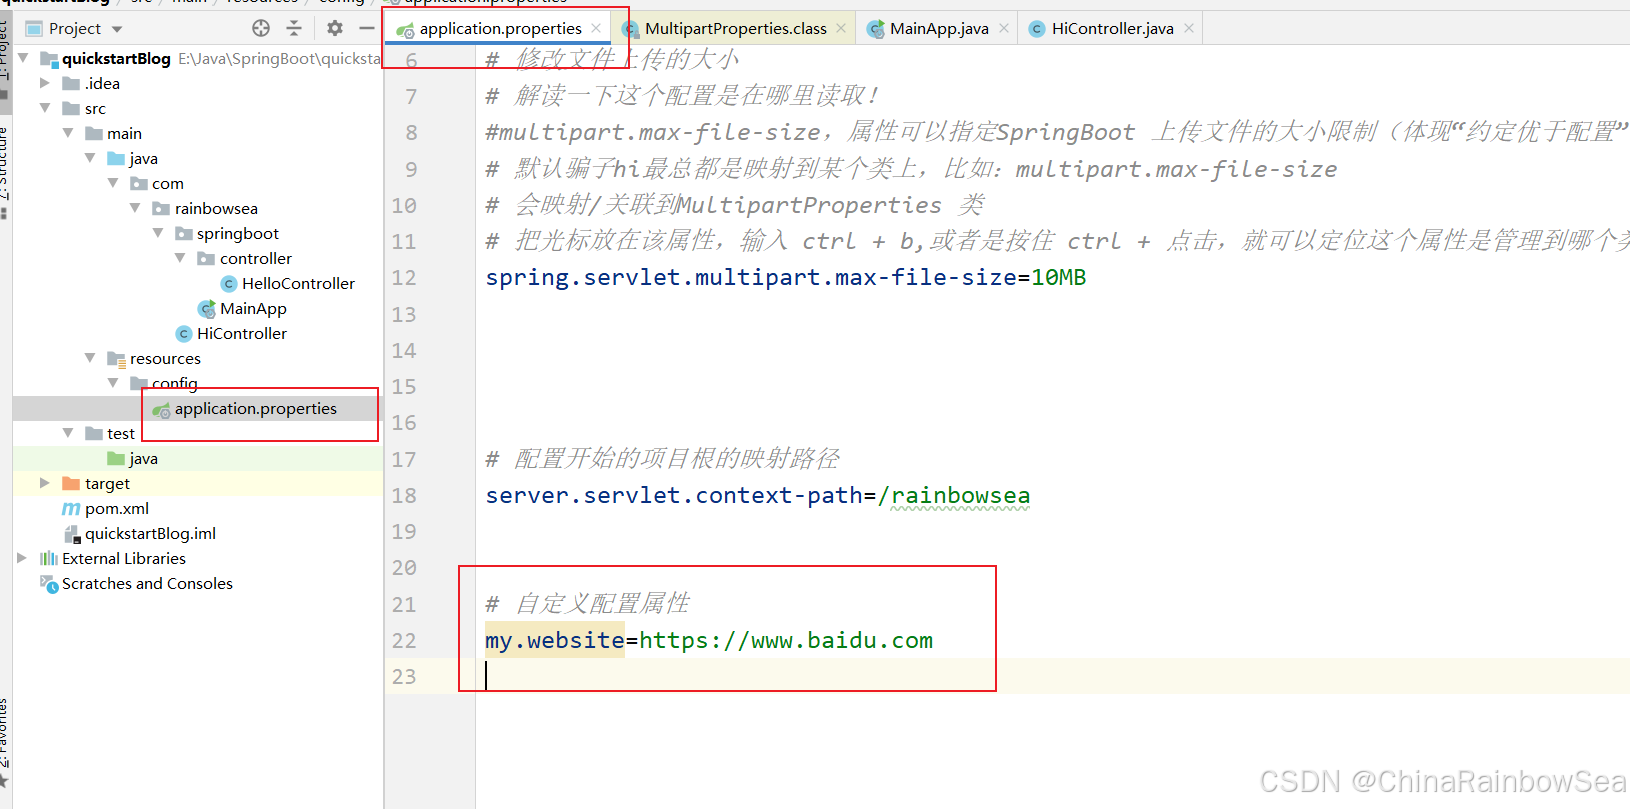
5.1.4 Spring Boot 中 application.properties 自定义配置
在 Spring Boot 中,我们还可以还在 .properties 文件中自定义配置,通过 @Value("${}") 的方式来获取对应属性值。
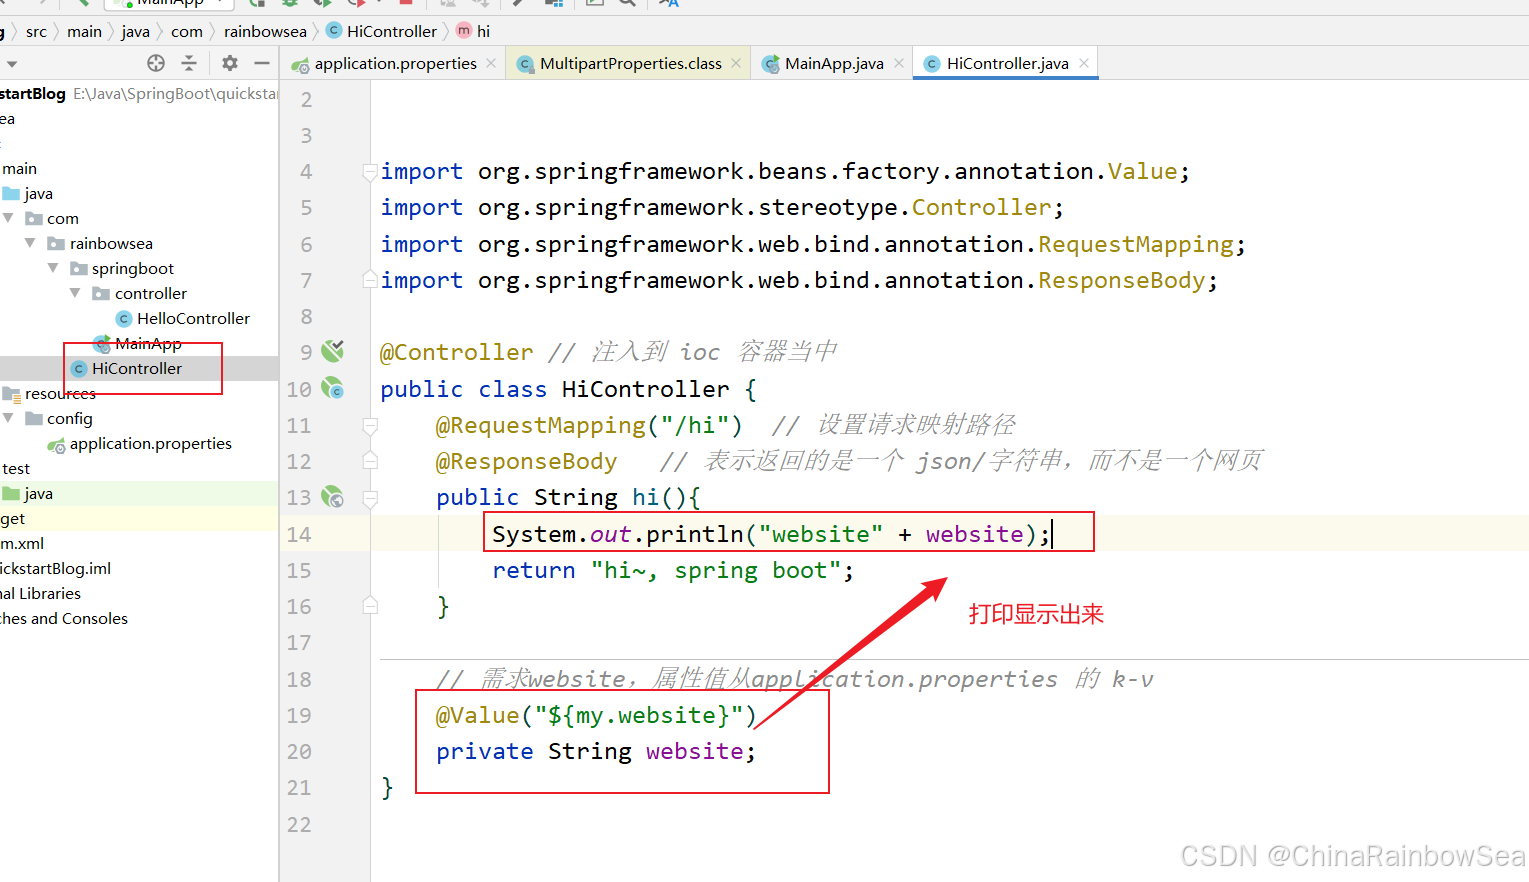
运行测试:
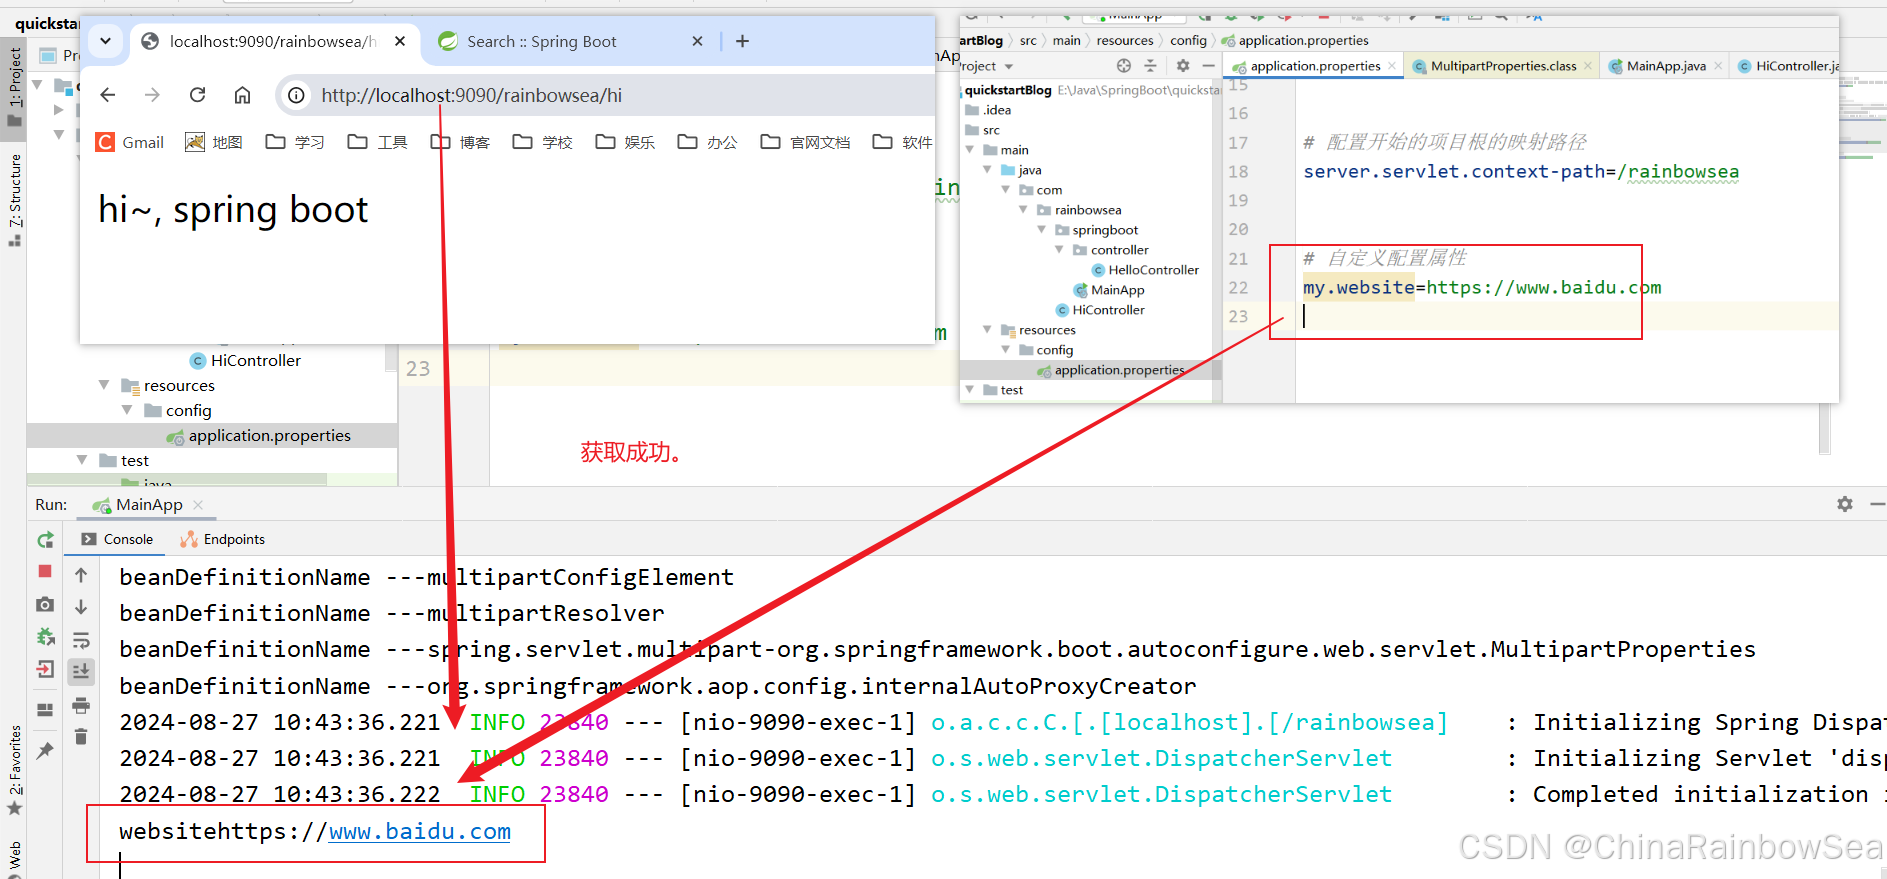
当然,我们也时可以 将其 配置到 Bean 对象上的,只不过,配置到 Bean 对象上的话,有更好的方式,可以用 Spring Boot 的容器管理。
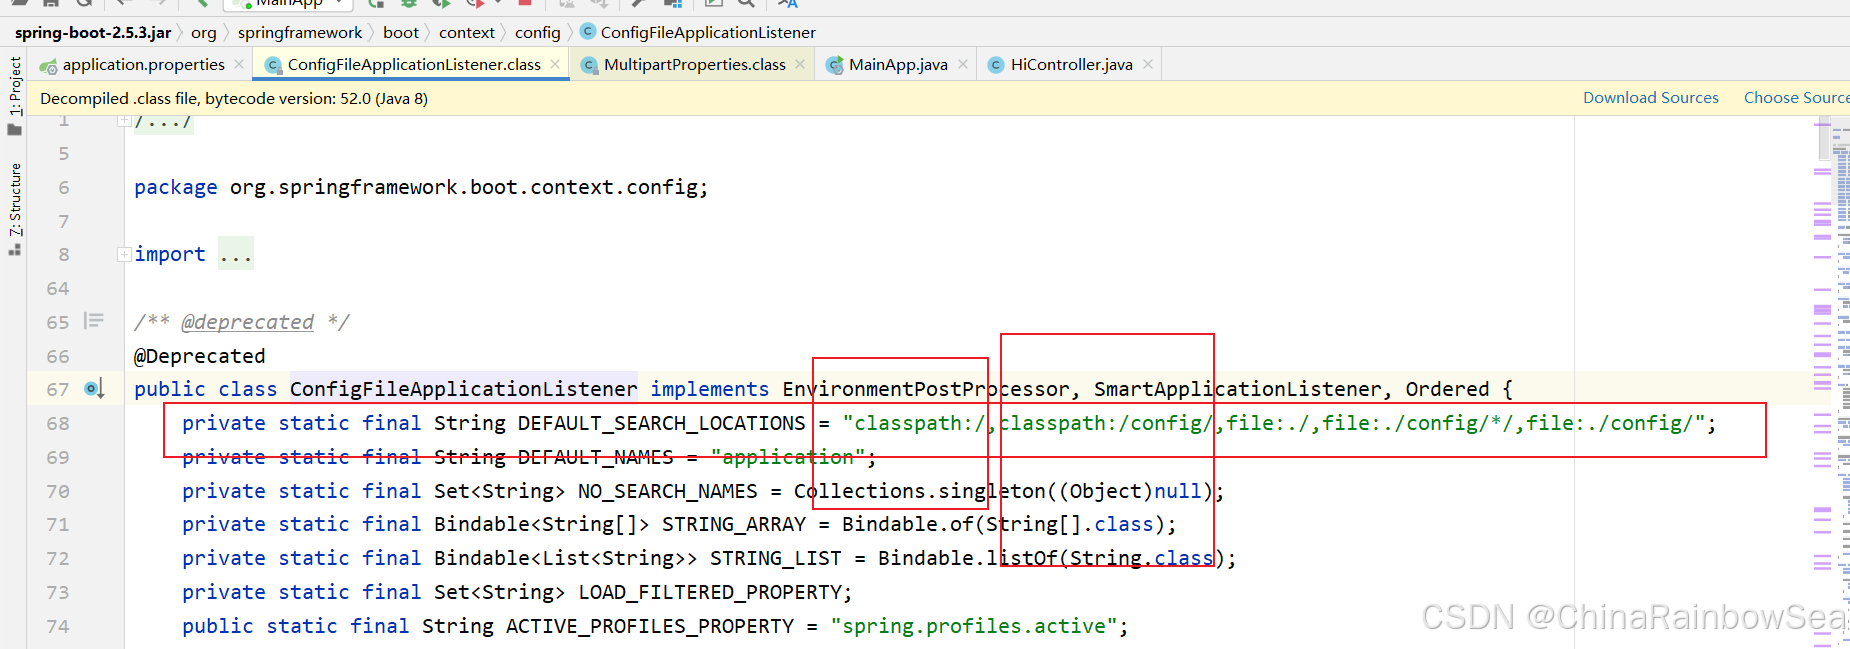
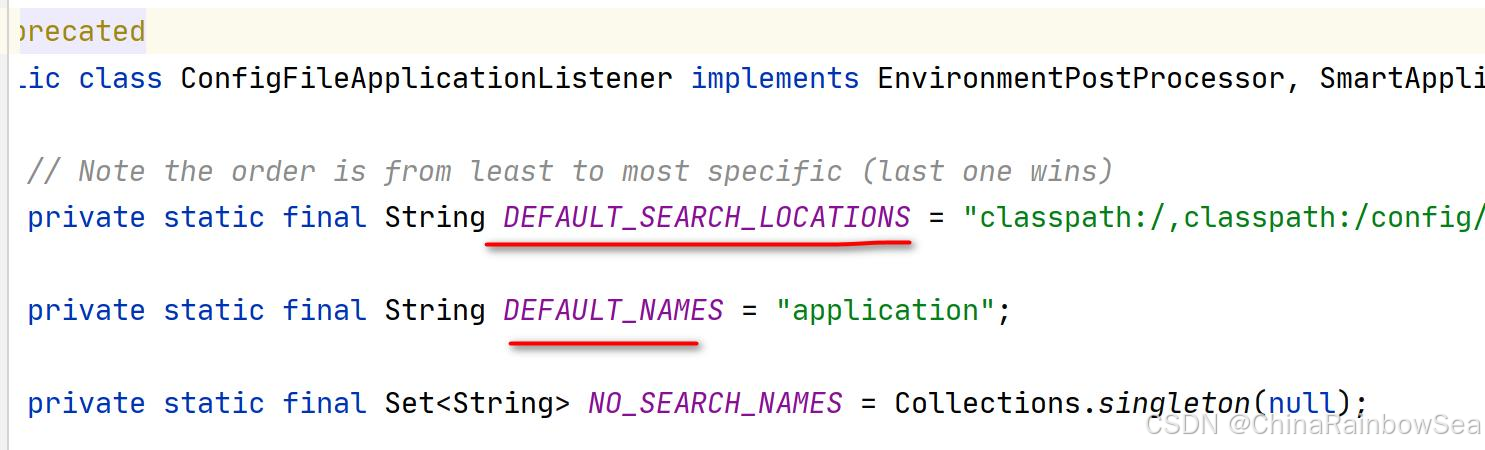
6.1 Spring Boot 中在哪里配置读取 application.properties 配置文件
打开 ConfigFileApplicationListener.java , 看一下源码;
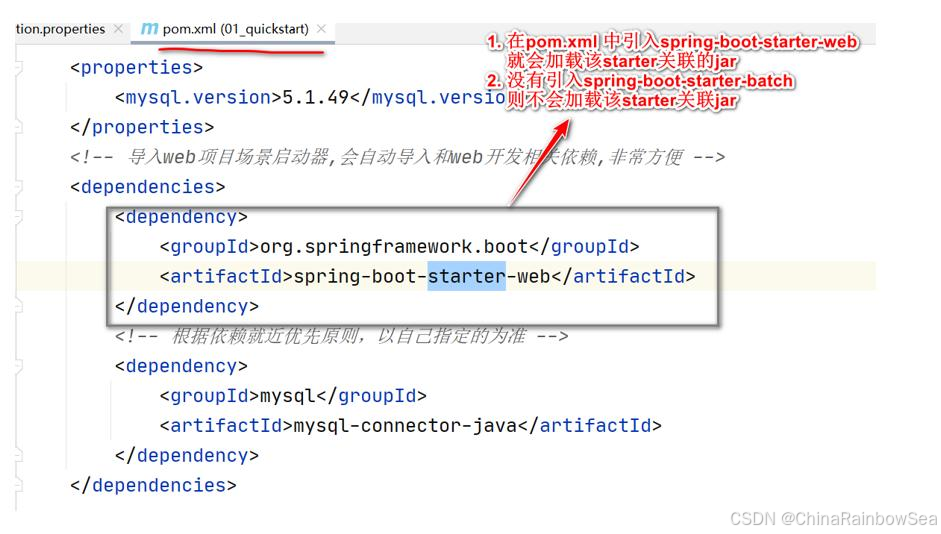
7.1 自动配置,遵守按需加载原则
自动配置遵守按需加载原则:也就是说,引入了哪个场景 starter启动器 就会加载该场景关联,的 jar 包,没有引入的 starter 则不会加载其关联 jar 。
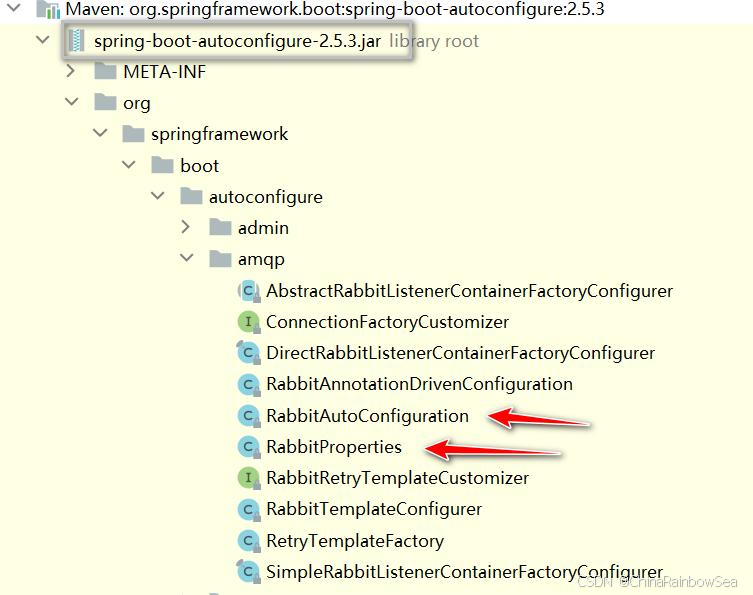
SpringBoot 所有的自动配置功能都在 spring-boot-autoconfigure 包里面;
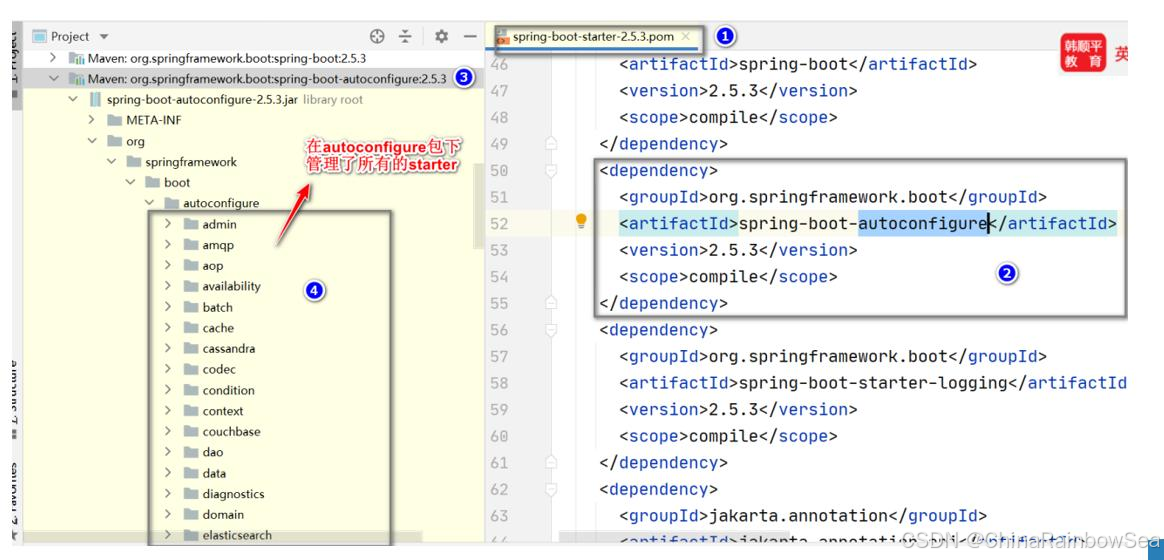
在 Spring Boot 中的自动配置包,一般是 XXxAutoConfiguration.java 对应 XXxProperties.java,如图
3. 总结:
Spring Boot 理解其中的 “约定优于配置”,又称约定编程,是一种软件设计规范,本质上是对系统,类库或框架中一些东西。减少不必要的配置,使用约定(默认的配置)吗。
Spring Boot 当中的 jar 版本的查看,以及 修改 Spring Boot 当中的 jar 版本的为字节所需。方式一: 直接在项目的
pom.xml文件当中直接导入,自己想要的jar的版本即可。方式二: 和方式一是一样的,不同的是编写方式,有所不同:“方式二:是将jar信息和jar的版本信息分开来编写的了”。Spring Boot 当中的 starter 场景启动器,Spring Boot 官方提供的 starter 场景启动器的介绍说明:https://docs.spring.io/spring-boot/reference/using/build-systems.html#using.build-systems.starters 。
Spring Boot 自动配置,Spring Boot 默认的扫描包结构,修改配置扫描包
Spring Boot 当中核心配置文件
application.properties的理解和使用。application.properties的每个配置属性,都对应这 Spring Boot 当中的某个类当中的某个属性,并且加入到了 ioc 容器当中。在 Spring Boot 中的自动配置包,一般是 XXxAutoConfiguration.java 对应 XXxProperties.java
文章转载自:Rainbow-Sea
原文链接:https://www.cnblogs.com/TheMagicalRainbowSea/p/18387661

还未添加个人签名 2023-06-19 加入
还未添加个人简介


评论