简介
如何在 OpenHarmony 上使用 SeetaFace2 人脸识别库?简介相信大部分同学们都已了解或接触过 OpenAtom OpenHarmony(以下简称“OpenHarmony”)了,但你一定没在 OpenHarmony 上实现过人脸识别功能,跟着本文带你快速在 OpenHarmony 标准设备上基于 SeetaFace2 和 OpenCV 实现人脸识别。
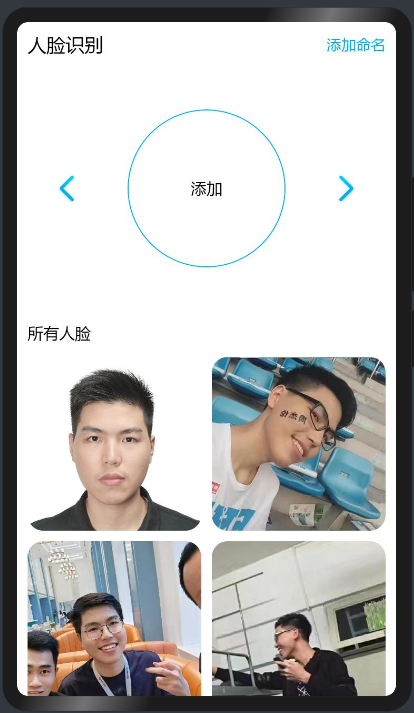
项目效果
本项目实现了导入人脸模型、人脸框选和人脸识别三大功能,操作流程如下:
录入页面点击右下角按钮,跳转拍摄页面进行拍照;
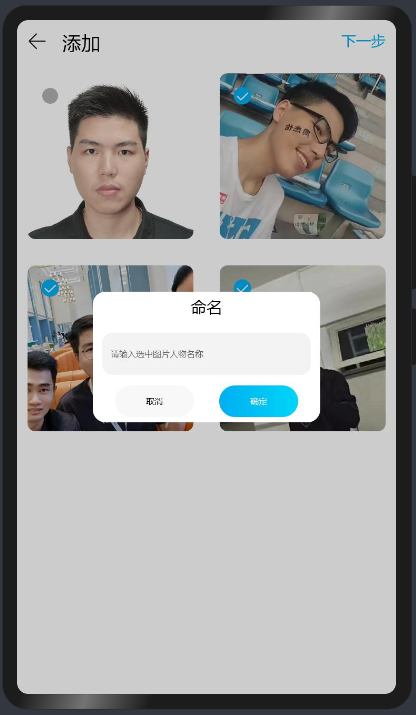
选择一张或多张人脸作为训练模型,并设置对应的名字;
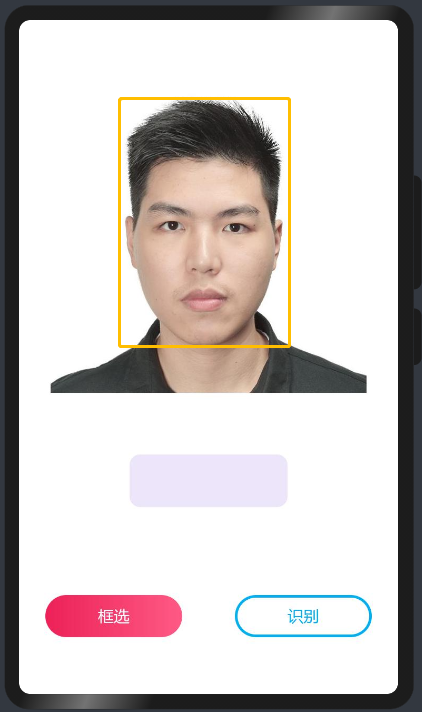
选择一张未录入的人脸图片,点击框选按钮实现人脸图片框选功能;
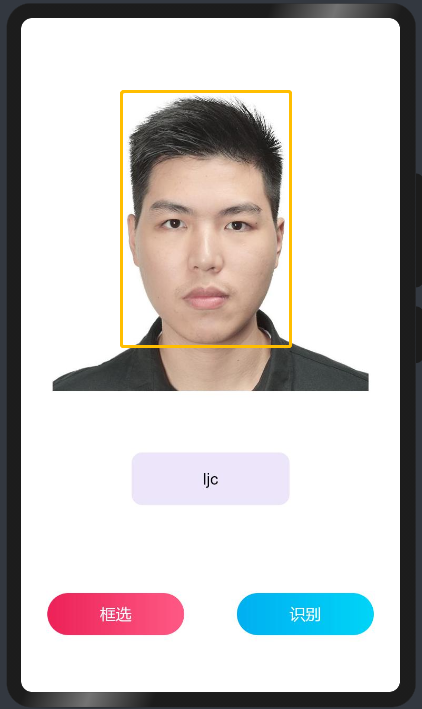
最后点击识别,应用会对当前图片进行匹配,最终在界面中显示识别结果。
快速上手
设备端开发
设备端通过 OpenCV 对图像进行处理并通过 Seetaface2 对图形数据进行人脸头像的识别,最终输出对应的 NAPI 接口提供给应用端调用。因此设备端开发主要涉及到 OpenCV 和 Seetaface2 的移植以及 NAPI 接口的开发。
OpenCV 库移植
OpenCV 是一个功能非常强大的开源计算机视觉库。此库已由知识体系工作组移植到了 OpenHarmony 中,后期还会将此库合入到主仓。在此库上主仓之前,我们只需要以下几个步骤就可以实现 OpenCV 的移植使用。
通过以下命令下载已经移植好的 OpenCV
git clone git@gitee.com:zhong-luping/ohos_opencv.git
复制代码
2.将 OpenCV 拷贝到 OpenHarmony 目录的 third_party 下
cp -raf opencv ~/openharmony/third_party/
复制代码
3.适当裁剪编译选项
打开 OpenCV 目录下的 BUILD.gn,如下:
不需要 video 以及 flann 功能,将对应的模块注释即可。
import("//build/ohos.gni")group("opencv") { deps = [ "//third_party/opencv/modules/core:opencv_core", // "//third_party/opencv/modules/flann:opencv_flann", "//third_party/opencv/modules/imgproc:opencv_imgproc", "//third_party/opencv/modules/ml:opencv_ml", "//third_party/opencv/modules/photo:opencv_photo", "//third_party/opencv/modules/dnn:opencv_dnn", "//third_party/opencv/modules/features2d:opencv_features2d", "//third_party/opencv/modules/imgcodecs:opencv_imgcodecs", "//third_party/opencv/modules/videoio:opencv_videoio", "//third_party/opencv/modules/calib3d:opencv_calib3d", "//third_party/opencv/modules/highgui:opencv_highgui", "//third_party/opencv/modules/objdetect:opencv_objdetect", "//third_party/opencv/modules/stitching:opencv_stitching", "//third_party/opencv/modules/ts:opencv_ts", // "//third_party/opencv/modules/video:opencv_video", "//third_party/opencv/modules/gapi:opencv_gapi", ]}
复制代码
4.添加依赖子系统的 part_name,编译框架子系统会将编译出的库拷贝到系统文件中。
此项目中我们新建了一个 SeetaFaceApp 的子系统,该子系统中命名 part_name 为 SeetafaceApi,所以我们需要在对应模块中的 BUILD.gn 中加上 part_name="SeetafaceApi"以 module/core 为例:
ohos_shared_library("opencv_core"){ sources = [ ... ]configs = [ ... ]deps = [ ... ]part_name = "SeetafaceApi"}
复制代码
5.编译工程需要添加 OpenCV 的依赖。
在生成 NAPI 的 BUILD.gn 中添加以下依赖:
deps += [ "//third_party/opencv:opencv" ]
复制代码
至此,人脸识别中 OpenCV 的移植使用完成。
SeetaFace2 库移植
SeetaFace2 是中科视拓开源的第二代人脸识别库。包括了搭建一套全自动人脸识别系统所需的三个核心模块,即:人脸检测模块 FaceDetector、面部关键点定位模块 FaceLandmarker 以及人脸特征提取与比对模块 FaceRecognizer。
关于 SeetaFace2 的移植请参照文档:SeetaFace2 移植开发文档。
NAPI 接口开发
关于 OpenHarmony 中的 NAPI 开发,参考视频:OpenHarmony 中 napi 的开发视频教程。本文将重点讲解 NAPI 接口如何实现 OpenCV 以及 SeetaFace 的调用。
人脸框获取的 NAPI 接口的实现。
int GetRecognizePoints(const char *image_path);
此接口主要是通过应用层输入一张图片,通过 OpenCV 的 imread 接口获取到图片数据,并通过人脸检测模块 FaceDetector 分析获得图片中所有的人脸矩形框(矩形框是以 x,y,w,h 的方式)并将人脸框矩形以数组的方式返回到应用层。
人脸框矩形获取的主要代码如下:
static int RecognizePoint(string image_path, FaceRect *rect, int num){    if (rect == nullptr) {        cerr << "NULL POINT!" << endl;        LOGE("NULL POINT! \n");        return -1;    }    seeta::ModelSetting::Device device = seeta::ModelSetting::CPU;    int id = 0;
    /* 设置人脸识别模型。*/    seeta::ModelSetting FD_model( "/system/usr/model/fd_2_00.dat", device, id );    seeta::ModelSetting FL_model( "/system/usr/model/pd_2_00_pts81.dat", device, id );
    seeta::FaceDetector FD(FD_model);    seeta::FaceLandmarker FL(FL_model);
    FD.set(seeta::FaceDetector::PROPERTY_VIDEO_STABLE, 1);
    /* 读取图片数据 */    auto frame = imread(image_path);    seeta::cv::ImageData simage = frame;    if (simage.empty()) {        cerr << "Can not open image: " << image_path << endl;        LOGE("Can not open image: %{public}s", image_path.c_str());        return -1;    }    /* 图片数据进行人脸识别处理 ,获取所有的人脸框数据对象*/    auto faces = FD.detect(simage);    if (faces.size <= 0) {        cerr << "detect " << image_path << "failed!" << endl;        LOGE("detect image: %s failed!", image_path.c_str());        return -1;    }    for (int i = 0; (i < faces.size && i < num); i++) {        /* 将所有人脸框对象数据以坐标形式输出*/        auto &face = faces.data[i];        memcpy(&rect[i], &(face.pos), sizeof(FaceRect));    }    return faces.size;}
复制代码
其中 FD_model 是人脸检测模型,而 FL_model 是面部关键点定位模型(此模型分为 5 点定位和 81 点定位,本项目中使用的是 81 点定位模型),这些模型从开源项目中免费获取。
通过以上方式获取到对应的人脸矩形框后,再将矩形框以数组的方式返回到应用端:
string image = path; p = (FaceRect *)malloc(sizeof(FaceRect) * MAX_FACE_RECT); /* 根据图片进行人脸识别并获取人脸框坐标点 */ int retval = RecognizePoint(image, p, MAX_FACE_RECT); if (retval <= napi_ok) { LOGE("GetNapiValueString failed!"); free(p); return result; } /*将所有坐标点以数组方式返回到应用端*/ for (int i = 0; i < retval; i++) { int arry_int[4] = {p[i].x, p[i].y, p[i].w, p[i].h}; int arraySize = (sizeof(arry_int) / sizeof(arry_int[0])); for (int j = 0; j < arraySize; j++) { napi_value num_val; if (napi_create_int32(env, arry_int[j], &num_val) != napi_ok) { LOGE("napi_create_int32 failed!"); return result; } napi_set_element(env, array, i*arraySize + j, num_val); } } if (napi_create_object(env, &result) != napi_ok) { LOGE("napi_create_object failed!"); free(p); return result; } if (napi_set_named_property(env, result, "recognizeFrame", array) != napi_ok) { LOGE("napi_set_named_property failed!"); free(p); return result; } LOGI(""); free(p); return result;
复制代码
其中 array 是通过 napi_create_array 创建的一个 NAPI 数组对象,通过 napi_set_element 将所有的矩形框数据保存到 array 对象中,最后通过 napi_set_named_property 将 array 转换成应用端可识别的对象类型 result 并将其返回。
2. 人脸搜索识别初始化与逆初始化。
int FaceSearchInit();
int FaceSearchDeinit();
这 2 个接口主要是提供给人脸搜索以及识别调用的,初始化主要包含模型的注册以及识别模块的初始化:
static  int FaceSearchInit(FaceSearchInfo *info){    if (info == NULL) {        info = (FaceSearchInfo *)malloc(sizeof(FaceSearchInfo));        if (info == nullptr) {            cerr << "NULL POINT!" << endl;            return -1;        }    }
    seeta::ModelSetting::Device device = seeta::ModelSetting::CPU;    int id = 0;    seeta::ModelSetting FD_model( "/system/usr/model/fd_2_00.dat", device, id );    seeta::ModelSetting PD_model( "/system/usr//model/pd_2_00_pts5.dat", device, id );    seeta::ModelSetting FR_model( "/system/usr/model/fr_2_10.dat", device, id );
    info->engine = make_shared<seeta::FaceEngine>(FD_model, PD_model, FR_model, 2, 16);    info->engine->FD.set( seeta::FaceDetector::PROPERTY_MIN_FACE_SIZE, 80);
    info->GalleryIndexMap.clear();
    return 0;
复制代码
而逆初始化就是做一些内存的释放。
static void FaceSearchDeinit(FaceSearchInfo *info, int need_delete){    if (info != nullptr) {        if (info->engine != nullptr) {        }
        info->GalleryIndexMap.clear();        if (need_delete) {            free(info);            info = nullptr;        }    }}
复制代码
人脸搜索识别注册接口的实现。
int FaceSearchRegister(const char *value);
需要注意的是,该接口需要应用端传入一个 json 数据的参数,主要包含注册人脸的名字,图片以及图片个数,如{"name":"刘德华","sum":"2","image":{"11.jpg","12.jpg"}}。而解析参数的时候需要调用 napi_get_named_property 对 json 数据的各个对象进行解析,具体代码如下:
  napi_get_cb_info(env, info, &argc, &argv, &thisVar, &data);    napi_value object = argv;    napi_value value = nullptr;
    if (napi_get_named_property(env, object, (const char *)"name", &value) == napi_ok) {        char name[64] = {0};        if (GetNapiValueString(env, value, (char *)name, sizeof(name)) < 0) {            LOGE("GetNapiValueString failed!");            return result;        }        reg_info.name = name;    }    LOGI("name = %{public}s", reg_info.name.c_str());    if (napi_get_named_property(env, object, (const char *)"sum", &value) == napi_ok) {                if (napi_get_value_uint32(env, value, &sum) != napi_ok) {            LOGE("napi_get_value_uint32 failed!");            return result;        }    }    LOGI("sum = %{public}d", sum);    if (napi_get_named_property(env, object, (const char *)"image", &value) == napi_ok) {        bool res = false;        if (napi_is_array(env, value, &res) != napi_ok || res == false) {            LOGE("napi_is_array failed!");            return result;        }        for (int i = 0; i < sum; i++) {            char image[256] = {0};            napi_value imgPath = nullptr;            if (napi_get_element(env, value, i, &imgPath) != napi_ok) {                LOGE("napi_get_element failed!");                return result;            }            if (GetNapiValueString(env, imgPath, (char *)image, sizeof(image)) < 0) {                LOGE("GetNapiValueString failed!");                return result;            }            reg_info.path = image;            if (FaceSearchRegister(g_FaceSearch, reg_info) != napi_ok) {                retval = -1;                break;            }        }    }
复制代码
通过 napi_get_cb_info 获取从应用端传来的参数,并通过 napi_get_named_property 获取对应的 name 以及图片个数,最后通过 napi_get_element 获取图片数组中的各个 image,将 name 和 image 通过 FaceSearchRegister 接口将图片和名字注册到 SeetaFace2 模块的识别引擎中。具体实现如下:
static int FaceSearchRegister(FaceSearchInfo &info, RegisterInfo &gegister){    if (info.engine == nullptr) {        cerr << "NULL POINT!" << endl;        return -1;    }
    seeta::cv::ImageData image = cv::imread(gegister.path);    auto id = info.engine->Register(image);    if (id >= 0) {        info.GalleryIndexMap.insert(make_pair(id, gegister.name));    }
    return 0;}
复制代码
注册完数据后,后续可以通过该引擎来识别对应的图片。
4. 获取人脸搜索识别结果接口的实现。
char *FaceSearchGetRecognize(const char *image_path);
复制代码
该接口实现了通过传入一张图片,在识别引擎中进行搜索识别。如果识别引擎中有类似的人脸注册,则返回对应人脸注册时的名字,否则返回不识别(ignored)字样。该方法是通过异步回调的方式实现的:
    // 创建async work,创建成功后通过最后一个参数(commandStrData->asyncWork)返回async work的handle    napi_value resourceName = nullptr;    napi_create_string_utf8(env, "FaceSearchGetPersonRecognizeMethod", NAPI_AUTO_LENGTH, &resourceName);    napi_create_async_work(env, nullptr, resourceName, FaceSearchRecognizeExecuteCB, FaceSearchRecognizeCompleteCB,            (void *)commandStrData, &commandStrData->asyncWork);
    // 将刚创建的async work加到队列,由底层去调度执行    napi_queue_async_work(env, commandStrData->asyncWork);
复制代码
其中 FaceSearchRecognizeExecuteCB 实现了人脸识别
static void FaceSearchRecognizeExecuteCB(napi_env env, void *data){    CommandStrData *commandStrData = dynamic_cast<CommandStrData*>((CommandStrData *)data);    if (commandStrData == nullptr) {        HILOG_ERROR("nullptr point!", __FUNCTION__, __LINE__);        return;    }
    FaceSearchInfo faceSearch = *(commandStrData->mFaceSearch);    commandStrData->result = FaceSearchSearchRecognizer(faceSearch, commandStrData->filename);    LOGI("Recognize result : %s !", __FUNCTION__, __LINE__, commandStrData->result.c_str());}
复制代码
FaceSearchRecognizeCompleteCB 函数通过 napi_resolve_deferred 接口将识别结果返回到应用端。
static void FaceSearchRecognizeCompleteCB(napi_env env, napi_status status, void *data){    CommandStrData *commandStrData = dynamic_cast<CommandStrData*>((CommandStrData *)data);    napi_value result;
    if (commandStrData == nullptr || commandStrData->deferred == nullptr) {        LOGE("nullptr", __FUNCTION__, __LINE__);        if (commandStrData != nullptr) {            napi_delete_async_work(env, commandStrData->asyncWork);            delete commandStrData;        }
        return;    }
    const char *result_str = (const char *)commandStrData->result.c_str();    if (napi_create_string_utf8(env, result_str, strlen(result_str), &result) != napi_ok) {        LOGE("napi_create_string_utf8 failed!", __FUNCTION__, __LINE__);        napi_delete_async_work(env, commandStrData->asyncWork);        delete commandStrData;        return;    }
    napi_resolve_deferred(env, commandStrData->deferred, result);    napi_delete_async_work(env, commandStrData->asyncWork);
    delete commandStrData;}
复制代码
通过人脸特征提取与比对模块,对传入的数据与已注册的数据进行对比,并通过返回对比的相似度来进行判断当前人脸是否为可识别的,最后返回识别结果。具体实现代码:
static string FaceSearchSearchRecognizer(FaceSearchInfo &info, string filename){    if (info.engine == nullptr) {        cerr << "NULL POINT!" << endl;        return "recognize error 0";    }    string name;    float threshold = 0.7f;    seeta::QualityAssessor QA;    auto frame = cv::imread(filename);    if (frame.empty()) {        LOGE("read image %{public}s failed!", filename.c_str());        return "recognize error 1!";    }    seeta::cv::ImageData image = frame;    std::vector<SeetaFaceInfo> faces = info.engine->DetectFaces(image);
    for (SeetaFaceInfo &face : faces) {        int64_t index = 0;        float similarity = 0;
        auto points = info.engine->DetectPoints(image, face);
        auto score = QA.evaluate(image, face.pos, points.data());        if (score == 0) {            name = "ignored";        } else {            auto queried = info.engine->QueryTop(image, points.data(), 1, &index, &similarity);            // no face queried from database            if (queried < 1) continue;                // similarity greater than threshold, means recognized            if( similarity > threshold ) {                name = info.GalleryIndexMap[index];            }        }    }    LOGI("name : %{public}s \n", name.length() > 0 ? name.c_str() : "null");    return name.length() > 0 ? name : "recognize failed";}
复制代码
至此,所有的 NAPI 接口已经开发完成。
5. NAPI 库编译开发完 NAPI 接口后,我们需要将我们编写的库加入到系统中进行编译,我们需要添加一个自己的子系统。
首先在库目录下新建一个 ohos.build
{ "subsystem": "SeetafaceApp", "parts": { "SeetafaceApi": { "module_list": [ "//seetaface:seetafaceapp_napi" ], "test_list": [ ] } }}
复制代码
其次同一目录新建一个 BUILD.gn,将库源文件以及对应的依赖加上,如下:
import("//build/ohos.gni")
import("//build/ohos.gni")
config("lib_config") {    cflags_cc = [        "-frtti",        "-fexceptions",        "-DCVAPI_EXPORTS",        "-DOPENCV_ALLOCATOR_STATS_COUNTER_TYPE=int",        "-D_USE_MATH_DEFINES",        "-D__OPENCV_BUILD=1",        "-D__STDC_CONSTANT_MACROS",        "-D__STDC_FORMAT_MACROS",        "-D__STDC_LIMIT_MACROS",        "-O2",        "-Wno-error=header-hygiene",    ]}
ohos_shared_library("seetafaceapp_napi") {    sources = [        "app.cpp",    ]
    include_dirs = [        "./",        "//third_party/opencv/include",        "//third_party/opencv/common",        "//third_party/opencv/modules/core/include",        "//third_party/opencv/modules/highgui/include",        "//third_party/opencv/modules/imgcodecs/include",        "//third_party/opencv/modules/imgproc/include",        "//third_party/opencv/modules/calib3d/include",        "//third_party/opencv/modules/dnn/include",        "//third_party/opencv/modules/features2d/include",        "//third_party/opencv/modules/flann/include",        "//third_party/opencv/modules/ts/include",        "//third_party/opencv/modules/video/include",        "//third_party/opencv/modules/videoio/include",        "//third_party/opencv/modules/ml/include",        "//third_party/opencv/modules/objdetect/include",        "//third_party/opencv/modules/photo/include",        "//third_party/opencv/modules/stitching/include",        "//third_party/SeetaFace2/FaceDetector/include",        "//third_party/SeetaFace2/FaceLandmarker/include",        "//third_party/SeetaFace2/FaceRecognizer/include",        "//third_party/SeetaFace2/QualityAssessor/include",        "//base/accessibility/common/log/include",        "//base/hiviewdfx/hilog_lite/interfaces/native/innerkits"    ]
    deps = [ "//foundation/ace/napi:ace_napi" ]    deps += [ "//third_party/opencv:opencv" ]    deps += [ "//third_party/SeetaFace2:SeetaFace2" ]
    external_deps = [        "hiviewdfx_hilog_native:libhilog",    ]
    configs = [       ":lib_config"    ]
    # 指定库生成的路径    relative_install_dir = "module"    # 子系统及其组件,后面会引用    subsystem_name = "SeetafaceApp"    part_name = "SeetafaceApi"}
复制代码
添加完对应的文件后,我们需要将我们的子系统添加到系统中进行编译,打开 build/subsystem_config.json 并在最后添加以下代码:
"SeetafaceApp": { "path": "seetaface", "name": "SeetafaceApp" }
复制代码
添加完子系统再修改产对应的品配置
打开 productdefine/common/products/rk3568.json 并在最后添加以下代码:
"SeetafaceApp:SeetafaceApi":{}
复制代码
做完以上修改后我们就可以通过以下命令直接编译 NAPI 的库文件了:
./build.sh --product-name rk3568 --ccache
复制代码
参考 RK3568 快速上手-镜像烧录完成烧录即可。
应用端开发
在完成设备 NAPI 功能开发后,应用端通过调用 NAPI 组件中暴露给应用的人脸识别接口,即可实现对应功能。接下来就带着大家使用 NAPI 实现人脸识别功能。
开发准备
下载 DevEco Studio 3.0 Beta4;
搭建开发环境,参考开发准备;
了解属性 eTS 开发,参考 eTS 语言快速入门;
SeetaFace2 初始化
首先将 SeetaFace2 NAPI 接口声明文件放置于 SDK 目录/api 下;
然后导入 SeetaFace2 NAPI 模块;ck-start/star
调用初始化接口;
// 首页实例创建后async aboutToAppear() {  await StorageUtils.clearModel();  CommonLog.info(TAG,'aboutToAppear')  // 初始化人脸识别  let res = SeetafaceApp.FaceSearchInit()  CommonLog.info(TAG,`FaceSearchInit res=${res}`)  this.requestPermissions()}
// 请求权限requestPermissions(){  CommonLog.info(TAG,'requestPermissions')  let context = featureAbility.getContext()  context.requestPermissionsFromUser(PERMISSIONS, 666,(res)=>{    this.getMediaImage()  })}
复制代码
获取所有人脸图片
通过文件管理模块 fileio 和媒体库管理 mediaLibrary,获取指定应用数据目录下所有的图片信息,并将路径赋值给 faceList,faceList 数据用于 Image 组件提供 url 进行加载图片
// 获取所有图片async getMediaImage(){ let context = featureAbility.getContext(); // 获取本地应用沙箱路径 let localPath = await context.getOrCreateLocalDir() CommonLog.info(TAG, `localPath:${localPath}`) let facePath = localPath + "/files" // 获取所有照片 this.faceList = await FileUtil.getImagePath(facePath)}
复制代码
设置人脸模型
获取选中的人脸图片地址和输入的名字,调用 SeetafaceApp.FaceSearchRegister(params)进行设置人脸模型。其中参数 params 由 name 名字、image 图片地址集合和 sum 图片数量组成。
async submit(name) {    if (!name || name.length == 0) {        CommonLog.info(TAG, 'name is empty')        return    }    let selectArr = this.faceList.filter(item => item.isSelect)    if (selectArr.length == 0) {        CommonLog.info(TAG, 'faceList is empty')        return    }    // 关闭弹窗    this.dialogController.close()    try {        let urls = []        let files = []        selectArr.forEach(item => {            let source = item.url.replace('file://', '')            CommonLog.info(TAG, `source:${source}`)            urls.push(item.url)            files.push(source)        })
        // 设置人脸识别模型参数        let params = {            name: name,            image: files,            sum: files.length        }        CommonLog.info(TAG, 'FaceSearchRegister' + JSON.stringify(params))        let res = SeetafaceApp.FaceSearchRegister(params)        CommonLog.info(TAG, 'FaceSearchRegister res ' + res)        // 保存已设置的人脸模型到轻量存储        let data = {            name:name,            urls:urls        }        let modelStr = await StorageUtils.getModel()        let modelList = JSON.parse(modelStr)        modelList.push(data)        StorageUtils.setModel(modelList)        router.back()    } catch (err) {        CommonLog.error(TAG, 'submit fail ' + err)    }}
复制代码
实现框选人脸
调用 SeetafaceApp.GetRecognizePoints 传入当前图片地址,获取到人脸左上和右下坐标,再通过 CanvasRenderingContext2D 对象绘画出人脸框。
实现人脸识别
调用 SeetafaceApp.FaceSearchGetRecognize(url),传入图片地址对人脸进行识别并返回对应识别出来的名字。
// 人脸识别recognize(){ SeetafaceApp.FaceSearchGetRecognize(this.url).then(res=>{ CommonLog.info(TAG,'recognize suceess' + JSON.stringify(res)) if(res && res != 'ignored' && res != "recognize failed" && res != 'recognize error 1!'){ // 赋值识别到的人物模型 this.name = res }else{ this.name = '未识别到该模型' } }).catch(err=>{ CommonLog.error(TAG,'recognize' + err) this.name = '未识别到该模型' })}
复制代码
参考文档
SeetaFace2 移植开发文档:https://gitee.com/openharmony-sig/knowledge_demo_smart_home/blob/master/docs/SeetaFace2/%E4%BA%BA%E8%84%B8%E8%AF%86%E5%88%AB%E5%BA%93%E7%9A%84%E7%A7%BB%E6%A4%8D.mdOpenHarmony中
napi 的开发视频教程:https://www.bilibili.com/video/BV1L44y1p7KE?spm_id_from=333.999.0.0
RK3568 快速上手:https://growing.openharmony.cn/mainPlay/learnPathMaps?id=27
人脸识别应用:https://gitee.com/openharmony-sig/knowledge_demo_travel/blob/master/docs/FaceRecognition_ETS/README_zh.md
应用开发准备:https://docs.openharmony.cn/pages/v3.2Beta/zh-cn/application-dev/quick-start/start-overview.md/
eTS 语言快速入门:https://docs.openharmony.cn/pages/v3.2Beta/zh-cn/application-dev/quick-start/start-with-ets.md/
知识体系工作组:https://gitee.com/openharmony-sig/knowledge


评论