一、简介
继《OpenHarmony 有氧拳击设备端的开发》后,本次为大家带来酷炫的应用端开发。如下,开发者伴随着音乐,律动出拳后,那开发板屡屡播放“挨打”效果,这究竟是怎么一回事?让我们一探背后原理。这款拳击游戏开始时会播放音乐,然后以随机速度下落“击拳方块”。当小哥哥在击拳区域内挥拳时,游戏会判断方块的位置,根据不同位置确定播放普通击中或完美击中的动画效果。
二、动画
游戏中一共使用两种动画:属性动画和 Lottie 动画,分别实现下落和击中的效果。“击拳方块”下落效果是利用属性动画进行修改偏移量来实现。游戏同时设置定时器,定时获取挥拳状态和“击拳方块”的所处位置,用于判断当前挥拳是否得分。若得分则根据击中区间来播放不同效果的 Lottie 动画。
三、“下落”动画
1、属性动画介绍
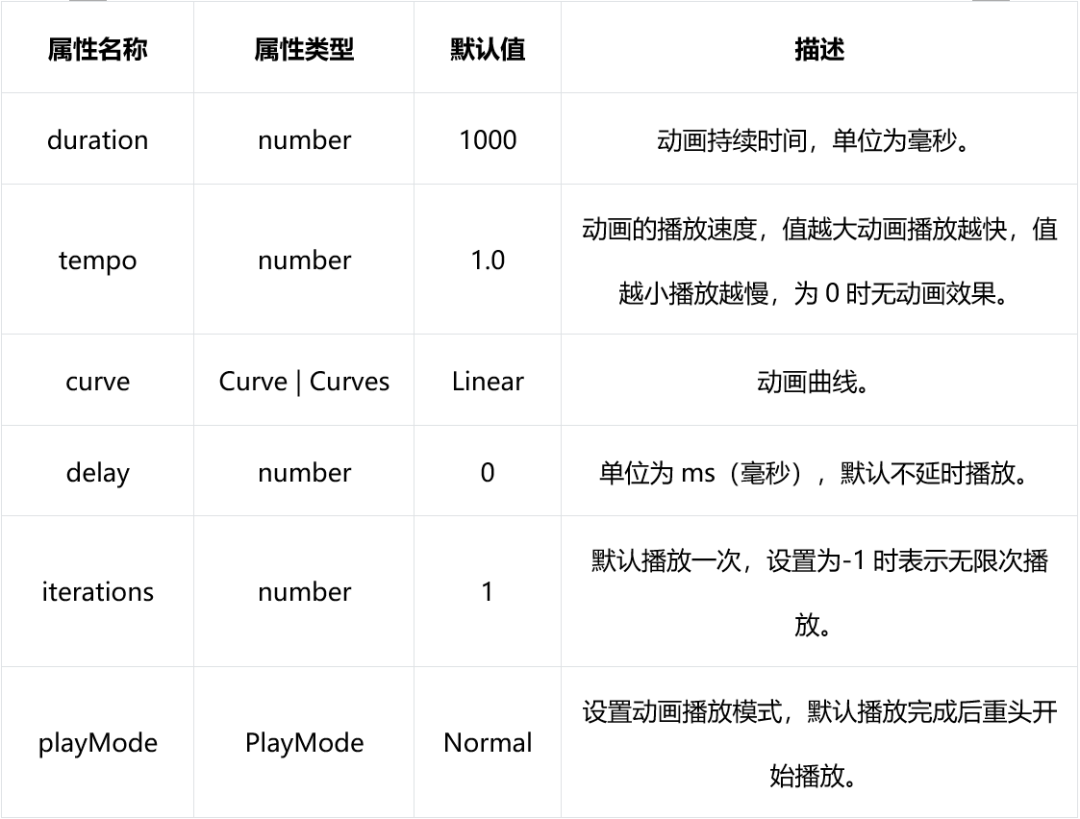
从上图可以看到,游戏中“击拳方块”是自上而下匀速移动。这种简单控制通用属性进行动画变化的动画,便很适合使用属性动画来实现。属性动画是指组件的通用属性发生变化时,会根据开始状态和通用属性改变后的状态作为动画关键帧,在指定时间内实现渐变效果。换言之我们只需要确定设置好组件在动画结束时的组件属性,然后调用 animateTo(value: AnimationOptions, event: ()=> void),即可创建属性动画。AnimationOptions 对象说明
● 属性
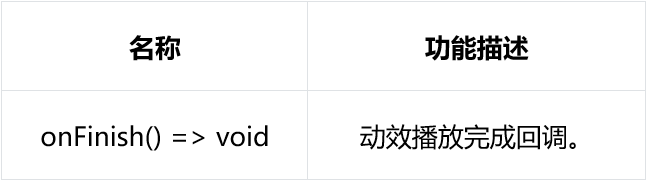
● 接口
2、动画实现
编写“击拳方块”UI 组件,并将组件的相对布局偏移量 offset 属性,绑定到 @state leftY1 变量中,那么通过修改 leftY1 的值即可实现修改组件所在位置。
@State leftY1: string = '50%' @Builder LeftBoxing(offsetY: string) { Image($r('app.media.icon_boxing_left')) .width(144) .height(110) .offset({ x: "-30%", y: offsetY }) .touchable(true) } build() { Stack() { // ..... // 左侧 this.LeftBoxing(this.leftY1) // ..... }
复制代码
3、创建动画
调用 animateTo 显式动画来播放动画实现单个“击拳方块”自上而下地移动,再通过设置 delay 参数实现 4 个“击拳方块”按顺序分别移动。
async leftAnimate(){ // 设置图标下滑动画 // 动画持续时间 let leftDuration = this.getRandomDuration() this.leftDuration = leftDuration // 延迟时长 let leftDelay = leftDuration / (this.boxingCount - 1) // 设置开始时间 let now = new Date this.animateLeftTimestamp = now.getTime() // 左侧animateTo动画 animateTo({ duration: leftDuration, curve: Curve.Linear,delay:0 * leftDelay ,iterations: 1 }, () => { this.leftY1 = "50%" }) animateTo({ duration: leftDuration, curve: Curve.Linear,delay:1 * leftDelay, iterations: 1 }, () => { this.leftY2 = "50%" }) animateTo({ duration: leftDuration, curve: Curve.Linear,delay:2 * leftDelay, iterations: 1 }, () => { this.leftY3 = "50%" }) animateTo({ duration: leftDuration, curve: Curve.Linear,delay:3 * leftDelay, iterations: 1 }, () => { this.leftY4 = "50%" }) let totalTime = leftDuration + 3 * leftDelay await this.sleep(totalTime) this.resetAnimate(true) this.leftAnimate() }
复制代码
4、设置击中区域监听
设置定时器定时查询当前是否挥拳,若检测到挥拳再通过计算当前动画运行时间来判断“击拳方块”位置,从而执行击中或完美击中的逻辑,以下为监听逻辑。
   setScoreListen(){        this.intervalNumber = setInterval(async()=>{            let res = await BoxingGameNAPI.recvMsg();            if(res?.message.length > 0){                if(res.message.includes('left') && !this.leftAnimateLock){                    // 检测到左手挥拳                    this.judgeLeft()                }            }        },200)    }
    judgeLeft(){        let nowTime = new Date().getTime()        // 首次抵达目标顶部时间        let firstTime = this.animateLeftTimestamp + (this.percentToPoint(this.targetOffsetY)+this.percentToPoint('50%') - this.percentToPoint('10%')) * this.leftDuration        // 结束时间        let endTime = this.animateLeftTimestamp + this.leftDuration * 2        if(nowTime > firstTime - 200 && nowTime < endTime){            // 得分时间界限            let leftDelay =  this.leftDuration /(this.boxingCount -1 )            let handleTime = (nowTime - firstTime) % leftDelay            let judgeTime = this.leftDuration /6            CommonLog.info(TAG,`leftDelay:${leftDelay},handleTime:${handleTime},judgeTime:${judgeTime}`)            // 完美击中            if (judgeTime/4 < handleTime && handleTime  < (judgeTime *(3/4))) {                            }else if(handleTime < judgeTime){               // 普通击中            }else{                // 不得分            }        }else{            // 未抵达区域        }    }
复制代码
四、击中动画
像前文提到的“下落”动画适合使用属性动画,那么当我们需要实现更复杂,如上图的动画效果时,该如何来实现呢?
Lottie 介绍
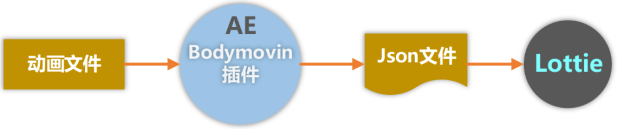
Lottie 是一款能够为应用程序添加动画的开源组件,它可以解析 AE(After Effects)导出的 json 文件,让复杂的动画资源轻松运行在应用程序中。如图所示,动画文件通过 AE 的 bodymovin 插件将动画转换成通用的 json 格式描述文件后,应用开发者只需使用 Lottie 解析 json 文件,就能将动画绘制出来。Lottie 优点:
只需使用 Lottie 解析 json 文件就能实现动画的加载,基本上实现了 0 代码开发;
应用开发者可以通过修改 json 文件的参数,将动画运行到不同的应用程序中,实现动画的一次设计多端使用;
应用开发者可从网络如 https://lottiefiles.com/直接下载 json 文件,实时更新动画资源;
Lottie 基于 canvas 画布进行基础的 2D 渲染,让动画流畅度更高;
Lottie 可以将 UX 设计师给出的复杂动画效果 100%还原到应用程序中 ;
Lottie 提供了丰富的 API,让开发者能轻松控制动画,大大提高了开发效率。
如何使用 Lottie?
导入 Lottie 在 Terminal 窗口使用 npm install @ohos/lottieETS 命令下载 Lottie,并在页面中导入 @ohos/lottieETS,如下:
import lottie from '@ohos/lottieETS'
复制代码
放置动画资源
将 After Effects 导出的 json 动画资源文件保存到项目 common/lottie 路径中,具体路径如下:entry/src/main/ets/MainAbility/common/lottie/animation.json
创建 Lottie 动画 Lottie 基于 canvas 画布进行基础的 2D 渲染,创建 canvas 画布后设置相关播放参数即可创建并播放 Lottie 动画,Lottie 更多信息可参考 Lottie 接口。
创建 canvas 画布:
    @Builder TargetArea(controller:CanvasRenderingContext2D,lottieName:string) {        Stack() {            Canvas(controller)                .aspectRatio(1)                .width(300)                .offset({ y:  this.targetOffsetY })                .onAppear(() => {
                })            Animator('__lottie_ets') // declare Animator('__lottie_ets') when use lottie        }.height('100%').width(220)    }
复制代码
设置 Lottie 动画参数:
setLottie(controller:CanvasRenderingContext2D,lottieName:string,animatePath:string){ lottie.loadAnimation({ container: controller, renderer: 'canvas', loop: false, autoplay: false, name: lottieName, path: animatePath, }) lottie.setSpeed(1,lottieName) }
复制代码
在“下落”动画击拳监听中加入播放不同效果的 Lottie 动画逻辑:
judgeLeft(){ ...... if(nowTime > firstTime - 200 && nowTime < endTime){ ...... // 完美击中 if (judgeTime/4 < handleTime && handleTime < (judgeTime *(3/4))) { lottie.destroy('animate_left') this.setLottie(this.controllerLeft,'animate_left',this.animatePerfectPath) lottie.play('animate_left') // 播放完美击中动画 // 等动画执行完成后才能进入下一次挥拳判定 this.leftAnimateLock = true setTimeout(()=>{ lottie.stop() lottie.destroy('animate_left') this.leftAnimateLock = false },this.lottieDuration) }else if(handleTime < judgeTime){ // 击中 lottie.destroy('animate_left') this.setLottie(this.controllerLeft,'animate_left',this.animateJustPath) lottie.play('animate_left')// 播放击中动画 this.leftAnimateLock = true setTimeout(()=>{ lottie.stop() lottie.destroy('animate_left') this.leftAnimateLock = false },this.lottieDuration) } } }
复制代码
五、总结
本文主要讲述了拳击互动游戏中,如何使用属性动画实现简单属性变化的动画效果,如游戏中“击拳方块”自上往下移动;使用 Lottie 组件实现复杂绚丽的动画效果,如游戏中的击拳效果。本样例是 OpenHarmony 知识体系工作组(相关链接在文章末尾)为广大开发者分享的样例。知识体系工作组结合日常生活,给开发者规划了各种场景的 Demo 样例,如智能家居场景、影音娱乐场景、运动健康场景等。欢迎广大开发者一同参与 OpenHarmony 的开发,更加完善样例,相互学习,相互进步。
六、参考链接
本样例代码下载链接https://growing.openharmony.cn/mainPlay/detail?sampleId=4070
属性动画
https://docs.openharmony.cn/pages/v3.2Beta/zh-cn/application-dev/reference/arkui-ts/ts-animatorproperty.md/
https://docs.openharmony.cn/pages/v3.2Beta/zh-cn/application-dev/reference/arkui-ts/ts-explicit-animation.md/
Lottie
https://docs.openharmony.cn/pages/v3.2Beta/zh-cn/application-dev/reference/arkui-ts/ts-components-canvas-lottie.md/
https://mp.weixin.qq.com/s/2adu8dNI9nedcNn4D4fjJw
OpenHarmony 知识体系共建开发仓
https://gitee.com/openharmony-sig/knowledge/blob/master/docs/co-construct_demos/README_zh.md
OpenHarmony 学习路径https://growing.openharmony.cn/mainPlay/learnPath
小熊派 BearPi-HM Nano 开发板学习路径
https://growing.openharmony.cn/mainPlay/learnPathMaps?id=19
https://gitee.com/bearpi/bearpi-hm_nano/tree/master
润和 DAYU200(RK3568)开发板介绍
https://growing.openharmony.cn/mainPlay/learnPathMaps?id=27
OpenHarmony 有氧拳击之设备端开发https://mp.weixin.qq.com/s/qVEFKid2gHsU34VearI7Gw


评论