Ubuntu 换源
ubuntu 20.04 系统自带源直接安装是 MySQL 8.0,我要安装 MySQL 5.7 的版本的所以先进行换源。
1.1 备份原来的 sorce 文件
sudo cp /etc/apt/sources.list /etc/apt/sources.list.old
复制代码
1.2 修改 sources.list 文件
sudo vim /etc/apt/sources.list
复制代码
我选择的是清华镜像源。将 sources.list 内容清空,然后选择一个源粘贴到 sources.list,保存退出。
# 清华镜像源deb https://mirrors.tuna.tsinghua.edu.cn/ubuntu/ xenial main restricted universe multiversedeb-src https://mirrors.tuna.tsinghua.edu.cn/ubuntu/ xenial main restricted universe multiversedeb https://mirrors.tuna.tsinghua.edu.cn/ubuntu/ xenial-updates main restricted universe multiversedeb-src https://mirrors.tuna.tsinghua.edu.cn/ubuntu/ xenial-updates main restricted universe multiversedeb https://mirrors.tuna.tsinghua.edu.cn/ubuntu/ xenial-backports main restricted universe multiversedeb-src https://mirrors.tuna.tsinghua.edu.cn/ubuntu/ xenial-backports main restricted universe multiversedeb https://mirrors.tuna.tsinghua.edu.cn/ubuntu/ xenial-security main restricted universe multiversedeb-src https://mirrors.tuna.tsinghua.edu.cn/ubuntu/ xenial-security main restricted universe multiverse
复制代码
1.3 更新镜像源和软件
# 更新镜像源sudo apt-get update
复制代码
# 更新软件sudo apt-get upgrade
复制代码
安装 mysql
2.1 apt-get install 方式安装
这种方式需要服务器能联网
# 执行下面安装命令
# 安装mysql5.7服务端sudo apt-get install mysql-server-5.7
# 安装mysql5.7客户端sudo apt-get install mysql-client-5.7
# 使用c/c++等语言操作mysql的动态链接库,如果不需要可不安装sudo apt install libmysqlclient-dev
复制代码
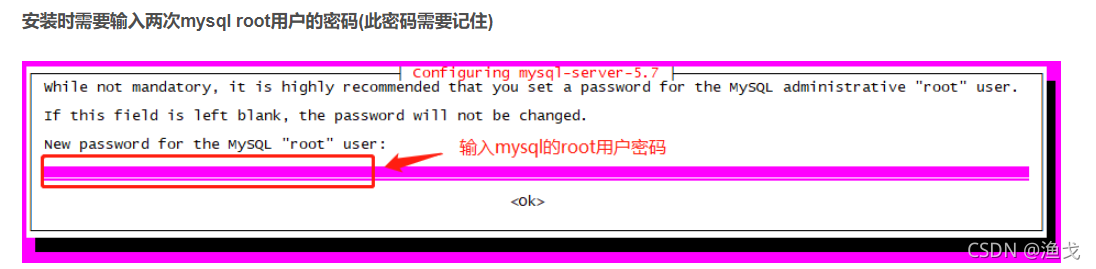
然后会出现一个界面,是设置 MySQL 的 root 用户密码,此密码需记住:
安装完成后查看 mysql 版本和服务
netstat -tap | grep mysql # 查看mysql服务
复制代码
如上图所示说明安装成功。
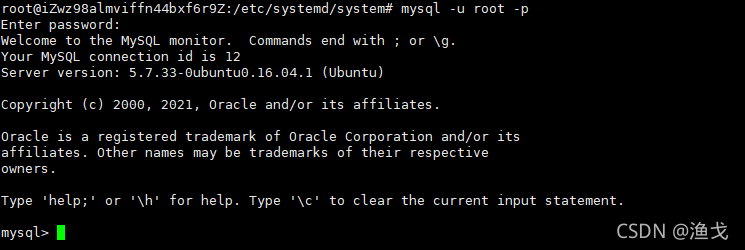
MySQL 登录:(使用 root 用户登录数据库)
mysql -u root -p
然后输入你的 root 用户密码:
出现下面这个就是登录成功了:
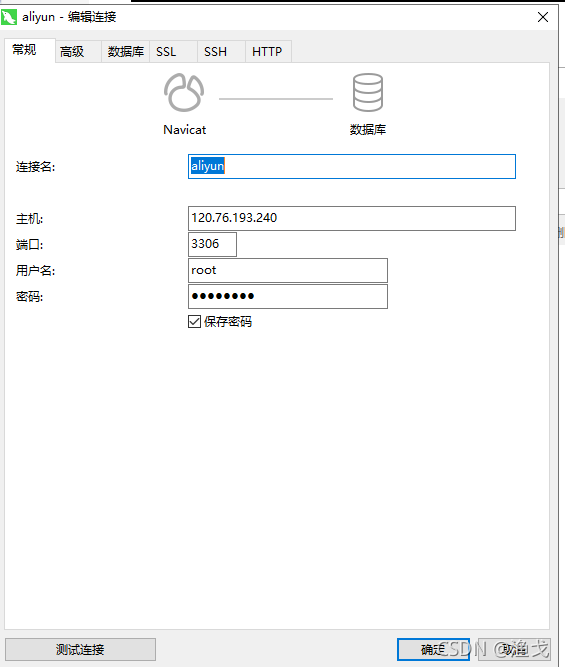
远程连接 MySQL
这里使用的是本机的 Navicat 来连接阿里云服务器的数据库:
1.首先我们需要到阿里云的服务器上的防火墙/安全组中开放 mysql 的 3306 端口.
2.需要在 Linux 系统中(这里使用的是 ubuntu 20.04)开启 MySQL 的 3306 端口:
(1)可以先查看自己是否已经开启了 3306 端口:
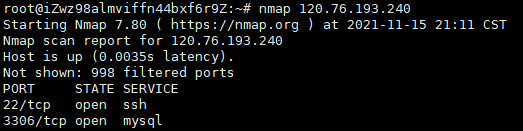
也可以使用端口扫描工具 nmap,centos/Ubuntu 系统的直接用 yum 安装就可以了,windows 自行百度下载。
用法:
探测目标主机 1-10000 范围内所开放的所有端口
nmap 120.76.193.240 #写你自己的ip地址
复制代码
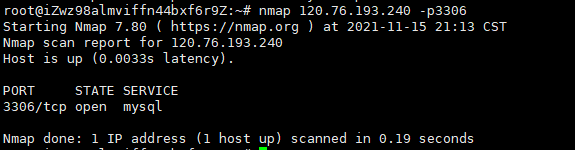
查看固定端口:
显示 open 就说明我们的 3306 端口是开着的。
(2)如果没有开启 3306 端口,就需要开启一下 3306 端口:
放开 3306 端口:
firewall-cmd --zone=public --add-port=3306/tcp --permanent
复制代码
重新加载配置:
查看防火墙所有开放的端口:
systemctl status firewalld
复制代码
如果 3306 端口还是没有开启,可以尝试使用一下命令:
vi /etc/mysql/mysql.conf.d/mysqld.cnf
复制代码
将 bind-address = 127.0.0.1 注销:
然后依次完成以下命令,123456 是你自己的密码。
然后输入你自己的 mysql 密码登录 mysql
grant all privileges on *.* to 'root'@'%' identified by '123456';
复制代码
***最后,记得要重启一下你的服务器,不然有些配置可能无法生效 ***
重启后,你就可以远程连接 MySQL 了.
这里的密码是你自己设置的 MySQL 中 root 用户的密码.
(3)防火墙命令:
1.启动防火墙:
systemctl start firewalld systemctl enable firewalld # 开机启动systemctl disable firewalld # 取消开机启动
复制代码
2.禁用防火墙:
3.设置开机启动:
systemctl enable firewalld
复制代码
4.停止并禁用开机启动
sytemctl disable firewalld
复制代码
5.重启防火墙:
6.查看状态:
systemctl status firewalld或者 firewall-cmd --state
复制代码
7.查看版本:
8.查看帮助
9.查看区域信息:
firewall-cmd --get-active-zones
复制代码
10.查看指定接口所属区域信息:
firewall-cmd --get-zone-of-interface=eth0
复制代码
11.拒绝所有包:
12.取消拒绝状态:
13.查看是否拒绝
firewall-cmd --query-panic
复制代码
14.将接口添加到区域(默认接口都在 public):
firewall-cmd --zone=public --add-interface=eth0(永久生效再加上 --permanent 然后reload防火墙)
复制代码
15.设置默认接口区域:
firewall-cmd --set-default-zone=public(立即生效,无需重启)
复制代码
16.更新防火墙规则:
firewall-cmd --reload或firewall-cmd --complete-reload(两者的区别就是第一个无需断开连接,就是firewalld特性之一动态添加规则,第二个需要断开连接,类似重启服务)
复制代码
17.查看指定区域所有打开的端口
firewall-cmd --zone=public --list-ports
复制代码
18.在指定区域打开端口(记得重启防火墙):
firewall-cmd --zone=public --add-port=80/tcp(永久生效再加上 --permanent)
复制代码
说明:
–zone 作用域
–add-port=8080/tcp 添加端口,格式为:端口/通讯协议
–permanent #永久生效,没有此参数重启后失效
centos 7 以后是修改 firewall
后续会在此博客继续更新 mysql 的有关内容


评论