
SpringBoot Web 开发访问静态资源 (附 + 详细源码剖析)
1. 基本介绍
SpringBoot 中对于静态资源的访问:
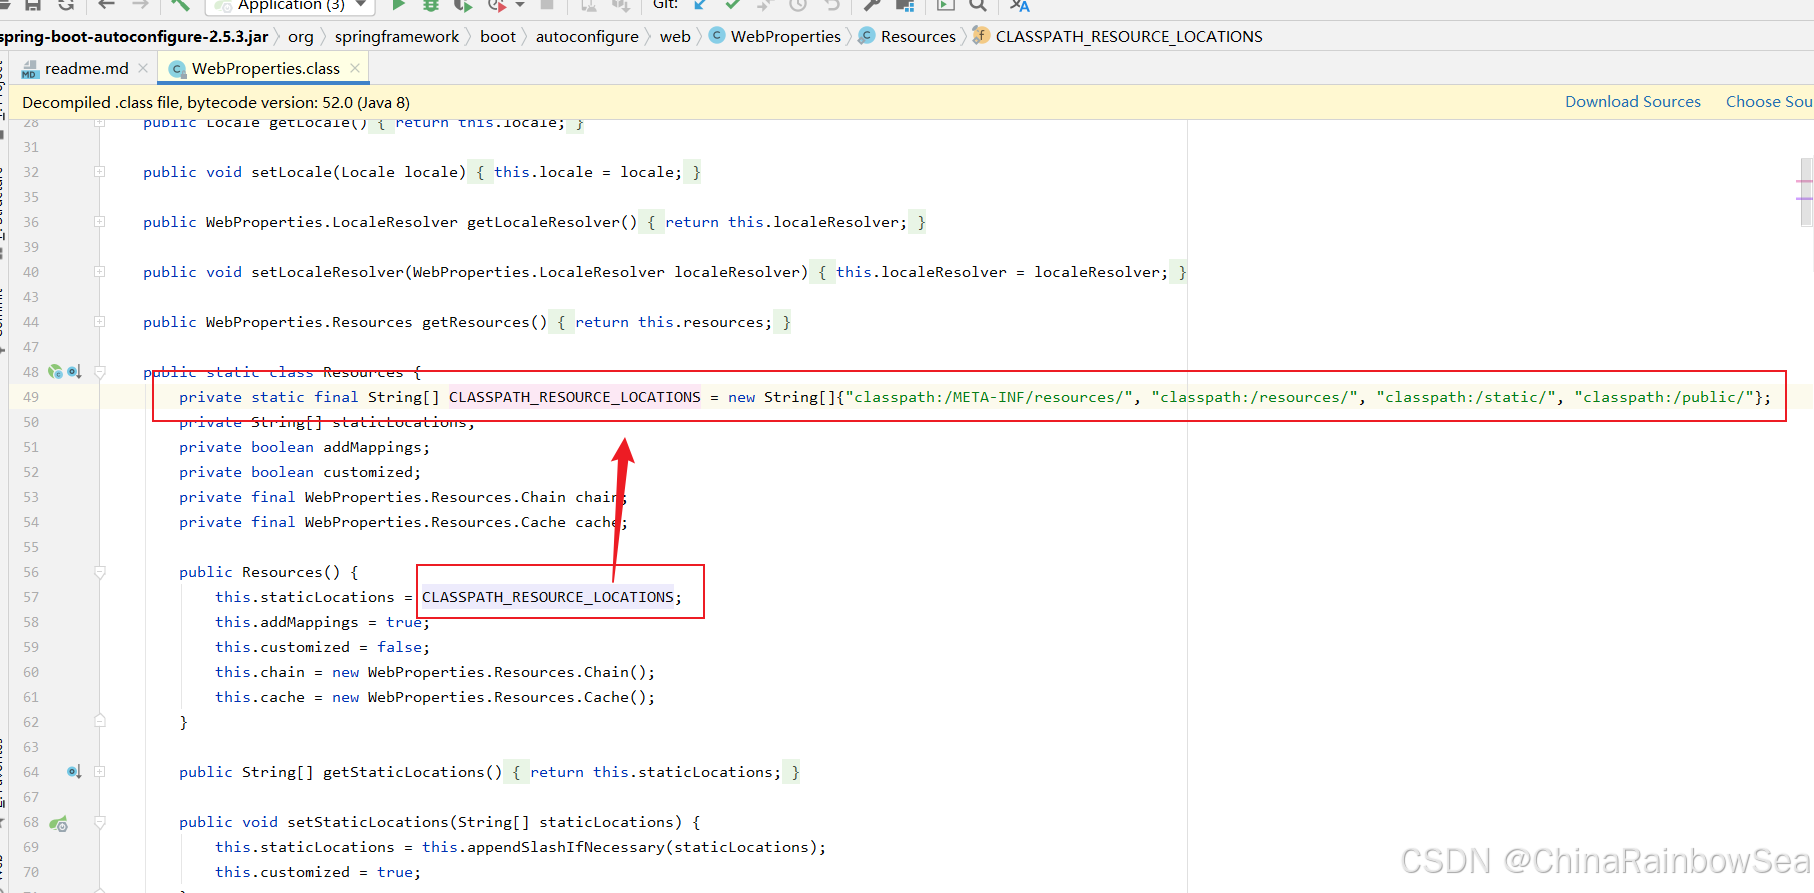
1、只要将静态资源放在类路径下: /static, /public, /resources, /META-INF/resources 就可以被直接访问-对应文件(这是 Spring Boot 的默认设置好的 )。关于这一点,我们从 WebProperties.java 这个类的源码上可以找到,对应的配置属性。
注意:classpath:/resources/ 表示服务器就会在 resources 路径下找,你在浏览器当中输入的 url 地址的时候,不可以输入 resources 目录,因为服务器就是会在 classpath:/resources/ 找的,而如果你写了 resources 在浏览器上的话,你想表达的就是:让浏览器从 resources/resouces 的路径下找,这是找不到的报 404 错误
2、常见静态资源: js,css,图片(.jpg,.png,.gif,.bmp,.svg) ,字体文件(Fonts)等
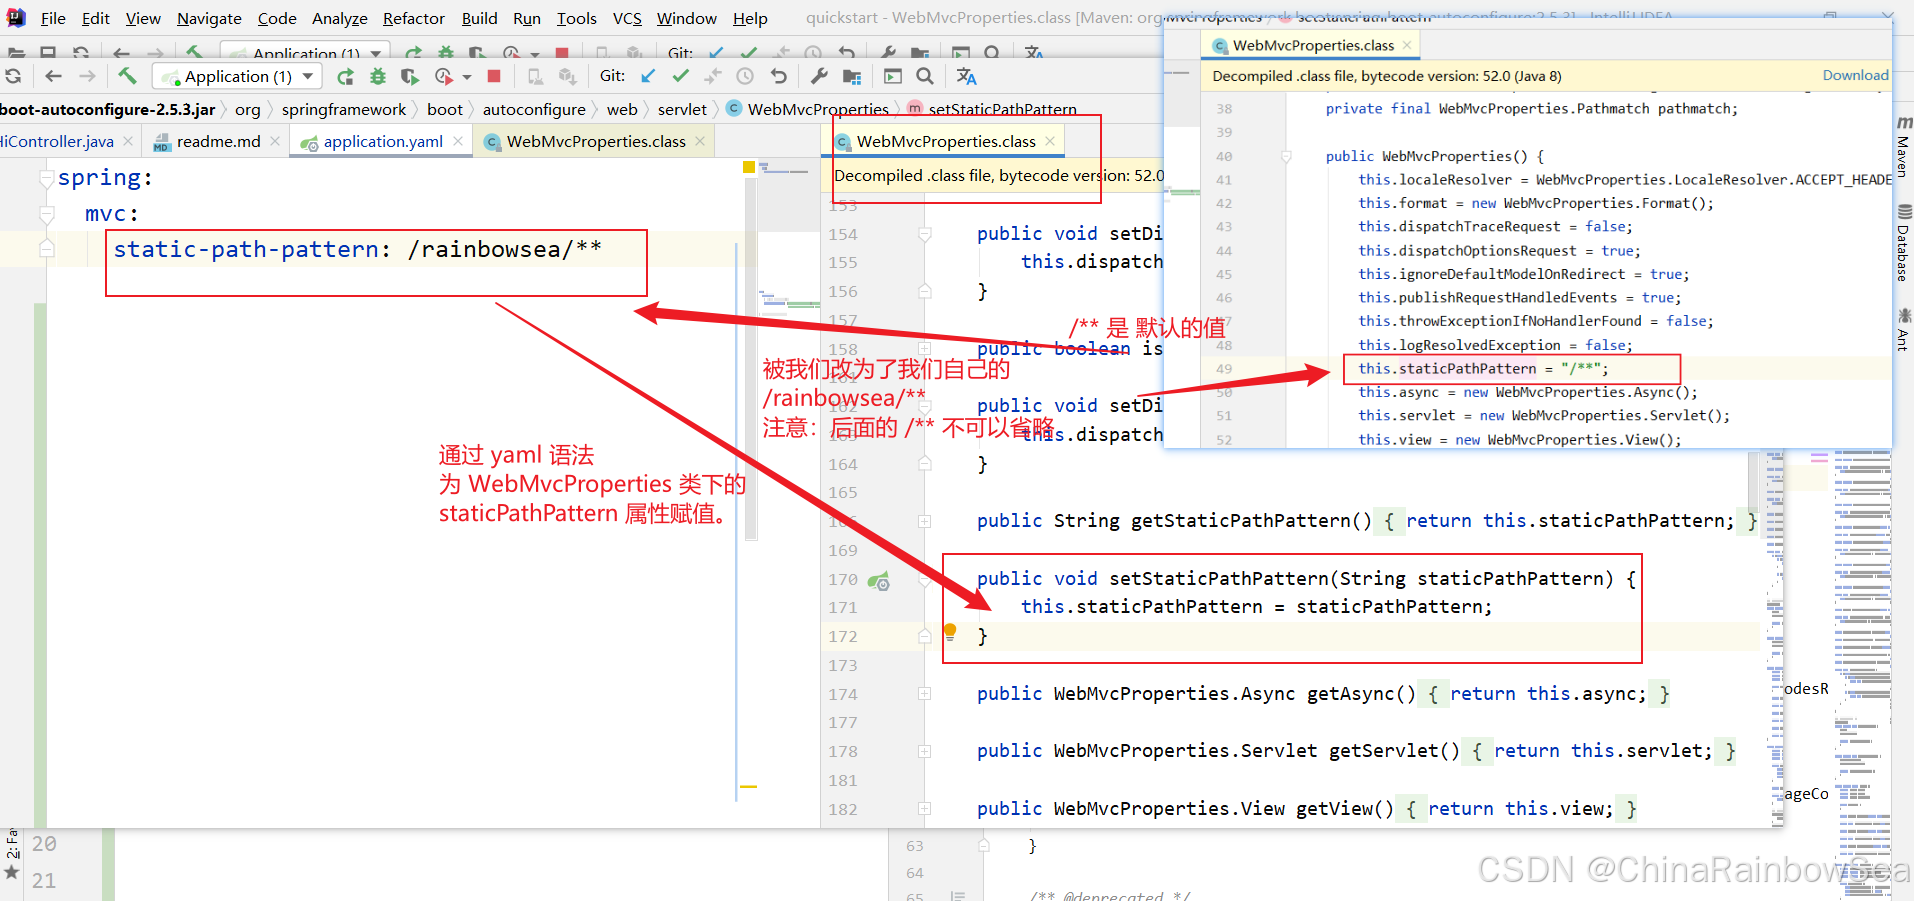
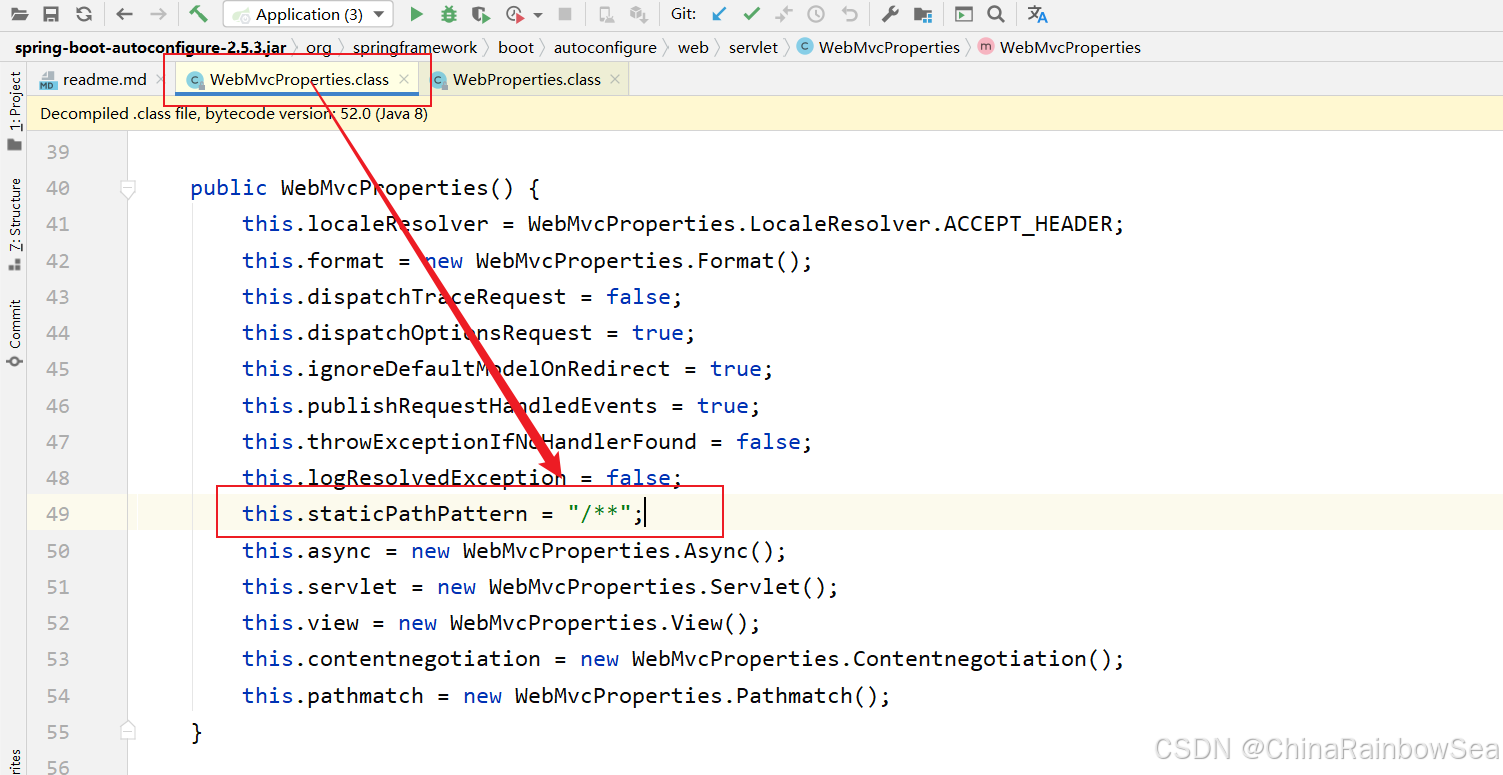
3、访问方式: 默认:项目根路径/+静态资源名 比如: http://localhost:8080/hi.html 。关于这一点,我们可以从 WebMvcProperties.java 类当中找到答案。

2. 快速入门
2.1 准备工作
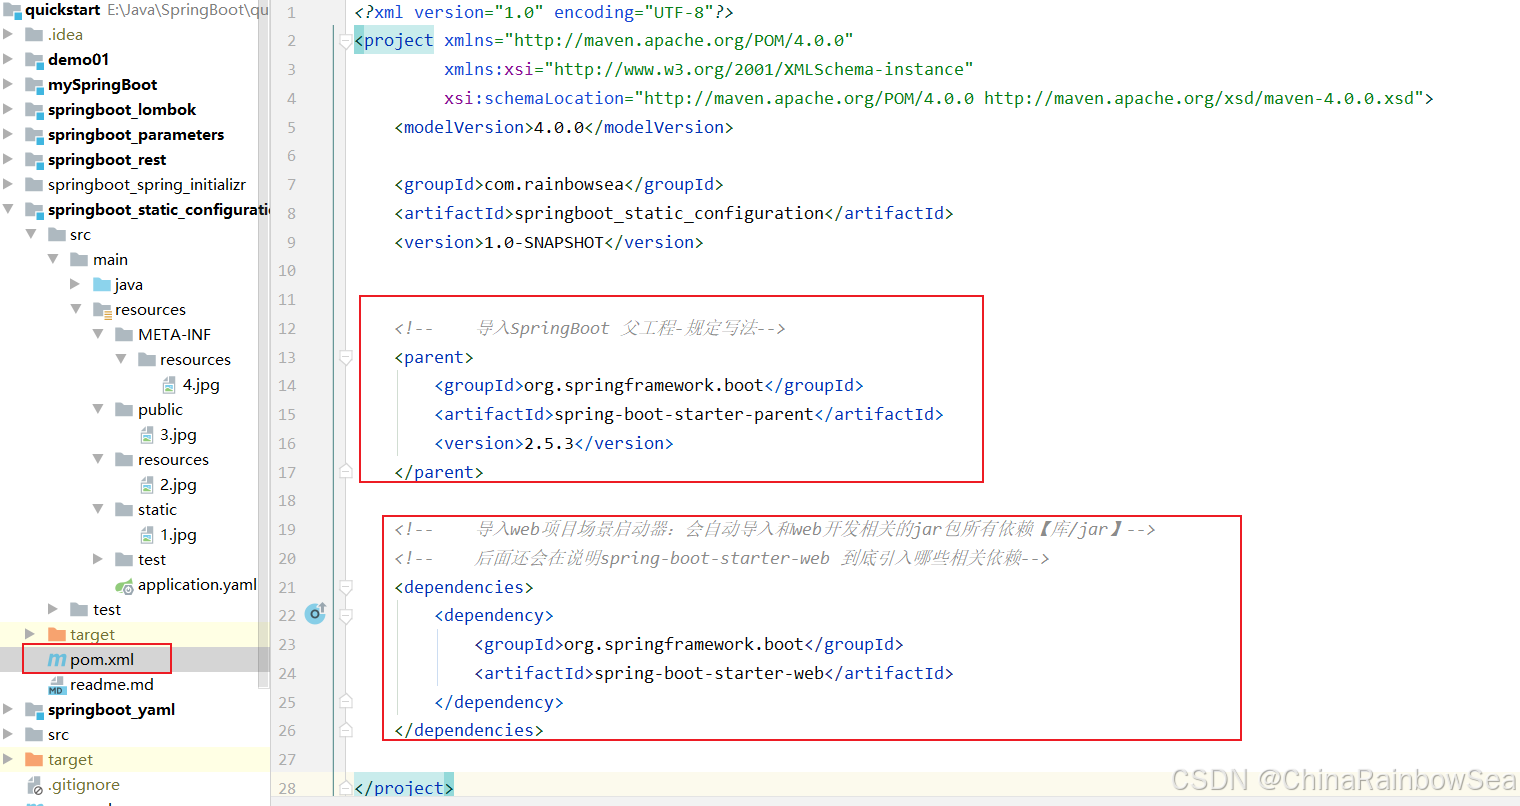
在 pom .xml 文件中导入相关的 jar 依赖。如下
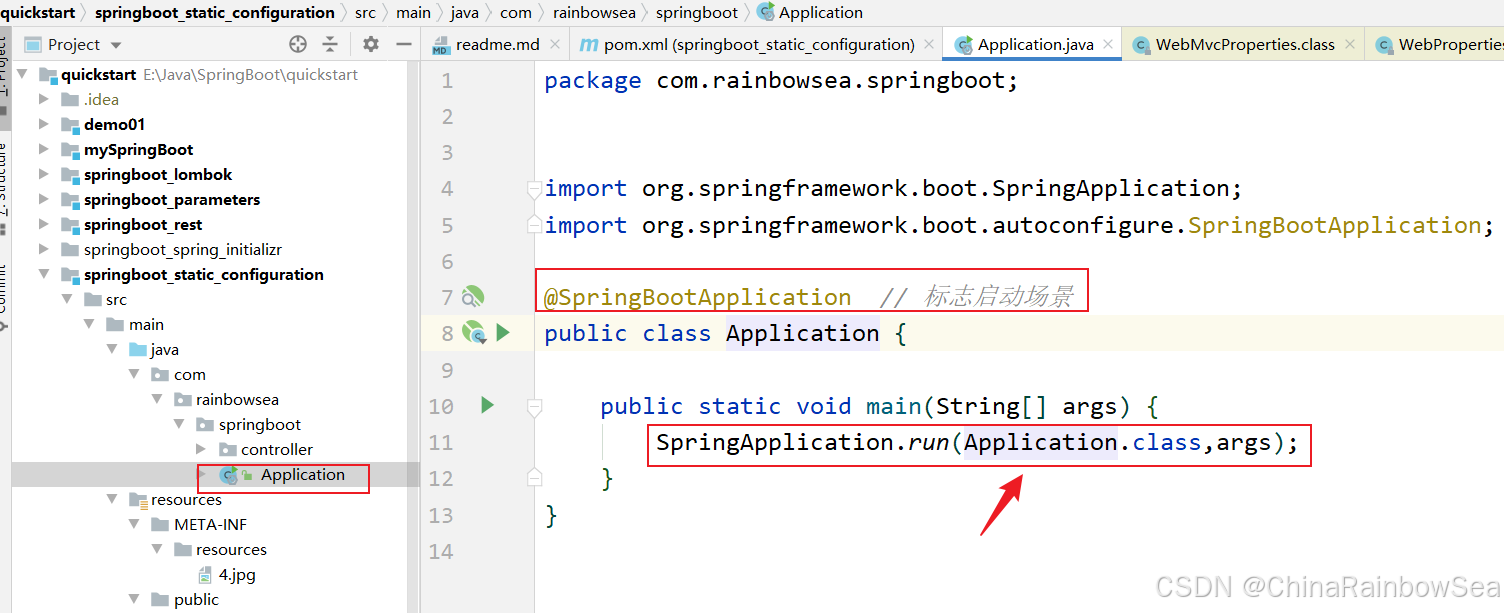
编写启动程序:
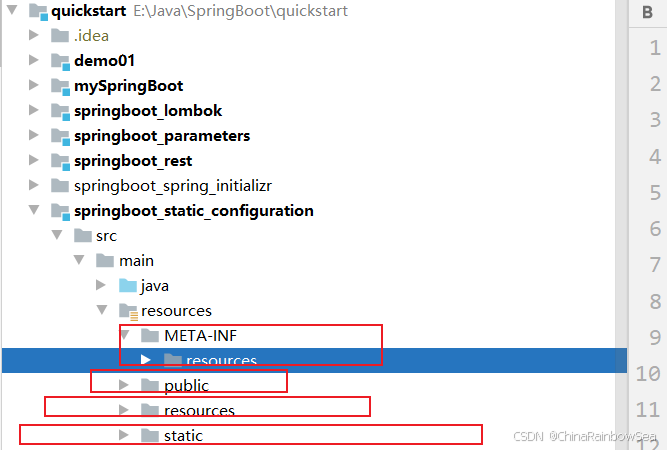
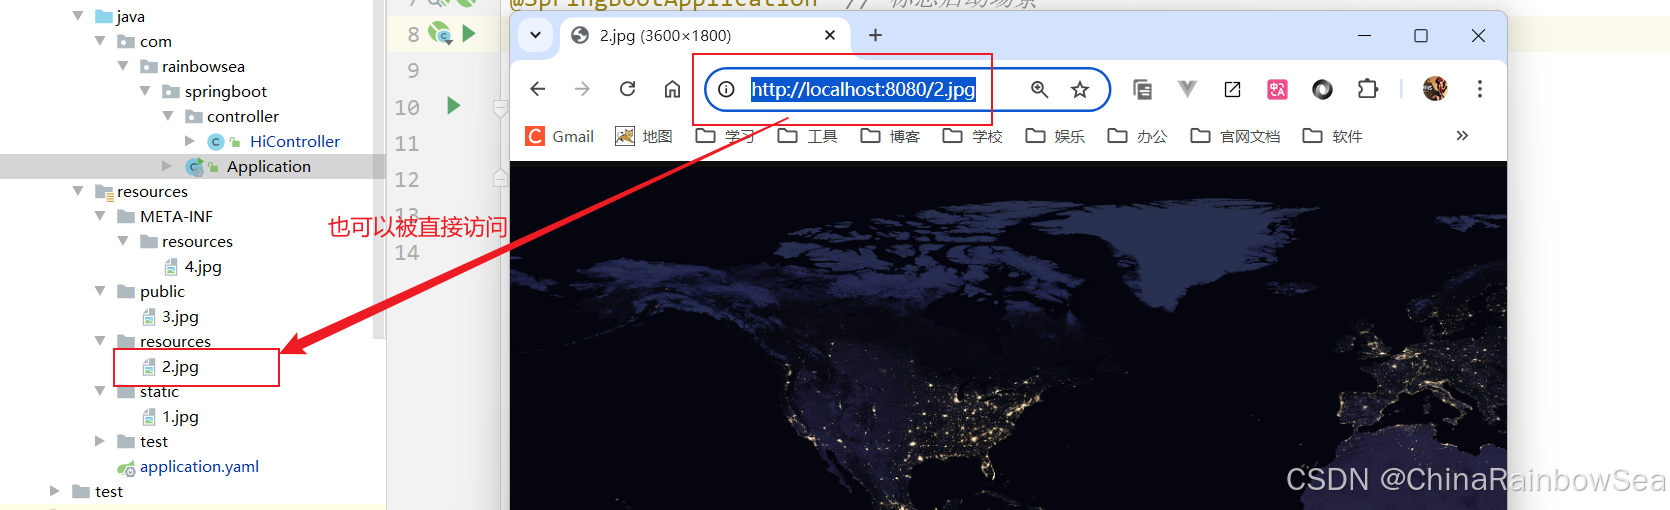
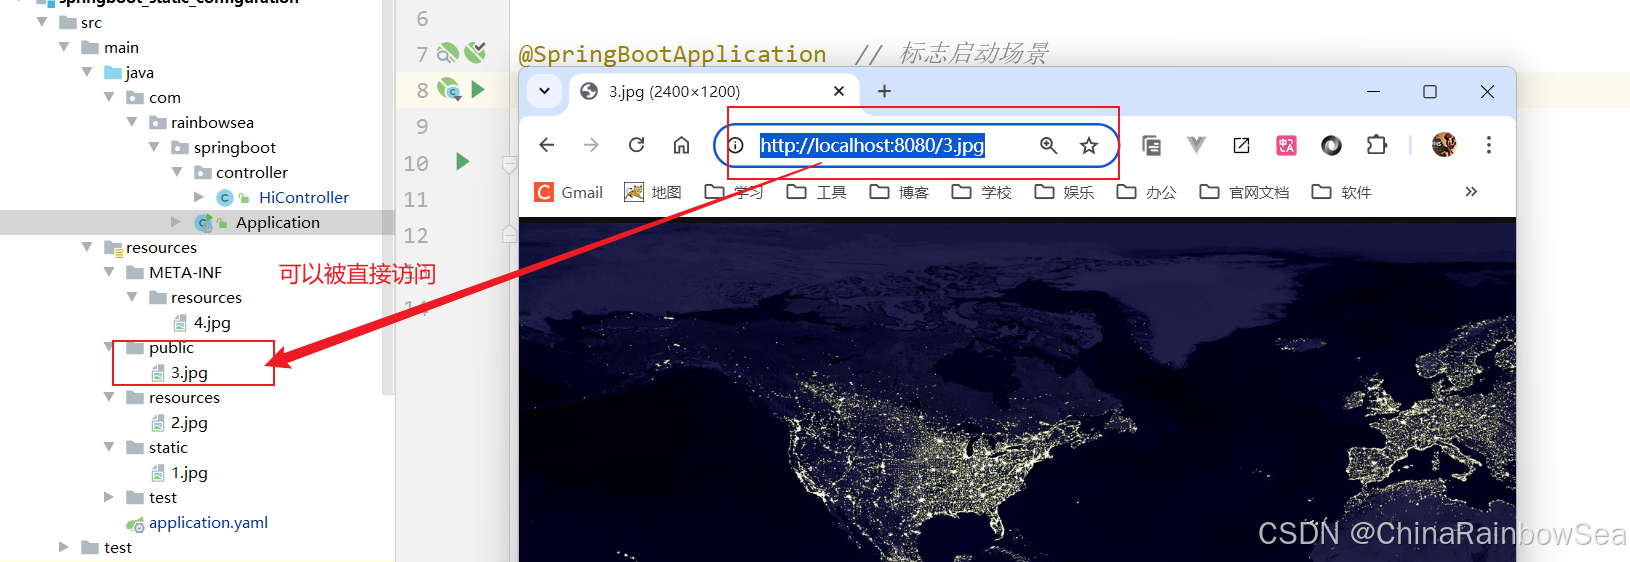
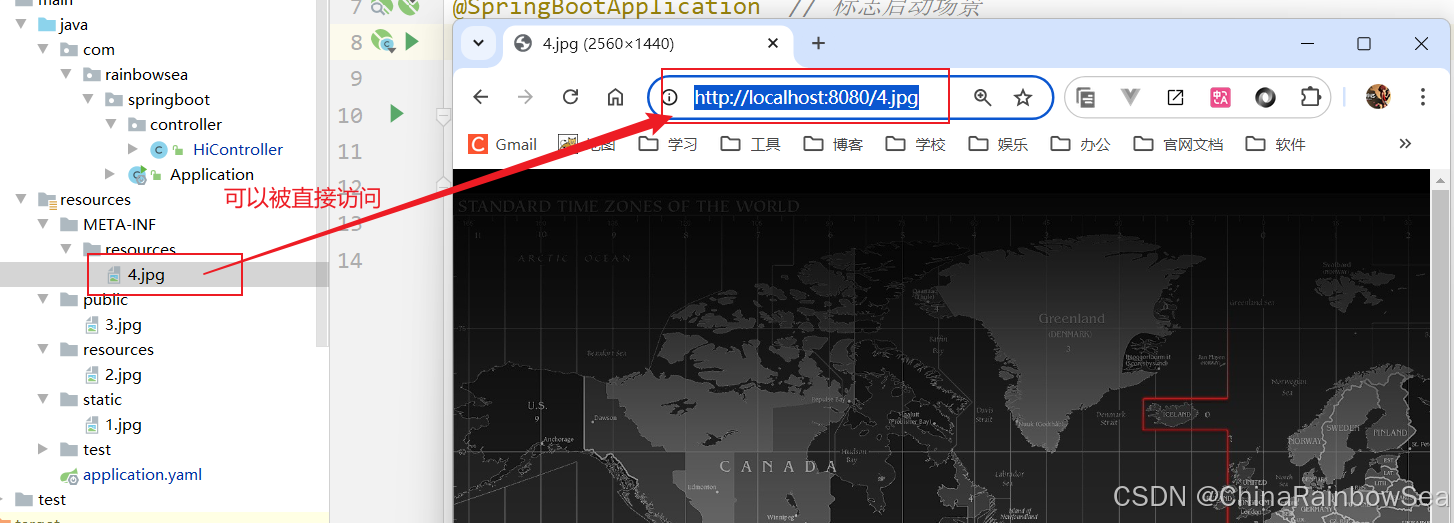
从上面的基本介绍 当中,我们知道了,Spring Boot 默认静态资源的访问路径有 4 个,我们这里就测试这四个路径是否可以直接访问 。
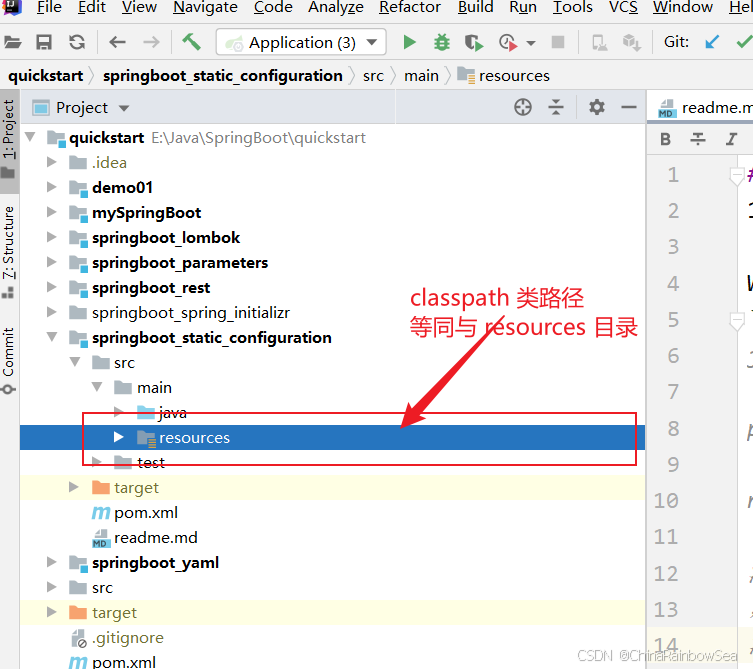
注意:classpath 表示的是类路径,就是如图下面的: resources 目录,简单的说就是 classpath ===(等同于)resources 。
下面:我们分别在 resources 类路径下,创建对应的 Spring Boot 默认的四个目录。如下图:
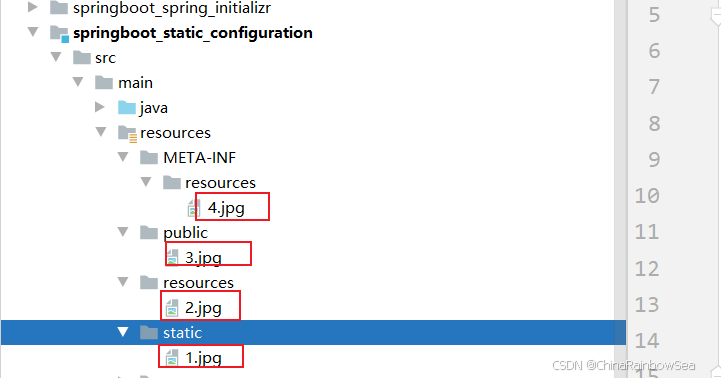
同时我们在这四个目录下,放入几张图片,用于访问测试。
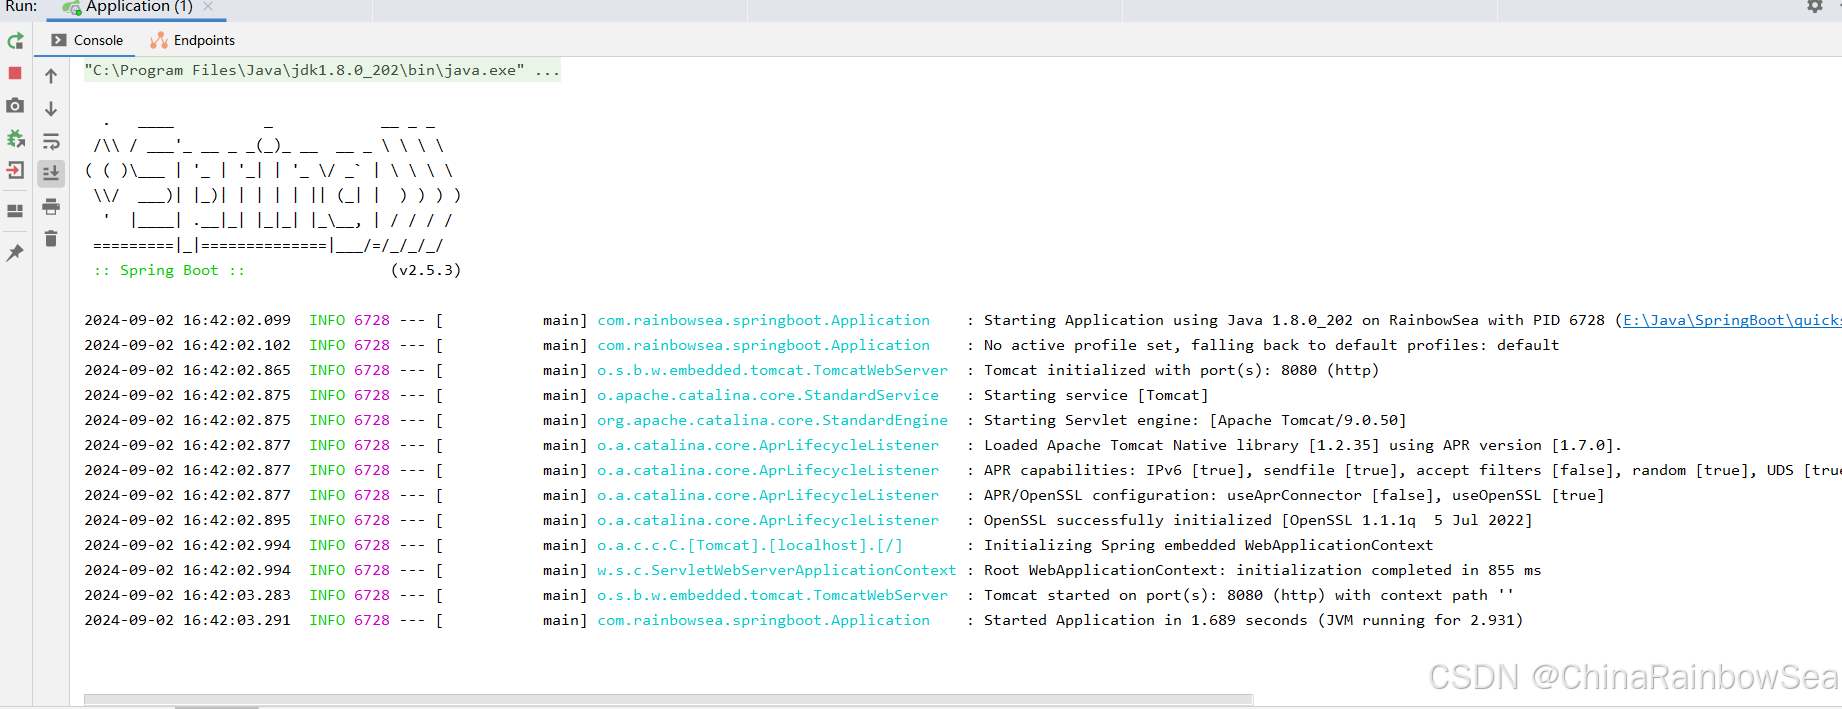
启动程序运行测试:
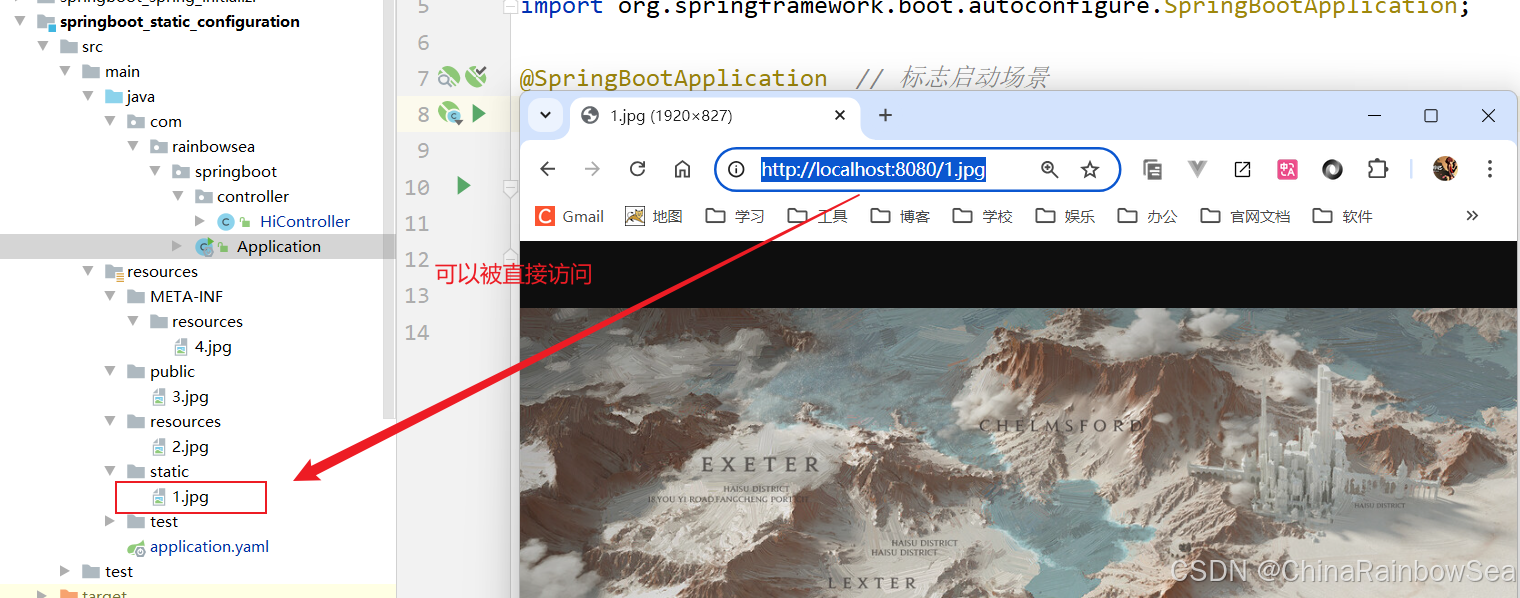
打开浏览器进行直接访问静态资源文件:
注意:
private static final String[] CLASSPATH_RESOURCE_LOCATIONS = new String[]{"classpath:/META-INF/resources/", "classpath:/resources/", "classpath:/static/", "classpath:/public/"};
注意:classpath:/resources/ 表示服务器就会在 resources 路径下找,你在浏览器当中输入的url地址的时候,不可以输入 resources 目录,因为服务器就是会在 classpath:/resources/ 找的,而如果你写了resources在浏览器上的话,你想表达的就是:让浏览器从resources/resouces的路径下找,这是找不到的报404错误
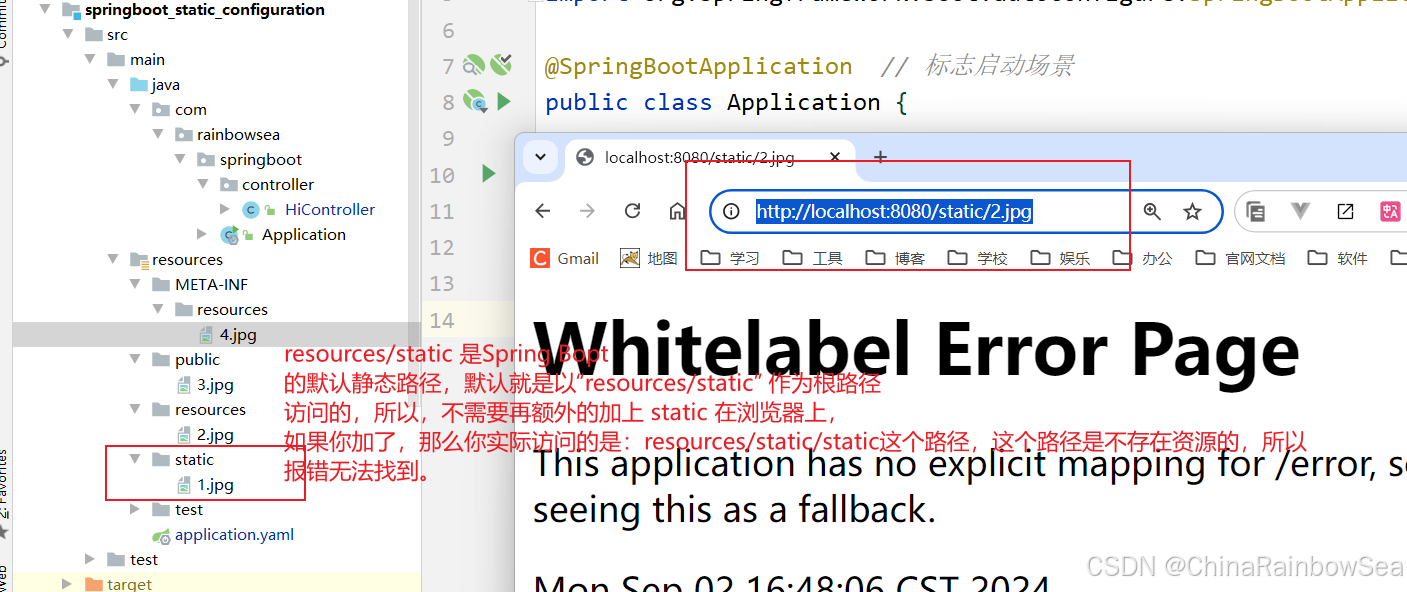
resources/static 是 Spring Bopt 的默认静态路径,默认就是以“resources/static” 作为根路径访问的,所以,不需要再额外的加上 static 在浏览器上,如果你加了,那么你实际访问的是:resources/static/static 这个路径,这个路径是不存在资源的,所以报错无法找到。
3. 改变静态资源访问前缀,定义为我们自己想要的
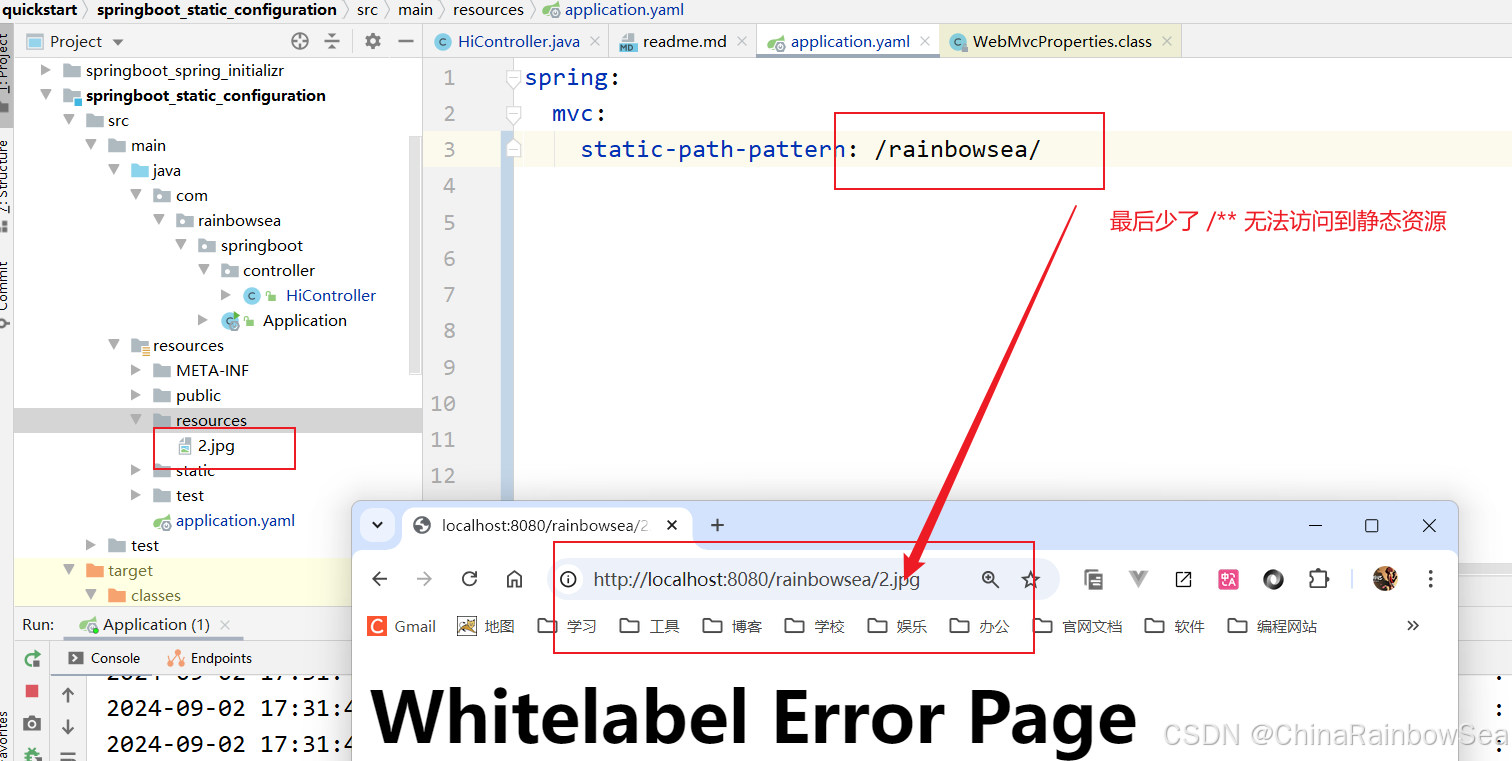
改变静态资源访问前缀,比如我们希望 http://locahost:8080/rainbowsea/* 下的请求路径,去请求静态资源,应用场景:静态资源访问前缀和控制器请求路径冲突。
我们这里需要用到 yaml 语法的内容,首先,我们在 resources 类路径下创建一个名为 application.yaml 的文件。

编写如下内容:
运行测试:
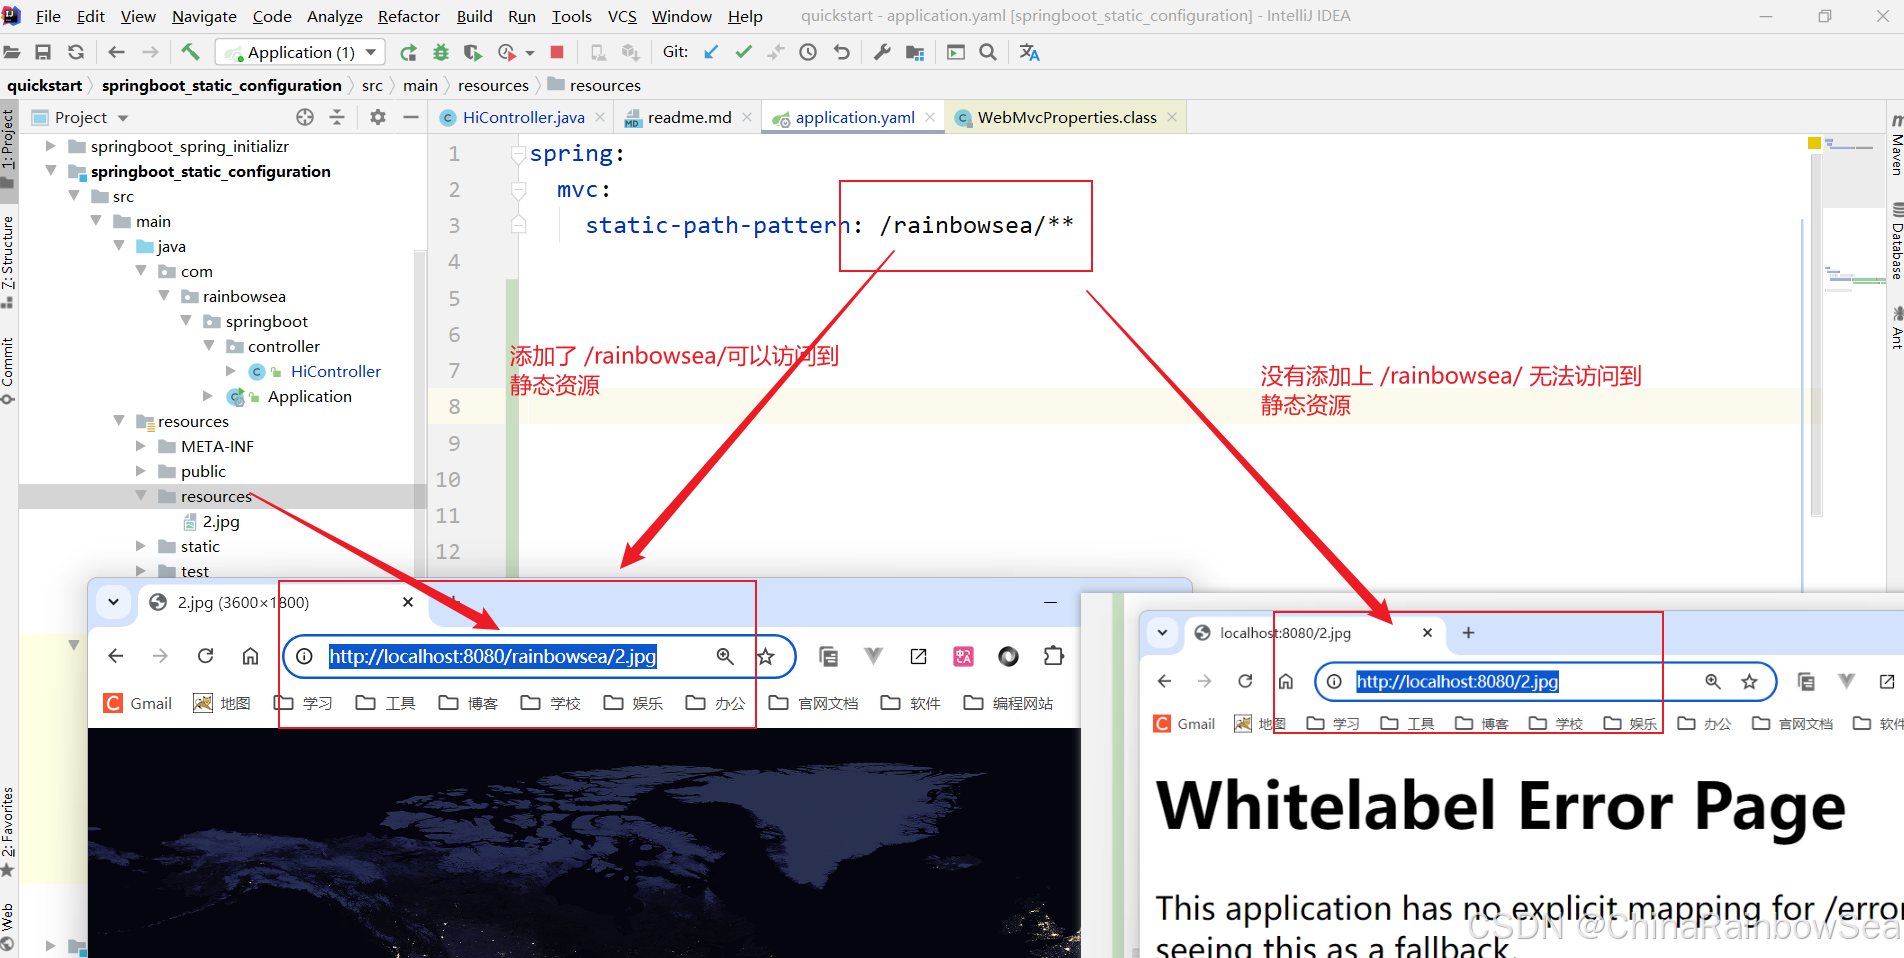
被我们改为了我们自己的
/rainbowsea/**注意:后面的/**不可以省略 。不然无法访问的。
4. 改变 Spring Boot 当中的默认的静态资源路径(实现自定义静态资源路径)
Spring Boot 也是支持我们自定义静态资源路径,提高了灵活性。
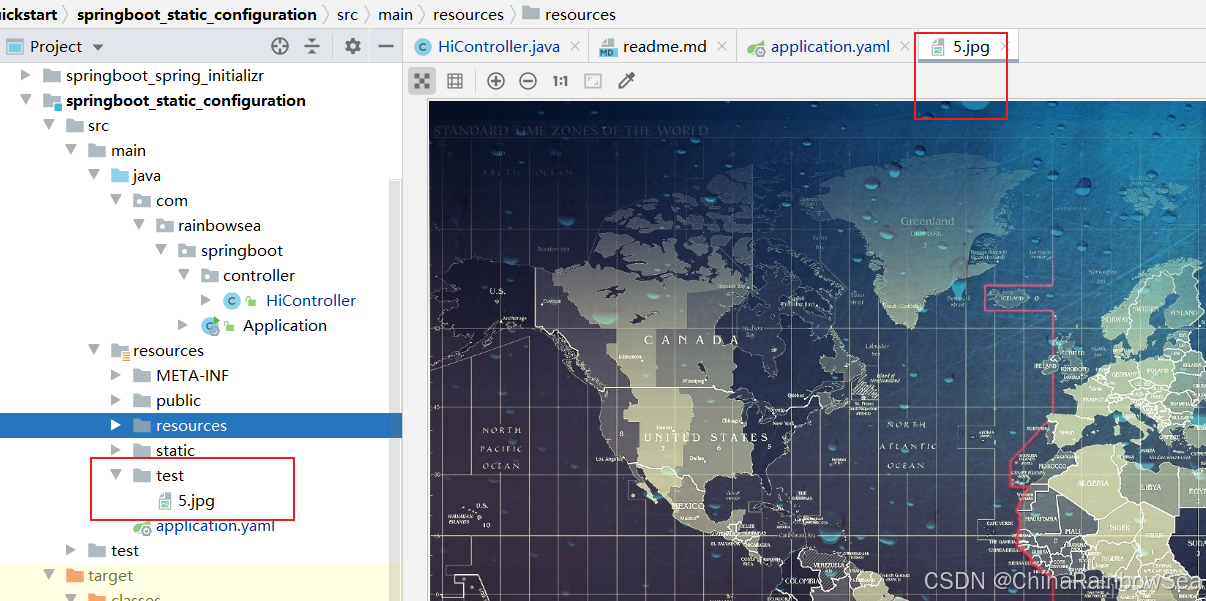
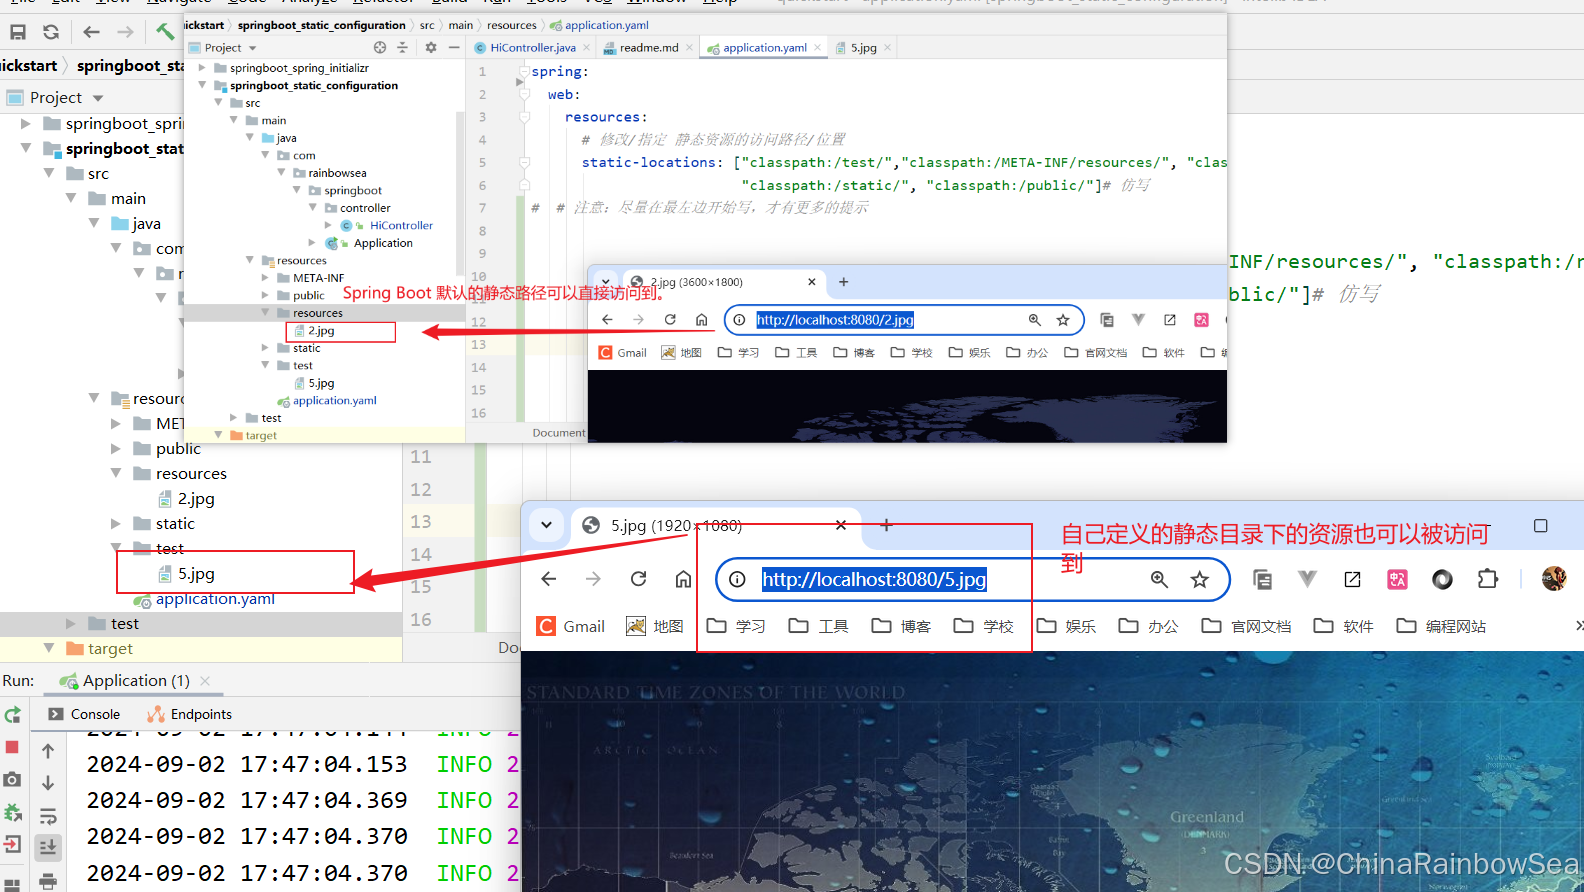
改变默认的静态资源路径,比如:我们自己在类路径下增加 test 目录,作为静态资源路径,并完成测试。
同样要想改变 Spring Boot 当中的默认静态资源,这里我们还是使用 yaml 语法进行。在 resources 类路径下创建一个名为 application.yaml 的文件。
yaml 编写如下:
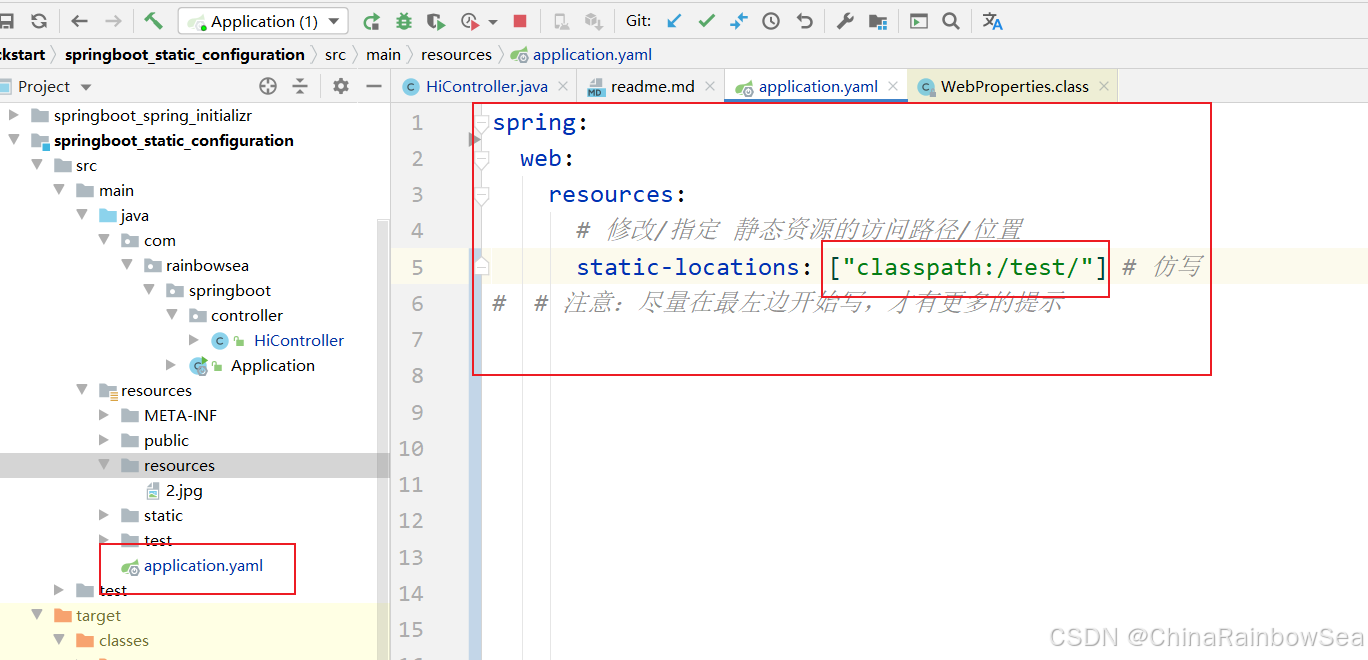

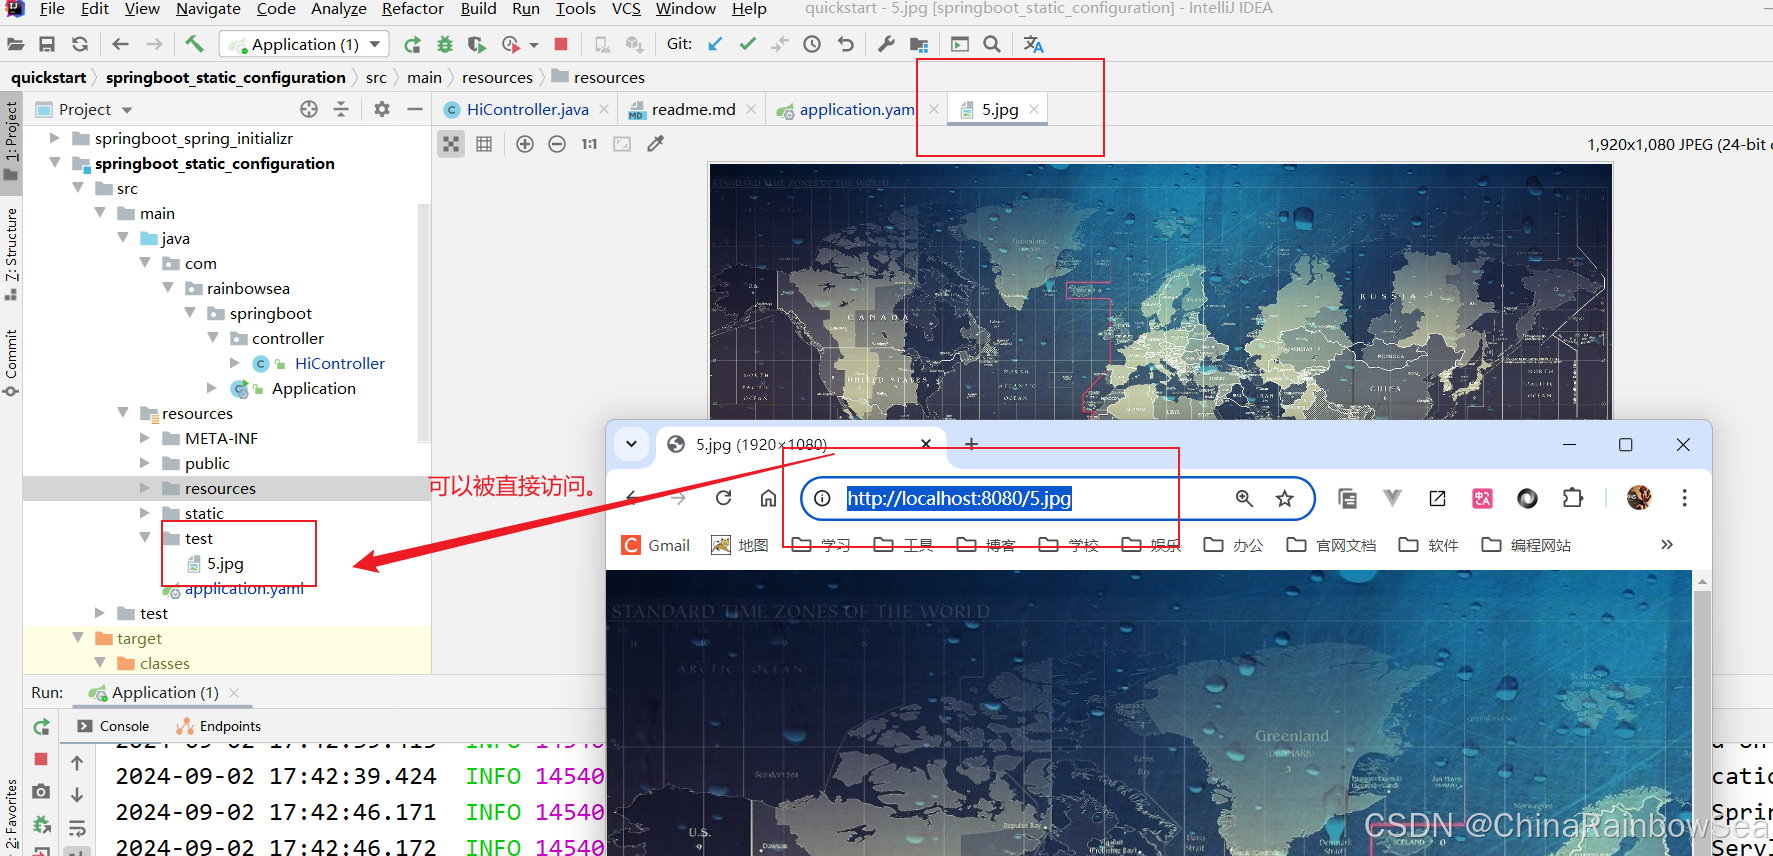
在 resources 类路径下,创建一个 test 目录,同时在该目录下,放入一个名为 5.jpg 的图片,访问测试。
打开浏览器访问测试:
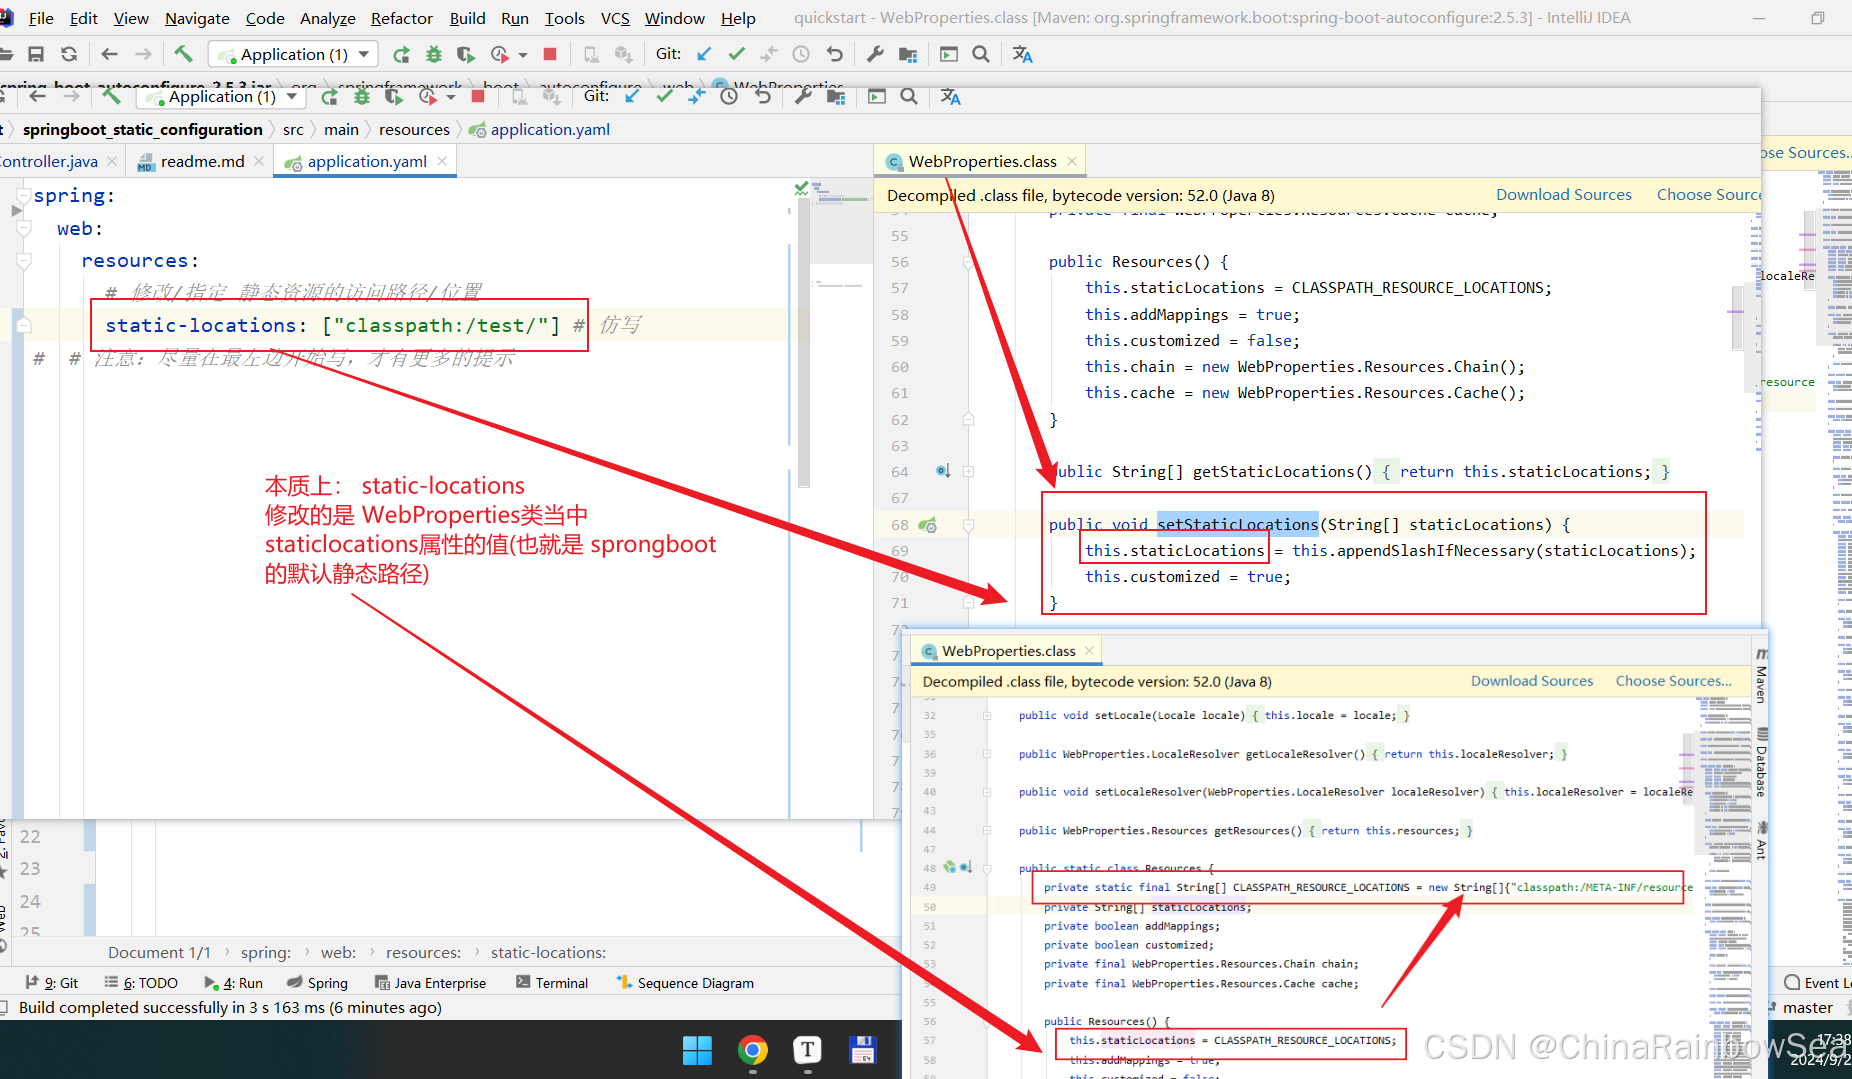
本质上: static-locations 修改的是 WebProperties 类当中 staticlocations 属性的值(也就是 springboot
的默认静态路径)。
所以这里我们修改了 Spring Boot 的默认静态资源路径,之前的放置在 Spring Boot 默认的静态路径下的资源就无法被访问到了。
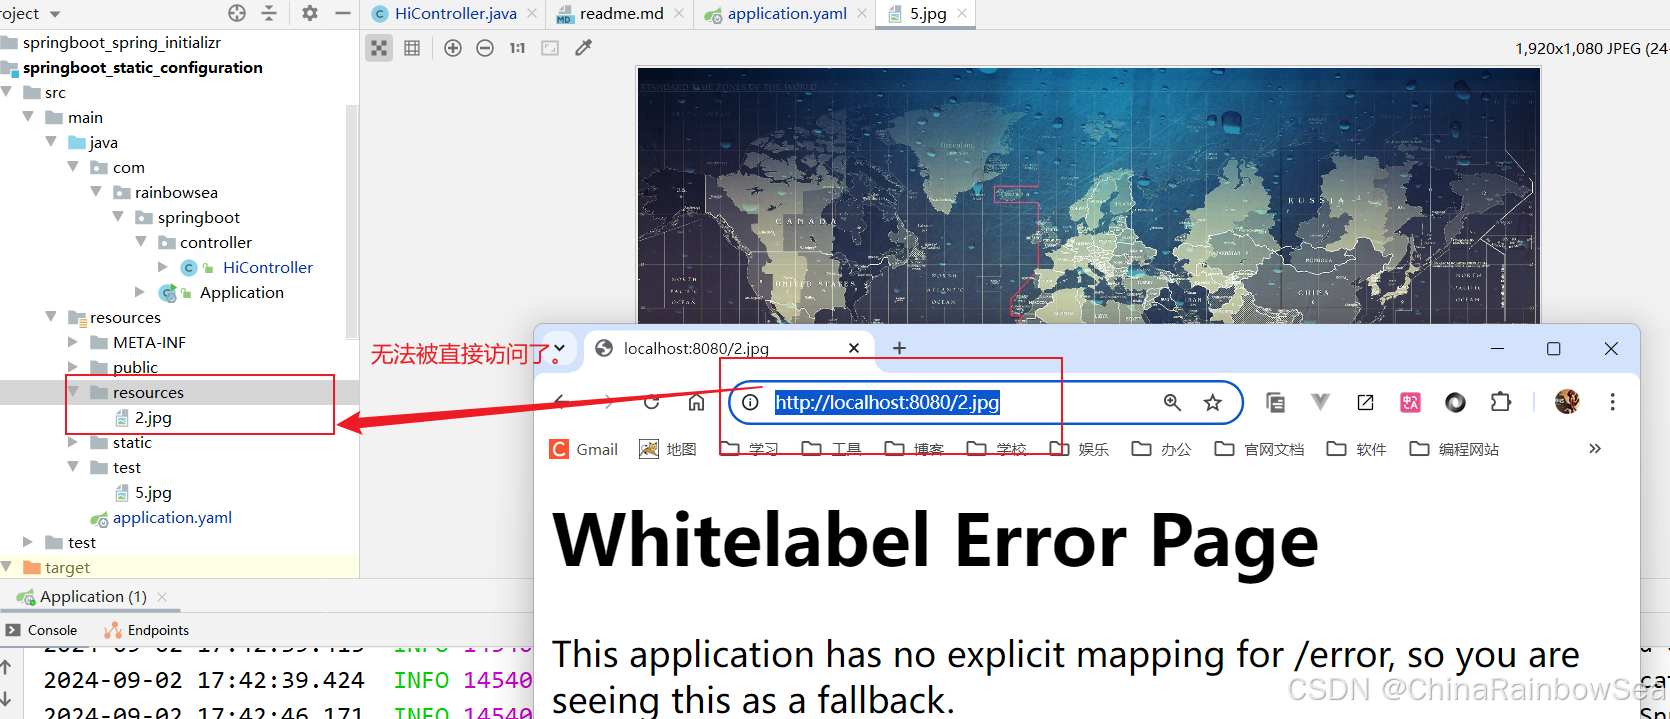
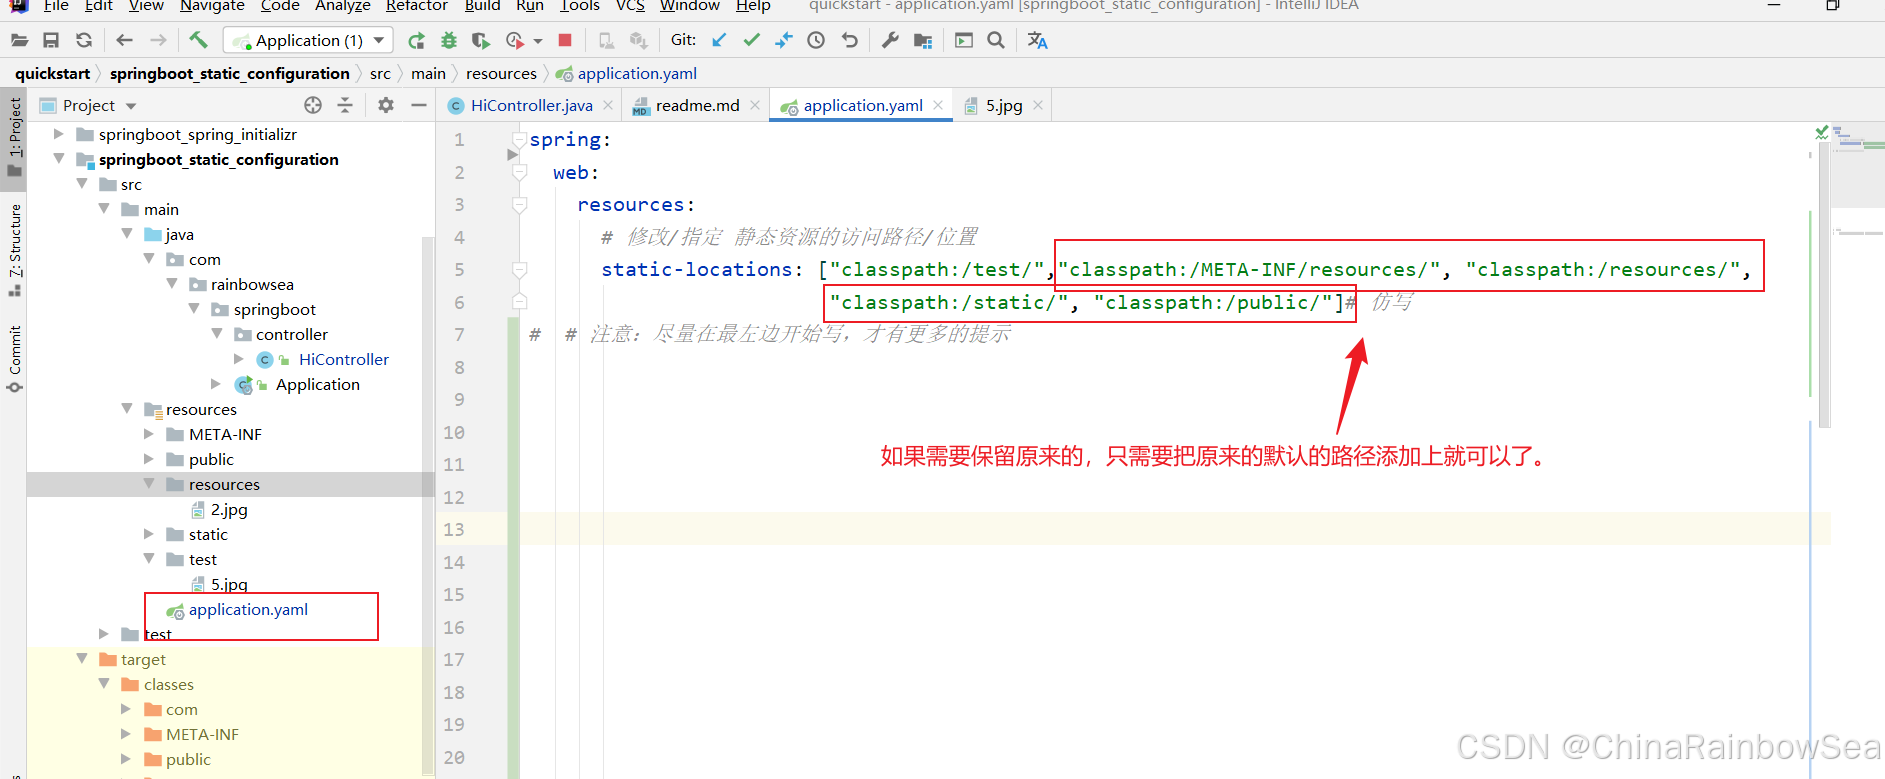
想要:保留原来 Spring Boot 的默认静态资源路径,只需要把原来的 Spring Boot 默认的路径添加上就可以了。
运行测试:
5. 静态资源访问注意事项和细节
1、注意:直接放在 resources 类的根路径下,是访问不到的。因为我们从 WebProperties 类源码上,就知道了,Spring Boot 的默认静态资源路径,就只有四个,而 resources 类路径是不属于这四个当中的。
运行测试:我们在 resources 类路径下,放入 6.jpg 图片,试试,可不可以被直接访问。
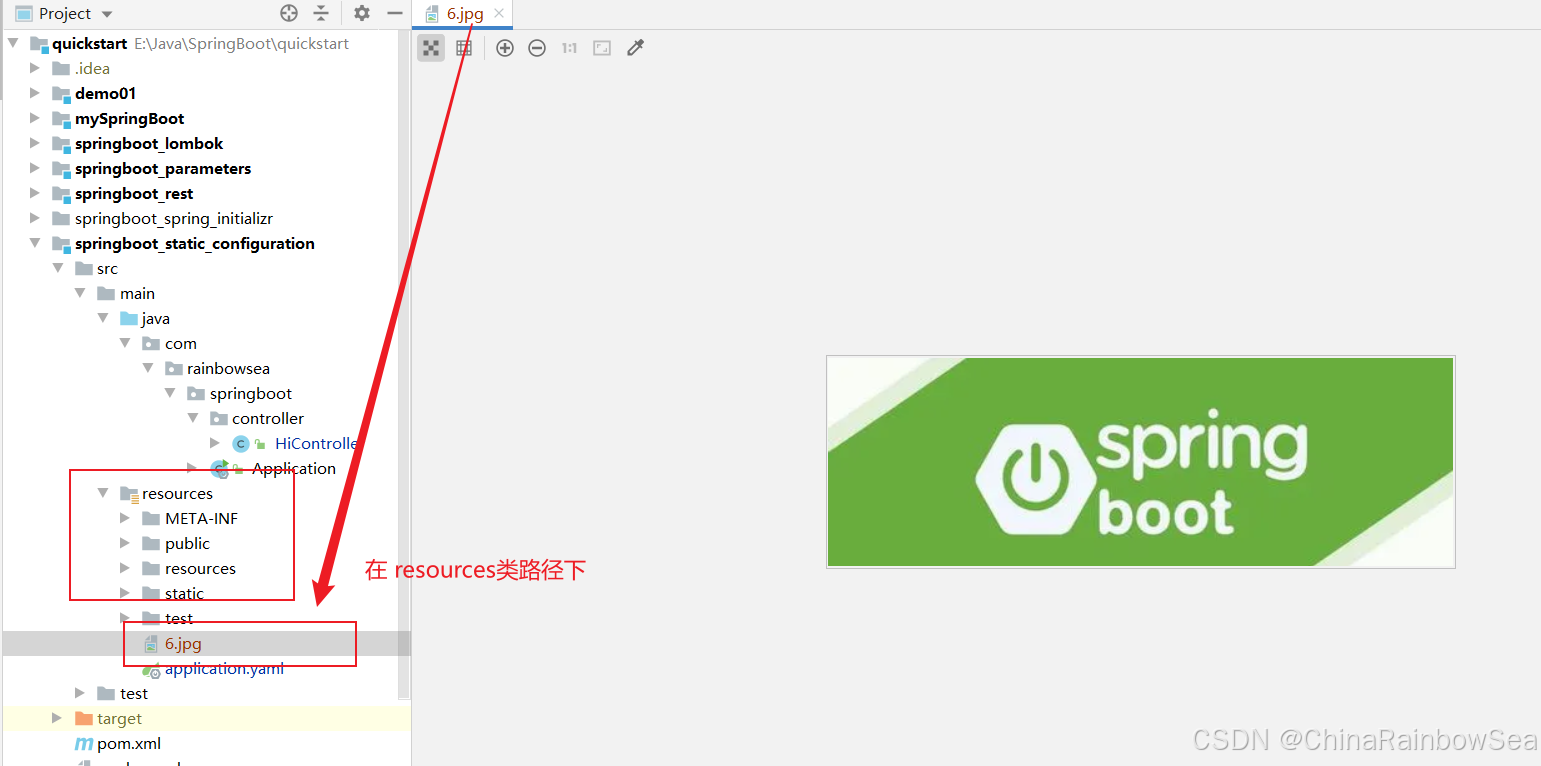
打开浏览器访问测试:

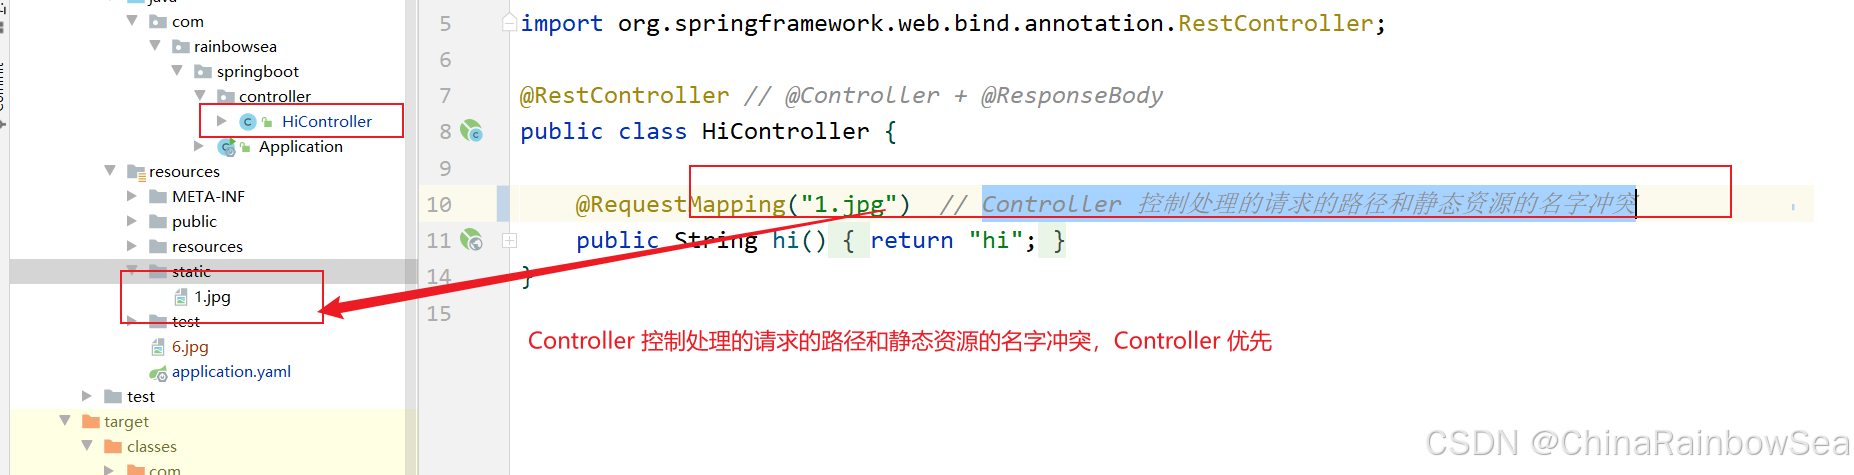
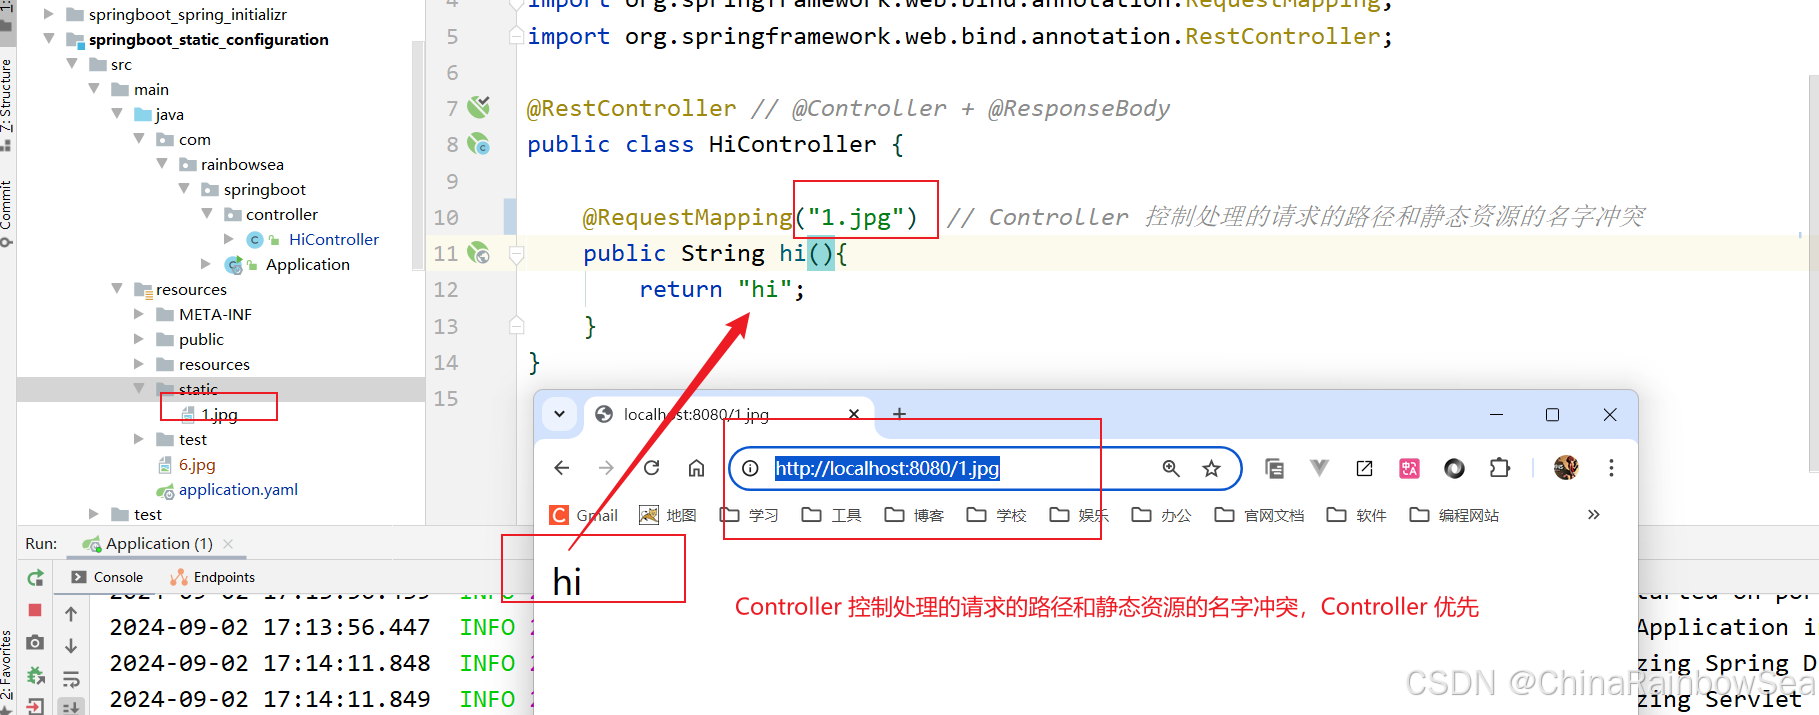
2、当默认请求的路径的资源的名字和 Controller 控制器请求处理的路径一样,冲突的时候。**优先看 Controller 能不能处理;不能,处理的请求交给静态资源处理,如果静态资源也找不到则相应点资源,则报:404 找不到的,页面。
静态资源被访问原理:静态映射是 /** , 也就是对所有请求拦截,请求进来,先看 Controller 能不能处理,不能处理的请求交给静态资源处理,如果静态资源找不到则相应 404 页面
6. 总结:
1、理解 Spring Boot 静态资源放在类路径下: /static, /public, /resources, /META-INF/resources 就可以被直接访问-对应文件(这是 Spring Boot 的默认设置好的 )。关于这一点,我们从 WebProperties.java 这个类的源码上可以找到,对应的配置属性。
2、访问方式: 默认:项目根路径/+静态资源名 比如: http://localhost:8080/hi.html 。关于这一点,我们可以从 WebMvcProperties.java 类当中找到答案。
3、改变静态资源访问前缀,比如我们希望 http://locahost:8080/rainbowsea/* 下的请求路径,去请求静态资源,应用场景:静态资源访问前缀和控制器请求路径冲突。

4、改变 Spring Boot 当中的默认的静态资源路径(实现自定义静态资源路径)。
5、注意:直接放在 resources 类的根路径下,是访问不到的。因为我们从 WebProperties 类源码上,就知道了,Spring Boot 的默认静态资源路径,就只有四个,而 resources 类路径是不属于这四个当中的。
文章转载自:Rainbow-Sea
原文链接:https://www.cnblogs.com/TheMagicalRainbowSea/p/18402909

还未添加个人签名 2023-06-19 加入
还未添加个人简介


评论