1.wait()与 notify()实现一个简易的内存队列
在多线程开发中,wait()和 notify()/notifyAll()还是挺常见的。在分布式系统里经常会使用 wait()和 notifyAll()来进行线程通信,当某个线程处于阻塞等待状态时,其他线程可以进行通知并唤醒它。
如下代码向内存队列添加元素和获取元素时,都使用了 MyQueue 对象锁。当内存队列满或者空时,需要释放锁,才能让添加或者获取继续下去。其中 wait()方法会释放锁,并让当前线程进入等待状态,而 notify()方法和 notifyAll()方法会唤醒等待获取锁的线程。所以 wait()和 notify()主要是用来控制线程的,当然也可认为用于线程通信。
public class MyQueue {    private final static int MAX_SIZE = 100;    private LinkedList<String> queue = new LinkedList<String>();       //向内存队列添加一个元素    public synchronized void offer(String element) {        try {            if (queue.size() == MAX_SIZE) {                //一个线程只要执行到这一步,就说明已经获取到锁                //但现在内存队列已经满了,所以可以让线程进入一个等待的状态,并释放锁                wait();            }            queue.addLast(element);            //唤醒当前在等待锁的线程            notifyAll();        } catch (Exception e) {            e.printStackTrace();        }    }
    //获取内存队列的第一个元素    public synchronized String take() {        //别的线程可以通过take()方法从队列里获取数据        String element = null;        try {            if (queue.size() == 0) {                //释放锁,并让当前线程自己进行阻塞等待                //等待其他线程往内存队列放入数据后,通过notifyAll()来唤醒自己                wait();            }            element = queue.removeFirst();            //唤醒当前在等待锁的线程            notifyAll();        } catch (Exception e) {            e.printStackTrace();        }        return element;    }}
复制代码
2.wait()与 notify()的底层原理
(1)获取重量级锁之前的锁膨胀
如果线程在运行 synchronized 修饰的同步块代码时,发现锁状态是轻量级锁并且有其他线程抢占了锁资源,那么该线程就会触发锁膨胀升级到重量级锁。
在获取重量级锁之前会先实现锁膨胀,锁膨胀时首先会创建一个 ObjectMonitor 对象,然后把 ObjectMonitor 对象的指针保存到锁对象的 Mark Word 中。
重量级锁的实现是在 ObjectMonitor 中完成的,所以锁膨胀的意义就是构建一个 ObjectMonitor 对象。
(2)ObjectMonitor 对象的重要字段
_owner:保存当前持有锁的线程
_cxq:没有获得锁的线程队列
_waitset:被 wait()方法阻塞的线程队列
_recursions:锁被重入的次数
(3)重量级锁的获取流程
重量级锁的竞争都是在 ObjectMonitor 对象中完成的。首先判断当前线程是否是重入,如果是则重入次数+1。然后通过 CAS 自旋来判断 ObjectMonitor 中的_owner 字段是否为空。如果为空,则表示重量级锁已经被释放,当前线程可以获得锁。如果不为空,就继续进行自适应自旋重试。最后如果通过自旋竞争锁失败,则把当前线程构建成一个 ObjectWaiter 结点,插入到 ObjectMonitor 的_cxq 队列的队头,再调用 park()方法阻塞当前线程。
(4)重量级锁的释放流程
首先把 ObjectMonitor 的_owner 字段设置为 null,然后从 ObjectMonitor 的_cxq 队列中调用 unpark()方法唤醒一个阻塞的线程。被唤醒的线程会重新竞争重量级锁,如果没抢到,则继续阻塞等待。因为 synchronized 是非公平锁,被唤醒的线程不一定能重新抢占到锁。
(5)wait()与 notify()的底层原理
这与 synchronized 的原理(ObjectMonitor 对象)相关,ObjectMonitor 对象有一个_waitset 队列和重入计数器。使用 wait()和 notify()时必须对同一个对象实例进行加 synchronized 锁。如果对象实例加锁,那么重入计数器 + 1。如果对象实例释放锁,那么重入计数器 - 1。
执行 wait()方法时会释放锁 + 阻塞当前线程 + 把当前线程放入_waitset 队列,执行 notify()方法时会唤醒_waitset 队列里的被阻塞的线程。
(6)wait()与 notify()在使用时的注意事项
wait()与 sleep()的区别:两者都会等待,前者释放锁,后者不释放锁。wait()必须要有其他线程调用 notify()来唤醒它。wait(timeout)会阻塞一段时间,然后自己唤醒自己,继续争抢锁。wait()与 notify()必须与 synchornized 一起,对同一个对象进行使用。notify()会唤醒阻塞状态的一个线程,notifyall()会唤醒阻塞状态的所有线程。
3.分布式存储系统 NameNode 机制介绍
(1)HDFS 的 DataNode 和 NameNode
HDFS 是 Hadoop 的分布式文件系统,它由很多机器组成。每台机器上运行一个 DataNode 进程,存储一部分数据。然后会有一台机器上运行一个 NameNode 进程,NameNode 可以认为是负责管理整个 HDFS 集群的进程,NameNode 里存储了 HDFS 集群的所有元数据。
(2)HDFS 的 NameNode 架构简介
一.每次修改元数据都顺序追加 edits log
NameNode 的核心功能是管理整个 HDFS 集群的元数据,比如文件目录树、权限设置、副本数设置等。
HDFS 客户端每次上传文件时,都要维护 NameNode 的文件目录树。但是 NameNode 的文件目录树是在内存里的,万一 NameNode 宕机,内存里的文件目录树可能就会丢失。
所以每次修改内存,就顺序追加一条 edits log(元数据操作日志)到磁盘文件。每次 NameNode 重启,就把 edits log(元数据操作日志)读到内存恢复数据。
二.如何避免 edits log 过大导致恢复过慢
为了避免 edits log(元数据操作日志)越来越大每次重启恢复过慢,于是引入了一个新的磁盘文件 fsimage、一个 JournalNodes 集群、一个 Active NameNode(主节点)、一个 Standby NameNode(备节点)。
主节点每修改一条元数据都会生成一条 edits log。每条 edits log 除了写到主节点外,还会写到 JournalNodes 集群。然后备节点会从 JournalNodes 集群拉取 edits log 到自己内存的文件目录树里,这样备节点的数据就可以跟主节点的数据保持一致了。
每隔一段时间备节点会把自己内存的文件目录树写一份到 fsimage 磁盘文件,这个也就是所谓的 checkpoint 检查点操作。然后备节点再把这个 fsimage 磁盘文件上传到到主节点,接着清空掉主节点上的旧的 edits log 文件(可能几十万行)。之后主节点继续处理修改元数据请求,那么可能只有几十行 edits log 日志了。
如果此时主节点重启,首先把备节点传过来的 fsimage 文件读到内存里,然后把新的 edits log 里少量的几十行操作日志重新恢复到内存中即可。
三.NameNode 主备高可用故障转移机制
整个过程有两个 NameNode:一是对外提供服务接收请求的主节点 NameNode,二是同步主节点 edits log + 定期执行 checkpoint 的备节点 NameNode。
这两个 NameNode 内存里的元数据几乎一模一样。所以如果主节点挂了,可以马上切换到备节点对外提供服务,而这就是所谓的 NameNode 主备高可用故障转移机制了。
4.分布式存储系统的 edits log 机制介绍
(1)高并发请求下 NameNode 会遇到的问题
NameNode 每修改一条元数据都要写一条 edits log,这包括两个步骤:写入本地磁盘和通过网络传输给 JournalNodes 集群。
NameNode 必须保证写入的每条 edits log 都有一个全局顺序递增的 txid,这样才可以标识出一条 edits log 的先后顺序。
如果要保证每条 edits log 的 txid 都是递增的,那么就必须要加锁。每个线程修改完元数据准备写一条 edits log 时,按顺序排队获取锁,获取到锁之后才能生成一个递增的 txid 给要准备写的 edits log。
但是如果每次在加锁的代码块里生成 txid,然后写磁盘文件 edits log,接着通过网络传输写入 JournalNodes,那么性能就一定很低。所以每个线程写 edits log 时最好不要串行化排队来执行这 3 个操作:生成 txid + 写磁盘 + 写 JournalNode。
(2)通过双缓冲机制来提升写 edits log 的性能
为了避免线程写 edits log 时串行化排队去生成 txid + 写磁盘 + 写 JournalNode,可以考虑增加内存缓冲。首先将 edits log 写入到内存缓冲里,然后通过后台线程将内存中的 edits log 刷入磁盘 + 写入 JournalNode。而且将 edits log 刷盘的过程中,其他线程依然可以将 edits log 写入内存缓冲。
如果针对同一块内存缓冲,同时有线程写入、同时有线程读取后刷入磁盘,那么是会存在并发读写问题的,因为不能并发读写一块共享内存数据。
所以 HDFS 采取了双缓冲机制来处理,也就是将一块内存缓冲分成两部分。其中一部分只用来写入,另一部分只用来读取进行刷盘。
5.分布式存储系统的 NameNode 实现
(1)NameNode 的基本功能
如果 NameNode 执行命令创建一个目录,那么会做两件事情:一是在内存里的文件目录树中加入目录节点,二是在磁盘里写入一条 edits log 日志来记录本次元数据修改。
所以接下来要实现两个功能:一是在内存文件目录树中加入目录节点,二是写 edits log 到磁盘文件。
如下是 NameNode 的核心组件说明:
FSNamesystem 类:作为 NameNode 里元数据操作的核心入口,负责管理所有的元数据的操作,会调用其他组件完成相关事情。
FSDirectory 类:管理内存中的文件目录树。
FSEditLog 类:写入 edits log 到磁盘文件里。
(2)NameNode 的核心启动类
//NameNode核心启动类public class NameNode { //NameNode是否在运行 private volatile Boolean shouldRun; //负责管理元数据的核心组件 private FSNamesystem namesystem; //NameNode对外提供RPC接口的Server,可以响应请求 private NameNodeRpcServer rpcServer; public NameNode() { this.shouldRun = true; } //初始化NameNode private void initialize() { this.namesystem = new FSNamesystem(); this.rpcServer = new NameNodeRpcServer(this.namesystem); this.rpcServer.start(); } //让NameNode运行起来 private void run() { try { while(shouldRun) { Thread.sleep(10000); } } catch (Exception e) { e.printStackTrace(); } } public static void main(String[] args) throws Exception { NameNode namenode = new NameNode(); namenode.initialize(); namenode.run(); }}
复制代码
(3)NameNode 的 RPC 服务接口
//NameNode的rpc服务的接口public class NameNodeRpcServer {    //负责管理元数据的核心组件    private FSNamesystem namesystem;      public NameNodeRpcServer(FSNamesystem namesystem) {        this.namesystem = namesystem;    }      //创建目录    public Boolean mkdir(String path) throws Exception {        return this.namesystem.mkdir(path);    }
    //启动这个rpc server    public void start() {        System.out.println("开始监听指定的rpc server的端口号,来接收请求");      }}
复制代码
(4)负责管理元数据的 FSNamesystem
//负责管理元数据的核心组件public class FSNamesystem { //负责管理内存文件目录树的组件 private FSDirectory directory; //负责管理edits log写入磁盘的组件 private FSEditlog editlog; public FSNamesystem() { this.directory = new FSDirectory(); this.editlog = new FSEditlog(); } //创建目录 public Boolean mkdir(String path) throws Exception { this.directory.mkdir(path); this.editlog.logEdit("创建了一个目录:" + path); return true; }}
复制代码
(5)负责管理文件目录树的 FSDirectory
//负责管理内存中的文件目录树的核心组件public class FSDirectory { //创建目录 public void mkdir(String path) { }}
复制代码
(6)负责管理 edits log 日志的 FSEditlog
//负责管理edits log日志的核心组件public class FSEditlog { //记录edits log日志 public void logEdit(String log) { }}
复制代码
6.分布式存储系统的创建目录功能实现
在内存的文件目录树中创建一个目录节点的代码如下。内存里的文件目录树是会被多线程并发写的资源,所以创建目录的代码块必须要用 synchronized 保护起来。
//负责管理内存中的文件目录树的核心组件public class FSDirectory { //内存中的文件目录树 private INodeDirectory dirTree; public FSDirectory() { this.dirTree = new INodeDirectory("/"); } //创建目录 public void mkdir(String path) { //path = /usr/warehouse/hive //首先判断'/'根目录下有没有一个'usr'目录 //如果有,那么再判断'/usr'目录下有没有一个'/warehouse'目录 //如果没有,那么就得先在'/usr'目录下创建一个'/warehosue'目录 //接着再在'/warehosue'目录下,创建'hive'这个目录节点 synchronized(dirTree) { String[] pathes = path.split("/"); INodeDirectory parent = dirTree; for (String splitedPath : pathes) { if (splitedPath.trim().equals("")) { continue; } INodeDirectory dir = findDirectory(parent, splitedPath); if (dir != null) { parent = dir; continue; } INodeDirectory child = new INodeDirectory(splitedPath); parent.addChild(child); } } } //对文件目录树递归查找目录 private INodeDirectory findDirectory(INodeDirectory dir, String path) { if (dir.getChildren().size() == 0) { return null; } INodeDirectory resultDir = null; for (INode child : dir.getChildren()) { if (child instanceof INodeDirectory) { INodeDirectory childDir = (INodeDirectory) child; if ((childDir.getPath().equals(path))) { return childDir; } resultDir = findDirectory(childDir, path); if (resultDir != null) { return resultDir; } } } return null; } //代表的是文件目录树中的一个节点 private interface INode { } //代表文件目录树中的一个目录 public static class INodeDirectory implements INode { private String path; private List<INode> children; public INodeDirectory(String path) { this.path = path; this.children = new LinkedList<INode>(); } public void addChild(INode inode) { this.children.add(inode); } public String getPath() { return path; } public void setPath(String path) { this.path = path; } public List<INode> getChildren() { return children; } public void setChildren(List<INode> children) { this.children = children; } } //代表文件目录树中的一个文件 public static class INodeFile implements INode { private String name; public String getName() { return name; } public void setName(String name) { this.name = name; } }}
复制代码
7.edits log 的全局 txid 机制和双缓冲机制实现
全局 txid 机制 + 双缓冲机制的代码如下:
//负责管理edits log日志的核心组件public class FSEditlog {    //当前递增到的txid的序号    private long txidSeq = 0L;        //内存双缓冲区    private DoubleBuffer editLogBuffer = new DoubleBuffer();        //记录edits log日志    public void logEdit(String content) {        //这里必须加锁        synchronized(this) {            //获取全局唯一递增的txid,代表了edits log的序号            txidSeq++;            long txid = txidSeq;            //构造一条edits log对象            EditLog log = new EditLog(txid, content);            //将edits log写入内存缓冲中,不是直接刷入磁盘文件            editLogBuffer.write(log);          }    }       //代表了一条edits log,内部类    private class EditLog {        long txid;        String content;        public EditLog(long txid, String content) {            this.txid = txid;            this.content = content;        }    }       //内存双缓冲,内部类    private class DoubleBuffer {        //专门用来承载线程写入edits log        LinkedList<EditLog> currentBuffer = new LinkedList<EditLog>();
        //专门用来将数据同步到磁盘中去的一块缓冲        LinkedList<EditLog> syncBuffer = new LinkedList<EditLog>();
        //将edits log写到内存缓冲里去        public void write(EditLog log) {            currentBuffer.add(log);        }
        //交换两块缓冲区,为同步内存数据到磁盘做准备        public void setReadyToSync() {            LinkedList<EditLog> tmp = currentBuffer;            currentBuffer = syncBuffer;            syncBuffer = tmp;        }
        //获取sync buffer缓冲区里的最大的一个txid        public Long getSyncMaxTxid() {            return syncBuffer.getLast().txid;        }
        //将syncBuffer缓冲区中的数据刷入磁盘中        public void flush() {            for (EditLog log : syncBuffer) {                System.out.println("将edit log写入磁盘文件中:" + log);                 //正常来说,就是用文件输出流将数据写入磁盘文件中            }            syncBuffer.clear();          }    }}
复制代码
8.synchronized 实现 edits log 分段加锁机制
logSync()方法通过分两段加 synchronized 锁,将耗时的刷盘操作放在锁外,然后通过更改标志位以及使用 wait()和 notify()来控制线程的等待和锁的释放,从而保证高并发下的刷盘性能。
//负责管理edits log日志的核心组件public class FSEditlog {    //当前递增到的txid的序号    private long txidSeq = 0L;    //内存双缓冲区    private DoubleBuffer editLogBuffer = new DoubleBuffer();    //当前是否在将内存缓冲刷入磁盘中    private volatile Boolean isSyncRunning = false;    //当前是否有线程在等待刷新下一批edits log到磁盘里去    private volatile Boolean isWaitSync = false;    //在同步到磁盘中的最大的一个txid    private volatile Long syncMaxTxid = 0L;    //每个线程自己本地的txid副本    private ThreadLocal<Long> localTxid = new ThreadLocal<Long>();       //记录edits log日志    public void logEdit(String content) {        //这里直接加锁,有线程执行logSync()方法时这里没有其他线程能进来        synchronized(this) {            //获取全局唯一递增的txid,代表了edits log的序号            txidSeq++;            long txid = txidSeq;            localTxid.set(txid);            //构造一条edits log对象            EditLog log = new EditLog(txid, content);            //将edits log写入内存缓冲中,不是直接刷入磁盘文件            editLogBuffer.write(log);          }        //尝试允许某一个执行logEdit()方法的线程,一次性将内存缓冲中的数据刷入到磁盘文件中        logSync();    }       //将内存缓冲中的数据刷入磁盘文件中    //在这里尝试允许某一个线程一次性将内存缓冲中的数据刷入到磁盘文件中    //相当于批量将内存缓冲的数据刷入磁盘    private void logSync() {        //再次尝试加锁,只有一个线程能进来,这个过程很快,纳秒级别,这里属于第一段加锁        synchronized(this) {            //如果当前正好有线程在刷内存缓冲到磁盘中去            if (isSyncRunning) {                ...            }
            //交换两块缓冲区            editLogBuffer.setReadyToSync();
            //然后保存当前要同步到磁盘中的最大txid,此时editLogBuffer中的syncBuffer在交换完以后可能有多条数据            //而且里面的edits log的txid一定是从小到大的,此时要同步的txid = 6,7,8,9,10,11,12,所以syncMaxTxid = 12            syncMaxTxid = editLogBuffer.getSyncMaxTxid();
            //设置当前正在同步到磁盘的标志位            isSyncRunning = true;        }              //释放锁,开始同步内存缓冲的数据到磁盘文件里去        //这个过程其实是比较慢,基本上肯定是毫秒级了,弄不好就要几十毫秒        editLogBuffer.flush();                //这里属于另外一段加锁        synchronized(this) {            //同步完了磁盘之后,就会将标志位复位,再释放锁            isSyncRunning = false;            //唤醒可能正在等待他同步完磁盘的线程            notifyAll();        }    }    ...}
复制代码
9.wait()与 notify()实现 edits log 批量刷磁盘
//负责管理edits log日志的核心组件public class FSEditlog {    //当前递增到的txid的序号    private long txidSeq = 0L;    //内存双缓冲区    private DoubleBuffer editLogBuffer = new DoubleBuffer();    //当前是否在将内存缓冲刷入磁盘中    private volatile Boolean isSyncRunning = false;    //当前是否有线程在等待刷新下一批edits log到磁盘里去    private volatile Boolean isWaitSync = false;    //在同步到磁盘中的最大的一个txid    private volatile Long syncMaxTxid = 0L;    //每个线程自己本地的txid副本    private ThreadLocal<Long> localTxid = new ThreadLocal<Long>();       //记录edits log日志    public void logEdit(String content) {        //这里直接加锁,有线程执行logSync()方法时这里没有其他线程能进来        synchronized(this) {            //获取全局唯一递增的txid,代表了edits log的序号            txidSeq++;            long txid = txidSeq;            localTxid.set(txid);            //构造一条edits log对象            EditLog log = new EditLog(txid, content);            //将edits log写入内存缓冲中,不是直接刷入磁盘文件            editLogBuffer.write(log);          }        //尝试允许某一个执行logEdit()方法的线程,一次性将内存缓冲中的数据刷入到磁盘文件中        logSync();    }       //将内存缓冲中的数据刷入磁盘文件中    //在这里尝试允许某一个线程一次性将内存缓冲中的数据刷入到磁盘文件中    //相当于批量将内存缓冲的数据刷入磁盘    private void logSync() {        //再次尝试加锁,只有一个线程能进来,这个过程很快,纳秒级别,这里属于第一段加锁        synchronized(this) {            //如果当前正好有线程在刷内存缓冲到磁盘中去            if (isSyncRunning) {                //假如某个线程正在把txid = 6,7,8,9,10,11,12的edits log从syncBuffer刷入磁盘                //此时syncMaxTxid = 12,代表的是正在刷入磁盘的最大txid                //那么刷盘的线程释放锁进行刷盘后,这时来一个线程对应的txid = 10,此时它可以直接返回                //因为它对应的edits log被刷盘的线程正在刷入或者已经刷入磁盘了,这时txid = 12的线程就不需要等待                long txid = localTxid.get();                if (txid <= syncMaxTxid) {                    return;                }                   //此时如果来的是一个txid = 13的线程,那么就会发现已经有线程在等待刷下一批数据到磁盘,此时会直接返回                if (isWaitSync) {                    return;                }
                //此时如果来的是一个txid = 14的线程,并且刷盘还没刷完,                //那么就在这里等待或者成为下一个刷盘的线程,只有一个线程在等                isWaitSync = true;                while (isSyncRunning) {                    try {                        wait(2000);//释放锁并自己等2秒或者等别人唤醒                    } catch (Exception e) {                        e.printStackTrace();                      }                }                isWaitSync = false;            }
            //交换两块缓冲区            editLogBuffer.setReadyToSync();
            //然后保存当前要同步到磁盘中的最大txid,此时editLogBuffer中的syncBuffer在交换完以后可能有多条数据            //而且里面的edits log的txid一定是从小到大的,此时要同步的txid = 6,7,8,9,10,11,12,所以syncMaxTxid = 12            syncMaxTxid = editLogBuffer.getSyncMaxTxid();
            //设置当前正在同步到磁盘的标志位            isSyncRunning = true;        }              //释放锁,开始同步内存缓冲的数据到磁盘文件里去        //这个过程其实是比较慢,基本上肯定是毫秒级了,弄不好就要几十毫秒        editLogBuffer.flush();                //这里属于另外一段加锁        synchronized(this) {            //同步完了磁盘之后,就会将标志位复位,再释放锁            isSyncRunning = false;            //唤醒可能正在等待他同步完磁盘的线程            notifyAll();        }    }    ...}
复制代码
10.i++和 AtomicInteger 分别实现并发安全
public class AtomicIntegerDemo {    static Integer i = 0;    static AtomicInteger j = new AtomicInteger(0);
    public static void main(String[] args) {        synchronizedAdd();        atomicAdd();    }
    private static void synchronizedAdd() {        for (int i = 0; i < 10; i++) {            new Thread() {                public void run() {                    //10个线程就要串行依次的一个一个进入锁代码块,然后依次对i变量进行++的操作                    //每次操作完i++,就写回到主存,下一个线程间进行从主存来加载,再次i++                    synchronized(AtomicIntegerDemo.class) {                        System.out.println(++AtomicIntegerDemo.i);                    }                }            }.start();        }    }
    private static void atomicAdd() {        for (int i = 0; i < 10; i++) {            new Thread() {                public void run() {                    //通过atomic实现多线程并发安全                    System.out.println(AtomicIntegerDemo.j.incrementAndGet());                 }            }.start();        }    }}
复制代码
11.AtomicInteger 中的 CAS 无锁化原理
(1)CAS 简介
CAS 就是 Compare and Set,首先判断此时内存中是否是某个值。如果是则修改,如果不是则重新查询最新的值,再执行判断。
(2)Atomic 原子类简介
Atomic 的原子类分别有:
AtomicInteger、AtomicLong、AtomicBoolean、AtomicReference、LongAdder 等。
Atomic 原子类底层的核心原理就是 CAS,属于一种乐观锁。每次修改时就先对比原值,看看有没有其他线程修改过原值。如果没有修改过就可以修改,如果有修改就重新查出最新值来重复这个过程。
12.Atomic 源码之仅限 JDK 使用的 Unsafe 类
(1)Atomic 原子类通过 Unsafe 执行 CAS 操作
public class AtomicInteger extends Number implements java.io.Serializable {    private static final Unsafe unsafe = Unsafe.getUnsafe();    private static final long valueOffset;    private volatile int value;    ...    //Creates a new AtomicInteger with the given initial value.    public AtomicInteger(int initialValue) {        value = initialValue;    }
    //Creates a new AtomicInteger with initial value {@code 0}.    public AtomicInteger() {            }
    //Gets the current value.    public final int get() {        return value;    }
    //Sets to the given value.    public final void set(int newValue) {        value = newValue;    }
    //Eventually sets to the given value.    public final void lazySet(int newValue) {        unsafe.putOrderedInt(this, valueOffset, newValue);    }
    //Atomically sets to the given value and returns the old value.    public final int getAndSet(int newValue) {        return unsafe.getAndSetInt(this, valueOffset, newValue);    }
    //Atomically sets the value to the given updated value if the current value == the expected value.    //@param expect the expected value    //@param update the new value    //@return true if successful. False return indicates that the actual value was not equal to the expected value.    public final boolean compareAndSet(int expect, int update) {        return unsafe.compareAndSwapInt(this, valueOffset, expect, update);    }
    //Atomically increments by one the current value.    //@return the previous value    public final int getAndIncrement() {        return unsafe.getAndAddInt(this, valueOffset, 1);    }
    //Atomically decrements by one the current value.    //@return the previous value    public final int getAndDecrement() {        return unsafe.getAndAddInt(this, valueOffset, -1);    }
    //Atomically adds the given value to the current value.    //@param delta the value to add    //@return the previous value    public final int getAndAdd(int delta) {        return unsafe.getAndAddInt(this, valueOffset, delta);    }
    //Atomically increments by one the current value.    //@return the updated value    public final int incrementAndGet() {        return unsafe.getAndAddInt(this, valueOffset, 1) + 1;    }
    //Atomically decrements by one the current value.    //@return the updated value    public final int decrementAndGet() {        return unsafe.getAndAddInt(this, valueOffset, -1) - 1;    }
    //Atomically adds the given value to the current value.    //@param delta the value to add    //@return the updated value    public final int addAndGet(int delta) {        return unsafe.getAndAddInt(this, valueOffset, delta) + delta;    }        //Atomically updates the current value with the results of applying the given function, returning the previous value.     //The function should be side-effect-free, since it may be re-applied when attempted updates fail due to contention among threads.    //@param updateFunction a side-effect-free function    //@return the previous value    public final int getAndUpdate(IntUnaryOperator updateFunction) {        int prev, next;        do {            prev = get();            next = updateFunction.applyAsInt(prev);        } while (!compareAndSet(prev, next));        return prev;    }        //Atomically updates the current value with the results of applying the given function, returning the updated value.     //The function should be side-effect-free, since it may be re-applied when attempted updates fail due to contention among threads.    //@param updateFunction a side-effect-free function    //@return the updated value    public final int updateAndGet(IntUnaryOperator updateFunction) {        int prev, next;        do {            prev = get();            next = updateFunction.applyAsInt(prev);        } while (!compareAndSet(prev, next));        return next;    }
    //Atomically updates the current value with the results of applying the given function to the current and given values, returning the previous value.     //The function should be side-effect-free, since it may be re-applied when attempted updates fail due to contention among threads.      //The function is applied with the current value as its first argument, and the given update as the second argument.    //@param x the update value    //@param accumulatorFunction a side-effect-free function of two arguments    //@return the previous value    public final int getAndAccumulate(int x, IntBinaryOperator accumulatorFunction) {        int prev, next;        do {            prev = get();            next = accumulatorFunction.applyAsInt(prev, x);        } while (!compareAndSet(prev, next));        return prev;    }
    //Atomically updates the current value with the results of applying the given function to the current and given values, returning the updated value.    //The function should be side-effect-free, since it may be re-applied when attempted updates fail due to contention among threads.      //The function is applied with the current value as its first argument, and the given update as the second argument.    //@param x the update value    //@param accumulatorFunction a side-effect-free function of two arguments    //@return the updated value    public final int accumulateAndGet(int x, IntBinaryOperator accumulatorFunction) {        int prev, next;        do {            prev = get();            next = accumulatorFunction.applyAsInt(prev, x);        } while (!compareAndSet(prev, next));        return next;    }    ...}
复制代码
(2)Unsafe 类仅限 JDK 内部使用
Unsafe 类是 JDK 底层的一个类,不允许被实例化和使用它里面的方法。因为 Unsafe 类的构造函数是私有的,所以不能手动进行实例化。其次调用 Unsafe.getUnsafe()方法来获取一个 UnSafe 实例也不被允许。
public final class Unsafe {    ...    private Unsafe() {    }
    @CallerSensitive    public static Unsafe getUnsafe() {        Class var0 = Reflection.getCallerClass();        if (!VM.isSystemDomainLoader(var0.getClassLoader())) {            throw new SecurityException("Unsafe");        } else {            return theUnsafe;        }    }    ...}
复制代码
13.Atomic 源码之无限重复循环以及 CAS 操作
(1)AtomicInteger 类的初始化
AtomicInteger 类初始化时,会执行静态代码块,即初始化 valueOffset 变量为 value 变量在 AtomicInteger 类中的偏移量。
这个 valueOffset 偏移量可以理解为:value 变量在 AtomicInteger 类的位置。由于 valueOffset 偏移量是 final 的,所以一旦初始化完毕就不会再改变。
public class AtomicInteger extends Number implements java.io.Serializable {    private static final Unsafe unsafe = Unsafe.getUnsafe();    private static final long valueOffset;    private volatile int value;
    static {        try {            valueOffset = unsafe.objectFieldOffset(AtomicInteger.class.getDeclaredField("value"));        } catch (Exception ex) {            throw new Error(ex);        }    }
    //Atomically increments by one the current value.    //@return the updated value    public final int incrementAndGet() {        return unsafe.getAndAddInt(this, valueOffset, 1) + 1;    }
    //Atomically sets the value to the given updated value if the current value == the expected value.    //@param expect the expected value    //@param update the new value    //@return true if successful. False return indicates that the actual value was not equal to the expected value.    public final boolean compareAndSet(int expect, int update) {        return unsafe.compareAndSwapInt(this, valueOffset, expect, update);    }    ...}
复制代码
(2)Unsafe 类的 getAndAddInt()方法
public final class Unsafe {    ...    //compareAndSwapInt()属于CAS方法    //这个方法会拿刚刚获取到的那个l值,认为是当前value的最新值    //然后和当前AtomicInteger对象实例中的value值进行比较    //如果一样,就将value的值给设置为:l(之前拿到的值) + delta(递增的值)    //如果不一样,compareAndSwapInt()方法就会返回false,自动进入下一轮while循环    //直到while循环结束,最后会返回一个l值,是递增delta前的旧值    public final int getAndAddInt(Object paramObject, long valueOffset, int delta) {        int l;        do {            //Unsafe的getIntVolatile方法会从AtomicInteger对象实例中,            //根据valueOffset偏移量(value变量的位置),去获取当前value的最新值为l            l = this.getIntVolatile(paramObject, valueOffset);        } while(!this.compareAndSwapInt(paramObject, valueOffset, l, l + delta));        return l;    }
    public native int getIntVolatile(Object paramObject, long valueOffset);
    //paramObject表示当前的实例对象    //valueOffset表示实例变量的内存地址偏移量    //expect表示期望值    //update表示更新后的值    public final native boolean compareAndSwapInt(Object paramObject, long valueOffset, int expect, int update);    ...}
复制代码
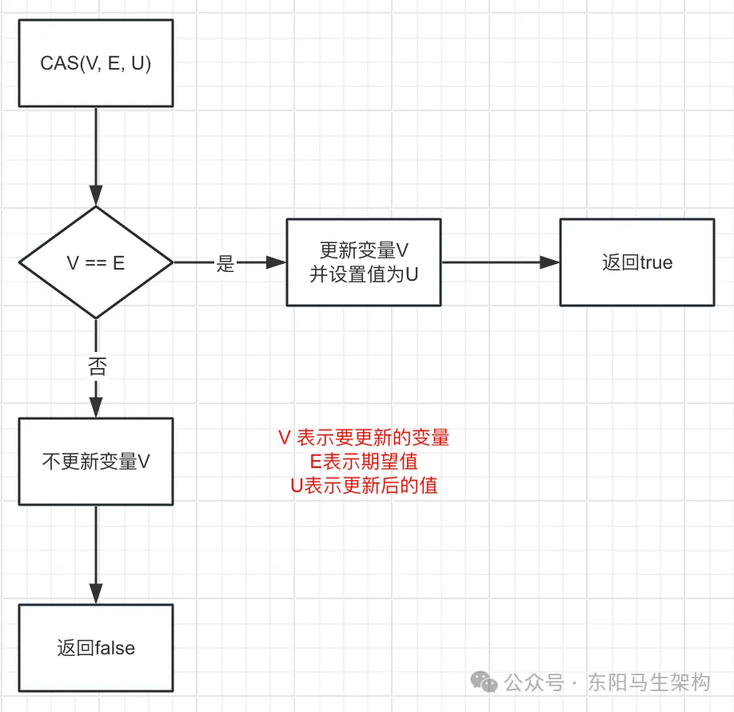
(3)CAS 的底层工作原理
下图表示通过 CAS 对变量 V 进行原子更新操作,底层的 CAS 方法中会传递三个参数。第一个参数 V 表示要更新的变量,第二个参数 E 表示期望值,第三个参数 U 表示更新后的值。
更新的方式是:如果 V == E,表示预期值和实际值相等,则将 V 修改成 U 并返回 true;否则修改失败,然后返回 false。
(4)自旋策略与阻塞策略
当一个线程拿不到锁时,有两种基本策略。
策略一:放弃 CPU 进入阻塞状态,等待后续被唤醒,再重新被操作系统调度。
策略二:不放弃 CPU,而是进入空转进行不断重试,也就是自旋。
单核 CPU 只能使用策略一,AtomicInteger 就是使用了自旋策略。synchronized 则是先自旋几圈,自旋后还获取不到锁再阻塞。
14.Atomic 原子类基于 CAS 操作的三大问题
(1)ABA 问题
ABA 问题就是:如果某个值一开始是 A,后来变成了 B,然后又变成了 A。AtomicStampedReference 能原子更新带有版本号的引用类型,解决 ABA 问题。此外一般用 AtomicInteger 进行的是不断累加计数,所以 ABA 问题比较少。
(2)无限循环问题
Atomic 原子类设置值的时候会进入一个无限循环,只要不成功就不停循环再次尝试,在高并发修改值时是挺常见的。
比如用 AtomicInteger 定义一个原子变量,高并发下修改时,可能会导致 compareAndSet()要循环很多次才设置成功。所以引入了 LongAdder 来解决,通过分段 CAS 的思路来解决无限循环问题。
(3)多个变量的原子性问题
一般的 AtomicInteger,只能保证一个变量的原子性,但是如果多个变量呢?
要保证多个变量的原子性,可以使用 AtomicReference 来封装自定义对象。将多个变量放在一个对象里,通过对象的引用来实现多个变量的原子性。
15.AtomicLong 优化服务注册中心心跳计数器
可以使用 AtomicLong 来优化服务注册中心内部的心跳计数器。
//心跳请求计数器public class HeartbeatCounter {    //单例实例    private static HeartbeatCounter instance = new HeartbeatCounter();
    //最近一分钟的心跳次数    private AtomicLong latestMinuteHeartbeatRate = new AtomicLong(0L);
    //最近一分钟的时间戳    private long latestMinuteTimestamp = System.currentTimeMillis();
    private HeartbeatCounter() {        Daemon daemon = new Daemon();        daemon.setDaemon(true);          daemon.start();    }
    //获取单例实例    public static HeartbeatCounter getInstance() {        return instance;    }
    //增加最近一分钟的心跳次数    public /**synchronized*/ void increment() {        //通过synchronized上锁,在很多线程的情况下,性能其实是很差的        //如果服务实例很多,比如1万个服务实例,那么每秒需要很多线程来处理大量的心跳请求        //这样就会出现很多线程卡在这里,一个一个排队获取锁,这样就会非常影响并发性能        //但换成AtomicLong之后,就不用加锁了,通过CAS操作实现无锁化编程,而且还保证了原子性        latestMinuteHeartbeatRate.incrementAndGet();      }
    //获取最近一分钟的心跳次数    public /**synchronized*/ long get() {        return latestMinuteHeartbeatRate.get();    }
    private class Daemon extends Thread {        @Override        public void run() {            while(true) {                try {                    long currentTime = System.currentTimeMillis();                    if (currentTime - latestMinuteTimestamp > 60 * 1000) {                        latestMinuteHeartbeatRate = new AtomicLong(0L);                         latestMinuteTimestamp = System.currentTimeMillis();                    }                    Thread.sleep(1000);                 } catch (Exception e) {                    e.printStackTrace();                }            }        }    }}
复制代码
16.LongAdder 的分段 CAS 优化多线程自旋
(1)采用分段 CAS 降低重试频率
这种分段的做法类似于 JDK7 中的 ConcurrentHashMap 的分段锁。
高并发场景下,value 变量其实就是一个热点数据,大量线程竞争一个热点。LongAdder 基本思路就是分散热点,将 value 分散到一个 Cell 数组中。不同线程会命中数组的不同槽位,各线程只对自己槽位的 value 进行 CAS 操作。这样热点就被分散了,冲突概率就变小了。
LongAdder 内部有一个 base 变量和一个 Cell[ ]数组。当并发不高的时候都是通过 CAS 来直接操作 base 变量的值。如果对 base 变量的 CAS 失败,则再针对 Cell[ ]数组中的 Cell 进行 CAS 操作。如果对 Cell[ ]数组中的 Cell 进行 CAS 失败,则换一个 Cell 进行 CAS 操作。
LongAdder 在无竞争情况下,跟 AtomicLong 是一样的, 对同一个 base 进行操作。当出现竞争的时候,则采用化整为零分散热点的做法,用空间换时间。通过使用一个 Cell[ ]数组,将一个 value 拆分进这个 Cell[ ]数组中。
(2)通过惰性求值提升自增性能
只有在使用 longValue()方法获取当前累加值时才会真正去结算计数的数据。LongAdder.longValue()方法其实就是调用 LongAdder.sum()方法,LongAdder.sum()方法会将 Cell 数组中的各元素 value 和 base 累加作为返回值。
AtomicLong.incrementAndGet()方法每次都会返回 long 类型的计数值,每次递增后还会伴随着数据返回,增加了额外的开销。
(3)LongAdder 和 AtomicLong 对比
一.AtomicLong 总结
AtomicLong 的实现原理是:
基于 CAS + 自旋操作,CAS 是基于硬件来实现原子性的,可以保障线程安全。
AtomicLong 的使用场景:
低并发下的全局计数器、序列号生成器。
AtomicLong 的优势是:
占用空间小。
AtomicLong 的缺点是:
高并发下性能急剧下降,N 个线程同时进行自旋,N-1 个线程会自旋失败、不断重试。
二.LongAdder 总结
LongAdder 设计思想是:
空间换时间,分散热点数据 value 的值。
LongAdder 的实现原理是:
高并发时通过 Cell[ ]数组进行分段 CAS。
LongAdder 的使用场景是:
高并发下的全局计数器。
LongAdder 的优势是:
减少 CAS 重试次数、防止伪共享、惰性求值。
LongAdder 的缺点是:
如果使用它的 sum()方法时有并发更新,可能数据结果存在误差。
(4)LongAdder 的源码分析
//并发不高的时候,直接更新base,类似AtomicLong;//高并发的时候,将每个线程的操作hash到不同的cells数组中;//从而将AtomicLong中更新一个value的行为优化之后,分散到多个value中,从而降低更新热点//而需要得到当前值时,直接将所有cell中的value与base相加即可;//但是和AtomicLong的CAS不同,incrementAndGet操作及其变种可以返回更新后的值,//而LongAdder的更新操作返回的是voidpublic class LongAdder extends Striped64 implements Serializable { //入参x是累加值 public void add(long x) { //as是累加单元数组cells的引用 Cell[] as; //b是指获取的base值,v是指期望值(当前Cell存储的值) long b, v; //m是cells数组的长度 int m; //当前线程命中的cells数组元素Cell对象 Cell a; //如果是第一次执行,则直接case操作base if ((as = cells) != null || !casBase(b = base, b + x)) { boolean uncontended = true; //as数组为空(null或者size为0) 或者 当前线程取模as数组大小为空 或者 cas更新Cell失败 if (as == null || (m = as.length - 1) < 0 || (a = as[getProbe() & m]) == null || !(uncontended = a.cas(v = a.value, v + x))) { longAccumulate(x, null, uncontended); } } }
public long sum() { //通过累加base与cells数组中的value从而获得sum Cell[] as = cells; Cell a; long sum = base; if (as != null) { for (int i = 0; i < as.length; ++i) { if ((a = as[i]) != null) { sum += a.value; } } } return sum; }}
abstract class Striped64 extends Number { //@Contended是防止缓存行伪共享的注解 //CPU缓存是以缓存行为单位的,每个缓存行对应着一块内存,一般是64字节(8个long) //Cell即为累加单元 @sun.misc.Contended static final class Cell { //保存累加结果 volatile long value; //构造方法中会初始化value值 Cell(long x) { value = x; } //使用CAS方式进行累加,cmp表示旧值,val表示新值 final boolean cas(long cmp, long val) { return UNSAFE.compareAndSwapLong(this, valueOffset, cmp, val); }
private static final sun.misc.Unsafe UNSAFE; private static final long valueOffset; static { try { UNSAFE = sun.misc.Unsafe.getUnsafe(); Class<?> ak = Cell.class; valueOffset = UNSAFE.objectFieldOffset(ak.getDeclaredField("value")); } catch (Exception e) { throw new Error(e); } } }
private static final sun.misc.Unsafe UNSAFE; private static final long BASE; private static final long CELLSBUSY; private static final long PROBE; static { try { UNSAFE = sun.misc.Unsafe.getUnsafe(); Class<?> sk = Striped64.class; BASE = UNSAFE.objectFieldOffset(sk.getDeclaredField("base")); CELLSBUSY = UNSAFE.objectFieldOffset(sk.getDeclaredField("cellsBusy")); Class<?> tk = Thread.class; //返回Field在内存中相对于对象内存地址的偏移量 PROBE = UNSAFE.objectFieldOffset(tk.getDeclaredField("threadLocalRandomProbe")); } catch (Exception e) { throw new Error(e); } }
//CPU数量,即cells数组的最大长度 static final int NCPU = Runtime.getRuntime().availableProcessors();
//cells数组,大小为2的幂,这里的Cell是Striped64的静态内部类 transient volatile Cell[] cells;
//在没有竞争的情况下,将操作值累到base中 //在cells数组初始化过程中,cells数组还不可用,这时候也会通过CAS将操作值累到base中 transient volatile long base;
//cellsBusy有两个值0和1,它的作用是当要修改cells数组时加锁,防止多线程同时修改cells数组 //加锁的情况有三种:一.cells数组初始化的时候;二.cells数组扩容的时候; //三.如果cells数组中某个元素为null,给这个位置创建新的Cell对象的时候; transient volatile int cellsBusy;
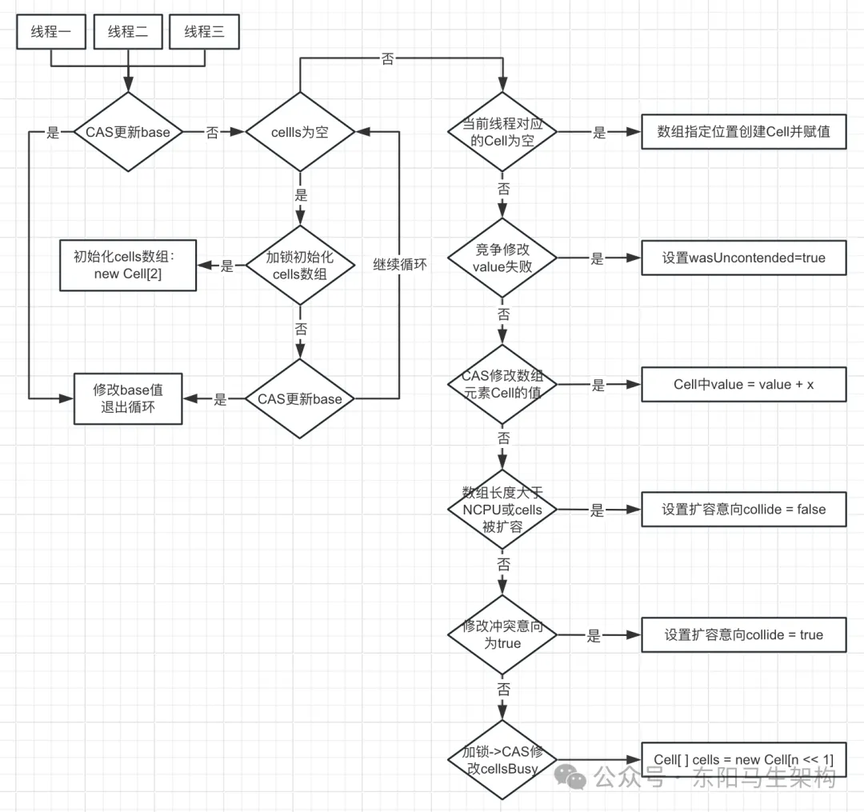
final void longAccumulate(long x, LongBinaryOperator fn, boolean wasUncontended) { //存储线程的hash值,有了hash值旧可以知道当前线程进入哪个槽位 int h; //如果getProbe()为0,说明随机数未初始化,需要初始化后,线程才能进入对应槽位 if ((h = getProbe()) == 0) { //使用ThreadLocalRandom为当前线程重新计算一个hash值,强制初始化 ThreadLocalRandom.current(); // force initialization //重新获取hash值 h = getProbe(); //重新获取hash值后,认为此次不算一次竞争,所以wasUncontended表示的是否竞争状态为true wasUncontended = true; } boolean collide = false;
//失败重试 for (;;) { Cell[] as; Cell a; int n; long v; if ((as = cells) != null && (n = as.length) > 0) { //若as数组已经初始化,(n-1) & h 即为取模操作,相对 % 效率要更高 if ((a = as[(n - 1) & h]) == null) { //其他线程没有使用,自然就没有加锁 if (cellsBusy == 0) { //创建累加单元,还没赋值到cells数组中 Cell r = new Cell(x);
//可能会有多个线程执行了"new Cell(x)",因此需要进行CAS操作,避免线程安全的问题 //同时需要再判断一次,避免正在初始化的时其他线程再进行额外的CAS操作 //这里的if条件是将创建的累加单元,设置到cells数组的空位置(cells[0]或cells[1]) //双重检查cellsBusy == 0,避免并发场景下重复赋值 //进入该if条件之前通过casCellsBusy()尝试加锁,保证赋值时是线程安全的 if (cellsBusy == 0 && casCellsBusy()) { boolean created = false; try { Cell[] rs; int m, j; //重新检查一下是否已经创建成功了 if ((rs = cells) != null && (m = rs.length) > 0 && rs[j = (m - 1) & h] == null) { rs[j] = r;//赋值到空槽位 created = true; } } finally { cellsBusy = 0;//解锁 } if (created) { break;//退出 } //槽位现在是非空了,continue到下次循环重试 continue; } } collide = false; } else if (!wasUncontended) { //wasUncontended为false说明在同一个槽位竞争失败 wasUncontended = true; } else if (a.cas(v = a.value, ((fn == null) ? v + x : fn.applyAsLong(v, x)))) { //尝试对已经有值的单元Cell进行累加,成功则退出 break;//若CAS更新成功则跳出循环,否则继续重试 } else if (n >= NCPU || cells != as) { //累加失败,判断是否超过CPU上限 //超过CPU上限后,设置collide为false,为了让下次循环进入下一个条件,防止进行扩容 collide = false; } else if (!collide) { collide = true; } else if (cellsBusy == 0 && casCellsBusy()) { //其他线程没加锁,当前线程进入时再自己加锁 try { //对cells进行扩容 if (cells == as) { //每次扩容2倍 Cell[] rs = new Cell[n << 1]; for (int i = 0; i < n; ++i) { //将旧数组拷贝到新数组中 rs[i] = as[i]; } cells = rs; } } finally { cellsBusy = 0;//解锁 } collide = false; //重新找槽位 continue; }
//执行到这一步说明,前面的步骤都没成功,需要尝试换一个累加单元Cell进行累加 h = advanceProbe(h); } else if (cellsBusy == 0 && cells == as && casCellsBusy()) { boolean init = false; try { //再次检查cells引用是否改变,双重检查是为了避免并发场景下重复创建cells if (cells == as) { Cell[] rs = new Cell[2];//创建长度为2的cells数组 rs[h & 1] = new Cell(x);//将累加值x随机存放到cell数组对应的索引下标位置 cells = rs;//再将创建的cell数组引用赋值到cells init = true; } } finally { cellsBusy = 0;//创建完cells数组后,解锁 } if (init) { break; } } else if (casBase(v = base, ((fn == null) ? v + x : fn.applyAsLong(v, x)))) {//尝试CAS累加 //若已经有另一个线程在初始化,那么尝试直接更新base break; } } }
final boolean casCellsBusy() { return UNSAFE.compareAndSwapInt(this, CELLSBUSY, 0, 1); }
static final int getProbe() { //通过Unsafe获取Thread中threadLocalRandomProbe的值 return UNSAFE.getInt(Thread.currentThread(), PROBE); } ...}
复制代码
longAccumulate()方法的流程图:
(5)LongAdder 的设计总结
一.分段 CAS 机制
把一个变量拆成多份变成多个变量,类似 JDK 1.7 的 ConcurrentHashMap 的分段锁。具体来说就是把一个 Long 型变量拆成一个 base 变量外加多个 Cell 变量,每个 Cell 变量包装了一个 Long 型变量。当多个线程并发累加时,如果并发度低就直接加到 base 变量上,如果并发度高就分散到 Cell 变量上。在最后取值时,再把 base 变量和这些 Cell 变量进行累加求和运算。
LongAddr 只能进行累加操作,并且初始值默认为 0。LongAccumulator 可以自定义一个二元操作符,而且可以传入一个初始值。
二.最终一致性
LongAddr 的 sum()方法并没有对 cell[ ]数组加锁,所以存在一边有线程对 cell[ ]数组求和、一边有线程修改数组的情况。类似于 ConcurrentHashMap 的 clear()方法,一边清空数据一边放入数据。
三.伪共享与缓存行填充
LongAddr 在定义 Cell 时,使用了注解 @Contended。这个注解可以用来进行缓存行填充,从而解决伪共享问题。
四.数组扩容
Cell[ ]数组的大小始终是 2 的整数次方,每次扩容都变为原来的 2 倍。
(6)伪共享问题说明
每个 CPU 都有自己的缓存,也就是高速缓存。CPU 缓存与主内存进行数据交换的基本单位叫缓存行。CPU 缓存是由若干个缓存行组成的,缓存行是 CPU 缓存的最小存储单位。在 64 位的 x86 架构中,每个缓存行是 64 字节,也就是 8 个 Long 型的大小。当 CPU 的缓存失效了需要从主内存刷新数据时,至少需要刷新 64 字节。
假设主内存的 Long 型变量 X、Y 已被 CPU1 和 CPU2 分别读入自己的缓存,且 Long 型变量 X、Y 在 CPU 缓存和主内存中都是放在同一行缓存行中的。这样当 CPU1 修改了变量 X,需要失效整个缓存行时,就会往总线发送消息,通知 CPU2 对应的缓存行失效。所以虽然 CPU2 并没有修改变量 Y,但也需要刷新变量 Y 所在的缓存行。这就是伪共享问题,缓存行上的不同变量,读 CPU 受到写 CPU 的影响。
17.LongAdder 的分段 CAS 优化心跳计数器
使用 LongAdder 替代 AtomicLong:
//private AtomicLong latestMinuteHeartbeatRate = new AtomicLong(0L); private LongAdder latestMinuteHeartbeatRate = new LongAdder(); ...//latestMinuteHeartbeatRate.incrementAndGet(); latestMinuteHeartbeatRate.increment();...//return latestMinuteHeartbeatRate.get();return latestMinuteHeartbeatRate.longValue();...//latestMinuteHeartbeatRate = new AtomicLong(0L); latestMinuteHeartbeatRate = new LongAdder();
复制代码
18.服务注册中心的增量拉取机制
(1)服务注册中心的增量拉取机制
由于服务注册表的每一条数据并不是都会变化的,每隔 30 秒可能只有少数几个服务实例的数据会出现变化,所以并不需要每隔 30 秒就全量拉取服务注册表的所有数据。
否则,如果服务实例有几万个,那么服务注册表里对应有几万条数据。每 30 秒拉取几万条数据,将对网络开销、注册中心的性能产生巨大压力。
注册中心启动时,会先全量拉取一次服务注册表,然后每隔 30 秒增量拉取一次服务注册表。所以每隔 30 秒,拉取最近 30 秒变化的少量服务实例信息即可。
(2)增量拉取服务注册表的实现
可以使用一个队列,队列里存放的就是最近 3 分钟有变化的服务实例。
//服务注册表public class ServiceRegistry {    public static final Long RECENTLY_CHANGED_ITEM_CHECK_INTERVAL = 3000L;    public static final Long RECENTLY_CHANGED_ITEM_EXPIRED = 3 * 60 * 1000L;
    //注册表是一个单例    private static ServiceRegistry instance = new ServiceRegistry();
    //核心的内存数据结构:注册表,Map:key是服务名称,value是这个服务的所有的服务实例    private Map<String, Map<String, ServiceInstance>> registry = new HashMap<String, Map<String, ServiceInstance>>();    		//最近变更的服务实例的队列      private LinkedList<RecentlyChangedServiceInstance> recentlyChangedQueue = new LinkedList<RecentlyChangedServiceInstance>();        //获取服务注册表的单例实例    public static ServiceRegistry getInstance() {        return instance;    }        //构造函数    private ServiceRegistry() {        //启动后台线程监控最近变更的队列        RecentlyChangedQueueMonitor recentlyChangedQueueMonitor = new RecentlyChangedQueueMonitor();        recentlyChangedQueueMonitor.setDaemon(true);         recentlyChangedQueueMonitor.start();    }        //服务注册    public synchronized void register(ServiceInstance serviceInstance) {        //将服务实例放入最近变更的队列中        RecentlyChangedServiceInstance recentlyChangedItem = new RecentlyChangedServiceInstance(serviceInstance, System.currentTimeMillis(), ServiceInstanceOperation.REGISTER);        recentlyChangedQueue.offer(recentlyChangedItem);        //将服务实例放入注册表中        Map<String, ServiceInstance> serviceInstanceMap = registry.get(serviceInstance.getServiceName());        if (serviceInstanceMap == null) {            serviceInstanceMap = new HashMap<String, ServiceInstance>();            registry.put(serviceInstance.getServiceName(), serviceInstanceMap);        }        serviceInstanceMap.put(serviceInstance.getServiceInstanceId(), serviceInstance);        System.out.println("服务实例,完成注册......【" + serviceInstance + "】");          System.out.println("注册表:" + registry);     }        //获取服务实例    public synchronized ServiceInstance getServiceInstance(String serviceName, String serviceInstanceId) {        Map<String, ServiceInstance> serviceInstanceMap = registry.get(serviceName);        return serviceInstanceMap.get(serviceInstanceId);    }        //获取整个注册表    public synchronized Map<String, Map<String, ServiceInstance>> getRegistry() {        return registry;    }        //从注册表删除一个服务实例    public synchronized void remove(String serviceName, String serviceInstanceId) {        System.out.println("服务实例从注册表中摘除[" + serviceName + ", " + serviceInstanceId + "]");        //获取服务实例        Map<String, ServiceInstance> serviceInstanceMap = registry.get(serviceName);        ServiceInstance serviceInstance = serviceInstanceMap.get(serviceInstanceId);        //将服务实例变更信息放入队列中        RecentlyChangedServiceInstance recentlyChangedItem = new RecentlyChangedServiceInstance(serviceInstance, System.currentTimeMillis(), ServiceInstanceOperation.REMOVE);        recentlyChangedQueue.offer(recentlyChangedItem);        //从服务注册表删除服务实例        serviceInstanceMap.remove(serviceInstanceId);    }            //最近变化的服务实例-内部类    class RecentlyChangedServiceInstance {        //服务实例        ServiceInstance serviceInstance;        //发生变更的时间戳        Long changedTimestamp;        //变更操作        String serviceInstanceOperation;        public RecentlyChangedServiceInstance(ServiceInstance serviceInstance, Long changedTimestamp, String serviceInstanceOperation) {            this.serviceInstance = serviceInstance;            this.changedTimestamp = changedTimestamp;            this.serviceInstanceOperation = serviceInstanceOperation;        }    }        //服务实例操作-内部类    class ServiceInstanceOperation {        public static final String REGISTER = "register";//注册        public static final String REMOVE = "REMOVE";//删除    }        //最近变更队列的监控线程-内部类    class RecentlyChangedQueueMonitor extends Thread {        @Override        public void run() {            while(true) {                try {                    //和remove与register锁的都是注册表instance实例                    synchronized(instance) {                        RecentlyChangedServiceInstance recentlyChangedItem = null;                        Long currentTimestamp = System.currentTimeMillis();                        while ((recentlyChangedItem = recentlyChangedQueue.peek()) != null) {                            //判断如果一个服务实例变更信息已经在队列里存在超过3分钟了,就从队列中移除                            if (currentTimestamp - recentlyChangedItem.changedTimestamp > RECENTLY_CHANGED_ITEM_EXPIRED) {                                recentlyChangedQueue.pop();                            }                        }                    }                    Thread.sleep(RECENTLY_CHANGED_ITEM_CHECK_INTERVAL);                } catch (Exception e) {                    e.printStackTrace();                }             }        }    }}
复制代码
(3)提供全量和增量拉取注册表的接口
//负责接收register-client发送过来的请求的public class RegisterServerController {    private ServiceRegistry registry = ServiceRegistry.getInstance();        //服务注册    public RegisterResponse register(RegisterRequest registerRequest) {        ...    }         //发送心跳    public HeartbeatResponse heartbeat(HeartbeatRequest heartbeatRequest) {         ...    }        //拉取全量注册表    public Map<String, Map<String, ServiceInstance>> fetchFullServiceRegistry() {        return registry.getRegistry();    }        //拉取增量注册表    public LinkedList<RecentlyChangedServiceInstance> fetchDeltaServiceRegistry() {        return registry.getRecentlyChangedQueue();    }        //服务下线    public void cancel(String serviceName, String serviceInstanceId) {        ...    }}
public class ServiceRegistry {    ...    //获取整个注册表    public synchronized Map<String, Map<String, ServiceInstance>> getRegistry() {        return registry;    }          //获取最近有变化的注册表    public synchronized LinkedList<RecentlyChangedServiceInstance> getRecentlyChangedQueue() {        return recentlyChangedQueue;    }    ...}
复制代码
(4)客户端启动时拉取全量注册表
//服务注册中心的客户端缓存的一个服务注册表public class CachedServiceRegistry {    ...    //负责定时拉取注册表到客户端进行缓存的后台线程    private FetchDeltaRegistryWorker fetchDeltaRegistryWorker;
    ...    //构造函数    public CachedServiceRegistry(RegisterClient registerClient, HttpSender httpSender) {        this.fetchDeltaRegistryWorker = new FetchDeltaRegistryWorker();        this.registerClient = registerClient;        this.httpSender = httpSender;    }
    //初始化    public void initialize() {        //启动全量拉取注册表的线程        FetchFullRegistryWorker fetchFullRegistryWorker = new FetchFullRegistryWorker();        fetchFullRegistryWorker.start();          //启动增量拉取注册表的线程        this.fetchDeltaRegistryWorker.start();    }
    //销毁这个组件    public void destroy() {        this.fetchDeltaRegistryWorker.interrupt();    }
    //全量拉取注册表的后台线程    private class FetchFullRegistryWorker extends Thread {        @Override        public void run() {            registry = httpSender.fetchServiceRegistry();        }    }
    //增量拉取注册表的后台线程    private class FetchDeltaRegistryWorker extends Thread {        @Override        public void run() {            while(registerClient.isRunning()) {                  try {                    ...                    Thread.sleep(SERVICE_REGISTRY_FETCH_INTERVAL);                  } catch (Exception e) {                    e.printStackTrace();                  }            }        }    }    ...}
//负责发送各种http请求的组件public class HttpSender {    ...    //全量拉取服务注册表    public Map<String, Map<String, ServiceInstance>> fetchServiceRegistry() {        Map<String, Map<String, ServiceInstance>> registry = new HashMap<String, Map<String, ServiceInstance>>();        ServiceInstance serviceInstance = new ServiceInstance();        serviceInstance.setHostname("finance-service-01");          serviceInstance.setIp("192.168.31.1207");          serviceInstance.setPort(9000);          serviceInstance.setServiceInstanceId("FINANCE-SERVICE-192.168.31.207:9000");          serviceInstance.setServiceName("FINANCE-SERVICE");        Map<String, ServiceInstance> serviceInstances = new HashMap<String, ServiceInstance>();        serviceInstances.put("FINANCE-SERVICE-192.168.31.207:9000", serviceInstance);        registry.put("FINANCE-SERVICE", serviceInstances);        System.out.println("拉取注册表:" + registry);        return registry;    }        //增量拉取服务注册表    public LinkedList<RecentlyChangedServiceInstance> fetchDeltaServiceRegistry() {        LinkedList<RecentlyChangedServiceInstance> recentlyChangedQueue = new LinkedList<RecentlyChangedServiceInstance>();        ServiceInstance serviceInstance = new ServiceInstance();        serviceInstance.setHostname("order-service-01");          serviceInstance.setIp("192.168.31.288");          serviceInstance.setPort(9000);          serviceInstance.setServiceInstanceId("ORDER-SERVICE-192.168.31.288:9000");          serviceInstance.setServiceName("ORDER-SERVICE");        RecentlyChangedServiceInstance recentlyChangedItem = new RecentlyChangedServiceInstance(serviceInstance, System.currentTimeMillis(), "register");        recentlyChangedQueue.add(recentlyChangedItem);        System.out.println("拉取增量注册表:" + recentlyChangedQueue);        return recentlyChangedQueue;    }    ...}
复制代码
(5)客户端定时拉取增量注册表到本地
//服务注册中心的客户端缓存的一个服务注册表public class CachedServiceRegistry { ... //增量拉取注册表的后台线程 private class FetchDeltaRegistryWorker extends Thread { @Override public void run() { while(registerClient.isRunning()) { try { //拉取回来的是最近3分钟变化的服务实例 Thread.sleep(SERVICE_REGISTRY_FETCH_INTERVAL); LinkedList<RecentlyChangedServiceInstance> deltaRegistry = httpSender.fetchDeltaServiceRegistry(); //增量信息有两类:一类是注册,一类是删除 //如果是注册信息,就判断一下这个服务实例是否在这个本地缓存的注册表中,如果不在就放到本地缓存注册表里 //如果是删除信息,就看服务实例是否存在,存在就删除 //这里会大量修改本地缓存的注册表,所以需要加锁 synchronized(registry) { mergeDeltaRegistry(deltaRegistry); } } catch (Exception e) { e.printStackTrace(); } } } //合并增量注册表到本地缓存注册表 private void mergeDeltaRegistry(LinkedList<RecentlyChangedServiceInstance> deltaRegistry) { for (RecentlyChangedServiceInstance recentlyChangedItem : deltaRegistry) { //如果是注册操作 if (ServiceInstanceOperation.REGISTER.equals(recentlyChangedItem.serviceInstanceOperation)) { Map<String, ServiceInstance> serviceInstanceMap = registry.get(recentlyChangedItem.serviceInstance.getServiceName()); if (serviceInstanceMap == null) { serviceInstanceMap = new HashMap<String, ServiceInstance>(); registry.put(recentlyChangedItem.serviceInstance.getServiceName(), serviceInstanceMap); } ServiceInstance serviceInstance = serviceInstanceMap.get(recentlyChangedItem.serviceInstance.getServiceInstanceId()); if (serviceInstance == null) { serviceInstanceMap.put(recentlyChangedItem.serviceInstance.getServiceInstanceId(), recentlyChangedItem.serviceInstance); } } //如果是删除操作 else if (ServiceInstanceOperation.REMOVE.equals(recentlyChangedItem.serviceInstanceOperation)) { Map<String, ServiceInstance> serviceInstanceMap = registry.get(recentlyChangedItem.serviceInstance.getServiceName()); if (serviceInstanceMap != null) { serviceInstanceMap.remove(recentlyChangedItem.serviceInstance.getServiceInstanceId()); } } } } } ...}
复制代码
(6)客户端增量合并注册表后的校验与全量纠正
//增量拉取注册表的后台线程private class FetchDeltaRegistryWorker extends Thread { @Override public void run() { while(registerClient.isRunning()) { try { Thread.sleep(SERVICE_REGISTRY_FETCH_INTERVAL); //拉取回来的是最近3分钟变化的服务实例 DeltaRegistry deltaRegistry = httpSender.fetchDeltaRegistry(); //一类是注册,一类是删除 //如果是注册,就判断这个服务实例是否在本地缓存的注册表中 //如果不在,就放到本地缓存注册表里 //如果是删除,且服务实例还存在,那么就进行删除 //这里会大量修改本地缓存的注册表,所以需要加锁 synchronized(registry) { mergeDeltaRegistry(deltaRegistry.getRecentlyChangedQueue()); } //再检查一下,跟服务端的注册表的服务实例相比,数量是否是一致 //封装增量注册表的对象,也就是拉取增量注册表时, //一方面要返回那个数据,另外一方面要那个对应的register-server端的服务实例的数量 Long serverSideTotalCount = deltaRegistry.getServiceInstanceTotalCount(); Long clientSideTotalCount = 0L; for (Map<String, ServiceInstance> serviceInstanceMap : registry.values()) { clientSideTotalCount += serviceInstanceMap.size(); } if (serverSideTotalCount != clientSideTotalCount) { //重新拉取全量注册表进行纠正 registry = httpSender.fetchFullRegistry(); } } catch (Exception e) { e.printStackTrace(); } } } ...}
复制代码
19.AtomicReference 优化客户端缓存注册表
多个线程同时对缓存的注册表信息进行修改时,必然存在并发冲突问题,此时可用 AtomicReference 的 CAS 操作来替代使用加重量级锁。
//完整的服务实例的信息public class Applications {    private Map<String, Map<String, ServiceInstance>> registry = new HashMap<String, Map<String, ServiceInstance>>();    		public Applications() {            }
    public Applications(Map<String, Map<String, ServiceInstance>> registry) {        this.registry = registry;    }
    public Map<String, Map<String, ServiceInstance>> getRegistry() {        return registry;    }
    public void setRegistry(Map<String, Map<String, ServiceInstance>> registry) {        this.registry = registry;    }}

//服务注册中心的客户端缓存的一个服务注册表public class CachedServiceRegistry {    //服务注册表拉取间隔时间    private static final Long SERVICE_REGISTRY_FETCH_INTERVAL = 30 * 1000L;
    //客户端缓存的所有的服务实例的信息    private AtomicReference<Applications> applications = new AtomicReference<Applications>(new Applications());    		//负责定时拉取注册表到客户端进行缓存的后台线程    private FetchDeltaRegistryWorker fetchDeltaRegistryWorker;
    //RegisterClient    private RegisterClient registerClient;
    //http通信组件    private HttpSender httpSender;        //构造函数    public CachedServiceRegistry(RegisterClient registerClient, HttpSender httpSender) {        this.fetchDeltaRegistryWorker = new FetchDeltaRegistryWorker();        this.registerClient = registerClient;        this.httpSender = httpSender;    }        //初始化    public void initialize() {        //启动全量拉取注册表的线程        FetchFullRegistryWorker fetchFullRegistryWorker = new FetchFullRegistryWorker();        fetchFullRegistryWorker.start();          //启动增量拉取注册表的线程        this.fetchDeltaRegistryWorker.start();    }        //销毁这个组件    public void destroy() {        this.fetchDeltaRegistryWorker.interrupt();    }        //全量拉取注册表的后台线程    private class FetchFullRegistryWorker extends Thread {        @Override        public void run() {            //拉取全量注册表            Applications fetchedApplications = httpSender.fetchFullRegistry();            while (true) {                Applications expectedApplications = applications.get();                if (applications.compareAndSet(expectedApplications, fetchedApplications)) {                    break;                }            }        }    }        //增量拉取注册表的后台线程    private class FetchDeltaRegistryWorker extends Thread {        @Override        public void run() {            while (registerClient.isRunning()) {                try {                    Thread.sleep(SERVICE_REGISTRY_FETCH_INTERVAL);                    //拉取回来的是最近3分钟变化的服务实例                    DeltaRegistry deltaRegistry = httpSender.fetchDeltaRegistry();
                    //一类是注册,一类是删除                    //如果是注册,就判断这个服务实例是否在这个本地缓存的注册表中                    //如果不在,就放到本地缓存注册表里                    //如果是删除,且服务实例还存在,就进行删除                    mergeDeltaRegistry(deltaRegistry);
                    //再检查一下,跟服务端的注册表的服务实例相比,数量是否一致                    //封装增量注册表的对象,也就是拉取增量注册表时,                    //一方面要返回那个数据,另外一方面要那个对应的register-server端的服务实例的数量                    reconcileRegistry(deltaRegistry);                  } catch (Exception e) {                    e.printStackTrace();                  }            }        }              //合并增量注册表到本地缓存注册表里去        private void mergeDeltaRegistry(DeltaRegistry deltaRegistry) {            synchronized(applications) {                Map<String, Map<String, ServiceInstance>> registry = applications.get().getRegistry();                LinkedList<RecentlyChangedServiceInstance> recentlyChangedQueue = deltaRegistry.getRecentlyChangedQueue();                for (RecentlyChangedServiceInstance recentlyChangedItem : recentlyChangedQueue) {                    String serviceName = recentlyChangedItem.serviceInstance.getServiceName();                    String serviceInstanceId = recentlyChangedItem.serviceInstance.getServiceInstanceId();                    //如果是注册操作                    if (ServiceInstanceOperation.REGISTER.equals(recentlyChangedItem.serviceInstanceOperation)) {                        Map<String, ServiceInstance> serviceInstanceMap = registry.get(serviceName);                        if (serviceInstanceMap == null) {                            serviceInstanceMap = new HashMap<String, ServiceInstance>();                            registry.put(serviceName, serviceInstanceMap);                        }                        ServiceInstance serviceInstance = serviceInstanceMap.get(serviceInstanceId);                        if (serviceInstance == null) {                            serviceInstanceMap.put(serviceInstanceId, recentlyChangedItem.serviceInstance);                        }                    }                    //如果是删除操作                    else if (ServiceInstanceOperation.REMOVE.equals(recentlyChangedItem.serviceInstanceOperation)) {                        Map<String, ServiceInstance> serviceInstanceMap = registry.get(serviceName);                        if (serviceInstanceMap != null) {                            serviceInstanceMap.remove(serviceInstanceId);                         }                    }                }            }        }              //校对调整注册表        private void reconcileRegistry(DeltaRegistry deltaRegistry) {            Map<String, Map<String, ServiceInstance>> registry = applications.get().getRegistry();            Long serverSideTotalCount = deltaRegistry.getServiceInstanceTotalCount();            Long clientSideTotalCount = 0L;            for (Map<String, ServiceInstance> serviceInstanceMap : registry.values()) {                clientSideTotalCount += serviceInstanceMap.size();             }                     if (serverSideTotalCount != clientSideTotalCount) {                //重新拉取全量注册表进行纠正                Applications fetchedApplications = httpSender.fetchFullRegistry();                while(true) {                    Applications expectedApplications = applications.get();                    if (applications.compareAndSet(expectedApplications, fetchedApplications)) {                        break;                    }                }             }        }    }
    //服务实例操作    class ServiceInstanceOperation {        public static final String REGISTER = "register";//注册        public static final String REMOVE = "REMOVE";//删除    }        //获取服务注册表    public Map<String, Map<String, ServiceInstance>> getRegistry() {        return applications.get().getRegistry();    }
    //最近变更的实例信息    static class RecentlyChangedServiceInstance {        //服务实例        ServiceInstance serviceInstance;              //发生变更的时间戳        Long changedTimestamp;              //变更操作        String serviceInstanceOperation;              public RecentlyChangedServiceInstance(ServiceInstance serviceInstance, Long changedTimestamp, String serviceInstanceOperation) {            this.serviceInstance = serviceInstance;            this.changedTimestamp = changedTimestamp;            this.serviceInstanceOperation = serviceInstanceOperation;        }              @Override        public String toString() {            return"RecentlyChangedServiceInstance [serviceInstance=" + serviceInstance + ", changedTimestamp=" + changedTimestamp + ", serviceInstanceOperation=" + serviceInstanceOperation + "]";        }    }}
复制代码
20.AtomicStampedReference 解决 ABA 问题
public class CachedServiceRegistry { ... //客户端缓存的所有的服务实例的信息 private AtomicStampedReference<Applications> applications; ... //构造函数 public CachedServiceRegistry(RegisterClient registerClient, HttpSender httpSender) { this.fetchDeltaRegistryWorker = new FetchDeltaRegistryWorker(); this.registerClient = registerClient; this.httpSender = httpSender; this.applications = new AtomicStampedReference<Applications>(new Applications(), 0); } ... //全量拉取注册表的后台线程 private class FetchFullRegistryWorker extends Thread { @Override public void run() { //拉取全量注册表 Applications fetchedApplications = httpSender.fetchFullRegistry(); while(true) { Applications expectedApplications = applications.getReference(); int expectedStamp = applications.getStamp(); if (applications.compareAndSet(expectedApplications, fetchedApplications, expectedStamp, expectedStamp + 1)) { break; } } } } ...}
复制代码
21.AtomicLong 多线程拉取注册表版本不错乱
前面使用 AtomicReference 来解决多线程并发赋值时的原子性问题,下面使用 AtomicLong 来解决多线程并发拉注册表时可能的版本混乱问题。
(1)发生版本错乱问题的情况
public class CachedServiceRegistry { ... //全量拉取注册表的后台线程 private class FetchFullRegistryWorker extends Thread { @Override public void run() { //拉取全量注册表操作需要通过网络完成,但是可能网络异常一直卡住,导致该请求的数据没有返回 //卡了几分钟后,此时客户端已经缓存了很多服务实例,总服务实例已达40个 //但该请求却可以返回了,而返回的数据却已经成为旧版本了,里面仅包含30个服务实例 //该请求对应的全量拉取注册表线程被唤醒后,将30个服务实例的旧版本数据赋值给本地缓存注册表 //于是便发生了版本错乱问题 //所以在发起网络请求前,需要先拿到一个当时的版本号 fetchFullRegistry(); } } ...}
复制代码
(2)AtomicLong 解决注册表版本错乱问题
public class CachedServiceRegistry {    ...    //代表当前本地缓存的服务注册表的一个版本号    private AtomicLong applicationsVersion = new AtomicLong(0L);    ...    //拉取全量注册表到本地    private void fetchFullRegistry() {        Long expectedVersion = applicationsVersion.get(); // version = 0        Applications fetchedApplications = httpSender.fetchFullRegistry();        if (applicationsVersion.compareAndSet(expectedVersion, expectedVersion + 1)) {            while (true) {                Applications expectedApplications = applications.getReference();                int expectedStamp = applications.getStamp();                if (applications.compareAndSet(expectedApplications, fetchedApplications, expectedStamp, expectedStamp + 1)) {                    break;                }            }        }    }
    //增量拉取注册表的后台线程      private class FetchDeltaRegistryWorker extends Thread {        @Override        public void run() {            while(registerClient.isRunning()) {                  try {                    Thread.sleep(SERVICE_REGISTRY_FETCH_INTERVAL);                     Long expectedVersion = applicationsVersion.get();                    if (applicationsVersion.compareAndSet(expectedVersion, expectedVersion + 1)) {                        DeltaRegistry deltaRegistry = httpSender.fetchDeltaRegistry();                        mergeDeltaRegistry(deltaRegistry);                         //和服务端的注册表的服务实例的数量相比是否一致                        reconcileRegistry(deltaRegistry);                      }                } catch (Exception e) {                    e.printStackTrace();                  }            }        }        ...    }    ...}
复制代码
文章转载自:东阳马生架构
原文链接:https://www.cnblogs.com/mjunz/p/18719177
体验地址:http://www.jnpfsoft.com/?from=001YH


评论