对于学习 Vue 的同学来说,封装 vue 组件是实现代码复用的重要一环。在 Vue 官网中非常详细地介绍了 vue 组件的相关知识,我这里简单摘取使用最频繁的几个知识点,带大家快速入门 vue 组件的使用。
快速入门
我们假设在页面上有很多地方都要用到一个计数器,与其在每个地方都实现计数器功能,不如封装一个计数器组件,随后在需要的地方引用。于是,我们定义了如下代码所示的计数器组件:
<script>export default {  data() {    return {      count: 0    }  }}</script>
<template>  <button @click="count++">    You clicked me {{ count }} times.  </button></template>
复制代码
随后,我们在需要的地方引用计数器组件,如下代码所示。
<script>import ButtonCounter from './ButtonCounter.vue'  export default {  components: {    ButtonCounter  }}</script>
<template>	<h1>Here are many child components!</h1>	<ButtonCounter />	<ButtonCounter />	<ButtonCounter /></template>
复制代码
运行效果如下图所示。
本例运行内容及效果可在这里查看:简单的计数器组件。
到这里,我们就完成了一个简单地 vue 组件的封装。
传递参数
在封装组件的时候,我们可能需要向组件中传递参数,从而实现不同的业务逻辑。例如:我们需要封装一个博文的组件,我们需要向组件中传递标题和内容,这时候我们就需要用到传递参数 —— props。对于博文组件,我们对于组件的封装如下代码所示。
<script>export default {  props: ['title']}</script>
<template>  <h4>{{ title }}</h4></template>
复制代码
接着,我们在页面上引用博文组件,如下代码所示。
<script>import BlogPost from './BlogPost.vue'  export default {  components: {    BlogPost  },  data() {    return {      posts: [        { id: 1, title: 'My journey with Vue' },        { id: 2, title: 'Blogging with Vue' },        { id: 3, title: 'Why Vue is so fun' }      ]    }  }}</script>
<template>	<BlogPost  	v-for="post in posts"	  :key="post.id"  	:title="post.title"	></BlogPost></template>
复制代码
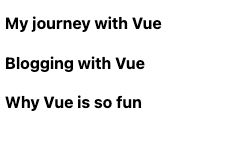
运行效果如下图所示:
本例运行内容及效果可在这里查看:传递参数的博文组件
监听事件
有时候,我们不仅希望能往组件中传递参数,也希望父组件能感知子组件的变化。例如:我们希望可以通过子组件来设置父组件的文字大小,从而动态改变文章的文字大小。这时候,我们可以在子组件中使用 $emit() 来触发事件,在父组件使用 @enlarge-text 来监听事件,如下代码所示。
// BlogPost.vue<script>export default {  props: ['title'],  emits: ['enlarge-text']}</script>
<template>  <div class="blog-post">	  <h4>{{ title }}</h4>	  <button @click="$emit('enlarge-text')">Enlarge text</button>  </div></template>
复制代码
如上代码所示,我们在 export default 的 emits 属性中注明了该组件会抛出 enlarge-text 事件。随后,我们在按钮点击时,使用 $emit('enlarge-text') 抛出了 enlarge-text 事件。
<script>import BlogPost from './BlogPost.vue'  export default {  components: {    BlogPost  },  data() {    return {      posts: [        { id: 1, title: 'My journey with Vue' },        { id: 2, title: 'Blogging with Vue' },        { id: 3, title: 'Why Vue is so fun' }      ],      postFontSize: 1    }  }}</script>
<template>  <div :style="{ fontSize: postFontSize + 'em' }">    <BlogPost      v-for="post in posts"      :key="post.id"      :title="post.title"      @enlarge-text="postFontSize += 0.1"    ></BlogPost>  </div></template>
复制代码
在上述代码中,我们在父组件中使用 @enlarge-text 监听 enlarge-text 事件。当监听到该事件后,我们将 postFontSize 的值加 0.1,从而实现动态改变文字大小的目的。
总结
关于 vue 组件的使用,props 和事件传递可以说是使用最频繁的两个功能。对于更复杂的组件来说,肯定还有更多更复杂的语法和功能。但对于初学者来说,学得够用就行,后续需要时再慢慢学习。关于 vue 组件更多内容,可以参考 vue 官网相关章节:组件基础 | Vue.js
参考资料
文章转载自:陈树义
原文链接:https://www.cnblogs.com/chanshuyi/p/head-first-of-vue-component.html
体验项目:http://www.jnpfsoft.com/?from=001
文章转载自:
原文链接:
体验项目:http://www.jnpfsoft.com/?from=001


评论