IOC 容器的初始化整体过程
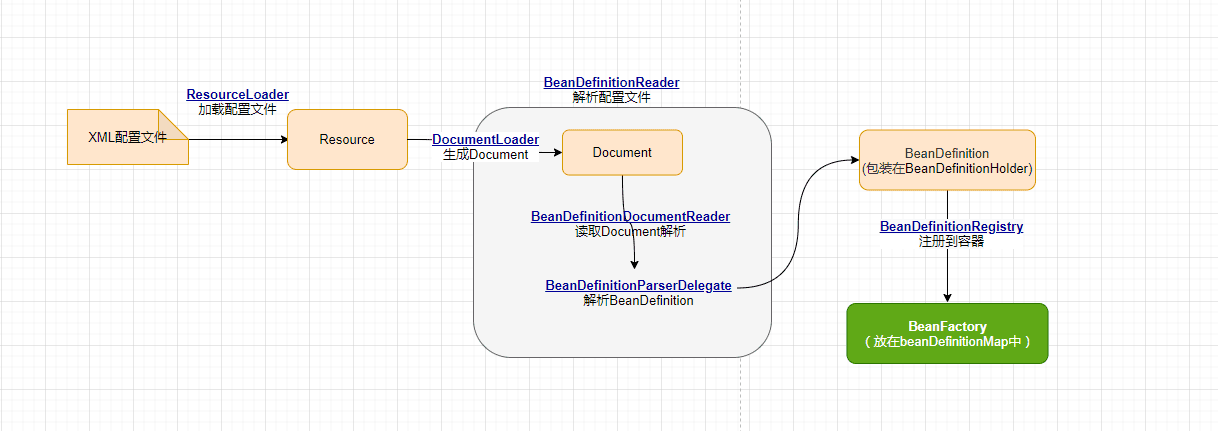
Spring 是如何实现将资源配置(以 xml 配置为例)通过加载,解析,生成 BeanDefination 并注册到 IoC 容器中的?这主要会经过以下 4 步:
从 XML 中读取配置文件,并将配置文件转换为 Document
再将 Document 中的 bean 标签解析成 BeanDefinition,如解析 property 元素, 并注入到 BeanDefinition 实例中。
将 BeanDefinition 注册到容器 BeanDefinitionMap 中。
BeanFactory 根据 BeanDefinition 的定义信息创建实例化和初始化 bean。
启动的入口
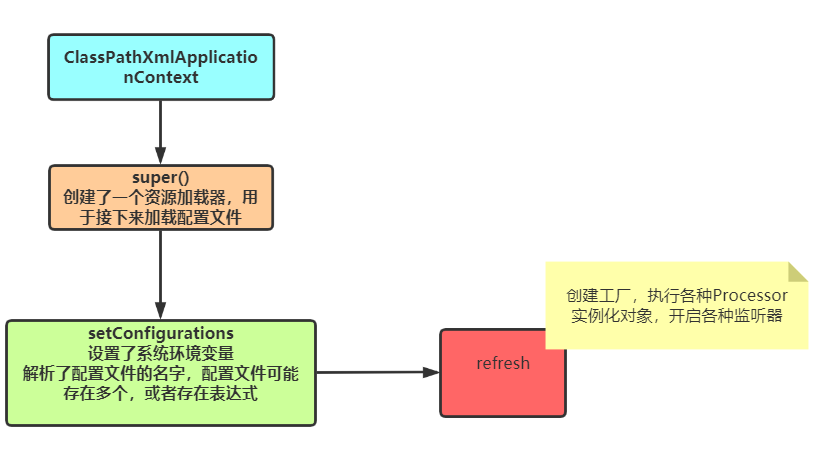
对于 xml 配置的 Spring 应用,在 main()方法中实例化 ClasspathXmlApplicationContext 即可创建一个 IoC 容器。可以从这个构造方法开始,探究一下 IoC 容器的初始化过程。
 // create and configure beansApplicationContext context = new ClassPathXmlApplicationContext("aspects.xml", "daos.xml", "services.xml");public ClassPathXmlApplicationContext(String... configLocations) throws BeansException {    this(configLocations, true, (ApplicationContext)null);}
public ClassPathXmlApplicationContext(String[] configLocations, boolean refresh, @Nullable ApplicationContext parent) throws BeansException {    // 设置Bean资源加载器    super(parent);
    // 设置配置路径    this.setConfigLocations(configLocations);
    // 初始化容器    if (refresh) {        this.refresh();    }}
复制代码
这里的作用就是加载了一个解析配置文件路径的加载器,然后通过系统环境变量拿到这个配置文件,进行一些配置文件的去空格,转换表达式等等操作(注意,这里没有进行解析);最后通过 refresh 方法 完成了几乎所有的工作。
设置资源解析器和环境
调用父类容器 AbstractApplicationContext 的构造方法(super(parent)方法)为容器设置好 Bean 资源加载器
public AbstractApplicationContext(@Nullable ApplicationContext parent) {    // 默认构造函数初始化容器id, name, 状态 以及 资源解析器    this();
    // 将父容器的Environment合并到当前容器    this.setParent(parent);}
复制代码
通过 AbstractApplicationContext 默认构造函数初始化容器 id, name, 状态 以及 资源解析器
public AbstractApplicationContext() { this.logger = LogFactory.getLog(this.getClass()); this.id = ObjectUtils.identityToString(this); this.displayName = ObjectUtils.identityToString(this); this.beanFactoryPostProcessors = new ArrayList(); this.active = new AtomicBoolean(); this.closed = new AtomicBoolean(); this.startupShutdownMonitor = new Object(); this.applicationStartup = ApplicationStartup.DEFAULT; this.applicationListeners = new LinkedHashSet(); this.resourcePatternResolver = this.getResourcePatternResolver();}// Spring资源加载器protected ResourcePatternResolver getResourcePatternResolver() { return new PathMatchingResourcePatternResolver(this);}
复制代码
通过 AbstractApplicationContext 的setParent(parent)方法将父容器的 Environment 合并到当前容器
public void setParent(@Nullable ApplicationContext parent) { this.parent = parent; if (parent != null) { Environment parentEnvironment = parent.getEnvironment(); if (parentEnvironment instanceof ConfigurableEnvironment) { this.getEnvironment().merge((ConfigurableEnvironment)parentEnvironment); } }}
复制代码
设置配置路径
在设置容器的资源加载器之后,接下来 FileSystemXmlApplicationContet 执行 setConfigLocations 方法通过调用其父类 AbstractRefreshableConfigApplicationContext 的方法进行对 Bean 定义资源文件的定位
public void setConfigLocations(@Nullable String... locations) {    if (locations != null) {        Assert.noNullElements(locations, "Config locations must not be null");        this.configLocations = new String[locations.length];
        for(int i = 0; i < locations.length; ++i) {            // 解析配置路径            this.configLocations[i] = this.resolvePath(locations[i]).trim();        }    } else {        this.configLocations = null;    }}protected String resolvePath(String path) {    // 从上一步Environment中解析    return this.getEnvironment().resolveRequiredPlaceholders(path);}
复制代码
启动的主体流程
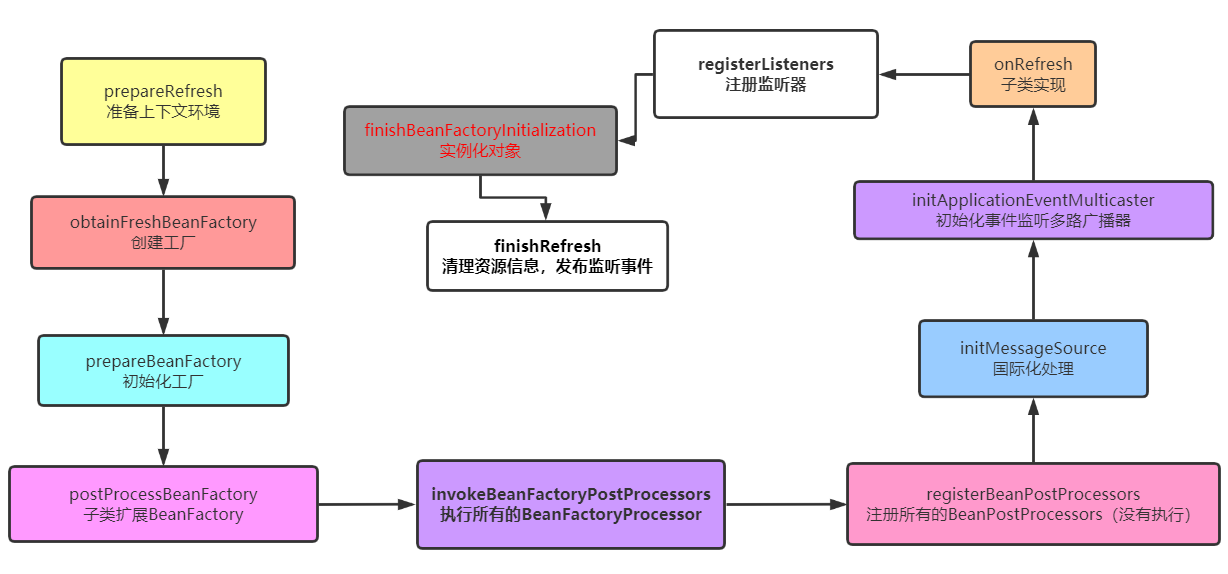
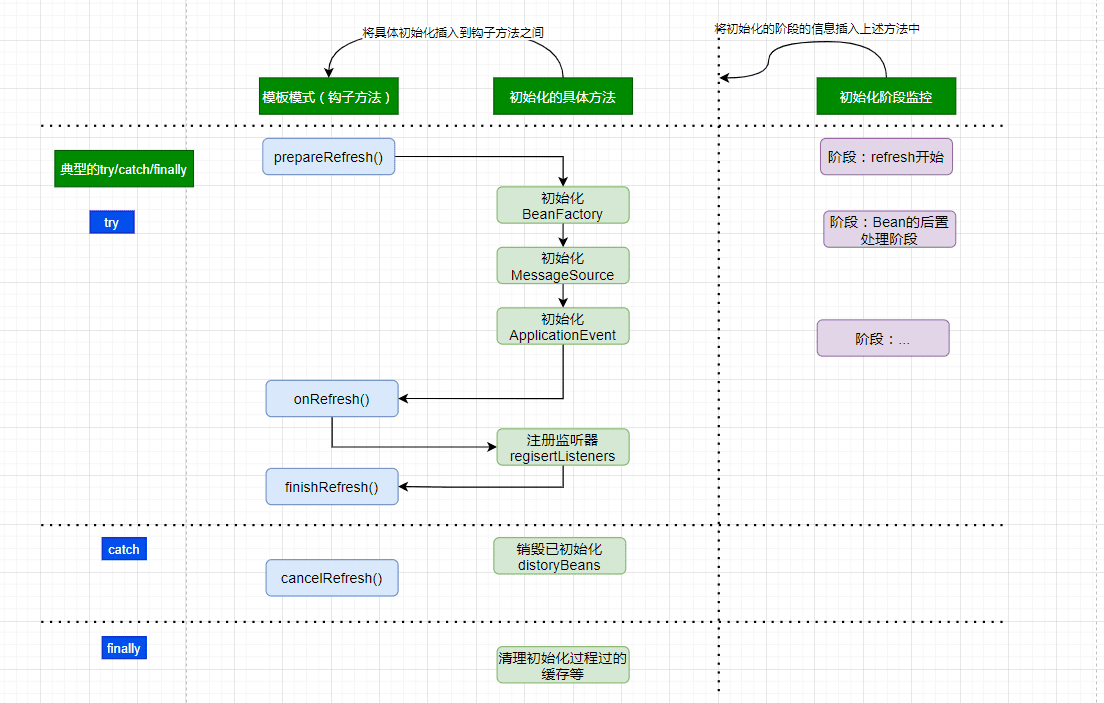
Spring IoC 容器对 Bean 定义资源的载入是从 refresh()函数开始的,refresh()是一个模板方法
refresh()方法的作用是:在创建 IoC 容器前,如果已经有容器存在,则需要把已有的容器销毁和关闭,以保证在 refresh 之后使用的是新建立起来的 IoC 容器。refresh 的作用类似于对 IoC 容器的重启,在新建立好的容器中对容器进行初始化,对 Bean 定义资源进行载入。
@Overridepublic void refresh() throws BeansException, IllegalStateException {    synchronized (this.startupShutdownMonitor) {        StartupStep contextRefresh = this.applicationStartup.start("spring.context.refresh");
        //① 容器刷新前的准备工作        prepareRefresh();
        //② 调用子类容器的refreshBeanFactory()方法,启动容器载入Bean定义资源文件的过程        ConfigurableListableBeanFactory beanFactory = obtainFreshBeanFactory();
        //③ 准备Bean工厂        prepareBeanFactory(beanFactory);
        try {            //④ 子类扩展BeanFactory            postProcessBeanFactory(beanFactory);
            StartupStep beanPostProcess = this.applicationStartup.start("spring.context.beans.post-process");            //⑤ 执行增强方法            invokeBeanFactoryPostProcessors(beanFactory);
            //⑥ 注册BeanPostProcessors,但没执行            registerBeanPostProcessors(beanFactory);            beanPostProcess.end();
            //⑦ 执行国际化内容            initMessageSource();
            //⑧ 创建了一个多播器,为添加`Listener`提供支持。            initApplicationEventMulticaster();
            //⑨ 子类扩展            onRefresh();
            //⑩ Check for listener beans and register them.            registerListeners();
            //⑪ Instantiate all remaining (non-lazy-init) singletons.            finishBeanFactoryInitialization(beanFactory);
            // Last step: publish corresponding event.            finishRefresh();        }
        catch (BeansException ex) {            if (logger.isWarnEnabled()) {                logger.warn("Exception encountered during context initialization - " +                        "cancelling refresh attempt: " + ex);            }
            // Destroy already created singletons to avoid dangling resources.            destroyBeans();
            // Reset 'active' flag.            cancelRefresh(ex);
            // Propagate exception to caller.            throw ex;        }
        finally {            // Reset common introspection caches in Spring's core, since we            // might not ever need metadata for singleton beans anymore...            resetCommonCaches();            contextRefresh.end();        }    }}@Overridepublic void refresh() throws BeansException, IllegalStateException {    synchronized (this.startupShutdownMonitor) {        StartupStep contextRefresh = this.applicationStartup.start("spring.context.refresh");
        //① 容器刷新前的准备工作        prepareRefresh();
        //② 调用子类容器的refreshBeanFactory()方法,启动容器载入Bean定义资源文件的过程        ConfigurableListableBeanFactory beanFactory = obtainFreshBeanFactory();
        //③ 准备Bean工厂        prepareBeanFactory(beanFactory);
        try {            //④ 子类扩展BeanFactory            postProcessBeanFactory(beanFactory);
            StartupStep beanPostProcess = this.applicationStartup.start("spring.context.beans.post-process");            //⑤ 执行增强方法            invokeBeanFactoryPostProcessors(beanFactory);
            //⑥ 注册BeanPostProcessors,但没执行            registerBeanPostProcessors(beanFactory);            beanPostProcess.end();
            //⑦ 执行国际化内容            initMessageSource();
            //⑧ 创建了一个多播器,为添加`Listener`提供支持。            initApplicationEventMulticaster();
            //⑨ 子类扩展            onRefresh();
            //⑩ Check for listener beans and register them.            registerListeners();
            //⑪ Instantiate all remaining (non-lazy-init) singletons.            finishBeanFactoryInitialization(beanFactory);
            // Last step: publish corresponding event.            finishRefresh();        }
        catch (BeansException ex) {            if (logger.isWarnEnabled()) {                logger.warn("Exception encountered during context initialization - " +                        "cancelling refresh attempt: " + ex);            }
            // Destroy already created singletons to avoid dangling resources.            destroyBeans();
            // Reset 'active' flag.            cancelRefresh(ex);
            // Propagate exception to caller.            throw ex;        }
        finally {            // Reset common introspection caches in Spring's core, since we            // might not ever need metadata for singleton beans anymore...            resetCommonCaches();            contextRefresh.end();        }    }}
复制代码
这里的设计上是一个非常典型的资源类加载处理型的思路,头脑中需要形成如下图的顶层思路(而不是只停留在流水式的方法上面):
① prepareRefresh 准备上下文环境
protected void prepareRefresh() {    //1、设置启动时间、一些标志位        //设置容器的启动时间    this.startupDate = System.currentTimeMillis();    //设置容器的启动时间    this.closed.set(false);    //设置容器的激活标志位    this.active.set(true);    if (this.logger.isDebugEnabled()) {        if (this.logger.isTraceEnabled()) {            this.logger.trace("Refreshing " + this);        } else {            this.logger.debug("Refreshing " + this.getDisplayName());        }    }        //2、初始化占位符属性源,留给子类实现    this.initPropertySources();        //3、验证并获取环境对象,验证需要的属性是否都已经放入环境对象中    this.getEnvironment().validateRequiredProperties();        //4、判断刷新前的应用程序监听器集合是否为空,如果为空,则将监听器添加到此集合中    if (this.earlyApplicationListeners == null) {        this.earlyApplicationListeners = new LinkedHashSet(this.applicationListeners);    } else {        //如果不为空,清空集合        this.applicationListeners.clear();        this.applicationListeners.addAll(this.earlyApplicationListeners);    }
    this.earlyApplicationEvents = new LinkedHashSet();}
复制代码
② obtainFreshBeanFactory 创建工厂
这个方法主要就是创建了一个工厂BeanFactory,并且解析了配置文件,加载了Bean定义信息
AbstractApplicationContext 的 obtainFreshBeanFactory()方法调用子类容器的 refreshBeanFactory()方法,启动容器载入 Bean 定义资源文件的过程,代码如下:
protected ConfigurableListableBeanFactory obtainFreshBeanFactory() { // 这里使用了委派设计模式,父类定义了抽象的refreshBeanFactory()方法,具体实现调用子类容器的refreshBeanFactory()方法 refreshBeanFactory(); return getBeanFactory();}
复制代码
AbstractApplicationContext 类中只抽象定义了 refreshBeanFactory()方法,如下:
//org.springframework.context.support.AbstractApplicationContext#refreshBeanFactoryprotected abstract void refreshBeanFactory() throws BeansException, IllegalStateException;
复制代码
容器真正调用的是其子类 AbstractRefreshableApplicationContext 实现的 refreshBeanFactory()方法;在创建 IoC 容器前,如果已经有容器存在,则需要把已有的容器销毁和关闭,以保证在 refresh 之后使用的是新建立起来的 IoC 容器。方法的源码如下:
protected final void refreshBeanFactory() throws BeansException { // 如果已经有容器存在,则需要把已有的容器销毁和关闭,以保证在refresh之后使用的是新建立起来的IoC容器 if (hasBeanFactory()) { destroyBeans(); closeBeanFactory(); } try { // 创建DefaultListableBeanFactory,并调用loadBeanDefinitions(beanFactory)装载bean定义 DefaultListableBeanFactory beanFactory = createBeanFactory(); beanFactory.setSerializationId(getId()); customizeBeanFactory(beanFactory); // 对IoC容器进行定制化,如设置启动参数,开启注解的自动装配等 loadBeanDefinitions(beanFactory); // 调用载入Bean定义的方法,主要这里又使用了一个委派模式,在当前类中只定义了抽象的loadBeanDefinitions方法,具体的实现调用子类容器 this.beanFactory = beanFactory; } catch (IOException ex) { throw new ApplicationContextException("I/O error parsing bean definition source for " + getDisplayName(), ex); }}
复制代码
loadBeanDefinitions
AbstractRefreshableApplicationContext 中只定义了抽象的 loadBeanDefinitions 方法,容器真正调用的是其子类 AbstractXmlApplicationContext 对该方法的实现,AbstractXmlApplicationContext 的主要源码如下:
protected void loadBeanDefinitions(DefaultListableBeanFactory beanFactory) throws BeansException, IOException {    // 创建XmlBeanDefinitionReader,即创建Bean读取器,并通过回调设置到容器中去,容器使用该读取器读取Bean定义资源      XmlBeanDefinitionReader beanDefinitionReader = new XmlBeanDefinitionReader(beanFactory);
    // 配置上下文的环境,资源加载器、解析器    beanDefinitionReader.setEnvironment(this.getEnvironment());    beanDefinitionReader.setResourceLoader(this);    beanDefinitionReader.setEntityResolver(new ResourceEntityResolver(this)); // 为Bean读取器设置SAX xml解析器
    // 允许子类自行初始化(比如校验机制),并提供真正的加载方法    initBeanDefinitionReader(beanDefinitionReader); // 当Bean读取器读取Bean定义的Xml资源文件时,启用Xml的校验机制      loadBeanDefinitions(beanDefinitionReader);}
protected void loadBeanDefinitions(XmlBeanDefinitionReader reader) throws BeansException, IOException {    // 加载XML配置方式里的Bean定义的资源    Resource[] configResources = getConfigResources();    if (configResources != null) {        reader.loadBeanDefinitions(configResources);    }    // 加载构造函数里配置的Bean配置文件,即{"aspects.xml", "daos.xml", "services.xml"}    String[] configLocations = getConfigLocations();    if (configLocations != null) {        reader.loadBeanDefinitions(configLocations);    }}
复制代码
Xml Bean 读取器(XmlBeanDefinitionReader)调用其父类 AbstractBeanDefinitionReader 的 reader.loadBeanDefinitions 方法读取 Bean 定义资源。
由于这里使用 ClassPathXmlApplicationContext 作为例子分析,因此 getConfigResources 的返回值为 null,因此程序执行 reader.loadBeanDefinitions(configLocations)分支。
AbstractBeanDefinitionReader 读取 Bean 定义资源
AbstractBeanDefinitionReader 的 loadBeanDefinitions 方法源码如下:
@Overridepublic int loadBeanDefinitions(String location) throws BeanDefinitionStoreException {    return loadBeanDefinitions(location, null);}
public int loadBeanDefinitions(String location, @Nullable Set<Resource> actualResources) throws BeanDefinitionStoreException {    ResourceLoader resourceLoader = getResourceLoader();    if (resourceLoader == null) {        throw new BeanDefinitionStoreException(                "Cannot load bean definitions from location [" + location + "]: no ResourceLoader available");    }
    // 模式匹配类型的解析器,这种方式是加载多个满足匹配条件的资源    if (resourceLoader instanceof ResourcePatternResolver) {        try {            // 获取到要加载的资源            Resource[] resources = ((ResourcePatternResolver) resourceLoader).getResources(location);            int count = loadBeanDefinitions(resources); // 委派调用其子类XmlBeanDefinitionReader的方法,实现加载功能              if (actualResources != null) {                Collections.addAll(actualResources, resources);            }            if (logger.isTraceEnabled()) {                logger.trace("Loaded " + count + " bean definitions from location pattern [" + location + "]");            }            return count;        }        catch (IOException ex) {            throw new BeanDefinitionStoreException(                    "Could not resolve bean definition resource pattern [" + location + "]", ex);        }    }    else {        // 只能通过绝对路径URL加载单个资源.        Resource resource = resourceLoader.getResource(location);        int count = loadBeanDefinitions(resource);        if (actualResources != null) {            actualResources.add(resource);        }        if (logger.isTraceEnabled()) {            logger.trace("Loaded " + count + " bean definitions from location [" + location + "]");        }        return count;    }}
复制代码
从对 AbstractBeanDefinitionReader 的 loadBeanDefinitions 方法源码分析可以看出该方法做了以下两件事:
XmlBeanDefinitionReader 加载 Bean 定义资源
XmlBeanDefinitionReader 的 loadBeanDefinitions 方法主要是调用了 loadBeanDefinitions(Resource …) 方法,可以看到代表 bean 文件的资源定义以后的载入过程。
/** * 本质上是加载XML配置的Bean。 * @param inputSource the SAX InputSource to read from * @param resource the resource descriptor for the XML file */protected int doLoadBeanDefinitions(InputSource inputSource, Resource resource)        throws BeanDefinitionStoreException {
    try {        Document doc = doLoadDocument(inputSource, resource); // 将Bean定义资源转换成Document对象        int count = registerBeanDefinitions(doc, resource);        if (logger.isDebugEnabled()) {            logger.debug("Loaded " + count + " bean definitions from " + resource);        }        return count;    }    catch (BeanDefinitionStoreException ex) {        throw ex;    }    catch (SAXParseException ex) {        throw new XmlBeanDefinitionStoreException(resource.getDescription(),                "Line " + ex.getLineNumber() + " in XML document from " + resource + " is invalid", ex);    }    catch (SAXException ex) {        throw new XmlBeanDefinitionStoreException(resource.getDescription(),                "XML document from " + resource + " is invalid", ex);    }    catch (ParserConfigurationException ex) {        throw new BeanDefinitionStoreException(resource.getDescription(),                "Parser configuration exception parsing XML from " + resource, ex);    }    catch (IOException ex) {        throw new BeanDefinitionStoreException(resource.getDescription(),                "IOException parsing XML document from " + resource, ex);    }    catch (Throwable ex) {        throw new BeanDefinitionStoreException(resource.getDescription(),                "Unexpected exception parsing XML document from " + resource, ex);    }}
// 使用配置的DocumentLoader加载XML定义文件为Document.protected Document doLoadDocument(InputSource inputSource, Resource resource) throws Exception {    return this.documentLoader.loadDocument(inputSource, getEntityResolver(), this.errorHandler,            getValidationModeForResource(resource), isNamespaceAware());}
复制代码
通过源码分析,载入 Bean 定义资源文件的最后一步是将 Bean 定义资源转换为 Document 对象,该过程由 documentLoader 实现
DocumentLoader 将 Bean 定义资源转换为 Document 对象
DocumentLoader 将 Bean 定义资源转换成 Document 对象的源码如下:
// 使用标准的JAXP将载入的Bean定义资源转换成document对象@Overridepublic Document loadDocument(InputSource inputSource, EntityResolver entityResolver,        ErrorHandler errorHandler, int validationMode, boolean namespaceAware) throws Exception {
    // 创建文件解析器工厂    DocumentBuilderFactory factory = createDocumentBuilderFactory(validationMode, namespaceAware);    if (logger.isTraceEnabled()) {        logger.trace("Using JAXP provider [" + factory.getClass().getName() + "]");    }    // 创建文档解析器    DocumentBuilder builder = createDocumentBuilder(factory, entityResolver, errorHandler);    return builder.parse(inputSource); // 解析}
protected DocumentBuilderFactory createDocumentBuilderFactory(int validationMode, boolean namespaceAware)        throws ParserConfigurationException {
    DocumentBuilderFactory factory = DocumentBuilderFactory.newInstance();    factory.setNamespaceAware(namespaceAware);
    // 设置解析XML的校验    if (validationMode != XmlValidationModeDetector.VALIDATION_NONE) {        factory.setValidating(true);        if (validationMode == XmlValidationModeDetector.VALIDATION_XSD) {            // Enforce namespace aware for XSD...            factory.setNamespaceAware(true);            try {                factory.setAttribute(SCHEMA_LANGUAGE_ATTRIBUTE, XSD_SCHEMA_LANGUAGE);            }            catch (IllegalArgumentException ex) {                ParserConfigurationException pcex = new ParserConfigurationException(                        "Unable to validate using XSD: Your JAXP provider [" + factory +                        "] does not support XML Schema. Are you running on Java 1.4 with Apache Crimson? " +                        "Upgrade to Apache Xerces (or Java 1.5) for full XSD support.");                pcex.initCause(ex);                throw pcex;            }        }    }
    return factory;}
复制代码
该解析过程调用 JavaEE 标准的 JAXP 标准进行处理。
至此 Spring IoC 容器根据定位的 Bean 定义资源文件,将其加载读入并转换成为 Document 对象过程完成。
接下来继续分析 Spring IoC 容器将载入的 Bean 定义资源文件转换为 Document 对象之后,是如何将其解析为 Spring IoC 管理的 Bean 对象并将其注册到容器中的。
XmlBeanDefinitionReader 解析载入的 Bean 定义资源文件
XmlBeanDefinitionReader 类中的 doLoadBeanDefinitions 方法是从特定 XML 文件中实际载入 Bean 定义资源的方法,该方法在载入 Bean 定义资源之后将其转换为 Document 对象,接下来调用 registerBeanDefinitions 启动 Spring IoC 容器对 Bean 定义的解析过程,registerBeanDefinitions 方法源码如下:
// 按照Spring的Bean语义要求将Bean定义资源解析并转换为容器内部数据结构 public int registerBeanDefinitions(Document doc, Resource resource) throws BeanDefinitionStoreException {    BeanDefinitionDocumentReader documentReader = createBeanDefinitionDocumentReader();    int countBefore = getRegistry().getBeanDefinitionCount();    // 解析过程入口,这里使用了委派模式,具体的解析实现过程由实现类DefaultBeanDefinitionDocumentReader完成      documentReader.registerBeanDefinitions(doc, createReaderContext(resource));    return getRegistry().getBeanDefinitionCount() - countBefore;  // 返回此次解析了多少个对象}
// 创建BeanDefinitionDocumentReader对象,解析Document对象  protected BeanDefinitionDocumentReader createBeanDefinitionDocumentReader() {    return BeanUtils.instantiateClass(this.documentReaderClass);}
/** * Create the {@link XmlReaderContext} to pass over to the document reader. */public XmlReaderContext createReaderContext(Resource resource) {    return new XmlReaderContext(resource, this.problemReporter, this.eventListener,            this.sourceExtractor, this, getNamespaceHandlerResolver());}
复制代码
Bean 定义资源的载入解析分为以下两个过程:
在这个方法中很好地应用了面向对象中单一职责的原则,将逻辑处理委托给单一的类进行处理,而这个逻辑处理类就是 BeanDefinitionDocumentReader。BeanDefinitionDocumentReader 是一个接口,而实例化的工作是在 createBeanDefinitionDocumentReader()中完成的,而通过此方法,BeanDefinitionDocumentReader 真正的类型其实已经是 DefaultBeanDefinitionDocumentReader 了。按照 Spring 的 Bean 规则对 Document 对象解析的过程是在接口 BeanDefinitionDocumentReader 的实现类 DefaultBeanDefinitionDocumentReader 中实现的。
DefaultBeanDefinitionDocumentReader 对 Bean 定义的 Document 对象解析
BeanDefinitionDocumentReader 接口通过 registerBeanDefinitions 方法调用其实现类 DefaultBeanDefinitionDocumentReader 对 Document 对象进行解析,解析的代码如下:
@Overridepublic void registerBeanDefinitions(Document doc, XmlReaderContext readerContext) {    this.readerContext = readerContext;    doRegisterBeanDefinitions(doc.getDocumentElement());}
// 注册<beans/>配置的Beans@SuppressWarnings("deprecation")  // for Environment.acceptsProfiles(String...)protected void doRegisterBeanDefinitions(Element root) {    // Any nested <beans> elements will cause recursion in this method. In    // order to propagate and preserve <beans> default-* attributes correctly,    // keep track of the current (parent) delegate, which may be null. Create    // the new (child) delegate with a reference to the parent for fallback purposes,    // then ultimately reset this.delegate back to its original (parent) reference.    // this behavior emulates a stack of delegates without actually necessitating one.    BeanDefinitionParserDelegate parent = this.delegate;    this.delegate = createDelegate(getReaderContext(), root, parent);
    if (this.delegate.isDefaultNamespace(root)) {        //专门对 profile 标签进行解析        String profileSpec = root.getAttribute(PROFILE_ATTRIBUTE);        if (StringUtils.hasText(profileSpec)) {            String[] specifiedProfiles = StringUtils.tokenizeToStringArray(                    profileSpec, BeanDefinitionParserDelegate.MULTI_VALUE_ATTRIBUTE_DELIMITERS);            // We cannot use Profiles.of(...) since profile expressions are not supported            // in XML config. See SPR-12458 for details.            //            if (!getReaderContext().getEnvironment().acceptsProfiles(specifiedProfiles)) {                if (logger.isDebugEnabled()) {                    logger.debug("Skipped XML bean definition file due to specified profiles [" + profileSpec +                            "] not matching: " + getReaderContext().getResource());                }                return;            }        }    }
        preProcessXml(root);//解析前处理,留给子类实现    parseBeanDefinitions(root, this.delegate); // 从Document的根元素开始进行Bean定义的Document对象      postProcessXml(root);//解析后处理,留给子类实现
    this.delegate = parent;}
复制代码
这里我们注意到在注册 Bean 的最开始是对 PROFILE_ATTRIBUTE 属性的解析,有了 profile 这个特性我们就可以同时在配置文件中部署两套配置来适用于生产环境和开发环境,这样可以方便的进行切换开发、部署环境,最常用的就是更换不同的数据库。
首先程序会获取 beans 节点是否定义了 profile 属性,如果定义了则会需要到环境变量中去寻找,因为 profile 是可以同时指定多个的,需要程序对其拆分,并解析每个 profile 是都符合环境变量中所定义的,不定义则不会浪费性能去解析。
注意:跟进 preProcessXml(root) 和 postProcessXml(root) 后发现代码是空的。记住,一个类要么是面向继承设计,要么是 final 修饰的。而这个类并不是 final 修饰的,那么就是面向继承设计的,显然这里是用到了模板方法设计模式,如果继承自 DefaultBeanDefinitionDocumentReader 的子类需要在 Bean 解析前后做一些处理的话,那么只需要重写这两个方法即可
BeanDefinitionParserDelegate 解析 Bean 定义资源文件生成 BeanDefinition
处理了 profile 后就可以进行 XML 的读取了,跟踪代码进入 parseBeanDefinitions(root, this.delegate)。
/** * Parse the elements at the root level in the document: * "import", "alias", "bean". * @param root the DOM root element of the document */protected void parseBeanDefinitions(Element root, BeanDefinitionParserDelegate delegate) { if (delegate.isDefaultNamespace(root)) { NodeList nl = root.getChildNodes(); for (int i = 0; i < nl.getLength(); i++) { Node node = nl.item(i); if (node instanceof Element) { Element ele = (Element) node; if (delegate.isDefaultNamespace(ele)) { //对默认标签解析 parseDefaultElement(ele, delegate); } else { //对默认自定义标签的解析 delegate.parseCustomElement(ele); } } } } else { delegate.parseCustomElement(root); }}
复制代码
上面的代码看起来逻辑还是蛮清晰的,因为在 Spring 的 XML 配置里面有两大类 Bean 声明,一个是默认的,如:
<bean id="test" class="test.TestBean"/>
复制代码
另一类就是自定义的,如:
而两种方式的读取及解析差别是非常大的,如果采用 Spring 默认的配置,Spring 当然知道该怎么做,但是如果是自定义的,那么就需要用户实现一些接口及配置了。对于根节点或者子节点如果是默认命名空间的话则采用 parseDefaultElement 方法进行解析,否则使用 delegate.parseCustomElement 方法对自定义命名空间进行解析。而判断是否默认命名空间还是自定义命名空间的办法其实是使用 node.getNamespaceURI()获取命名空间,并与 Spring 中固定的命名空间http://www.Springframework.org/schema/beans进行比对。如果一致则认为是默认,否则就认为是自定义。
默认标签的解析
private void parseDefaultElement(Element ele, BeanDefinitionParserDelegate delegate) { // 如果元素节点是<Import>导入元素,进行导入解析 if (delegate.nodeNameEquals(ele, IMPORT_ELEMENT)) { importBeanDefinitionResource(ele); } // 如果元素节点是<Alias>别名元素,进行别名解析 else if (delegate.nodeNameEquals(ele, ALIAS_ELEMENT)) { processAliasRegistration(ele); } // 如果元素节点<Bean>元素, 按照Spring的Bean规则解析元素 else if (delegate.nodeNameEquals(ele, BEAN_ELEMENT)) { processBeanDefinition(ele, delegate); } // 如果元素节点<Beans>元素,即它是嵌套类型的 else if (delegate.nodeNameEquals(ele, NESTED_BEANS_ELEMENT)) { // 递归解析 doRegisterBeanDefinitions(ele); }}
复制代码
委托 BeanDefinitionDelegate 类的 parseBeanDefinitionElement 方法进行元素解析,返回 BeanDefinitionHolder 类型的实例 bdHolder,经过这个方法后,bdHolder 实例已经包含我们配置文件中配置的各种属性了,例如 class、name、id、alias 之类的属性。
/*** Process the given bean element, parsing the bean definition* and registering it with the registry.*/protected void processBeanDefinition(Element ele, BeanDefinitionParserDelegate delegate) { BeanDefinitionHolder bdHolder = delegate.parseBeanDefinitionElement(ele); if (bdHolder != null) { bdHolder = delegate.decorateBeanDefinitionIfRequired(ele, bdHolder); try { // 注册最终的装饰实例 BeanDefinitionReaderUtils.registerBeanDefinition(bdHolder, getReaderContext().getRegistry()); } catch (BeanDefinitionStoreException ex) { getReaderContext().error("Failed to register bean definition with name '" + bdHolder.getBeanName() + "'", ele, ex); } // Send registration event. getReaderContext().fireComponentRegistered(new BeanComponentDefinition(bdHolder)); }}
复制代码
parseBeanDefinitionElement 的解析方法 就不一一展开了,无非就是解析 XML 各种元素,来生成 BeanDefinition。
自定义标签的解析
在实际项目中,较少进行自定义标签,因此这里不展开描述了。
解析过后的 BeanDefinition 在 IoC 容器中的注册
Document 对象的解析后得到封装 BeanDefinition 的 BeanDefinitionHold 对象,然后调用 BeanDefinitionReaderUtils 的 registerBeanDefinition 方法向 IoC 容器注册解析的 Bean,BeanDefinitionReaderUtils 的注册的源码如下:
// 通过BeanDefinitionRegistry将BeanDefinitionHolder注册到BeanFactorypublic static void registerBeanDefinition(        BeanDefinitionHolder definitionHolder, BeanDefinitionRegistry registry)        throws BeanDefinitionStoreException {
    // Register bean definition under primary name.    String beanName = definitionHolder.getBeanName();    registry.registerBeanDefinition(beanName, definitionHolder.getBeanDefinition());
    // Register aliases for bean name, if any.    String[] aliases = definitionHolder.getAliases();    if (aliases != null) {        for (String alias : aliases) {            registry.registerAlias(beanName, alias);        }    }}
复制代码
当调用 BeanDefinitionReaderUtils 向 IoC 容器注册解析的 BeanDefinition 时,真正完成注册功能的是 DefaultListableBeanFactory。
DefaultListableBeanFactory 向 IoC 容器注册解析后的 BeanDefinition
IOC 容器本质上就是一个 beanDefinitionMap, 注册即将 BeanDefinition put 到 map 中
/** Map of bean definition objects, keyed by bean name. */private final Map<String, BeanDefinition> beanDefinitionMap = new ConcurrentHashMap<>(256);
/** Map from bean name to merged BeanDefinitionHolder. */private final Map<String, BeanDefinitionHolder> mergedBeanDefinitionHolders = new ConcurrentHashMap<>(256);

@Overridepublic void registerBeanDefinition(String beanName, BeanDefinition beanDefinition)        throws BeanDefinitionStoreException {
    Assert.hasText(beanName, "Bean name must not be empty");    Assert.notNull(beanDefinition, "BeanDefinition must not be null");
    if (beanDefinition instanceof AbstractBeanDefinition) {        try {            ((AbstractBeanDefinition) beanDefinition).validate();        }        catch (BeanDefinitionValidationException ex) {            throw new BeanDefinitionStoreException(beanDefinition.getResourceDescription(), beanName,                    "Validation of bean definition failed", ex);        }    }
    BeanDefinition existingDefinition = this.beanDefinitionMap.get(beanName);    // 如果已经注册    if (existingDefinition != null) {        // 检查是否可以覆盖        if (!isAllowBeanDefinitionOverriding()) {            throw new BeanDefinitionOverrideException(beanName, beanDefinition, existingDefinition);        }        else if (existingDefinition.getRole() < beanDefinition.getRole()) {            // e.g. was ROLE_APPLICATION, now overriding with ROLE_SUPPORT or ROLE_INFRASTRUCTURE            if (logger.isInfoEnabled()) {                logger.info("Overriding user-defined bean definition for bean '" + beanName +                        "' with a framework-generated bean definition: replacing [" +                        existingDefinition + "] with [" + beanDefinition + "]");            }        }        else if (!beanDefinition.equals(existingDefinition)) {            if (logger.isDebugEnabled()) {                logger.debug("Overriding bean definition for bean '" + beanName +                        "' with a different definition: replacing [" + existingDefinition +                        "] with [" + beanDefinition + "]");            }        }        else {            if (logger.isTraceEnabled()) {                logger.trace("Overriding bean definition for bean '" + beanName +                        "' with an equivalent definition: replacing [" + existingDefinition +                        "] with [" + beanDefinition + "]");            }        }        // 覆盖        this.beanDefinitionMap.put(beanName, beanDefinition);    }    else {        if (hasBeanCreationStarted()) {            // Cannot modify startup-time collection elements anymore (for stable iteration)            synchronized (this.beanDefinitionMap) {                this.beanDefinitionMap.put(beanName, beanDefinition);                List<String> updatedDefinitions = new ArrayList<>(this.beanDefinitionNames.size() + 1);                updatedDefinitions.addAll(this.beanDefinitionNames);                updatedDefinitions.add(beanName);                this.beanDefinitionNames = updatedDefinitions;                removeManualSingletonName(beanName);            }        }        else {            // Still in startup registration phase            this.beanDefinitionMap.put(beanName, beanDefinition);            this.beanDefinitionNames.add(beanName);            removeManualSingletonName(beanName);        }        //重置所有已经注册过的BeanDefinition的缓存          this.frozenBeanDefinitionNames = null;    }
    if (existingDefinition != null || containsSingleton(beanName)) {        resetBeanDefinition(beanName);    }    else if (isConfigurationFrozen()) {        clearByTypeCache();    }}
复制代码
至此,Bean 定义资源文件中配置的 Bean 被解析过后,已经注册到 IoC 容器中,被容器管理起来,真正完成了 IoC 容器初始化所做的全部工作。现在 IoC 容器中已经建立了整个 Bean 的配置信息,这些 BeanDefinition 信息已经可以使用,并且可以被检索,IoC 容器的作用就是对这些注册的 Bean 定义信息进行处理和维护。这些的注册的 Bean 定义信息是 IoC 容器控制反转的基础,正是有了这些注册的数据,容器才可以进行依赖注入。
小结
现在通过上面的代码,总结一下 IOC 容器初始化的基本步骤:
初始化的入口在容器实现中的 refresh()调用来完成
对 bean 定义载入 IOC 容器使用的方法是 loadBeanDefinition,其中的大致过程如下:通过 ResourceLoader 来完成资源文件位置的定位,DefaultResourceLoader 是默认的实现,同时上下文本身就给出了 ResourceLoader 的实现,可以从类路径,文件系统, URL 等方式来定为资源位置。如果是 XmlBeanFactory 作为 IOC 容器,那么需要为它指定 bean 定义的资源,也就是说 bean 定义文件时通过抽象成 Resource 来被 IOC 容器处理的通过 BeanDefinitionReader 来完成定义信息的解析和 Bean 信息的注册, 往往使用的是 XmlBeanDefinitionReader 来解析 bean 的 xml 定义文件 — 实际的处理过程是委托给 BeanDefinitionParserDelegate 来完成的,从而得到 bean 的定义信息,这些信息在 Spring 中使用 BeanDefinition 对象来表示容器解析得到 BeanDefinition 以后,需要把它在 IOC 容器中注册,这由 IOC 实现 BeanDefinitionRegistry 接口来实现。注册过程就是在 IOC 容器内部维护的一个 HashMap 来保存得到的 BeanDefinition 的过程。这个 HashMap 是 IoC 容器持有 bean 信息的场所,以后对 bean 的操作都是围绕这个 HashMap 来实现的.
最后可以通过 BeanFactory 和 ApplicationContext 来享受到 Spring IOC 的服务了,在使用 IOC 容器的时候,除了少量粘合代码,绝大多数以正确 IoC 风格编写的应用程序代码完全不用关心如何到达工厂,因为容器将把这些对象与容器管理的其他对象钩在一起。基本的策略是把工厂放到已知的地方,最好是放在对预期使用的上下文有意义的地方,以及代码将实际需要访问工厂的地方。 Spring 本身提供了对声明式载入 web 应用程序用法的应用程序上下文,并将其存储在 ServletContext 中的框架实现。
③ prepareBeanFactory 准备 Bean 工厂
为BeanFactory准备一些环境,方便在实例化的时候使用,同时添加容器自己的BeanPostProcessor
// org.springframework.context.support.AbstractApplicationContext#prepareBeanFactoryprotected void prepareBeanFactory(ConfigurableListableBeanFactory beanFactory) {    //设置bean工厂使用上下文的类加载器    beanFactory.setBeanClassLoader(this.getClassLoader());    //设置bean表达式解析器,默认可以使用#{bean.xxx}的形式来调用相关属性值    beanFactory.setBeanExpressionResolver(new StandardBeanExpressionResolver(beanFactory.getBeanClassLoader()));    //设置属性编辑器    beanFactory.addPropertyEditorRegistrar(new ResourceEditorRegistrar(this, this.getEnvironment()));        //添加BeanPostProcessor -> Applicat ionContextAwareProcessor    // AppLicationContextAwareProcessor在 postProcessBeforeInitialization()方法调用invokeAwareInterfaces(bean)    // 主要外理实现Aware接的bean在被初始化之前能够获取一些对应的资源,如ApplicationContext. ResourceLoader、 Environment    beanFactory.addBeanPostProcessor(new ApplicationContextAwareProcessor(this));        //忽略以下接口的自动装配依赖,因为前面的ApplicationContextAwareProcessor已经实现了类似功能    beanFactory.ignoreDependencyInterface(EnvironmentAware.class);    beanFactory.ignoreDependencyInterface(EmbeddedValueResolverAware.class);    beanFactory.ignoreDependencyInterface(ResourceLoaderAware.class);    beanFactory.ignoreDependencyInterface(ApplicationEventPublisherAware.class);    beanFactory.ignoreDependencyInterface(MessageSourceAware.class);    beanFactory.ignoreDependencyInterface(ApplicationContextAware.class);    beanFactory.registerResolvableDependency(BeanFactory.class, beanFactory);    beanFactory.registerResolvableDependency(ResourceLoader.class, this);    beanFactory.registerResolvableDependency(ApplicationEventPublisher.class, this);    beanFactory.registerResolvableDependency(ApplicationContext.class, this);        //添加BeanPostProcessor    beanFactory.addBeanPostProcessor(new ApplicationListenerDetector(this));    if (beanFactory.containsBean("loadTimeWeaver")) {        beanFactory.addBeanPostProcessor(new LoadTimeWeaverAwareProcessor(beanFactory));        beanFactory.setTempClassLoader(new ContextTypeMatchClassLoader(beanFactory.getBeanClassLoader()));    }    //注册默认环境bean    if (!beanFactory.containsLocalBean("environment")) {        beanFactory.registerSingleton("environment", this.getEnvironment());    }
    if (!beanFactory.containsLocalBean("systemProperties")) {        beanFactory.registerSingleton("systemProperties", this.getEnvironment().getSystemProperties());    }
    if (!beanFactory.containsLocalBean("systemEnvironment")) {        beanFactory.registerSingleton("systemEnvironment", this.getEnvironment().getSystemEnvironment());    }
}
复制代码
④ postProcessBeanFactory 子类扩展 BeanFactory
protected void postProcessBeanFactory(ConfigurableListableBeanFactory beanFactory) {}
复制代码
⑤ invokeBeanFactoryPostProcessors 执行增强的方法
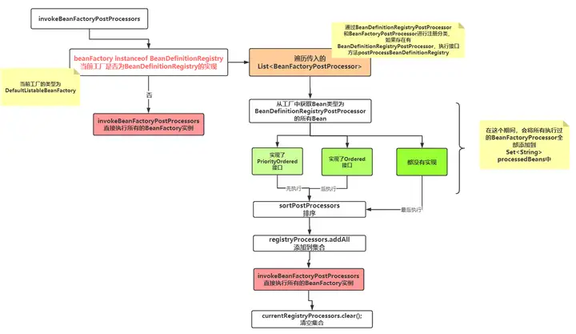
这个类,涉及到了两个接口。
它的总体执行流程是:先执行BeanDefinitionRegistryPostProcessor的BeanFactoryPostProcessor,然后再执行BeanFactoryPostProcessor
下图是BeanDefinitionRegistryPostProcessor接口的处理过程:
BeanFactoryPostProcessor 的处理逻辑
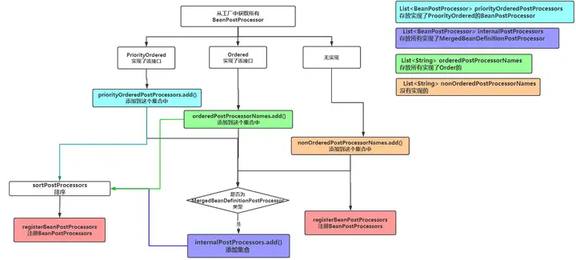
总逻辑就是先分类,已经处理过的直接跳过,没有处理过的,分类处理,逻辑和上面的相同。
执行 BeanFactoryPostProcessor 后置处理器的 postProcessBeanFactory()增强方法
protected void invokeBeanFactoryPostProcessors(ConfigurableListableBeanFactory beanFactory) { // 1.拿到当前应用上下文beanFactoryPostProcessors变量中的值 // 2.实例化并调用所有已注册的BeanFactoryPostProcessor PostProcessorRegistrationDelegate.invokeBeanFactoryPostProcessors(beanFactory, this.getBeanFactoryPostProcessors()); if (beanFactory.getTempClassLoader() == null && beanFactory.containsBean("loadTimeWeaver")) { beanFactory.addBeanPostProcessor(new LoadTimeWeaverAwareProcessor(beanFactory)); beanFactory.setTempClassLoader(new ContextTypeMatchClassLoader(beanFactory.getBeanClassLoader())); }}
复制代码
⑥ registerBeanPostProcessors
这个方法的逻辑和上面的一样,只不过上面是直接执行了 BeanFactoryPostProcessor,而这个仅仅注册没执行。
首先拿到工厂中所有的BeanPostProcessor类型的Bean,然后分类处理,排序注册。
⑦ initMessageSource()
执行国际化内容
⑧ initApplicationEventMulticaster
创建了一个多播器,为添加Listener提供支持。
主要逻辑:
⑨ onRefresh()
子类扩展
⑩ registerListeners()
观察者模式的实现
protected void registerListeners() {    // 拿到当前容器中的监听器,注册到多播器中    for (ApplicationListener <? > listener: getApplicationListeners()) {        getApplicationEventMulticaster().addApplicationListener(listener);    }
    //拿到容器中为监听器的Bean,注册    String[] listenerBeanNames = getBeanNamesForType(ApplicationListener.class, true, false);    for (String listenerBeanName: listenerBeanNames) {        getApplicationEventMulticaster().addApplicationListenerBean(listenerBeanName);    }
    // 清空开始的事件,到广播器中    Set < ApplicationEvent > earlyEventsToProcess = this.earlyApplicationEvents;    this.earlyApplicationEvents = null;    if (earlyEventsToProcess != null) {        for (ApplicationEvent earlyEvent: earlyEventsToProcess) {            getApplicationEventMulticaster().multicastEvent(earlyEvent);        }    }}
复制代码
⑪ finishBeanFactoryInitialization
 /**   * Finish the initialization of this context's bean factory,   * initializing all remaining singleton beans.     在上下文工厂中完成所有Bean 的初始化   */ protected void finishBeanFactoryInitialization(ConfigurableListableBeanFactory beanFactory) {     // 初始化上下文转换服务Bean     if (beanFactory.containsBean(CONVERSION_SERVICE_BEAN_NAME) &&         beanFactory.isTypeMatch(CONVERSION_SERVICE_BEAN_NAME, ConversionService.class)) {         beanFactory.setConversionService(             beanFactory.getBean(CONVERSION_SERVICE_BEAN_NAME, ConversionService.class));     }

     //如果不存在前入值解析器,则注册一个默认的嵌入值解析器,主要是注解属性解析     if (!beanFactory.hasEmbeddedValueResolver()) {         beanFactory.addEmbeddedValueResolver(strVal - > getEnvironment().resolvePlaceholders(strVal));     }
     // 初始化LoadTimeWeaverAware     String[] weaverAwareNames = beanFactory.getBeanNamesForType(LoadTimeWeaverAware.class, false, false);     for (String weaverAwareName: weaverAwareNames) {         getBean(weaverAwareName);     }
     // Stop using the temporary ClassLoader for type matching.     beanFactory.setTempClassLoader(null);
     // Allow for caching all bean definition metadata, not expecting further changes.     beanFactory.freezeConfiguration();
     // Instantiate all remaining (non-lazy-init) singletons.     //实例化,重点     beanFactory.preInstantiateSingletons(); }
复制代码
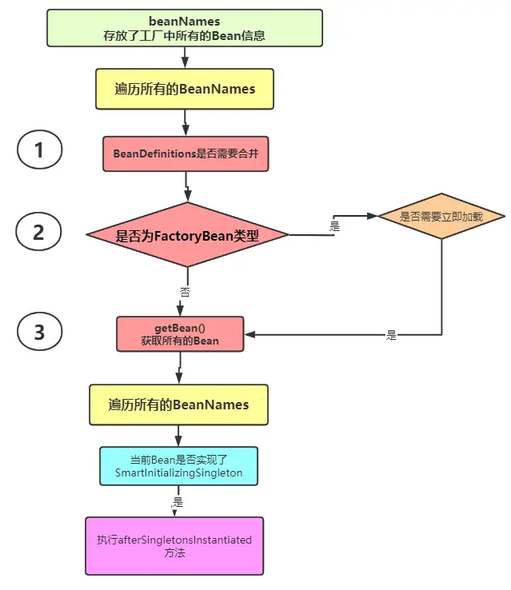
下图是创建 Bean 的主要流程
按照途中的序号一个一个说:
BeanDefinition是否需要合并。BeanDefinition根据不同类型的配置文件信息,会将Bean封装到不同的Bean信息定义类中。比如我们常用的配置文件版的GenericBeanDefinition;注解扫描版的ScannedGenericBeanDefinition等等。
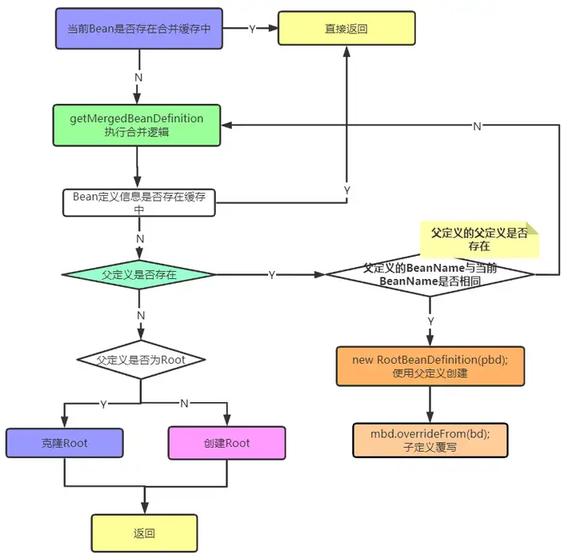
而在这个过程中就出现了,父定义和子定义,我们需要在实际处理定义信息的时候进行合并处理,主要有一下三个方面
存在父定义信息,使用父定义信息创建一个RootBeanDefinition,然后将自定义信息作为参数传入。
不存在父定义信息,并且当前BeanDefinition是RootBeanDefintion类型的,直接返回一份RootBeanDefintion的克隆
不存在父定义信息,并且当前BeanDefintion不是RootBeanDefintiton类型的,直接通过该BeanDefintion构建一个RootBeanDefintion返回
上面的流程也是源码中的执行流程
isFactoryBean。判断是否为FactoryBean
简单介绍一下:FactoryBean是让开发者创建自己需要Bean接口。内部提供了三个方法
T getObject() throws Exception;//返回的Bean信息Class<?> getObjectType();//返回的Bean类型default boolean isSingleton() {return true;}//是否单例
复制代码
当我们通过GetBean直接该Bean的时候,获取到的是该工厂指定返回的Bean类型。如果想要获取该Bean本身,需要通过一个前缀获得&
@Overridepublic boolean isFactoryBean(String name) throws NoSuchBeanDefinitionException { String beanName = transformedBeanName(name); //解析真正的BeanName Object beanInstance = getSingleton(beanName, false); //获取容器中的bean if (beanInstance != null) { //如果容器中存在,直接返回该Bean是否为FactoryBea类型 return (beanInstance instanceof FactoryBean); } //没有Bean信息,检查这个Bean信息 if (!containsBeanDefinition(beanName) && getParentBeanFactory() instanceof ConfigurableBeanFactory) { // 从父工厂中获取 return ((ConfigurableBeanFactory) getParentBeanFactory()).isFactoryBean(name); } //MergedBeanDefinition来检查beanName对应的Bean是否为FactoryBean return isFactoryBean(beanName, getMergedLocalBeanDefinition(beanName));}
复制代码
再来看一个点,这个就是从容器中获取 Bean 的主要方法,也是解决循环依赖的逻辑,
protected Object getSingleton(String beanName, boolean allowEarlyReference) { //查看当前容器中是否存在该Bean Object singletonObject = this.singletonObjects.get(beanName); //如果不存在,且当前Bean正在被创建 if (singletonObject == null && isSingletonCurrentlyInCreation(beanName)) { synchronized(this.singletonObjects) { //从早期的容器中获取Bean singletonObject = this.earlySingletonObjects.get(beanName); //如果早期容器也没有且允许创建早期引用 if (singletonObject == null && allowEarlyReference) { //获取该Bean的ObjectFactory工厂 ObjectFactory <? > singletonFactory = this.singletonFactories.get(beanName); //如果当前工厂不为空 if (singletonFactory != null) { //创建一个对象实例,此时处于半初始化状态 singletonObject = singletonFactory.getObject(); //添加到早期引用中 this.earlySingletonObjects.put(beanName, singletonObject); //移除创建早期引用的工厂,因为该Bean已经创建且添加到了早期容器中,不需要再次进行创建了。 this.singletonFactories.remove(beanName); } } } } return singletonObject;}
复制代码
⑫ finishRefresh
这个方法进行了一系列的资源清理
protected void finishRefresh() {  // 清空上下文资源缓存  clearResourceCaches();
  // 初始化生命周期处理器  initLifecycleProcessor();
  // 将已经刷新完毕的处理器传播(扔到)生命周期处理器中  getLifecycleProcessor().onRefresh();
  // 推送上下文刷新完毕的时间到相应的监听器  publishEvent(new ContextRefreshedEvent(this));
  // Participate in LiveBeansView MBean, if active.  LiveBeansView.registerApplicationContext(this); }
复制代码
initLifecycleProcessor,这个方法极具简单,就看一下当前 Bean 中是否存在生命周期处理器,如果存在直接使用这个,如果不存在则创建一个默认的,并且注册为一个单例的扔到容器中。
文章转载自:Seven
原文链接:https://www.cnblogs.com/seven97-top/p/18608839
体验地址:http://www.jnpfsoft.com/?from=infoq





评论