
前端 react 面试题总结
为什么调用 setState 而不是直接改变 state?
解答
如果您尝试直接改变组件的状态,React 将无法得知它需要重新渲染组件。通过使用setState()方法,React 可以更新组件的 UI。
另外,您还可以谈谈如何不保证状态更新是同步的。如果需要基于另一个状态(或属性)更新组件的状态,请向setState()传递一个函数,该函数将 state 和 props 作为其两个参数:
React 数据持久化有什么实践吗?
封装数据持久化组件:
在 React 项目中,通过 redux 存储全局数据时,会有一个问题,如果用户刷新了网页,那么通过 redux 存储的全局数据就会被全部清空,比如登录信息等。这时就会有全局数据持久化存储的需求。首先想到的就是 localStorage,localStorage 是没有时间限制的数据存储,可以通过它来实现数据的持久化存储。
但是在已经使用 redux 来管理和存储全局数据的基础上,再去使用 localStorage 来读写数据,这样不仅是工作量巨大,还容易出错。那么有没有结合 redux 来达到持久数据存储功能的框架呢?当然,它就是 redux-persist。redux-persist 会将 redux 的 store 中的数据缓存到浏览器的 localStorage 中。其使用步骤如下:
(1)首先要安装 redux-persist:
(2)对于 reducer 和 action 的处理不变,只需修改 store 的生成代码,修改如下:
(3)在 index.js 中,将 PersistGate 标签作为网页内容的父标签:
这就完成了通过 redux-persist 实现 React 持久化本地数据存储的简单应用。
redux 中间件
中间件提供第三方插件的模式,自定义拦截 action -> reducer 的过程。变为 action -> middlewares -> reducer 。这种机制可以让我们改变数据流,实现如异步 action ,action 过 滤,日志输出,异常报告等功能
常见的中间件:
redux-logger:提供日志输出;
redux-thunk:处理异步操作;
redux-promise: 处理异步操作;
actionCreator 的返回值是 promise
类组件和函数组件之间的区别是啥?
类组件可以使用其他特性,如状态
state和生命周期钩子。当组件只是接收
props渲染到页面时,就是无状态组件,就属于函数组件,也被称为哑组件或展示组件。函数组件和类组件当然是有区别的,而且函数组件的性能比类组件的性能要高,因为类组件使用的时候要实例化,而函数组件直接执行函数取返回结果即可。为了提高性能,尽量使用函数组件。
React 中 keys 的作用是什么?
Keys是React用于追踪哪些列表中元素被修改、被添加或者被移除的辅助标识
在开发过程中,我们需要保证某个元素的
key在其同级元素中具有唯一性。在React Diff算法中React会借助元素的Key值来判断该元素是新近创建的还是被移动而来的元素,从而减少不必要的元素重渲染。此外,React 还需要借助Key值来判断元素与本地状态的关联关系,因此我们绝不可忽视转换函数中Key的重要性
简述 flux 思想
Flux的最大特点,就是数据的"单向流动"。
用户访问
ViewView发出用户的ActionDispatcher收到Action,要求Store进行相应的更新Store更新后,发出一个"change"事件View收到"change"事件后,更新页面
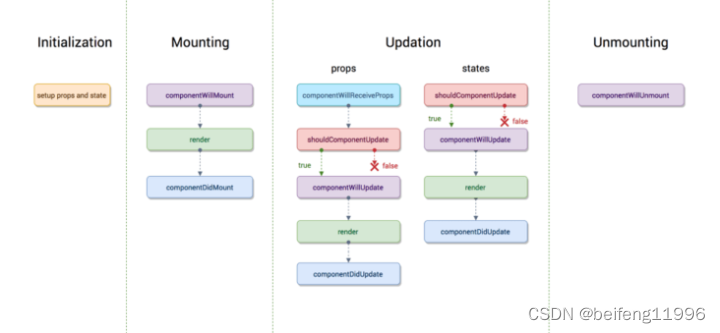
React 组件生命周期有哪些不同阶段?
在组件生命周期中有四个不同的阶段:
Initialization:在这个阶段,组件准备设置初始化状态和默认属性。
Mounting:react 组件已经准备好挂载到浏览器 DOM 中。这个阶段包括
componentWillMount和componentDidMount生命周期方法。Updating:在这个阶段,组件以两种方式更新,发送新的 props 和 state 状态。此阶段包括
shouldComponentUpdate、componentWillUpdate和componentDidUpdate生命周期方法。Unmounting:在这个阶段,组件已经不再被需要了,它从浏览器 DOM 中卸载下来。这个阶段包含
componentWillUnmount生命周期方法。除以上四个常用生命周期外,还有一个错误处理的阶段:Error Handling:在这个阶段,不论在渲染的过程中,还是在生命周期方法中或是在任何子组件的构造函数中发生错误,该组件都会被调用。这个阶段包含了componentDidCatch生命周期方法。
diff 算法是怎么运作
每一种节点类型有自己的属性,也就是 prop,每次进行 diff 的时候,react 会先比较该节点类型,假如节点类型不一样,那么 react 会直接删除该节点,然后直接创建新的节点插入到其中,假如节点类型一样,那么会比较 prop 是否有更新,假如有 prop 不一样,那么 react 会判定该节点有更新,那么重渲染该节点,然后在对其子节点进行比较,一层一层往下,直到没有子节点
connect 原理
首先
connect之所以会成功,是因为Provider组件:在原应用组件上包裹一层,使原来整个应用成为
Provider的子组件 接收Redux的store作为props,通过context对象传递给子孙组件上的connect
connect做了些什么。它真正连接Redux和React,它包在我们的容器组件的外一层,它接收上面Provider提供的store里面的state和dispatch,传给一个构造函数,返回一个对象,以属性形式传给我们的容器组件
connect是一个高阶函数,首先传入mapStateToProps、mapDispatchToProps,然后返回一个生产Component的函数(wrapWithConnect),然后再将真正的Component作为参数传入wrapWithConnect,这样就生产出一个经过包裹的Connect组件,
该组件具有如下特点
通过
props.store获取祖先Component的store props包括stateProps、dispatchProps、parentProps,合并在一起得到nextState,作为props传给真正的Component componentDidMount时,添加事件this.store.subscribe(this.handleChange),实现页面交互shouldComponentUpdate时判断是否有避免进行渲染,提升页面性能,并得到nextStatecomponentWillUnmount时移除注册的事件this.handleChange
由于
connect的源码过长,我们只看主要逻辑
组件更新有几种方法
this.setState() 修改状态的时候 会更新组件
this.forceUpdate() 强制更新
组件件 render 之后,子组件使用到父组件中状态,导致子组件的 props 属性发生改变的时候 也会触发子组件的更新
React 和 vue.js 的相似性和差异性是什么?
相似性如下。(1)都是用于创建 UI 的 JavaScript 库。(2)都是快速和轻量级的代码库(这里指 React 核心库)。(3)都有基于组件的架构。(4)都使用虚拟 DOM。(5)都可以放在单独的 HTML 文件中,或者放在 Webpack 设置的一个更复杂的模块中。(6)都有独立但常用的路由器和状态管理库。它们最大的区别在于 Vue. js 通常使用 HTML 模板文件,而 React 完全使用 JavaScript 创建虚拟 DOM。 Vue. js 还具有对于“可变状态”的“ reactivity”的重新渲染的自动化检测系统。
React 性能优化
shouldCompoentUpdate
pureComponent 自带 shouldCompoentUpdate 的浅比较优化
结合 Immutable.js 达到最优
如何用 React 构建( build)生产模式?
通常,使用 Webpack 的 DefinePlugin 方法将 NODE ENV 设置为 production。这将剥离 propType 验证和额外的警告。除此之外,还可以减少代码,因为 React 使用 Uglify 的 dead-code 来消除开发代码和注释,这将大大减少包占用的空间。
componentWillReceiveProps 调用时机
已经被废弃掉
当 props 改变的时候才调用,子组件第二次接收到 props 的时候
这三个点(...)在 React 干嘛用的?
... 在 React(使用 JSX)代码中做什么?它叫什么?
这个叫扩展操作符号或者展开操作符,例如,如果this.props包含a:1和b:2,则
等价于下面内容:
扩展符号不仅适用于该用例,而且对于创建具有现有对象的大多数(或全部)属性的新对象非常方便,在更新state 咱们就经常这么做:
redux 中间件
中间件提供第三方插件的模式,自定义拦截
action->reducer的过程。变为action->middlewares->reducer。这种机制可以让我们改变数据流,实现如异步action,action过滤,日志输出,异常报告等功能
redux-logger:提供日志输出redux-thunk:处理异步操作redux-promise:处理异步操作,actionCreator的返回值是promise
createElement 过程
React.createElement(): 根据指定的第一个参数创建一个 React 元素
第一个参数是必填,传入的是似 HTML 标签名称,eg: ul, li
第二个参数是选填,表示的是属性,eg: className
第三个参数是选填, 子节点,eg: 要显示的文本内容
什么是高阶组件?
高阶组件(HOC)是接受一个组件并返回一个新组件的函数。基本上,这是一个模式,是从 React 的组合特性中衍生出来的,称其为纯组件,因为它们可以接受任何动态提供的子组件,但不会修改或复制输入组件中的任何行为。
HOC 可以用于以下许多用例
代码重用、逻辑和引导抽象
渲染劫持
state 抽象和操作
props 处理
什么是虚拟 DOM?
虚拟 DOM (VDOM)是真实 DOM 在内存中的表示。UI 的表示形式保存在内存中,并与实际的 DOM 同步。这是一个发生在渲染函数被调用和元素在屏幕上显示之间的步骤,整个过程被称为调和。
为什么有些 react 生命周期钩子被标记为 UNSAFE
componentWillMount
componentWillMount 生命周期发生在首次渲染前,一般使用的小伙伴大多在这里初始化数据或异步获取外部数据赋值。初始化数据,react 官方建议放在 constructor 里面。而异步获取外部数据,渲染并不会等待数据返回后再去渲染
试想一下,假如组件在第一次渲染的时候被中断,由于组件没有完成渲染,所以并不会执行 componentWillUnmount 生命周期(注:很多人经常认为 componentWillMount 和 componentWillUnmount 总是配对,但这并不是一定的。只有调用 componentDidMount 后,React 才能保证稍后调用 componentWillUnmount 进行清理)。因此 handleSubscriptionChange 还是会在数据返回成功后被执行,这时候 setState 由于组件已经被移除,就会导致内存泄漏。所以建议把异步获取外部数据写在 componentDidMount 生命周期里,这样就能保证 componentWillUnmount 生命周期会在组件移除的时候被执行,避免内存泄漏的风险。
现在,小伙伴清楚为什么了要用
UNSAFE_componentWillMount替换componentWillMount了吧
componentWillReceiveProps
componentWillReceiveProps 生命周期是在 props 更新时触发。一般用于 props 参数更新时同步更新 state 参数。但如果在 componentWillReceiveProps 生命周期直接调用父组件的某些有调用 setState 的函数,会导致程序死循环
如上代码,在 Child 组件的 componentWillReceiveProps 里直接调用 Parent 组件的 changeSelectData 去更新 Parent 组件 state 的 selectedData 值。会触发 Parent 组件重新渲染,而 Parent 组件重新渲染会触发 Child 组件的 componentWillReceiveProps 生命周期函数执行。如此就会陷入死循环。导致程序崩溃。
所以,React 官方把 componentWillReceiveProps 替换为 UNSAFE_componentWillReceiveProps,让小伙伴在使用这个生命周期的时候注意它会有缺陷,要注意避免,比如上面例子,Child 在 componentWillReceiveProps 调用 changeSelectData 时先判断 list 是否有更新再确定是否要调用,就可以避免死循环。
componentWillUpdate
componentWillUpdate 生命周期在视图更新前触发。一般用于视图更新前保存一些数据方便视图更新完成后赋值。 案例三:如下是列表加载更新后回到当前滚动条位置的案例
由于 componentWillUpdate 和 componentDidUpdate 这两个生命周期函数有一定的时间差(componentWillUpdate 后经过渲染、计算、再更新 DOM 元素,最后才调用 componentDidUpdate),如果这个时间段内用户刚好拉伸了浏览器高度,那 componentWillUpdate 计算的 previousScrollOffset 就不准确了。如果在 componentWillUpdate 进行 setState 操作,会出现多次调用只更新一次的问题,把 setState 放在 componentDidUpdate,能保证每次更新只调用一次。
所以,react 官方建议把 componentWillUpdate 替换为 UNSAFE_componentWillUpdate。如果真的有以上案例的需求,可以使用 16.3 新加入的一个周期函数 getSnapshotBeforeUpdat
结论
React 意识到 componentWillMount、componentWillReceiveProps 和 componentWillUpdate 这三个生命周期函数有缺陷,比较容易导致崩溃。但是由于旧的项目已经在用以及有些老开发者习惯用这些生命周期函数,于是通过给它加 UNSAFE_来提醒用它的人要注意它们的缺陷
React 加入了两个新的生命周期函数 getSnapshotBeforeUpdate 和 getDerivedStateFromProps,目的为了即使不使用这三个生命周期函数,也能实现只有这三个生命周期能实现的功能

还未添加个人签名 2022-09-01 加入
还未添加个人简介


评论