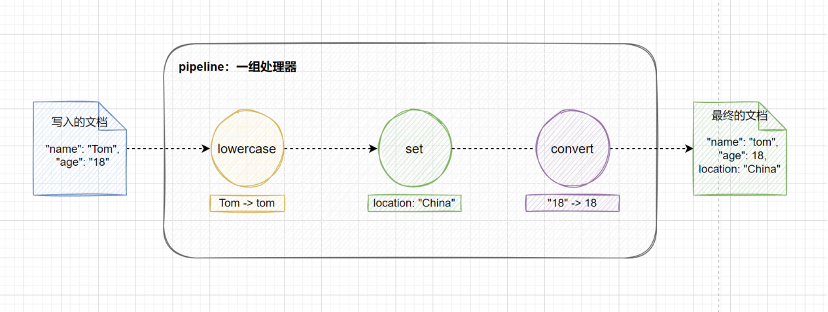
Ingest pipeline 允许文档在被索引之前对数据进行预处理,将数据加工处理成我们需要的格式。例如,可以使用 ingest pipeline 添加或者删除字段,转换类型,解析内容等等。Pipeline 由一组处理器 Processor 构成,每个处理器依次运行,对传入的文档进行特定的更改。Ingest pipeline 和 Logstash 中的 filter 作用相似,并且更加轻量和易于调试。
要使用 ingest pipeline,集群中必须至少有一个具有 ingest 角色的节点。对于大量摄取负载,建议设置专用的 ingest 节点,要创建专用的 ingest 节点,请设置:
1 Ingest Pipeline 的基本用法
1.1 创建和使用 Ingest Pipeline
接下来介绍一下 ingest pipeline 的创建与使用,如下所示,使用 ingest API 创建一个名为 my-pipeline 的 ingest pipeline,在 processors 参数中指定了两个处理器,set 处理器为文档添加一个新的字段 location,设置值为 China;lowercase 处理器将 name 字段的所有字母转换为小写。
PUT _ingest/pipeline/my-pipeline{ "description": "My first Ingest Pipeline", "processors": [ { "set": { "description": "Add a new field", "field": "location", "value": "China" } }, { "lowercase": { "description": "Lowercase name", "field": "name" } } ]}
复制代码
然后往索引 my-index 中写入一条数据,通过 pipeline 参数指定使用刚刚创建的 my-pipeline。
PUT my-index/_doc/1?pipeline=my-pipeline{ "name": "Tom", "age": 18}
复制代码
查看 id 为 1 的文档,可以看到 name 字段由 Tom 转换为 tom,并且新增了 location 字段,说明 my-pipeline 管道成功处理了摄入的数据。
GET my-index/_doc/1
# 返回结果{  "_index" : "my-index",  "_type" : "_doc",  "_id" : "1",  "_version" : 1,  "_seq_no" : 0,  "_primary_term" : 1,  "found" : true,  "_source" : {    "name" : "tom",    "location" : "China",    "age" : 18  }}
复制代码
1.2 使用 Simulate API 测试 Pipeline
为了让开发者更好地了解和使用 pipeline 中的处理器,Elasticsearch 提供了 simulate API 接口,方便我们对 pipeline 进行测试。如下所示,我们对 1.1 创建和使用 Ingest Pipeline 章节中创建的 my-pipeline 进行测试,在 docs 列表中我们可以填写多个原始文档。
POST _ingest/pipeline/my-pipeline/_simulate{ "docs": [ { "_source": { "name": "Tom", "age": 18 } } ]}
复制代码
返回结果如下,可以看到模拟的结果和实际创建的文档一致,只不过 simulate API 并不会真正地创建这个文档。
{ "docs" : [ { "doc" : { "_index" : "_index", "_type" : "_doc", "_id" : "_id", "_source" : { "name" : "tom", "location" : "China", "age" : 18 }, "_ingest" : { "timestamp" : "2022-03-03T14:04:15.941884826Z" } } } ]}
复制代码
除了在请求路径中指定 pipeline,我们还可以在请求体中定义 pipeline 进行模拟,这样就不用预先创建好 pipeline,而是等到测试成功后再去创建 pipeline。
POST _ingest/pipeline/_simulate{ "pipeline": { "processors": [ { "set": { "description": "Add a new field", "field": "location", "value": "China" } }, { "lowercase": { "description": "Lowercase name", "field": "name" } } ] }, "docs": [ { "_source": { "name": "Tom", "age": 18 } } ]}
复制代码
1.3 异常处理
当我们使用 pipeline 处理一个文档的时候,有时并不是所有的文档都很规范,这个时候可能就会出现文档不能被正确解析或者发生异常的情况,此时 Elasticsearch 会返回给客户端一个错误的信息,表明文档不能被正确地处理。pipeline 中的处理器(processor)按照顺序依次执行,默认情况下,当处理器发生错误或者异常时,将会停止后续的处理。
在 ingest pipeline 中,异常处理可以分为 3 种情况:
下面将会分别对上述 3 种情况进行演示,首先模拟 2 个异常:
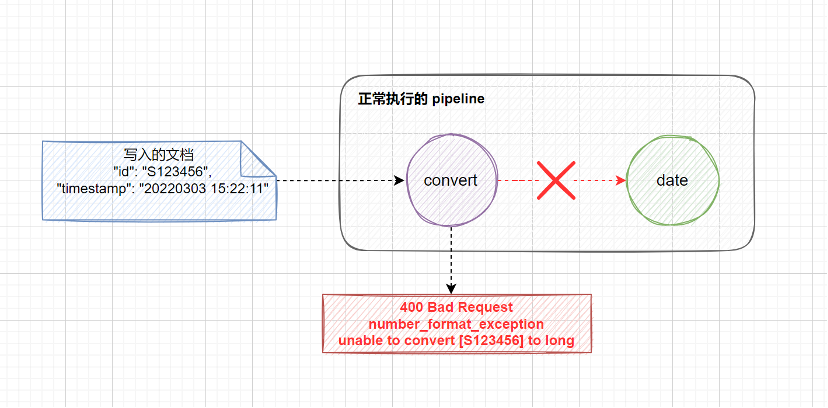
convert 处理器将 id 字段转换为 long 类型,由于传入文档的 id 字段值设置为 S123456,无法转换成 long 类型的数字,会产生 number_format_exception 的异常。
date 处理器解析 timestamp 字段的日期格式,formats 参数要求输入的格式是 yyyy-MM-dd HH:mm:ss,例如 2022-03-03 15:22:11,解析出日期对应的年月日信息,以 yyyy/MM/dd 的格式输出到 date 字段中,例如 2022/03/03。由于传入文档的 timestamp 字段的格式是 20220303 15:22:11,并不满足 formats 参数要求的日期格式,因此会产生 date_time_parse_exception 的异常。
执行以下 pipeline 测试语句,在请求路径中加上 verbose 可以看到每个处理器的执行情况。
POST _ingest/pipeline/_simulate?verbose{ "pipeline": { "processors": [ { "convert": { "field": "id", "type": "long" } }, { "date": { "field": "timestamp", // 解析的字段 "formats": [ "yyyy-MM-dd HH:mm:ss" // 解析的格式 ], "output_format": "yyyy/MM/dd", // 输出的格式 "target_field": "date" // 输出的字段 } } ] }, "docs": [ { "_source": { "id": "S123456", "timestamp": "20220303 15:22:11", "message": "User login successfully" } } ]}
复制代码
返回结果如下,尽管我们人为制造了 2 个异常,但是只看到了 convert 处理器的异常报错,这是因为当处理器发生错误或者异常时,将会停止后续的处理,直接向客户端返回错误信息。
{ "docs" : [ { "processor_results" : [ { "processor_type" : "convert", "status" : "error", "error" : { "root_cause" : [ { "type" : "illegal_argument_exception", "reason" : "unable to convert [S123456] to long" } ], "type" : "illegal_argument_exception", "reason" : "unable to convert [S123456] to long", "caused_by" : { "type" : "number_format_exception", "reason" : "For input string: \"S123456\"" } } } ] } ]}
复制代码
1.3.1 ignore_failure 忽略异常
在处理器中设置 ignore_failure 参数为 true,当该处理器发生异常时,允许忽略异常,继续执行后续的处理器。
POST _ingest/pipeline/_simulate?verbose{ "pipeline": { "processors": [ { "convert": { "field": "id", "type": "long", "ignore_failure": true // 忽略异常 } }, { "date": { "field": "timestamp", "formats": [ "yyyy-MM-dd HH:mm:ss" ], "output_format": "yyyy/MM/dd", "target_field": "date" } } ] }, "docs": [ { "_source": { "id": "S123456", "timestamp": "2022/03/03 15:22:11", "message": "User login successfully" } } ]}
复制代码
这次在返回结果中可以看到有 2 个异常信息,其中 convert 处理器的 status 的值为 error_ignored,表示该异常被忽略了,在 doc 中可以看到该处理器处理完毕后的结果,可以看到 id 字段的内容保留不变。接着 pipeline 继续往后执行,当执行到 date 处理器时,再次发生异常,由于 date 处理器中未对异常进行处理,此时向客户端返回异常信息。
{ "docs" : [ { "processor_results" : [ { "processor_type" : "convert", "status" : "error_ignored", // 第 1 个异常,忽略异常 "ignored_error" : { "error" : { "root_cause" : [ { "type" : "illegal_argument_exception", "reason" : "unable to convert [S123456] to long" } ], "type" : "illegal_argument_exception", "reason" : "unable to convert [S123456] to long", "caused_by" : { "type" : "number_format_exception", "reason" : "For input string: \"S123456\"" } } }, "doc" : { "_index" : "_index", "_type" : "_doc", "_id" : "_id", "_source" : { "id" : "S123456", // 跳过 convert 处理器对 id 字段的处理 "message" : "User login successfully", "timestamp" : "2022/03/03 15:22:11" }, "_ingest" : { "pipeline" : "_simulate_pipeline", "timestamp" : "2022-03-04T02:48:13.562353005Z" } } }, { "processor_type" : "date", "status" : "error", // 第 2 个异常 "error" : { "root_cause" : [ { "type" : "illegal_argument_exception", "reason" : "unable to parse date [2022/03/03 15:22:11]" } ], "type" : "illegal_argument_exception", "reason" : "unable to parse date [2022/03/03 15:22:11]", "caused_by" : { "type" : "illegal_argument_exception", "reason" : "failed to parse date field [2022/03/03 15:22:11] with format [yyyy-MM-dd HH:mm:ss]", "caused_by" : { "type" : "date_time_parse_exception", "reason" : "Text '2022/03/03 15:22:11' could not be parsed at index 4" } } } } ] } ]}
复制代码
1.3.2 on_failure 处理异常
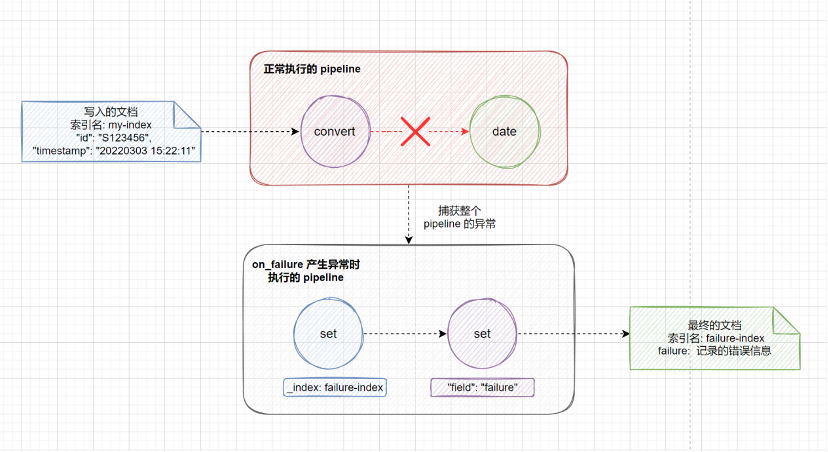
使用 on_failure 参数可以定义发生异常时执行的处理器列表,该参数允许在 processor 和 pipeline 级别中定义。在 pipeline 级别定义时,on_failure 捕获整个 pipeline 发生的任何异常,当产生异常时直接执行 on_failure 中定义的处理器列表,不会再执行后续的处理器。
在 processor 级别定义时,on_failure 参数可以针对单个处理器进行异常处理,会继续执行后续的处理器。
on_failure 参数可以同时在 pipeline 和 processor 中定义,这两者并不冲突,比较推荐的做法是,针对某些处理器设置 processor 级别的 on_failure 处理规则,另外设置 pipeline 级别的 on_failure 处理规则作为一条兜底的规则,当 processor 级别的 on_failure 处理规则也发生异常时或者没有设置异常处理的处理器发生异常时,就可以应用这条兜底的规则,这样做的好处就是可以尽可能地保证我们的 ingest pipeline 的健壮性。
如下所示,在 pipeline 级别设置了 on_failure 的处理规则,注意这里的 on_failure 参数和 processors 参数是处于同一层级的。当发生异常时, on_failure 会执行里面的 set 处理器,将索引名改为 failure-index,该索引专门用于记录 pipeline 处理异常的文档。之后我们就可以在 failure-index 索引中去查看哪些文档在预处理时发生了异常,方便后续实施相应的补救措施。
PUT _ingest/pipeline/failure-test-pipeline{ "processors": [ { "convert": { "field": "id", "type": "long" } }, { "date": { "field": "timestamp", "formats": [ "yyyy-MM-dd HH:mm:ss" ], "output_format": "yyyy/MM/dd", "target_field": "date" } } ], "on_failure": [ // 发生异常时执行的处理器列表 { "set": { "field": "_index", // 通过 _index 元数据字段,可以改变写入的索引 "value": "failure-index" } } ]}
复制代码
然后往 my-index 索引中插入一条有错误的文档,将文档 _id 设置为 1。从返回结果来看,并没有异常报错,文档成功写入了。但是仔细观察可以发现,文档并没有写入 my-index 索引,而是写入了我们记录异常的索引 failure-index。
PUT my-index/_doc/1?pipeline=failure-test-pipeline{  "id": "S123456",  "timestamp": "2022/03/03 15:22:11",  "message": "User login successfully"}
# 返回结果{  "_index" : "failure-index", // 写入了记录异常的索引  "_type" : "_doc",  "_id" : "1",  "_version" : 1,  "result" : "created",  "_shards" : {    "total" : 2,    "successful" : 1,    "failed" : 0  },  "_seq_no" : 0,  "_primary_term" : 1}
复制代码
查询 my-index 文档,确实没有找到 _id 为 1 的这条文档。
GET my-index/_doc/1
# 返回结果{  "error" : {    "root_cause" : [      {        "type" : "index_not_found_exception",        "reason" : "no such index [my-index]",        "resource.type" : "index_expression",        "resource.id" : "my-index",        "index_uuid" : "_na_",        "index" : "my-index"      }    ],    "type" : "index_not_found_exception",    "reason" : "no such index [my-index]",    "resource.type" : "index_expression",    "resource.id" : "my-index",    "index_uuid" : "_na_",    "index" : "my-index"  },  "status" : 404}
复制代码
查询 failure-index 索引可以找到这条处理异常的文档。
GET failure-index/_doc/1
# 返回结果{  "_index" : "failure-index",  "_type" : "_doc",  "_id" : "1",  "_version" : 1,  "_seq_no" : 0,  "_primary_term" : 1,  "found" : true,  "_source" : {    "id" : "S123456",    "message" : "User login successfully",    "timestamp" : "2022/03/03 15:22:11"  }}
复制代码
对于我们来说,目前 failure-index 索引记录的信息十分有限,根据以上内容我们无法知道是哪个处理器在执行时产生了异常。在 on_failure 中提供了以下 4 个元数据字段方便我们进行故障定位:
on_failure_pipeline:产生异常的 pipeline 类型的处理器中引用的 pipeline。ingest pipeline 中有一个 pipeline 类型的处理器,该处理器也可以指定使用其他的 pipeline,这里注意区分 pipeline 类型的处理器和 pipeline 管道。
on_failure_message:报错的内容。
on_failure_processor_type:产生异常的处理器的标签,标签可以在处理器中通过 tag 参数指定。当 pipeline 中使用了多个相同类型的处理器时,根据指定的标签可以方便我们进行区分。
on_failure_processor_tag:产生异常的处理器的类型。
如下所示,我们在 on_failure 参数新增了一个 set 处理器,将错误信息写入 failure-index 的 failure 字段中。
PUT _ingest/pipeline/failure-test-pipeline{ "processors": [ { "convert": { "tag": "my-index-convert", // 设置处理器的标签,方便定位问题 "field": "id", "type": "long" } }, { "date": { "tag": "my-index-date", // 设置处理器的标签,方便定位问题 "field": "timestamp", "formats": [ "yyyy-MM-dd HH:mm:ss" ], "output_format": "yyyy/MM/dd", "target_field": "date" } } ], "on_failure": [ { "set": { "field": "_index", "value": "failure-index" } }, { "set": { "field": "failure", "value": { "on_failure_pipeline": "{{ _ingest.on_failure_pipeline }}", "on_failure_message": "{{_ingest.on_failure_message}}", "on_failure_processor_type": "{{_ingest.on_failure_processor_type}}", "on_failure_processor_tag": "{{ _ingest.on_failure_processor_tag }}" } } } ]}
复制代码
然后往 my-index 索引中插入一条有错误的文档,将文档 _id 设置为 2。
PUT my-index/_doc/2?pipeline=failure-test-pipeline{ "id": "S123456", "timestamp": "2022/03/03 15:22:11", "message": "User login successfully"}
复制代码
查看 failure-index 索引记录的错误信息,可以得知打了 my-index-convert 标签的 convert 类型的处理器在处理 S123456 字符串时引发了异常。细心的同学可能会注意到, 在返回结果中 on_failure_pipeline 的内容为空,这是由于异常并不是由 pipeline 类型的处理器产生的,所以这里的结果是空值。如果只是想获取客户端直接调用的 ingest pipeline,那么可以通过 _ingest.pipeline 来获取。
{ "_index" : "failure-index", "_type" : "_doc", "_id" : "2", "_version" : 1, "_seq_no" : 1, "_primary_term" : 1, "found" : true, "_source" : { "failure" : { "on_failure_pipeline" : "", // 产生异常的 pipeline 类型的处理器中引用的 pipeline "on_failure_message" : "For input string: \\\"S123456\\\"", // 报错的内容 "on_failure_processor_tag" : "my-index-convert", // 产生异常的处理器的标签 "on_failure_processor_type" : "convert" // 产生异常的处理器的类型 }, "id" : "S123456", "message" : "User login successfully", "timestamp" : "2022/03/03 15:22:11" }}
复制代码
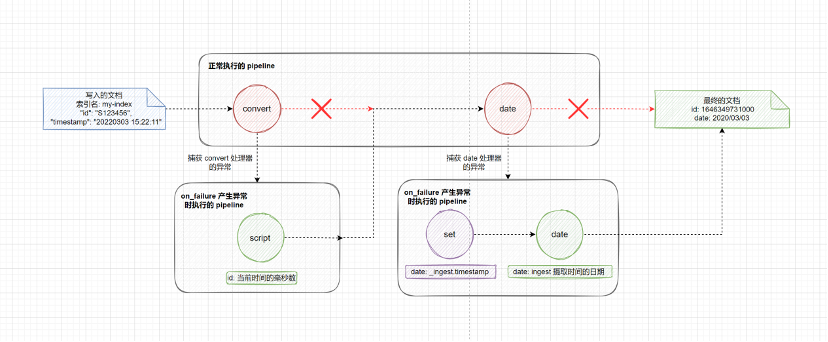
上面的示例介绍了 on_failure 参数在 pipeline 级别的处理,现在介绍下 on_failure 参数如何在 processor 级别进行处理。如下所示,在 convert 和 date 处理器中分别通过 on_failure 参数设置了发生异常时执行的处理器列表:当 convert 进行类型转换发生异常时,将当前时间的毫秒数设置 id 字段的值;当 date 处理器解析时间发生异常时,使用 ingest 摄取时间的日期戳作为 date 字段的值。
PUT _ingest/pipeline/failure-test-pipeline{ "processors": [ { "convert": { "field": "id", "type": "long", "on_failure": [ // 发生异常时将当前时间的毫秒数设置 id 字段的值 { "script": { "source": """ long timeNow = Calendar.getInstance().getTimeInMillis(); ctx.id = timeNow; """ } } ] } }, { "date": { "field": "timestamp", "formats": [ "yyyy-MM-dd HH:mm:ss" ], "output_format": "yyyy/MM/dd", "target_field": "date", "on_failure": [ // 发生异常时使用 ingest 摄取时间的日期戳作为 date 字段的值 { "set": { "field": "date", "value": "{{_ingest.timestamp}}" } }, { "date": { "field": "date", "formats": [ "yyyy-MM-dd'T'HH:mm:ss.SSSZ" ], "output_format": "yyyy/MM/dd", "target_field": "date" } } ] } } ]}
复制代码
然后往 my-index 索引中插入一条有错误的文档,将文档 _id 设置为 3。文档正常写入 my-index 中,没有返回报错信息。
PUT my-index/_doc/3?pipeline=failure-test-pipeline{  "id": "S123456",  "timestamp": "2022/03/03 15:22:11",  "message": "User login successfully"}
# 返回结果{  "_index" : "my-index",  "_type" : "_doc",  "_id" : "3",  "_version" : 1,  "result" : "created",  "_shards" : {    "total" : 2,    "successful" : 1,    "failed" : 0  },  "_seq_no" : 0,  "_primary_term" : 1}
复制代码
获取 my-index 索引中 _id 为 3 的文档,可以看到 id 字段的值并不是传入的原始文档中的 S123456,而是当前时间对应的毫秒值;date 字段的值被设置为了 ingest 摄取时间的日期。
GET my-index/_doc/3
# 返回结果{  "_index" : "my-index",  "_type" : "_doc",  "_id" : "3",  "_version" : 1,  "_seq_no" : 0,  "_primary_term" : 1,  "found" : true,  "_source" : {    "date" : "2022/03/03",    "id" : 1646349731000,    "message" : "User login successfully",    "timestamp" : "2022/03/03 15:22:11"  }}
复制代码
1.3.3 fail 主动抛出异常
和 ignore_failure, on_failure 两种处理异常的方式不同,使用 fail 处理器可以基于某些条件主动抛出异常,当你想要主动让 pipeline 失败并且返回特定的报错信息给请求者时,可以使用这种方式。如下所示,当 tags 字段中不包含 production 时,fail 处理器会主动抛出异常,在 message 参数中可以自定义相应的报错信息。
POST _ingest/pipeline/_simulate{  "pipeline": {    "processors": [      {        "fail": {          "if": "ctx.tags.contains('production') != true",          "message": "The production tag is not present, found tags: {{{tags}}}"        }      }    ]  },  "docs": [    {      "_source": {        "tags": ["development"]      }    }  ]}
# 返回结果{  "docs" : [    {      "error" : {        "root_cause" : [          {            "type" : "fail_processor_exception",            // 自定义的报错信息            "reason" : "The production tag is not present, found tags: {0=development}"          }        ],        "type" : "fail_processor_exception",        "reason" : "The production tag is not present, found tags: {0=development}"      }    }  ]}
复制代码
1.4 执行条件判断
每种类型的处理器中都支持 if 参数判断执行处理器的条件,在 if 参数中使用 painless 脚本进行逻辑判断,当 if 的判断结果为 true 时,相应的处理器才会执行。如下所示,创建了 if-test-pipeline,我们只想日志级别是 error 的消息,当 level 字段的值是 notice 时,丢弃该文档。
PUT _ingest/pipeline/if-test-pipeline{ "processors": [ { "drop": { "description": "Drop documents with level of notice", "if": "ctx.level == 'notice'" } } ]}
复制代码
然后往 log-index 索引中写入两条文档,指定使用 if-test-pipeline,其中一条文档的 level 值等于 notice,另一条的 level 值等于 error。
POST log-index/_doc?pipeline=if-test-pipeline{ "level": "notice", "message": "this is a notice log"}POST log-index/_doc?pipeline=if-test-pipeline{ "level": "error", "message": "this is a error log"}
复制代码
查询 log-index 索引,只返回了 1 条文档,level 等于 notice 的文档被丢弃了。
GET log-index/_search
# 返回结果{  "took" : 1,  "timed_out" : false,  "_shards" : {    "total" : 1,    "successful" : 1,    "skipped" : 0,    "failed" : 0  },  "hits" : {    "total" : {      "value" : 1,      "relation" : "eq"    },    "max_score" : 1.0,    "hits" : [      {        "_index" : "log-index",        "_type" : "_doc",        "_id" : "fV9ET38BKRZVqZj9X8yC",        "_score" : 1.0,        "_source" : {          "level" : "error",          "message" : "this is a error log"        }      }    ]  }}
复制代码
接下来介绍一种高级的用法,将一个 pipeline 作为多个不同的索引或者数据流默认的 pipeline,在这个 pipeline 中创建多个 pipeline 类型的处理器,每个处理器根据传入的文档选择后台真正要执行的 pipeline。这样做的好处就是,如果要更改后台使用的 pipeline,只需要修改默认的 pipeline 中引用的 pipeline 即可,客户端的代码或者索引中的设置无需修改,可以做到业务无感知的切换。如下所示,先创建两个 pipeline,其中 httpd_pipeline 用于处理 http 相关的日志,syslog_pipeline 用于处理 syslog 相关的日志。
PUT _ingest/pipeline/httpd_pipeline{  "processors": [    {      "set": {        "field": "message",        "value": "this is a apache_httpd log"      }    }  ]}
PUT _ingest/pipeline/syslog_pipeline{  "processors": [    {      "set": {        "field": "message",        "value": "this is a syslog log"      }    }  ]}
复制代码
接着创建一个 default_pipeline,使用 if 参数进行判断,当 service 字段的值等于 apache_httpd 时,执行 httpd_pipeline,当 service 字段的值等于 syslog 时,执行 syslog_pipeline。
PUT _ingest/pipeline/default_pipeline{ "processors": [ { "pipeline": { "description": "If 'service' is 'apache_httpd', use 'httpd_pipeline'", "if": "ctx.service == 'apache_httpd'", "name": "httpd_pipeline" } }, { "pipeline": { "description": "If 'service' is 'syslog', use 'syslog_pipeline'", "if": "ctx.service == 'syslog'", "name": "syslog_pipeline" } } ]}
复制代码
使用 simulate API 进行验证,可以看到由于传入的文档的 service 字段的值是 syslog,因此这条文档被交给 syslog_pipeline 进行处理。
POST _ingest/pipeline/default_pipeline/_simulate{ "docs": [ { "_source": { "service": "syslog" } } ]}# 返回结果{ "docs" : [ { "doc" : { "_index" : "_index", "_type" : "_doc", "_id" : "_id", "_source" : { "message" : "this is a syslog log", // syslog_pipeline 添加的内容 "service" : "syslog" }, "_ingest" : { "timestamp" : "2022-03-04T07:18:53.531846541Z" } } } ]}
复制代码
2 Processor 处理器
下表列出了 Elasticsearch 所有 processor 处理器的类型,并且根据各个处理器的用途作了相应的分类。下面的小节中仅会演示说明一些常用的处理器,未介绍到的部分读者可以自行查阅官方文档。
2.1 Lowercase & Uppercase
lowercase 处理器可以将字符串转换为其等效的小写字母。如果该字段是一个字符串数组,则该数组的所有成员都将被转换。uppercase 处理器和 lowercase 相反,将字符串转换为大写字母。如下所示,使用 lowercase 处理器将 name 字段转换为小写字母。
POST _ingest/pipeline/_simulate{  "pipeline": {    "processors": [      {        "lowercase": {          "field": "name"        }      }    ]  },  "docs": [    {      "_source": {        "name": "Tom"      }    }  ]}
# 返回结果{  "docs" : [    {      "doc" : {        "_index" : "_index",        "_type" : "_doc",        "_id" : "_id",        "_source" : {          "name" : "tom"        },        "_ingest" : {          "timestamp" : "2022-02-27T10:43:11.718792423Z"        }      }    }  ]}
复制代码
2.2 Split
split 处理器可以根据指定的分隔符,将字符串拆分为数组。如下所示,以 _ 符号作为分隔符,将 num 字段拆分为数组。
POST _ingest/pipeline/_simulate{  "pipeline": {    "processors": [      {        "split": {          "field": "num",          "separator": "_"        }      }    ]  },  "docs": [    {      "_source": {        "num": "111_222_333_444"      }    }  ]}
# 返回结果{  "docs" : [    {      "doc" : {        "_index" : "_index",        "_type" : "_doc",        "_id" : "_id",        "_source" : {          "num" : [            "111",            "222",            "333",            "444"          ]        },        "_ingest" : {          "timestamp" : "2022-02-27T11:10:25.249883405Z"        }      }    }  ]}
复制代码
2.3 Trim
trim 处理器可以去掉字符串头尾的空格。如下所示,使用 trim 处理器去掉 message 字段头尾的空格。
POST _ingest/pipeline/_simulate{  "pipeline": {    "processors": [      {        "trim": {          "field": "message"        }      }    ]  },  "docs": [    {      "_source": {        "message": "    Elasticsearch is the distributed search and analytics engine    "      }    }  ]}
# 返回结果{  "docs" : [    {      "doc" : {        "_index" : "_index",        "_type" : "_doc",        "_id" : "_id",        "_source" : {          "message" : "Elasticsearch is the distributed search and analytics engine"        },        "_ingest" : {          "timestamp" : "2022-02-27T11:12:26.952402786Z"        }      }    }  ]}
复制代码
2.4 Join
join 处理器可以将数组中的每个元素拼接成单个字符串。如下所示,使用 _ 符号作为分隔符,将 animal 字段中的元素拼接成单个字符串。
POST _ingest/pipeline/_simulate{  "pipeline": {    "processors": [      {        "join": {          "field": "animal",          "separator": "-"        }      }    ]  },  "docs": [    {      "_source": {        "animal": ["dog", "cat", "monkey"]      }    }  ]}
# 返回结果{  "docs" : [    {      "doc" : {        "_index" : "_index",        "_type" : "_doc",        "_id" : "_id",        "_source" : {          "animal" : "dog-cat-monkey"        },        "_ingest" : {          "timestamp" : "2022-02-27T10:33:39.63520118Z"        }      }    }  ]}
复制代码
2.5 Foreach
使用 foreach 处理器可以遍历数组,对其中的每个元素进行处理,使用 processor 参数指定一个处理器来处理数组中元素。在 foreach 处理器内引用的处理通过 _ingest._value 键来获取数组中每个元素的值。如下所示,将 values 字段中的每个元素转换为大写字母。
POST _ingest/pipeline/_simulate{  "pipeline": {    "processors": [      {        "foreach": {          "field": "values",          "processor": {            "uppercase": {              "field": "_ingest._value"            }          }        }      }    ]  },  "docs": [    {      "_source": {         "values" : ["foo", "bar", "baz"]      }    }  ]}

# 返回结果{  "docs" : [    {      "doc" : {        "_index" : "_index",        "_type" : "_doc",        "_id" : "_id",        "_source" : {          "values" : [            "FOO",            "BAR",            "BAZ"          ]        },        "_ingest" : {          "_value" : null,          "timestamp" : "2022-02-27T10:06:44.235660464Z"        }      }    }  ]}
复制代码
2.6 KV
kv 处理器可以以键值对的方式提取字段。如下所示,以空格作为不同键值对的分隔符,以 = 拆分每组键值对的键和值。
POST _ingest/pipeline/_simulate{  "pipeline": {    "processors": [      {        "kv": {          "field": "message",          "field_split": " ", // 拆分键值对          "value_split": "=" // 拆分键值对的键和值        }      }    ]  },  "docs": [    {      "_source": {        "message": "ip=1.2.3.4 error=REFUSED"      }    }  ]}
# 返回结果{  "docs" : [    {      "doc" : {        "_index" : "_index",        "_type" : "_doc",        "_id" : "_id",        "_source" : {          "message" : "ip=1.2.3.4 error=REFUSED",          "error" : "REFUSED",          "ip" : "1.2.3.4"        },        "_ingest" : {          "timestamp" : "2022-02-27T10:40:31.072140367Z"        }      }    }  ]}
复制代码
2.7 CSV
csv 处理器会将字段中的内容看作 csv 文本的一行,根据 separator 参数指定的分隔符,将拆分后的值赋值给 target_fields 列表中定义的字段。如下所示,将 person 字段按照 | 符号进行拆分,依次赋值给 name, age, country 字段。
POST _ingest/pipeline/_simulate{  "pipeline": {    "processors": [      {        "csv": {          "field": "person",          "target_fields": [ // 指定每列的字段值            "name",            "age",            "country"          ],          "separator": "|" // 字段间的分隔符        }      }    ]  },  "docs": [    {      "_source": {        "person": "zhangsan|18|china"      }    }  ]}
# 返回结果{  "docs" : [    {      "doc" : {        "_index" : "_index",        "_type" : "_doc",        "_id" : "_id",        "_source" : {          "country" : "china",          "person" : "zhangsan|18|china",          "name" : "zhangsan",          "age" : "18"        },        "_ingest" : {          "timestamp" : "2022-02-24T09:39:48.708832221Z"        }      }    }  ]}
复制代码
2.8 Grok
grok 处理器可以使用正则表达式来提取字段,并且内置了许多常用的表达式,可以直接通过表达式别名进行使用。可以使用以下命令获取所有 grok 内置的表达式。
GET _ingest/processor/grok?s
复制代码
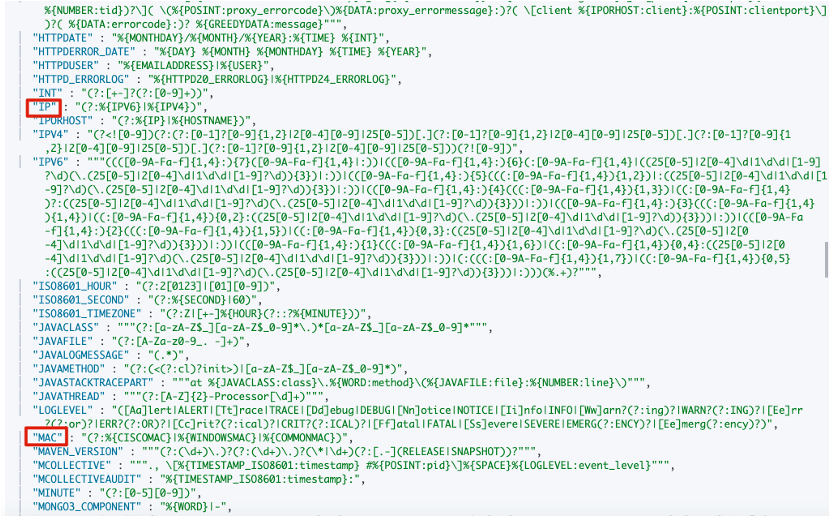
返回结果如下,例如我们想匹配 IP 地址就可以直接使用 %{IP} 进行匹配,想匹配 MAC 地址可以使用 %{MAC} 进行匹配。表达式别名还可以引用其他的表达式别名,比如表达式别名 IP 就引用了 IPV4 和 IPV6 两个别名。
接下来我们尝试使用 grok 处理器解析一条日志。%{<expression>:<field>} 表示将表达式匹配的值赋值到指定的 field 字段中,表达式可以是我们自定义的表达式,也可以是表达式别名;%{<expression>} 表示只匹配不赋值。
55.3.244.1 GET /index.html 15824 0.043"
复制代码
在上面的日志中:
55.3.244.2 是客户端的 IP 地址,使用 %{IP:client} 匹配 IP 地址,赋值到 client 字段中;
GET 是 HTTP 的请求方法,使用 %{WORD:method} 匹配数字和字母,赋值到 method 字段中;
/index.html 是请求的 URI 路径,使用 %{URIPATHPARAM:request} 匹配 URI 路径和参数,赋值到 request 字段中;
15824 是请求的字节大小,使用 %{NUMBER:bytes:int} 匹配数字,赋值到 bytes 字段中,并且将字段设置为 int 类型;
0.043 是请求的处理时间,使用 %{NUMBER:duration:double} 匹配数字,赋值到 duration 字段中,并且将字段设置为 double 类型。
上面用到的 IP, WORD, URIPATHPARAM, NUMBER 表达式都是 grok 内置的表达式别名,可以直接拿来使用。
POST _ingest/pipeline/_simulate{  "pipeline": {    "processors": [      {        "grok": {          "field": "message",          "patterns": ["%{IP:client} %{WORD:method} %{URIPATHPARAM:request} %{NUMBER:bytes:int} %{NUMBER:duration:double}"]        }      }    ]  },  "docs":[    {      "_source": {        "message": "55.3.244.1 GET /index.html 15824 0.043"      }    }  ]}
# 返回结果{  "docs" : [    {      "doc" : {        "_index" : "_index",        "_type" : "_doc",        "_id" : "_id",        "_source" : {          "duration" : 0.043,          "request" : "/index.html",          "method" : "GET",          "bytes" : 15824,          "client" : "55.3.244.1",          "message" : "55.3.244.1 GET /index.html 15824 0.043"        },        "_ingest" : {          "timestamp" : "2022-03-01T03:33:57.627169176Z"        }      }    }  ]}
复制代码
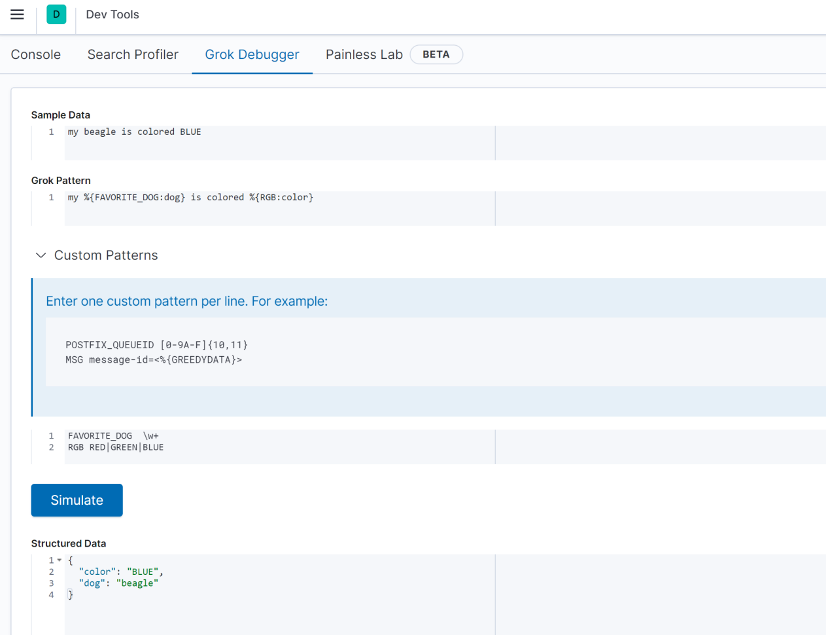
除了使用 grok 内置的表达式以外,grok 处理器也允许我们自定义表达式。可以在 pattern_definitions 参数中进行设置,其中键是我们自定义表达式的别名,值是具体的正则表达式。如下所示,我们定义了两个表达式别名:FAVORITE_DOG 使用正则表达式 \w+, 匹配数字和字母,注意这里需要额外使用一个 \ 来进行转义;RGB 可以匹配 RED,GREEN,BLUE 3 种颜色。
POST _ingest/pipeline/_simulate{  "pipeline": {    "processors": [      {        "grok": {          "field": "message",          "patterns": [            "my %{FAVORITE_DOG:dog} is colored %{RGB:color}"          ],          "pattern_definitions": { // 自定义表达式            "FAVORITE_DOG": "\\w+",  // 匹配数字和字母            "RGB": "RED|GREEN|BLUE"  // 匹配 3 个颜色          }        }      }    ]  },  "docs": [    {      "_source": {        "message": "my beagle is colored BLUE"      }    }  ]}
# 返回结果{  "docs" : [    {      "doc" : {        "_index" : "_index",        "_type" : "_doc",        "_id" : "_id",        "_source" : {          "message" : "my beagle is colored BLUE",          "color" : "BLUE",          "dog" : "beagle"        },        "_ingest" : {          "timestamp" : "2022-03-01T03:34:33.933398405Z"        }      }    }  ]}
复制代码
有时候一种匹配规则可能难以匹配所有的内容,我们可以在正则表达式中通过或的逻辑进行判断,但是这样会使得写出来的表达式难以阅读。这里还有一种更好的方法,在 grok 处理器中,patterns 参数允许填写多个表达式,这样我们的匹配规则看上去就一目了然,处理器会使用最先匹配到的表达式。如下所示,我们设置了 FAVORITE_DOG 和 FAVORITE_CAT 两个表达式都用于解析 pet 字段,如果想要知道是哪个表达式匹配了内容,可以设置参数 "trace_match": true,这样在返回结果的 _grok_match_index 字段中可以看到匹配了哪个表达式,其中 1 表示匹配了第二个表达式。
POST _ingest/pipeline/_simulate{ "pipeline": { "description": "parse multiple patterns", "processors": [ { "grok": { "field": "message", "patterns": [ // patterns 是数组, 可以填写多个表达式 "%{FAVORITE_DOG:pet}", "%{FAVORITE_CAT:pet}" ], "pattern_definitions": { "FAVORITE_DOG": "beagle", "FAVORITE_CAT": "burmese" }, "trace_match": true // 显示匹配了哪一个表达式, 第一个从 0 开始 } } ] }, "docs": [ { "_source": { "message": "I love burmese cats!" } } ]}# 返回结果{ "docs" : [ { "doc" : { "_index" : "_index", "_type" : "_doc", "_id" : "_id", "_source" : { "message" : "I love burmese cats!", "pet" : "burmese" }, "_ingest" : { "_grok_match_index" : "1", // 匹配了第 2 个表达式 "timestamp" : "2022-03-01T03:35:05.490483581Z" } } } ]}
复制代码
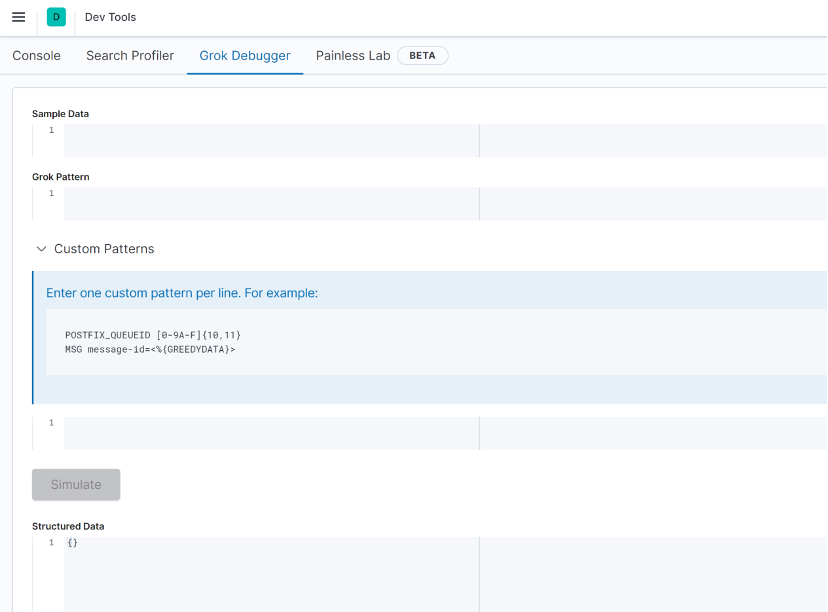
在 Kibana 的界面上还提供了 Grok Debugger 方便我们调试 grok 表达式。点击 Management -> Dev Tools -> Grok Gebugger 进入调试界面。
从上图可以看到,调试界面分为以下 4 个部分:
我们将示例中的内容按照上面的说明填写到相应的位置,点击 Simulate,就可以看到解析完成后的结构化数据了。
2.9 Dissect
dissect 和 grok 处理器类似,都是用于从单个文本字段中提取结构化字段。与 grok 相比,dissect 最大的优势就是简单和快速,dissect 在解析时不使用正则表达式,这使得 dissect 的语法更加简单,并且执行速度比 grok 更快。当然 grok 也有自己的独到之处,grok 可以同时使用多个 patterns 来对内容来进行匹配,这是 dissect 所不具备的能力。接下来首先介绍一下 dissect 处理器简单的使用方法,如下所示,我们要对一行日志内容进行解析,%{<field>} 表示将匹配到的字符串作为 field 字段的值。
POST _ingest/pipeline/_simulate{  "pipeline": {    "processors": [      {        "dissect": {          "field": "message",          "pattern": "%{clientip} %{ident} %{auth} [%{@timestamp}] \"%{verb} %{request} HTTP/%{httpversion}\" %{status} %{size}"        }      }    ]  },  "docs": [    {      "_source": {        "message": "1.2.3.4 - - [30/Apr/1998:22:00:52 +0000] \"GET /english/venues/cities/images/montpellier/18.gif HTTP/1.0\" 200 3171"      }    }  ]}
# 返回结果{  "docs" : [    {      "doc" : {        "_index" : "_index",        "_type" : "_doc",        "_id" : "_id",        "_source" : {          "request" : "/english/venues/cities/images/montpellier/18.gif",          "auth" : "-",          "ident" : "-",          "verb" : "GET",          "message" : """1.2.3.4 - - [30/Apr/1998:22:00:52 +0000] "GET /english/venues/cities/images/montpellier/18.gif HTTP/1.0" 200 3171""",          "@timestamp" : "30/Apr/1998:22:00:52 +0000",          "size" : "3171",          "clientip" : "1.2.3.4",          "httpversion" : "1.0",          "status" : "200"        },        "_ingest" : {          "timestamp" : "2022-03-01T06:37:23.791866312Z"        }      }    }  ]}
复制代码
在 dissect 中可以使用修饰符改变默认的匹配规则,例如可以指定 dissect 忽略某些字段、拼接多个字符等等。dissect 的修饰符说明如下表所示。
dissect 默认的匹配算法非常严格,要求 pattern 中的所有字符都与源字符串完全匹配。例如 %{a} %{b} 只能匹配“字符串 1 字符串 2”(中间 1 个空格),将无法匹配“字符串 1 字符串 2”(中间 5 个空格)。要处理这种情况就可以使用 -> 修饰符跳过箭头右边重复的字符,例如 %{a->} %{b} 就可以跳过字符串 1 和字符串 2 中间的多个空格,只对空格匹配一次。要跳过的字符我们可以自由设置,如下所示,使用 -> 修饰符跳过重复的 ~ 字符。
POST _ingest/pipeline/_simulate{  "pipeline": {    "processors": [      {        "dissect": {          "field": "message",          "pattern": "%{ts->}~%{level}" // 跳过重复的 ~ 字符        }      }    ]  },  "docs": [    {      "_source": {        "message": "1998-08-10T17:15:42,466~~~~~~~WARN"      }    }  ]}
# 返回结果{  "docs" : [    {      "doc" : {        "_index" : "_index",        "_type" : "_doc",        "_id" : "_id",        "_source" : {          "message" : "1998-08-10T17:15:42,466~~~~~~~WARN",          "level" : "WARN",          "ts" : "1998-08-10T17:15:42,466"        },        "_ingest" : {          "timestamp" : "2022-03-01T06:38:20.328535452Z"        }      }    }  ]}
复制代码
假如我们想将多个匹配的字符拼接为一个字段,可以使用 + 修饰符,append_separator 参数可以指定分隔符, 默认以空格作为分隔符。如下所示,我们将匹配的多个字符串拼接为 name 字段,使用 , 作为分隔符。
POST _ingest/pipeline/_simulate{  "pipeline": {    "processors": [      {        "dissect": {          "field": "message",          "pattern": "%{+name} %{+name} %{+name} %{+name}",          "append_separator": ","        }      }    ]  },  "docs": [    {      "_source": {        "message": "john jacob jingleheimer schmidt"      }    }  ]}
# 返回结果{  "docs" : [    {      "doc" : {        "_index" : "_index",        "_type" : "_doc",        "_id" : "_id",        "_source" : {          "name" : "john,jacob,jingleheimer,schmidt",          "message" : "john jacob jingleheimer schmidt"        },        "_ingest" : {          "timestamp" : "2022-03-02T13:41:40.058126802Z"        }      }    }  ]}
复制代码
如果我们想改变字符串拼接的顺序,可以同时使用 + 和 /n 修饰符指定顺序,其中 n 是顺序的数字。如下所示,可以看到返回结果中的 name 字段按照我们指定的顺序拼接。
POST _ingest/pipeline/_simulate{  "pipeline": {    "processors": [      {        "dissect": {          "field": "message",          "pattern": "%{+name/2} %{+name/4} %{+name/3} %{+name/1}",          "append_separator": ","        }      }    ]  },  "docs": [    {      "_source": {        "message": "john jacob jingleheimer schmidt"      }    }  ]}
# 返回结果{  "docs" : [    {      "doc" : {        "_index" : "_index",        "_type" : "_doc",        "_id" : "_id",        "_source" : {          "name" : "schmidt,john,jingleheimer,jacob",          "message" : "john jacob jingleheimer schmidt"        },        "_ingest" : {          "timestamp" : "2022-03-02T13:47:44.332086601Z"        }      }    }  ]}
复制代码
前面提到过,dissect 要求 pattern 中的所有字符都与源字符串完全匹配,否则解析将不会成功。如果我们仅仅想让某些字符串在匹配时充当“占位”的角色,并不想让它出现在最终的文档中,那么就可以使用 ? 修饰符来忽略最终结果中的匹配项。除了使用 ? 修饰符以外,还可以用一个空键 %{} 实现相同的效果,但是为了便于阅读,建议还是使用 %{?<field>} 的方式。如下所示,ident 和 auth 字段都不会出现在最终的结果中,仅用于字符串匹配。
POST _ingest/pipeline/_simulate{  "pipeline": {    "processors": [      {        "dissect": {          "field": "message",          "pattern": "%{clientip} %{?ident} %{?auth} [%{@timestamp}]"        }      }    ]  },  "docs": [    {      "_source": {        "message": "1.2.3.4 - - [30/Apr/1998:22:00:52 +0000]"      }    }  ]}
# 返回结果{  "docs" : [    {      "doc" : {        "_index" : "_index",        "_type" : "_doc",        "_id" : "_id",        "_source" : {          "@timestamp" : "30/Apr/1998:22:00:52 +0000",          "message" : "1.2.3.4 - - [30/Apr/1998:22:00:52 +0000]",          "clientip" : "1.2.3.4"        },        "_ingest" : {          "timestamp" : "2022-03-02T13:50:56.099402273Z"        }      }    }  ]}
复制代码
* 和 & 修饰符可以用于解析包含键值对的内容,其中输出键设置为 * 的值,输出值设置为 & 的值。
POST _ingest/pipeline/_simulate{  "pipeline": {    "processors": [      {        "dissect": {          "field": "message",          "pattern": "[%{ts}] [%{level}] %{*p1}:%{&p1} %{*p2}:%{&p2}"        }      }    ]  },  "docs": [    {      "_source": {        "message": "[2018-08-10T17:15:42,466] [ERR] ip:1.2.3.4 error:REFUSED"      }    }  ]}
# 返回结果{  "docs" : [    {      "doc" : {        "_index" : "_index",        "_type" : "_doc",        "_id" : "_id",        "_source" : {          "level" : "ERR",          "ip" : "1.2.3.4",          "message" : "[2018-08-10T17:15:42,466] [ERR] ip:1.2.3.4 error:REFUSED",          "error" : "REFUSED",          "ts" : "2018-08-10T17:15:42,466"        },        "_ingest" : {          "timestamp" : "2022-03-02T14:00:54.96982616Z"        }      }    }  ]}
复制代码
2.10 Rename
rename 处理器用于重命名现有字段。如果该字段不存在或者重命名的字段已存在,则会引发异常。如下所示,将 provider 字段重命名为 cloud.provider。
POST _ingest/pipeline/_simulate{  "pipeline": {    "processors": [      {        "rename": {          "field": "provider",          "target_field": "cloud.provider"        }      }    ]  },  "docs": [    {      "_source": {        "provider": "Aliyun"      }    }  ]}
# 返回结果{  "docs" : [    {      "doc" : {        "_index" : "_index",        "_type" : "_doc",        "_id" : "_id",        "_source" : {          "cloud" : {            "provider" : "Aliyun"          }        },        "_ingest" : {          "timestamp" : "2022-02-27T10:57:47.821558199Z"        }      }    }  ]}
复制代码
2.11 Remove
remove 处理器用于删除现有字段。如果删除的字段不存在,则会引发异常。如下所示,使用 remove 处理器删除文档中的 name 和 location 字段。
POST _ingest/pipeline/_simulate{  "pipeline": {    "processors": [      {        "remove": {          "field": ["age", "location"]        }      }    ]  },  "docs": [    {      "_source": {        "name": "tom",        "age": 18,        "location": "United States"      }    }  ]}
# 返回结果{  "docs" : [    {      "doc" : {        "_index" : "_index",        "_type" : "_doc",        "_id" : "_id",        "_source" : {          "name" : "tom"        },        "_ingest" : {          "timestamp" : "2022-02-27T10:56:05.119755281Z"        }      }    }  ]}
复制代码
2.12 Set
set 处理器用于为字段赋值,并且在赋值的时候还可以使用 {{{ }}} 符号从其他字段复制值,然后和指定字符串进行拼接。如下所示,将 version 字段的值设置为 2,host.os.name 字段的值为 copy from 字符串拼接 os 字段的结果。
POST _ingest/pipeline/_simulate{  "pipeline": {    "processors": [      {        "set": {          "field": "host.os.name",          "value": "copy from {{{os}}}" // 从 os 字段复制值进行拼接        }      },      {        "set": {          "field": "version",          "value": "2" // 设置静态值        }      }    ]  },  "docs": [    {      "_source": {        "os": "Ubuntu"      }    }  ]}
# 返回结果{  "docs" : [    {      "doc" : {        "_index" : "_index",        "_type" : "_doc",        "_id" : "_id",        "_source" : {          "host" : {            "os" : {              "name" : "copy from Ubuntu"            }          },          "os" : "Ubuntu",          "version" : "2"        },        "_ingest" : {          "timestamp" : "2022-02-28T13:39:31.035666829Z"        }      }    }  ]}
复制代码
2.13 Script
对于复杂的处理逻辑,如果使用 Elasticseach 其他自带的处理器无法实现,那么可以尝试在 script 处理器中编写脚本进行处理。在 script 处理器中通过 lang 参数可以指定脚本语言,通常我们使用 painless 作为脚本语言,这也是 Elasticsearch 中默认的脚本语言。在 script 处理器中,脚本在 ingest 上下文中运行,我们可以通过 ctx['field'] 或者 ctx.field 语法来访问文档中的字段。如下所示,传入的文档中有一个数字类型的参数 num,我们在脚本中通过 if else 条件语句进行判断,当 num 等于 7 时,将 result 的值设置为 happy;当 num 等于 4 时,将 result 的结果设置为 sad;当 num 是其他值时,将 result 的结果设置为 normal。
POST _ingest/pipeline/_simulate{  "pipeline": {    "processors": [      {        "script": {          "lang": "painless",          "source": """              if(ctx.num == 7){                ctx.result = 'happy'              }else if(ctx.num == 4){                ctx.result = 'sad'              }else {                ctx.result = 'normal'              }          """        }      }    ]  },  "docs": [    {      "_source": {        "num": 7      }    }  ]}
# 返回结果{  "docs" : [    {      "doc" : {        "_index" : "_index",        "_type" : "_doc",        "_id" : "_id",        "_source" : {          "result" : "happy",          "num" : 7        },        "_ingest" : {          "timestamp" : "2022-03-02T14:20:27.776240111Z"        }      }    }  ]}
复制代码
2.14 Drop
drop 处理器可以根据条件删除指定的文档。如下所示,删除 name 字段值为 tom 的文档。
POST _ingest/pipeline/_simulate{  "pipeline": {    "processors": [      {        "drop": {          "if": "ctx.name == 'tom'"        }      }    ]  },  "docs": [    {      "_source": {        "name": "tom",        "age": 18      }    }  ]}

# 返回结果{  "docs" : [    null  ]}
复制代码
3 Ingest Pipeline 应用场景
Ingest Pipeline 主要有以下 4 类应用场景:
写入时指定 pipeline,单条写入或者使用 _bulk API 批量写入时都可以使用。
更新时指定 pipeline。
定义索引或者模板时指定 pipeline,有两个相关的参数:
index.default_pipeline 参数可以定义 default pipeline(默认执行的 pipeline),当请求中没有指定 pipeline 时执行;
index.final_pipeline 参数可以定义 final pipeline(最终执行的 pipeline),在所有 pipeline 执行完后再执行。
reindex 时指定 pipeline,在重建索引或者数据迁移时使用。
3.1 写入时指定 Pipeline
首先创建一个名为 lowercase-pipeline 的 pipeline,它的作用是将 name 字段转换为小写字母。
PUT _ingest/pipeline/lowercase-pipeline{ "processors": [ { "lowercase": { "field": "name" } } ]}
复制代码
单条写入或者通过 _bulk API 批量写入时都可以通过 pipeline 参数指定使用的 pipeline。
# 写入单条数据时指定 pipelienPOST index-1/_doc?pipeline=lowercase-pipeline{  "name": "Tom",  "age": 20}
# _bulk 写入多条文档时指定 pipelinePUT index-1/_bulk?pipeline=lowercase-pipeline{"index":{ }}{"name":"Peter","age":17}{"index":{}}{"name":"Mary","age":19}
复制代码
查看写入的文档,可以看到所有文档的 name 字段都转换为了小写字母。
GET index-1/_search
# 返回结果{  "_index" : "index-1",  "_type" : "_doc",  "_id" : "g196X38BKRZVqZj9rsyn",  "_score" : 1.0,  "_source" : {    "name" : "tom",    "age" : 20  }},{  "_index" : "index-1",  "_type" : "_doc",  "_id" : "hF96X38BKRZVqZj9scwO",  "_score" : 1.0,  "_source" : {    "name" : "peter",    "age" : 17  }},{  "_index" : "index-1",  "_type" : "_doc",  "_id" : "hV96X38BKRZVqZj9scwO",  "_score" : 1.0,  "_source" : {    "name" : "mary",    "age" : 19  }}
复制代码
3.2 更新时指定 Pipeline
使用 _update_by_query API 可以批量更新索引中的文档,通常会结合 pipeline 来对文档进行更新。以下示例中我们对索引中的所有文档进行更新,也可以在 _update_by_query API 中使用 DSL 语句过滤出需要更新的文档。
# 往源索引中插入数据PUT index-2/_doc/1{  "name": "Smith",  "age": 18}
PUT index-2/_doc/1{  "name": "Mike",  "age": 16}
# 使用 update_by_query 进行更新,可以写 DSL 语句过滤出需要更新的文档POST index-2/_update_by_query?pipeline=lowercase-pipeline
复制代码
3.3 定义索引或者模板时指定 Pipeline
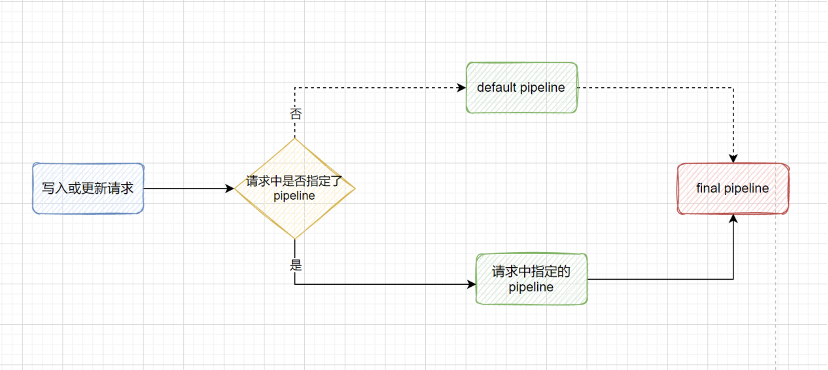
在定义索引或者模板时可以使用 index.default_pipeline 参数指定 default pipeline(默认执行的 pipeline),index.final_pipeline 参数指定 final pipeline(最终执行的 pipeline)。default pipeline 与 final pipeline 实际上都是普通的 ingest pipeline,只是和一般的 pipeline 执行时机不同;default pipeline 执行的时机是当前写入请求没有指定 pipeline 时,final pipeline 执行的时机是在所有 pipeline 执行完毕后。
如上图所示,如果当前的写入或者更新请求中指定了 pipeline,则会先执行自定义的 pipeline,当所有的 pipeline 执行完毕后再执行 final pipeline(如果索引显式设置了 index.final_pipeline);如果当前的写入或者更新请求中没有指定 pipeline,并且索引显式设置了 index.default_pipeline 参数时,则会先执行 default pipeline,最后再执行 final pipeline。
为了完成下面的演示,在前面 lowercase-pipeline 的基础上,现在再创建两个 pipeline,其中 uppercase-pipeline 的作用是 name 字段转换为小写字母,set-pipeline 的作用是为文档添加一个 message 字段。
PUT _ingest/pipeline/uppercase-pipeline{  "processors": [    {      "uppercase": {        "field": "name"      }    }  ]}
PUT _ingest/pipeline/set-pipeline{  "processors": [    {      "set": {        "field": "message",        "value": "set by final pipeline"      }    }  ]}
复制代码
接下来创建一个索引 index-3,在 settings 中指定索引的 default_pipeline 为 lowercase-pipeline,final_pipeline 为 set-pipeline。
PUT index-3{ "settings": { "index": { "default_pipeline": "lowercase-pipeline", // 默认执行的 pipeline "final_pipeline": "set-pipeline" // 最终执行的 pipeline } }}
复制代码
然后往索引中插入两条文档,其中 _id 为 1 的文档在写入时不指定 pipeline,_id 为 2 的文档在写入时指定使用 uppercase-pipeline。
PUT index-3/_doc/1{  "name": "Lisa",  "age": 18}
# 在写入时指定 pipeline 覆盖 default_pipelinePUT index-3/_doc/2?pipeline=uppercase-pipeline{  "name": "Jerry",  "age": 21}
复制代码
查询最终保存的文档,可以看到 final pipeline 始终会执行,2 个文档都添加了 message 字段;由于写入 _id 为 2 的文档时指定使用了 uppercase-pipeline,所以该文档没有执行 default pipeline,而是执行了 uppercase-pipeline 将字母转换为大写。
GET index-3/_search
# 返回结果{  "_index" : "index-3",  "_type" : "_doc",  "_id" : "1",  "_score" : 1.0,  "_source" : {    "name" : "lisa",    "message" : "set by final pipeline",    "age" : 18  }},{  "_index" : "index-3",  "_type" : "_doc",  "_id" : "2",  "_score" : 1.0,  "_source" : {    "name" : "JERRY",    "message" : "set by final pipeline",    "age" : 21  }}
复制代码
3.4 Reindex 时指定 Pipeline
Elasticsearch 提供了 reindex API 用于将文档从源索引复制到目标索引,在 reindex 时可以指定 pipeline 对复制的文档进行加工处理。如下所示,先创建源索引 source-index,并插入 1 条文档。
PUT source-index/_doc/1{ "name": "Jack", "age": 18}
复制代码
然后在 reindex 时指定使用 lowercase-pipeline,目标索引名设置为 dest-index。
POST _reindex{ "source": { "index": "source-index" }, "dest": { "index": "dest-index", "pipeline": "lowercase-pipeline" }}
复制代码
查看目标索引,name 字段已经成功转换为了小写字母。
GET dest-index/_search
# 返回结果{  "took" : 1,  "timed_out" : false,  "_shards" : {    "total" : 1,    "successful" : 1,    "skipped" : 0,    "failed" : 0  },  "hits" : {    "total" : {      "value" : 1,      "relation" : "eq"    },    "max_score" : 1.0,    "hits" : [      {        "_index" : "dest-index",        "_type" : "_doc",        "_id" : "1",        "_score" : 1.0,        "_source" : {          "name" : "jack",          "age" : "18"        }      }    ]  }}
复制代码
4 总结
Ingest pipeline 是 Elasticsearch 的一个非常实用的功能,它能够帮助用户在数据进入 Elasticsearch 索引之前对其进行预处理,从而提高搜索和分析的效率和准确性。本文向读者介绍了如何有效地创建,管理和测试 ElasticSearch Ingest Pipeline。在第一小节中首先说明了 ingest pipeline 的基本用法,包括创建和使用 ingest pipeline,使用 simulate API 对 pipeline 进行测试,以及如何处理 pipeline 中的异常;在第二小节中,将 ingest pipeline 中的 processor 处理器根据用途作了分类说明,并通过示例展示了常见的几个 processor 的用法;在最后一个小节中归纳了 ingest pipeline 的 4 个应用场景。


评论