写点什么

Spring Security 入门到实践(一)HTTP Basic 在 Spring Security 中的应用原理浅析

发布于: 2020 年 07 月 22 日
Spring Security入门到实践(一)HTTP Basic在Spring Security中的应用原理浅析

一、Spring Security简介


打开Spring Security的官网,从其首页的预览上就可以看见如下文字:


Spring Security is a powerful and highly customizable authentication and access-control framework. It is the de-facto standard for securing Spring-based applications.

>

Spring Security is a framework that focuses on providing both authentication and authorization to Java applications. Like all Spring projects, the real power of Spring Security is found in how easily it can be extended to meet custom requirements.


这段文字的大致意思是:


  • Spring Security是一个强大的、可高度定制化的身份验证和访问控制的框架,它基本上是保护基于Spring应用的安全标准。

  • Spring Security是一个专注于向Java应用程序提供身份验证和授权的框架。像所有的Spring项目一样,Spring Security的真正威力在于它可以很容易地被扩展以满足定制需求。


身份验证和访问控制是应用安全的两个重要方面,也常常被称为“认证”和“授权”。


  • 认证就是确定主体的过程,当未认证的主体访问系统资源的时候,系统会对主体的身份进行验证,确定该主体是否有合法的身份,不合法的主体将被应用拒绝访问,这一点也很容易理解,比如某电商网站,未登录的用户是无法访问敏感数据资源的,比如订单信息。

  • 授权是在主体认证结束后,判断该认证主体是否有权限去访问某些资源,没有权限的访问将被系统拒绝,比如某电商网站的登录用户去查看其它用户的订单信息,很明显,系统会拒绝这样的无理要求。


上面的两点是应用安全的基本关注点,Spring Security存在的意义就是帮助开发者更加便捷地实现了应用的认证和授权能力。


Spring Security的前身是Acegi Security,后来成为了Spring在安全领域的顶级项目,并正式更名到Spring名下,成为Spring全家桶中的一员,所以Spring Security很容易地集成到基于Spring的应用中来。Spring Security在用户认证方面支持众多主流认证标准,包括但不限于HTTP基本认证、HTTP表单验证、HTTP摘要认证、OpenID和LDAP等,在用户授权方面,Spring Security不仅支持最常用的基于URL的Web请求授权,还支持基于角色的访问控制(Role-Based Access Control,RBAC)以及访问控制列表(Access Control List,ACL)等。


学习Spring Security不仅仅是要学会如何使用,也要通过其设计精良的源码来进行深入地学习,学习它在认证与授权方面的设计思想,因为这些思想是可以脱离具体语言,应用到其他应用中。


本篇文章是连载系列文章:《Spring Security入门到实践》的一个入门文章,后面将围绕Spring Security进行深入源码解读,做到不仅会用,也知其所以然。


二、Spring Security的入门案例


我们使用IntelliJ IDEA的Spring Initializr工具创建一个Spring Boot项目,在其pom文件中加入如下的常用依赖:


<dependencies>
<!-- Spring Security的核心依赖 -->
<dependency>
<groupId>org.springframework.boot</groupId>
<artifactId>spring-boot-starter-security</artifactId>
</dependency>
<!-- Spring Boot Web的核心依赖 -->
<dependency>
<groupId>org.springframework.boot</groupId>
<artifactId>spring-boot-starter-web</artifactId>
</dependency>
<dependency>
<groupId>org.springframework.boot</groupId>
<artifactId>spring-boot-devtools</artifactId>
<scope>runtime</scope>
<optional>true</optional>
</dependency>
<dependency>
<groupId>org.springframework.boot</groupId>
<artifactId>spring-boot-configuration-processor</artifactId>
<optional>true</optional>
</dependency>
<dependency>
<groupId>org.projectlombok</groupId>
<artifactId>lombok</artifactId>
<optional>true</optional>
</dependency>
<dependency>
<groupId>org.springframework.boot</groupId>
<artifactId>spring-boot-starter-test</artifactId>
<scope>test</scope>
</dependency>
<dependency>
<groupId>org.springframework.security</groupId>
<artifactId>spring-security-test</artifactId>
<scope>test</scope>
</dependency>
</dependencies>


依赖添加完毕之后,再声明一个index路由,返回一段文字:“Welcome to learn Spring Security!”,具体代码如下所示:


@Slf4j
@Controller
@RequestMapping("/demo")
public class DemoController {
@GetMapping
@ResponseBody
public String index() {
return "Welcome to learn Spring Security!";
}
}


此时就可以启动LearningSpringSecurityMainApplication的main方法,我们的简单应用就在8080端口启动起来了,我们在浏览器里访问http://localhost:8008/demo接口,按照原来的思路,那么浏览器将接收到来自后端程序的问候:“Welcome to learn Spring Security!”,但是实际运行中,我们发现,我们访问的接口被拦截了,要求我们登录后才能继续访问/demo路由,如下图所示:


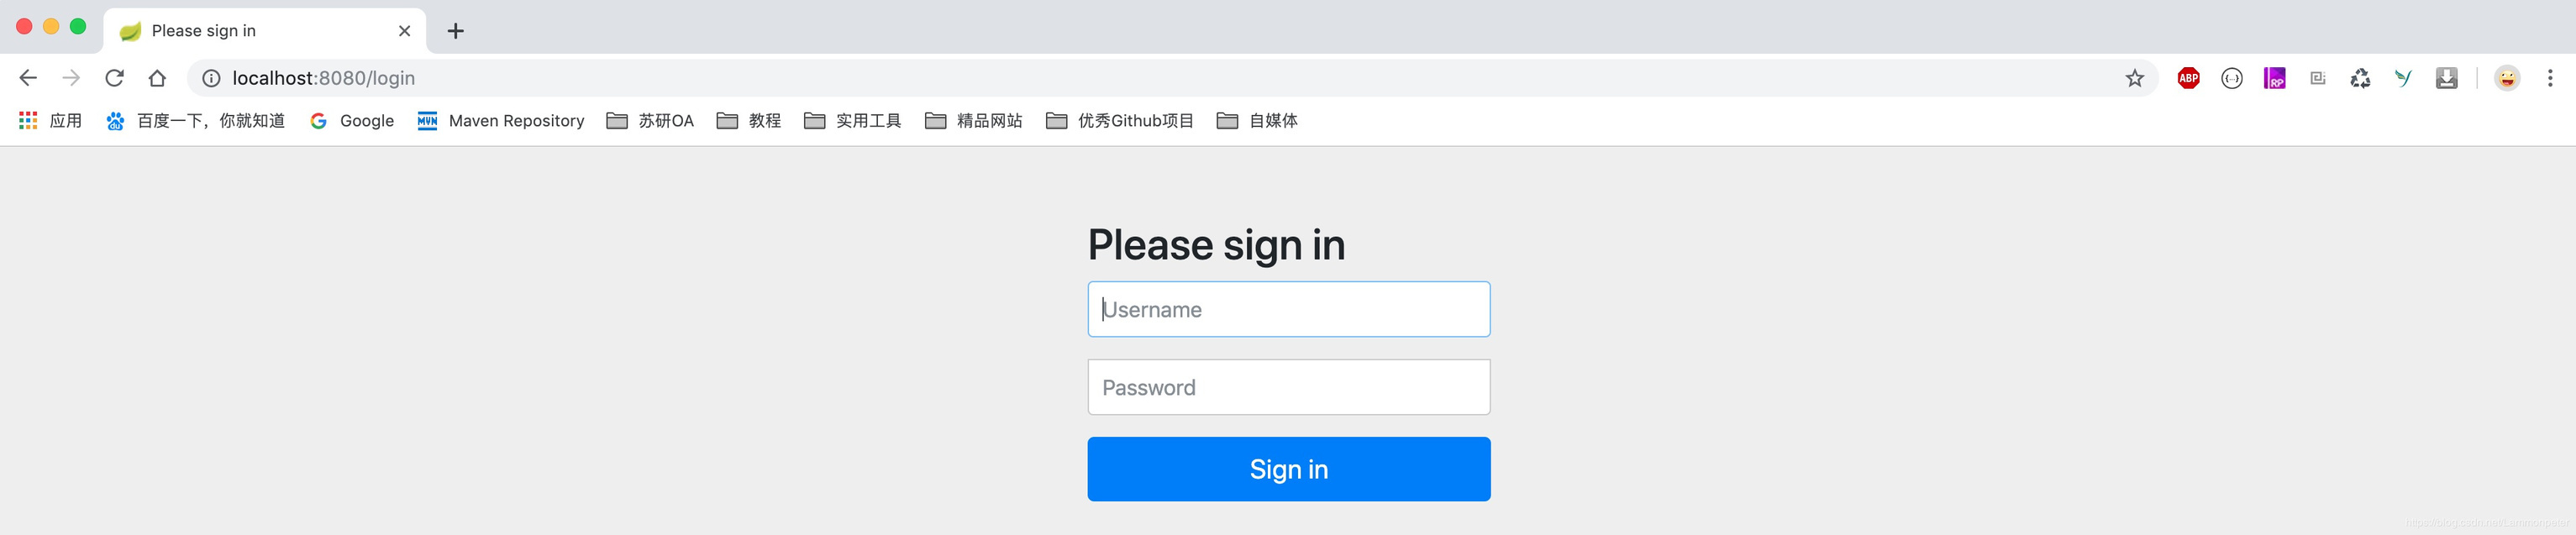
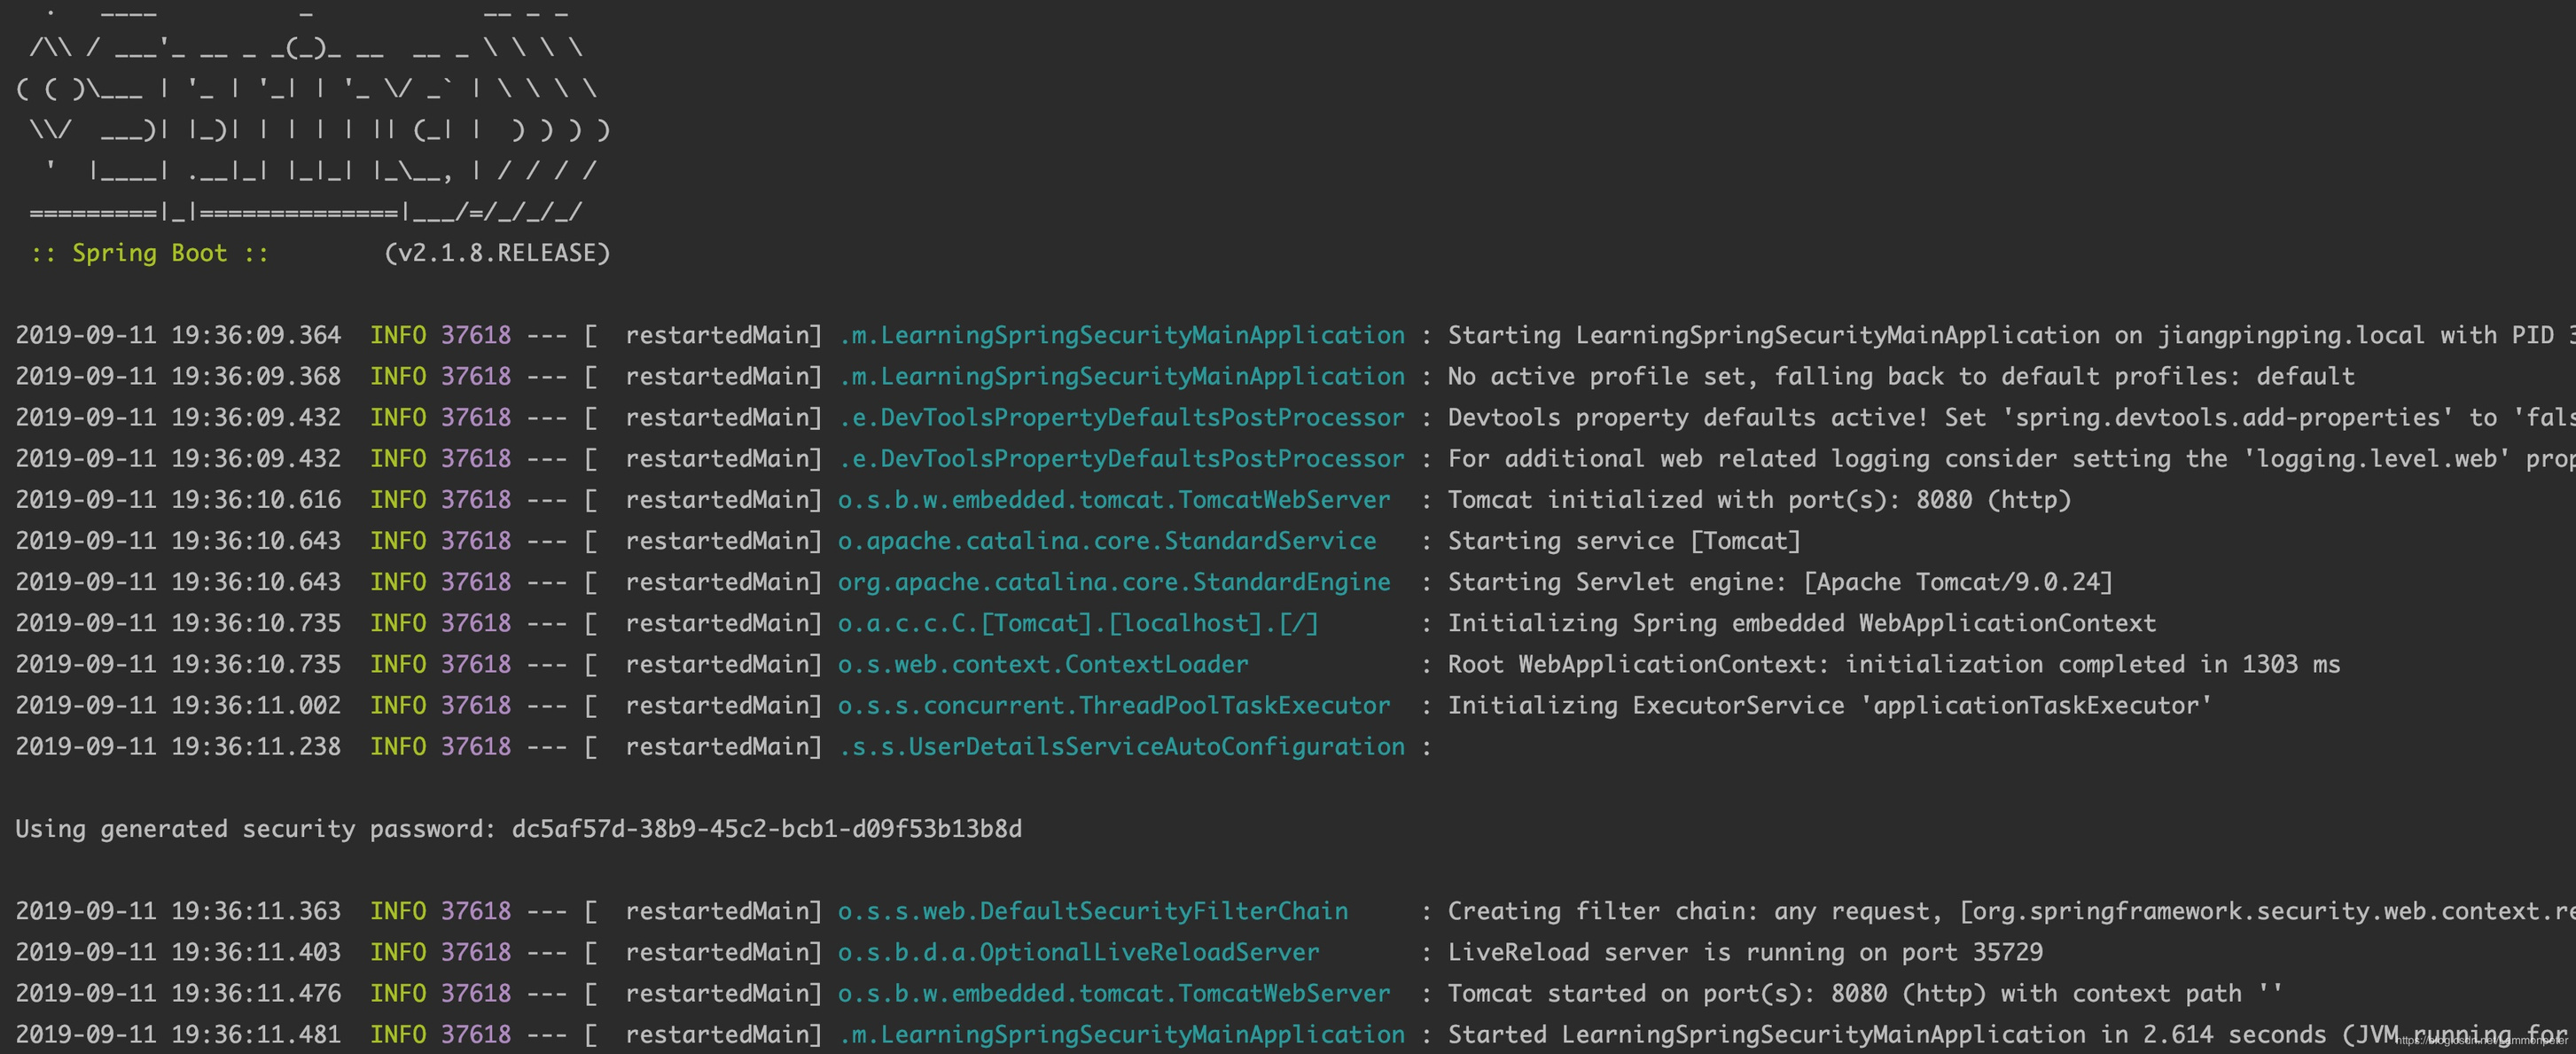
这是因为Spring Boot项目引入了Spring Security以后,自动装配了Spring Security的环境,Spring Security的默认配置是要求经过了HTTP Basic认证成功后才可以访问到URL对应的资源,且默认的用户名是user,密码则是一串UUID字符串,输出到了控制台日志里,如下图所示:


我们在登录窗口输入用户名和密码后,就正确返回了“Welcome to learn Spring Security!”


很明显,自动生成随机密码的方式并不是最常用的方法,但是在学习阶段,对于这种简单的认证方式,也是需要进行研究的,对于HTTP Basic认证,我们可以在resources中的application.properties中进行配置用户名和密码:


# 配置用户名和密码
spring.security.user.name=user
spring.security.user.password=1234


配置了用户名和密码后,那么再次启动应用,我们发现在控制台中就没有再生成新的随机密码了,使用我们配置用户名和密码就可以登录并正确访问到/demo路由了。


事实上,这种简易的认证方式并不能满足企业级权限系统的要求,我们需要根据企业的实际情况开发出复杂的权限系统。虽然这种简易方式并不常用,但是我们也是需要了解其运行机制和原理,接下来,我们一起深入了解这种基本方式运行原理。


三、Http Basic认证基本原理


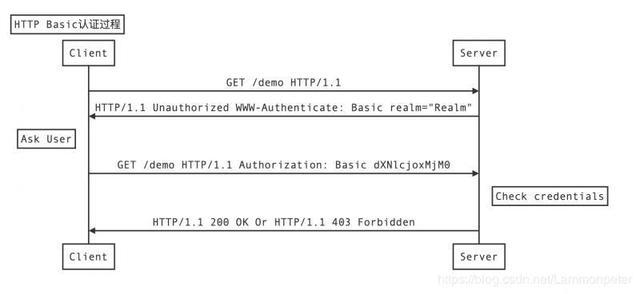
HTTP Basic认证是一种较为简单的HTTP认证方式,客户端通过将用户名和密码按照一定规则(用户名:密码)进行Base64编码进行“加密”(可反向解密,等同于明文),将加密后的字符串添加到请求头发送到服务端进行认证的方式。可想而知,HTTP Basic是个不安全的认证方式,通常需要配合HTTPS来保证信息的传输安全。基本的时序图如下所示:


我们通过Postman来测试HTTP Basic的认证过程:


  • 第一步:不输入用户名和密码进行Base64编码,直接访问/demo路由,返回结果如下图所示:


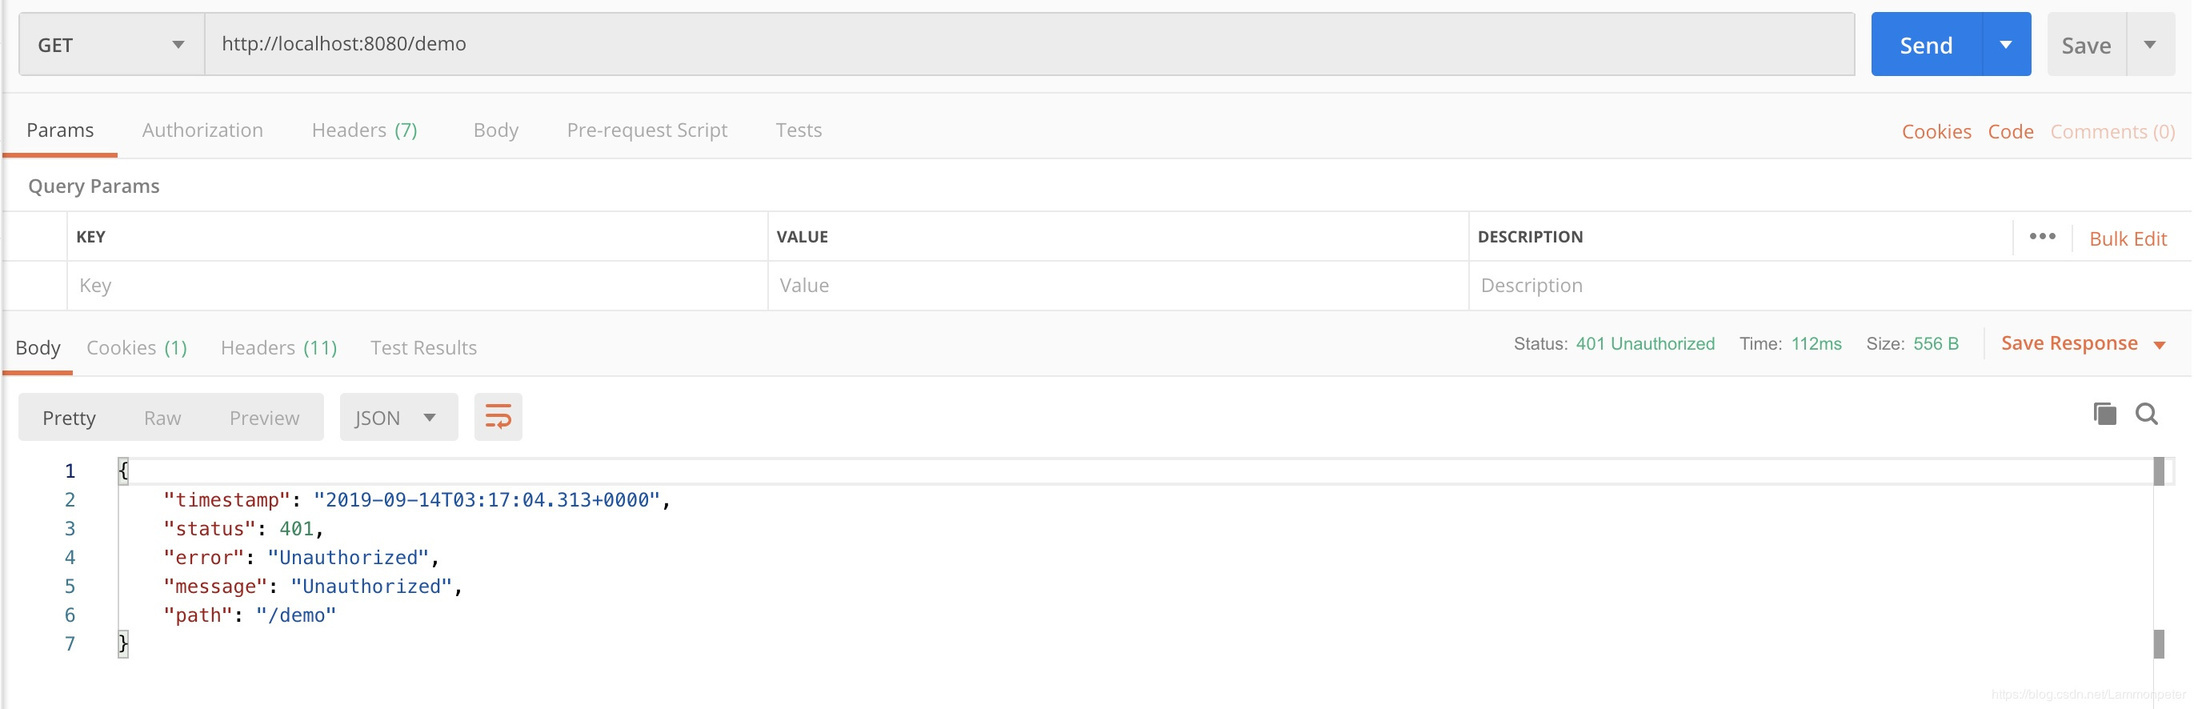
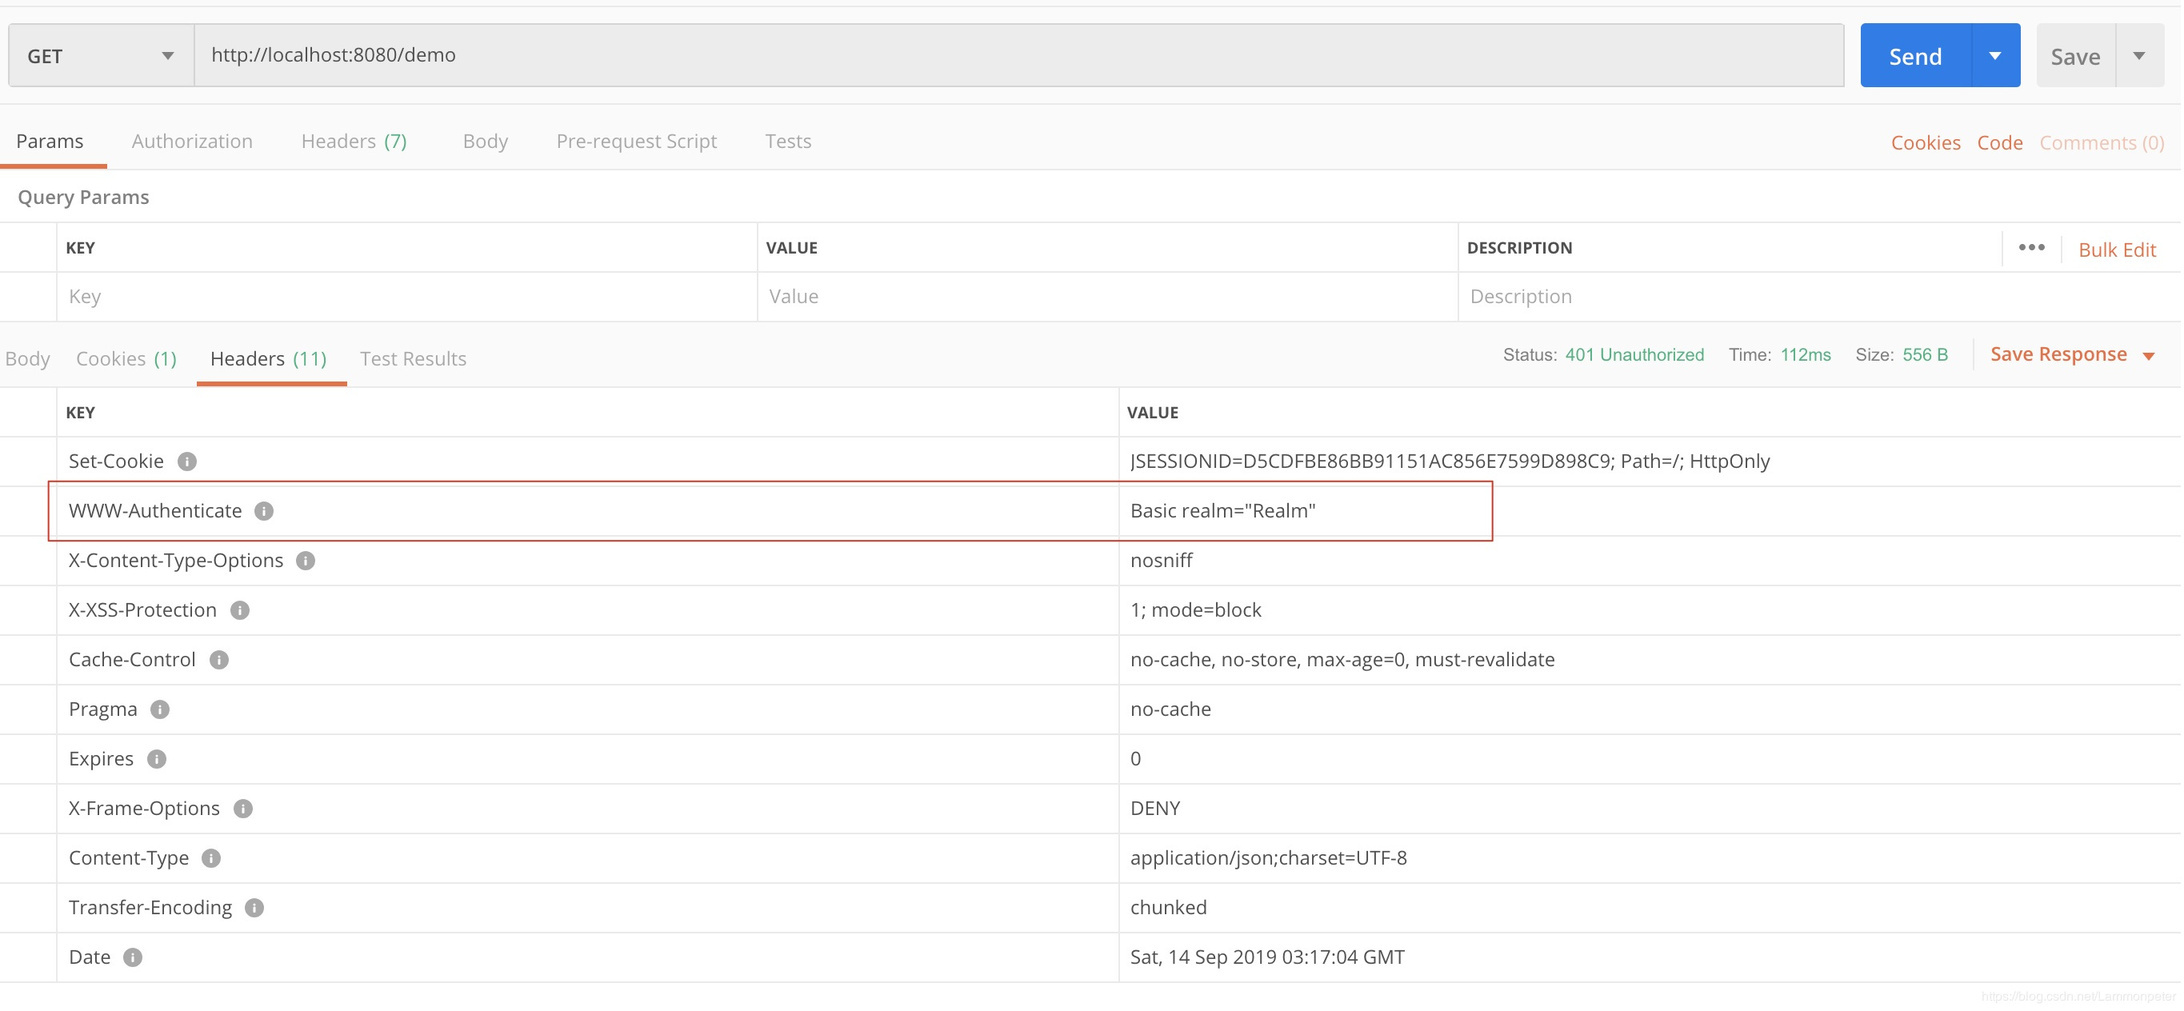
返回的结果显示该路由的访问前提条件是必须经过认证,没有经过认证是访问不到结果的,且我们观察返回头中包含了WWW-Authenticate: Basic realm="Realm",如果在浏览器中,当浏览器检测到返回头中包含这个属性,那么会弹出一个要求输入用户名和密码的对话框。返回头的具体信息如下图所示:


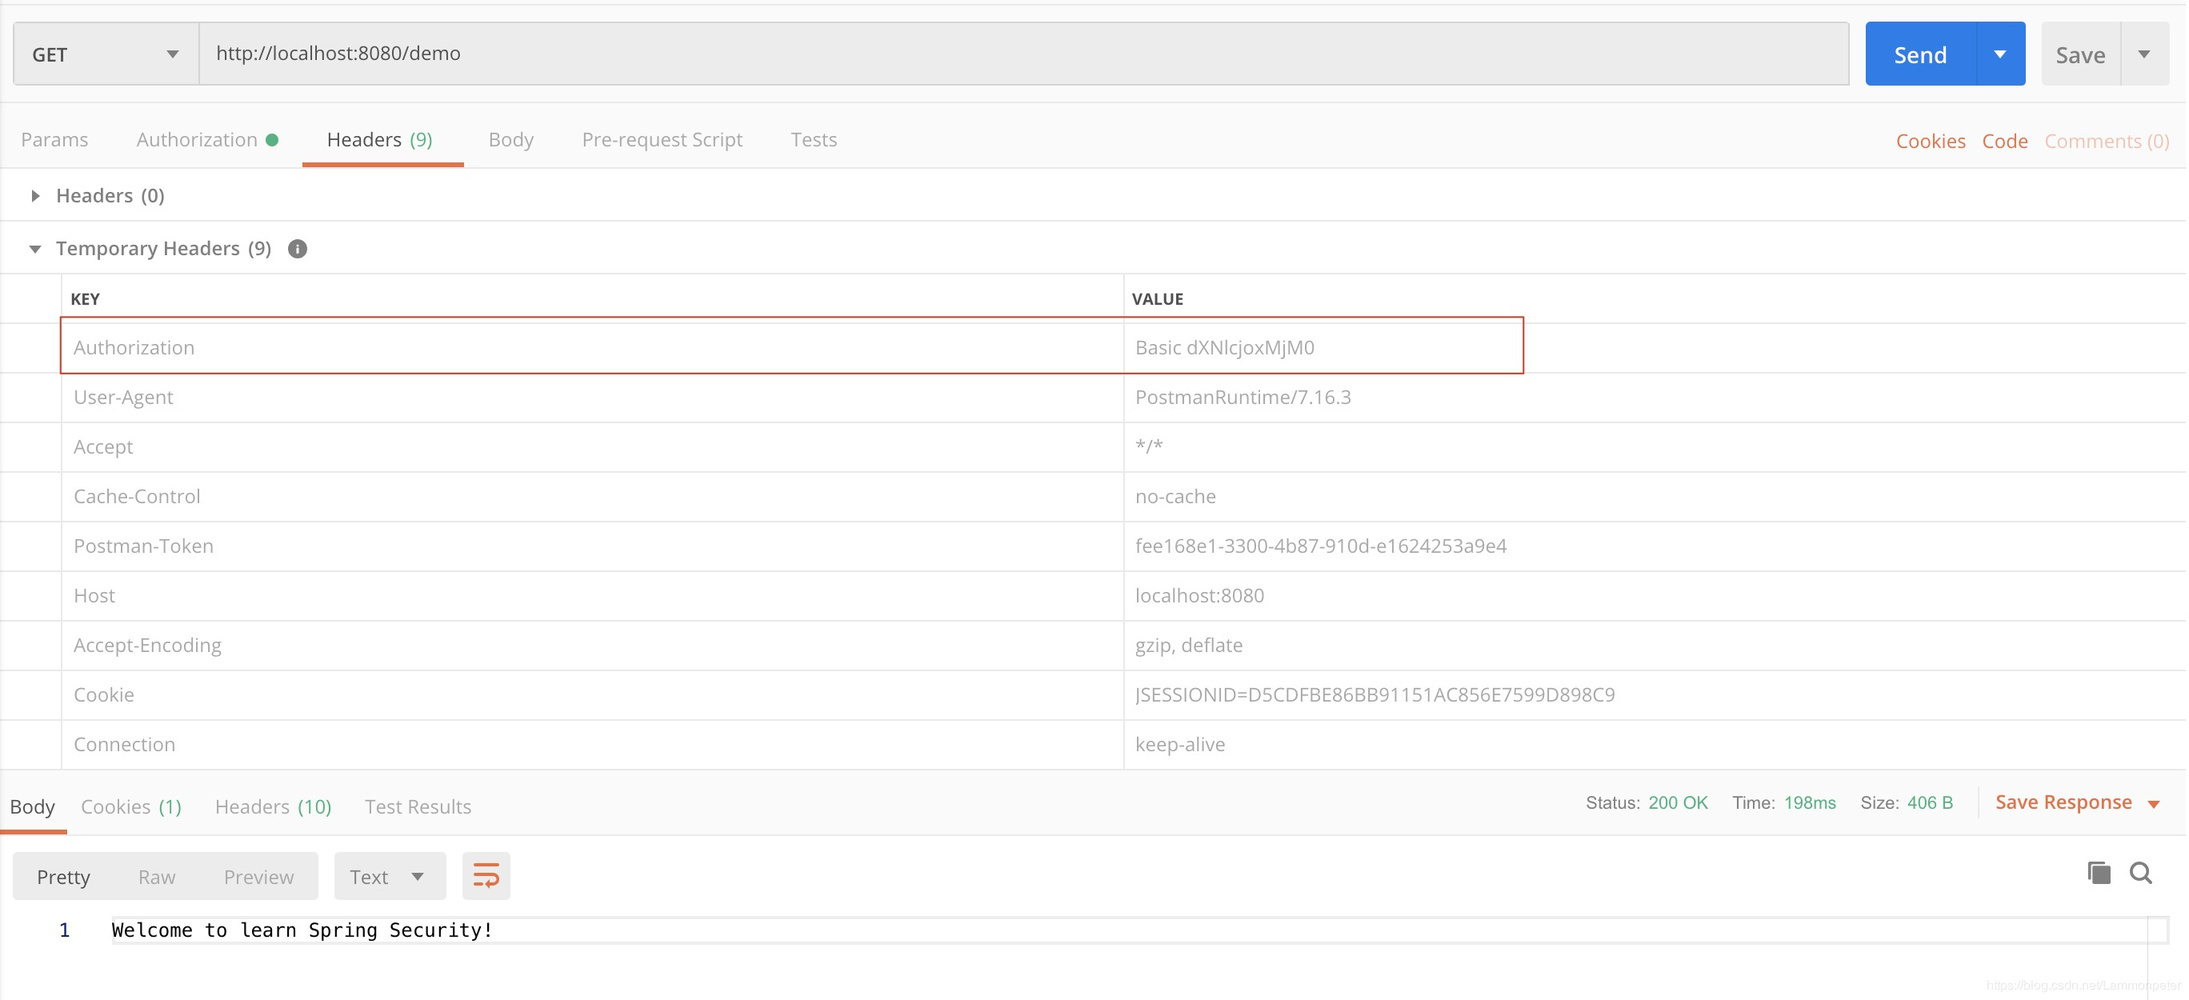
  • 第二步:输入用户名和密码或者自行通过Base64编码工具加密字符串“user:1234”,将加密后的结果dXNlcjoxMjM0联合Basic组成字符串“Basic dXNlcjoxMjM0”添加到请求头属性Authorization中访问/demo路由,那么将返回正确的结果。


HTTP Basic的认证方式在企业级开发中很少使用,但也常见于一些中间件中,比如ActiveMQ的管理页面,Tomcat的管理页面等,都采用的HTTP Basic认证。


四、HTTP Basic认证在Spring Security中的应用


Spring Security在没有经过任何配置的情况下,默认也支持了HTTP Basic认证,整个Spring Security的基本原理就是一个拦截器链,如下图所示:


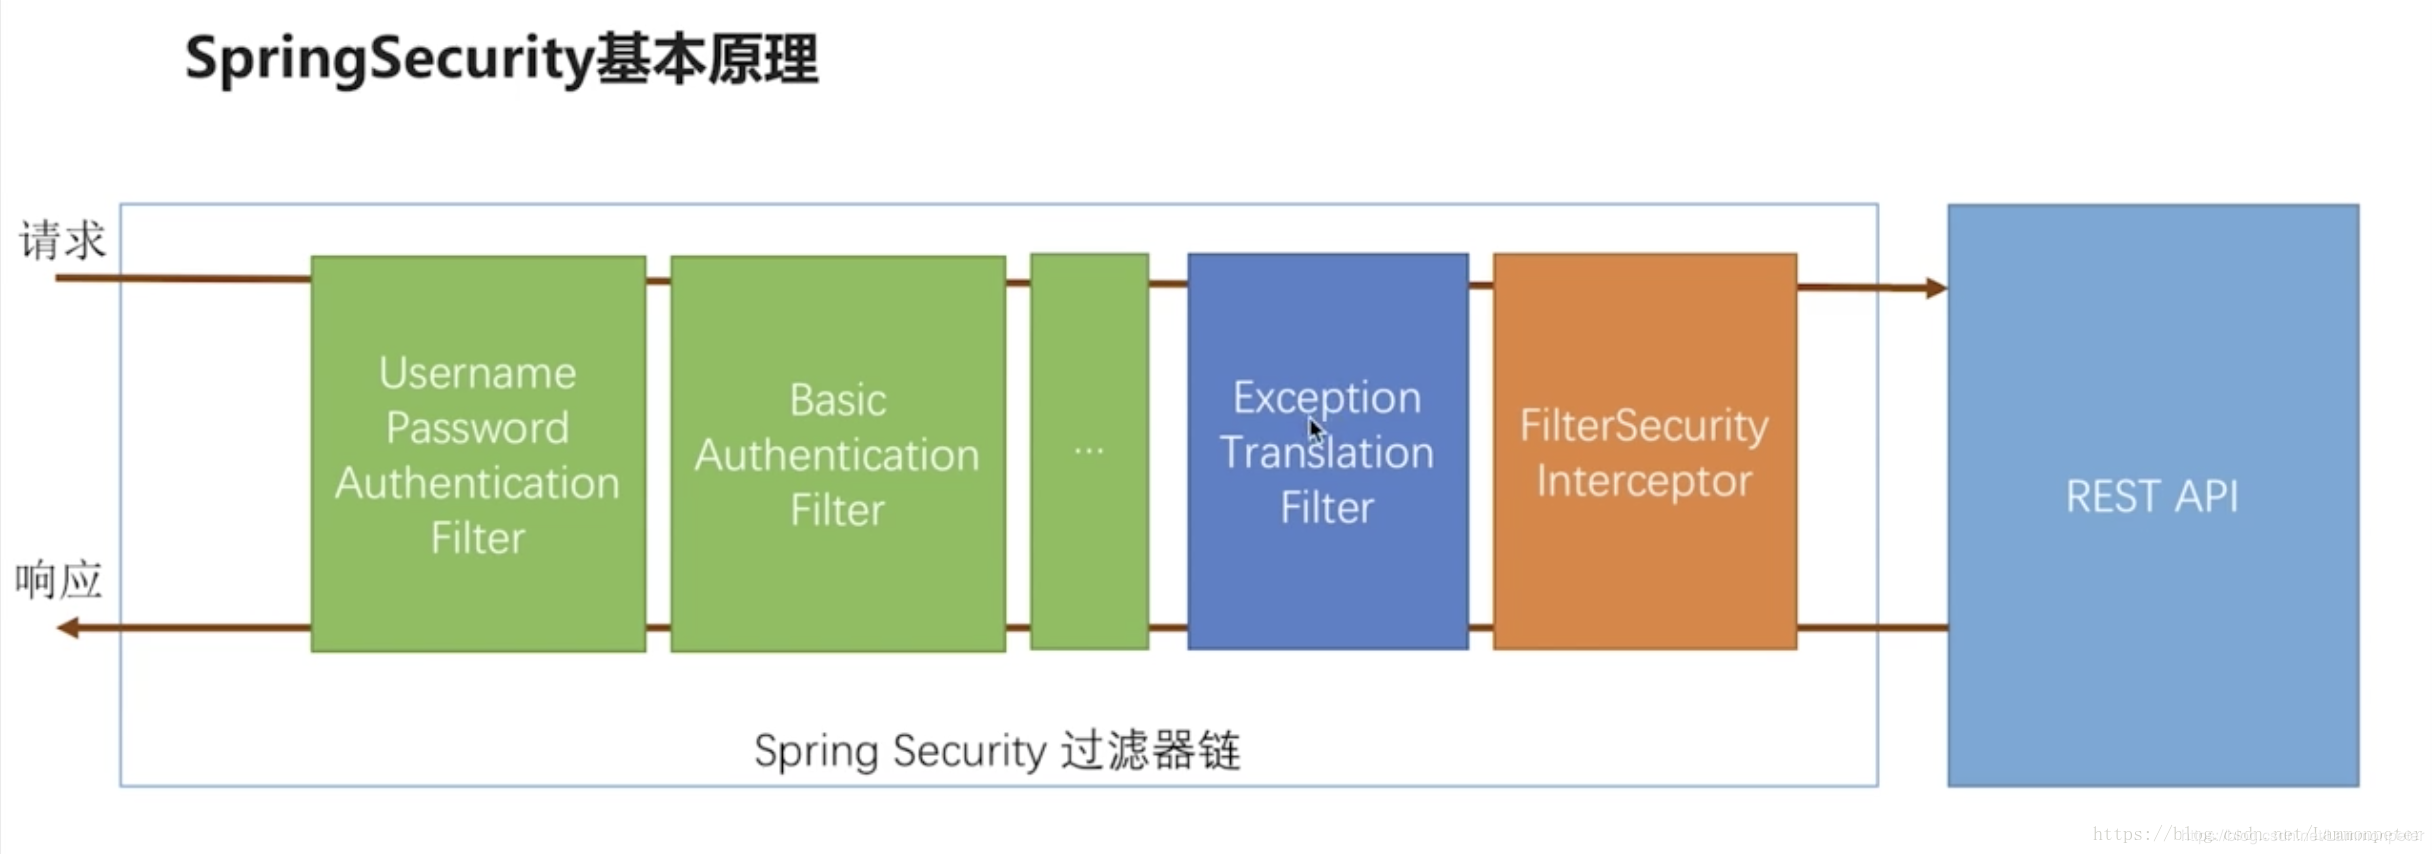
其中绿色部分的每一种过滤器代表着一种认证方式,主要工作检查当前请求有没有关于用户信息,如果当前的没有,就会跳入到下一个绿色的过滤器中,请求成功会打标记。绿色认证方式可以配置,比如短信认证,微信。比如如果我们不配置BasicAuthenticationFilter的话,那么它就不会生效。


FilterSecurityInterceptor过滤器是最后一个,它会决定当前的请求可不可以访问Controller,判断规则放在这个里面。当不通过时会把异常抛给在这个过滤器的前面的ExceptionTranslationFilter过滤器。


ExceptionTranslationFilter接收到异常信息时,将跳转页面引导用户进行认证。橘黄色和蓝色的位置不可更改。当没有认证的request进入过滤器链时,首先进入到FilterSecurityInterceptor,判断当前是否进行了认证,如果没有认证则进入到ExceptionTranslationFilter,进行抛出异常,然后跳转到认证页面(登录界面)。


上面的简单原理分析中提到,每一个过滤器都是经过配置后才会真正地生效,那么默认的相关配置在哪里呢?在Spring Security的官方文档中提到了WebSecurityConfigurerAdapter类,HTTP相关的认证配置都在这个类的configure(HttpSecurity http)方法中,具体代码如下:


protected void configure(HttpSecurity http) throws Exception {
logger.debug("Using default configure(HttpSecurity). If subclassed this will potentially override subclass configure(HttpSecurity).");
http
.authorizeRequests() // 拦截请求,创建了FilterSecurityInterceptor拦截器
.anyRequest().authenticated() // 设置所有请求都得经过认证后才可以访问
.and() // 用and来表示配置过滤器结束,以便进行下一个过滤器的创建和配置
.formLogin() // 设置表单登录,创建UsernamePasswordAuthenticationFilter拦截器
.and()
.httpBasic(); // 开启HTTP Basic,创建BasicAuthenticationFilter拦截器
}


这个方法中配置了三个拦截器,第一个是FilterSecurityInterceptor,第二个是基于表单登录的UsernamePasswordAuthenticationFilter,第三个是基于HTTP Basic的BasicAuthenticationFilter,进入到authorizeRequests()、formLogin()、httpBasic()方法中,这三个方法的具体实现都在HttpSecurity类中,观察三个方法的具体实现,分别创建了各自的配置类对象,分别是:ExpressionUrlAuthorizationConfigurer对象、FormLoginConfigurer对象以及HttpBasicConfigurer对象,这三个配置类有一个公共的父接口SecurityConfigurer,它有一个configure方法,每一个子类都会去实现这个方法,从而在这个方法里面配置各个拦截器(也并非所有的拦截器都在configure方法中配置,比如UsernamePasswordAuthenticationFilter就是在构造方法中配置,后面会讨论)以及其他信息。本节将重点介绍BasicAuthenticationFilter,后面的文章中将继续介绍其他的认证方式。


我们一起来解读一下HttpBasicConfigurer的configure方法,具体源码如下所示:


@Override
public void configure(B http) throws Exception {
AuthenticationManager authenticationManager = http
.getSharedObject(AuthenticationManager.class);
// 创建一个BasicAuthenticationFilter过滤器
BasicAuthenticationFilter basicAuthenticationFilter = new BasicAuthenticationFilter(
authenticationManager, this.authenticationEntryPoint);
if (this.authenticationDetailsSource != null) {
basicAuthenticationFilter
.setAuthenticationDetailsSource(this.authenticationDetailsSource);
}
RememberMeServices rememberMeServices = http.getSharedObject(RememberMeServices.class);
if (rememberMeServices != null) {
basicAuthenticationFilter.setRememberMeServices(rememberMeServices);
}
basicAuthenticationFilter = postProcess(basicAuthenticationFilter);
// 将当前的BasicAuthenticationFilter对象添加到拦截器链中
http.addFilter(basicAuthenticationFilter);
}


创建对象以及设置部分其他属性也可以在后面慢慢理解,那么最后一行代码将当前这个BasicAuthenticationFilter对象加入到了拦截器链中,我们应该在此刻就要理解清楚。我们都很清楚,作为拦截器链,链中的每个拦截器都是有先后顺序的,那么这个BasicAuthenticationFilter拦截器是如何加入到拦截器链中的呢?我进入到addFilter方法中一探究竟。


public HttpSecurity addFilter(Filter filter) {
Class<? extends Filter> filterClass = filter.getClass();
if (!comparator.isRegistered(filterClass)) {
throw new IllegalArgumentException(
"The Filter class "
filterClass.getName()
" does not have a registered order and cannot be added without a specified order. Consider using addFilterBefore or addFilterAfter instead.");
}
// 加入到拦截器列表中
this.filters.add(filter);
return this;
}


该addFilter方法在HttpSecurity类中,再加入到拦截器链之前,进行了一次检测,判断当前类型的拦截器是否已经注册到了默认的拦截器链Map集合中,返回的结果是拦截器的顺序值是否等于null的对比值。这个Map集合是以拦截器全限定类名为键,拦截器顺序值为值,且默认起始拦截器顺序为100,每个拦截器之间的顺序值相隔100,这就为拦截器前后添加其他拦截器提供了预留位置,是一个很好的设计。


public boolean isRegistered(Class<? extends Filter> filter) {
return getOrder(filter) != null;
}


上述代码就是通过拦截器对象来获取拦截器的顺序值,并且与null相比,继续进入到getOrder方法:


private Integer getOrder(Class<?> clazz) {
while (clazz != null) {
Integer result = filterToOrder.get(clazz.getName());
if (result != null) {
return result;
}
clazz = clazz.getSuperclass();
}
return null;
}


filterToOrder就是拦截器的Map集合,该集合中存储了多种拦截器,并规定了拦截器的顺序。因为BasicAuthenticationFilter类型的拦截器已经事先添加到了这个Map集合中,所以就返回了BasicAuthenticationFilter在整个拦截器链Map中的顺序值,这样isRegistered方法就会返回true,从而最后加入到了拦截器链中(拦截器链是一个List列表),这个Map集合中预先设置了多种拦截器,代码如下所示:


FilterComparator() {
Step order = new Step(INITIAL_ORDER, ORDER_STEP);
put(ChannelProcessingFilter.class, order.next());
put(ConcurrentSessionFilter.class, order.next());
put(WebAsyncManagerIntegrationFilter.class, order.next());
put(SecurityContextPersistenceFilter.class, order.next());
put(HeaderWriterFilter.class, order.next());
put(CorsFilter.class, order.next());
put(CsrfFilter.class, order.next());
put(LogoutFilter.class, order.next());
filterToOrder.put(
"org.springframework.security.oauth2.client.web.OAuth2AuthorizationRequestRedirectFilter",
order.next());
put(X509AuthenticationFilter.class, order.next());
put(AbstractPreAuthenticatedProcessingFilter.class, order.next());
filterToOrder.put("org.springframework.security.cas.web.CasAuthenticationFilter",
order.next());
filterToOrder.put(
"org.springframework.security.oauth2.client.web.OAuth2LoginAuthenticationFilter",
order.next());
put(UsernamePasswordAuthenticationFilter.class, order.next());
put(ConcurrentSessionFilter.class, order.next());
filterToOrder.put(
"org.springframework.security.openid.OpenIDAuthenticationFilter", order.next());
put(DefaultLoginPageGeneratingFilter.class, order.next());
put(DefaultLogoutPageGeneratingFilter.class, order.next());
put(ConcurrentSessionFilter.class, order.next());
put(DigestAuthenticationFilter.class, order.next());
filterToOrder.put(
"org.springframework.security.oauth2.server.resource.web.BearerTokenAuthenticationFilter", order.next());
put(BasicAuthenticationFilter.class, order.next());
put(RequestCacheAwareFilter.class, order.next());
put(SecurityContextHolderAwareRequestFilter.class, order.next());
put(JaasApiIntegrationFilter.class, order.next());
put(RememberMeAuthenticationFilter.class, order.next());
put(AnonymousAuthenticationFilter.class, order.next());
filterToOrder.put(
"org.springframework.security.oauth2.client.web.OAuth2AuthorizationCodeGrantFilter",
order.next());
put(SessionManagementFilter.class, order.next());
put(ExceptionTranslationFilter.class, order.next());
put(FilterSecurityInterceptor.class, order.next());
put(SwitchUserFilter.class, order.next());
}


这是从代码层面解读到了各个拦截器的具体顺序,我们从Spring Security的官方文档中也可以看到上述代码所规定顺序表,如下图所示:


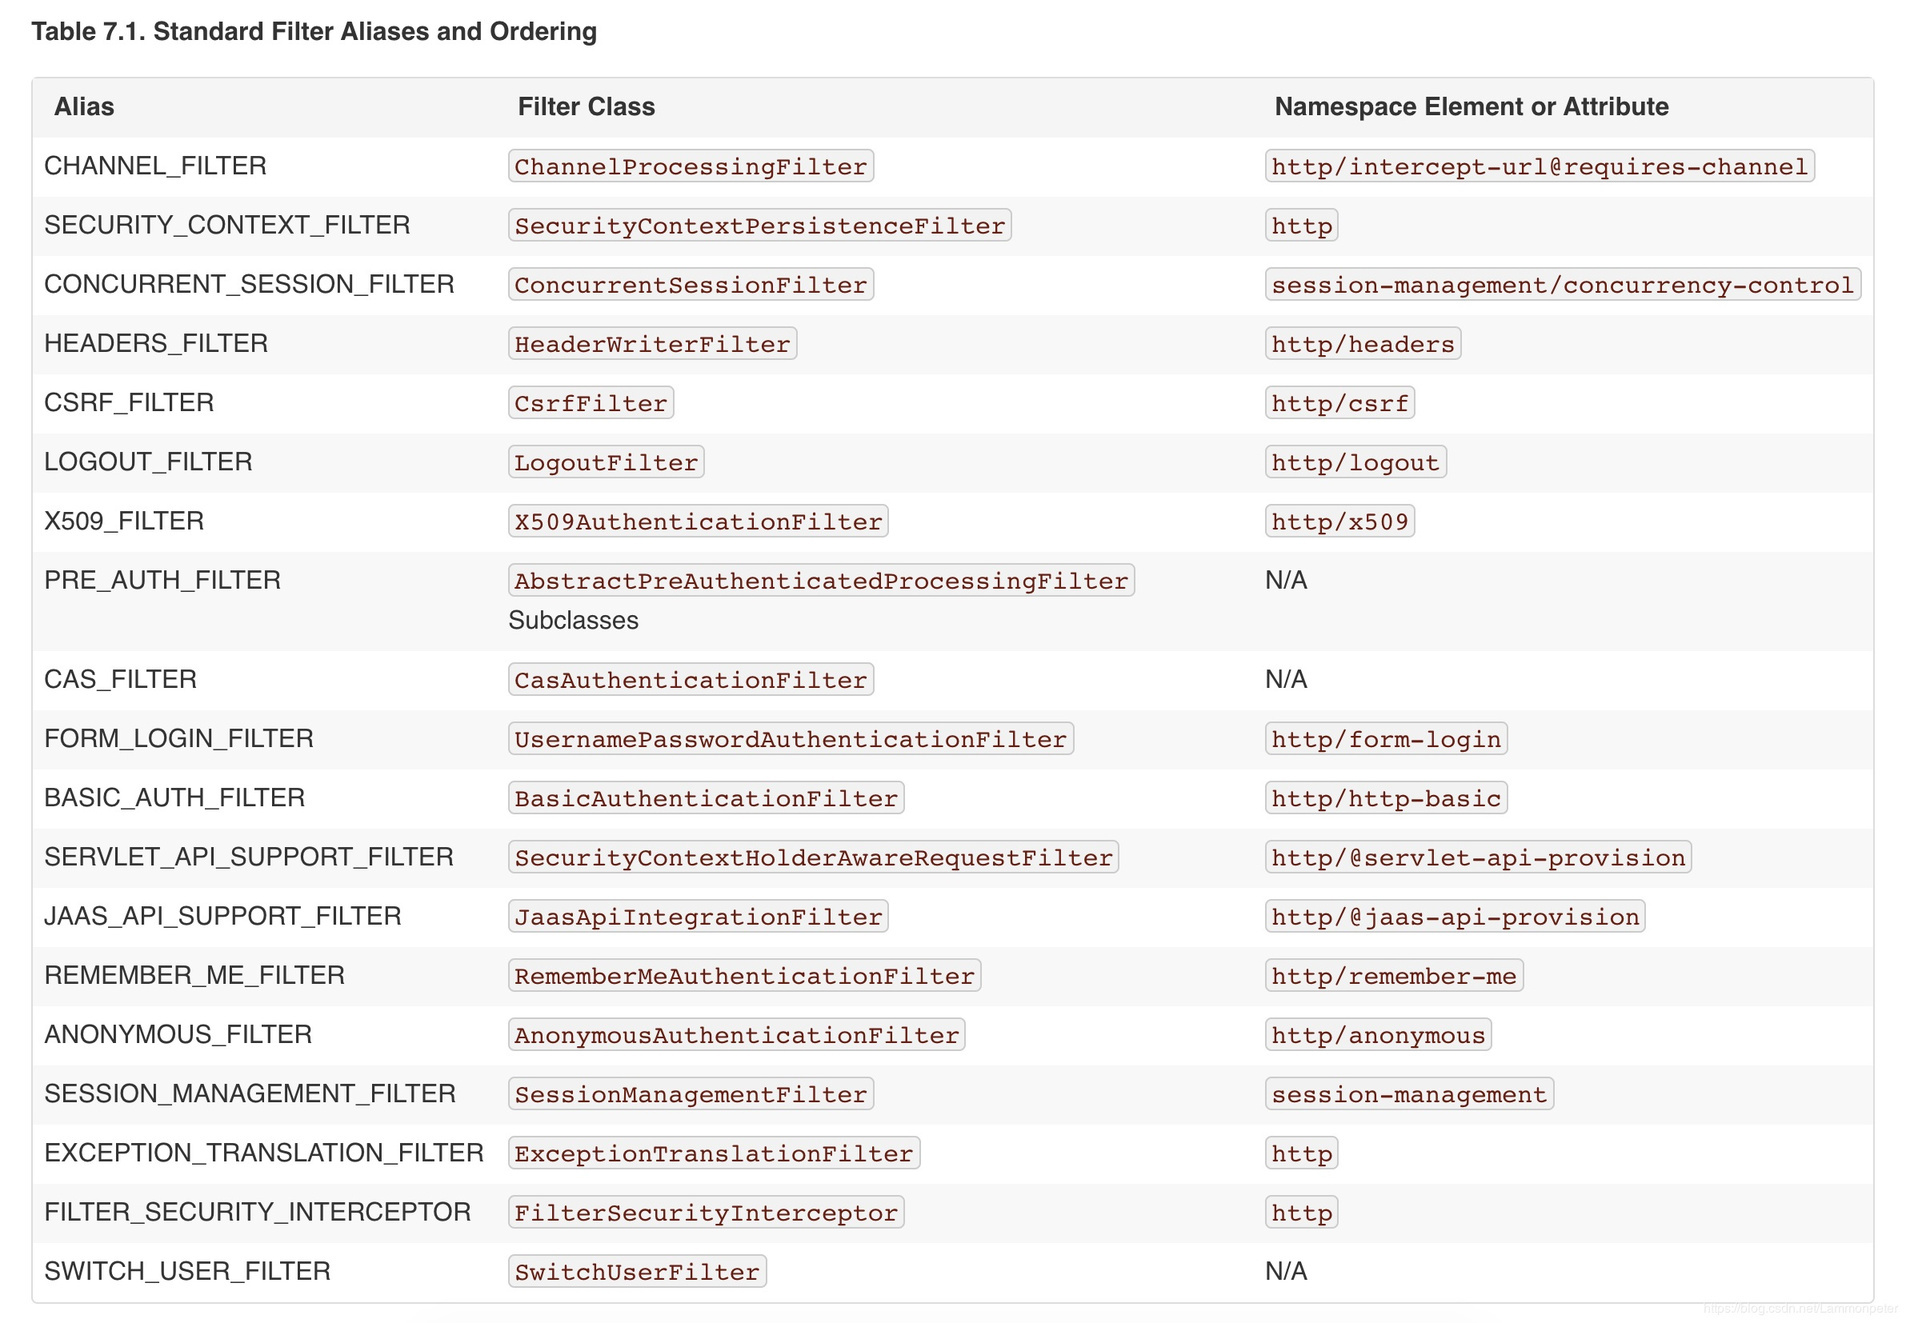
上图中并没有列出所有的拦截器,从图中我们可以看出,BasicAuthenticationFilter位于UsernamePasswordAuthenticationFilter之后,ExceptionTranslationFilter和FilterSecurityInterceptor顺序与前面的Spring Security的基本原理图保持了一致。


如果我们创建的Filter没有在预先设置的Map集合中,那么就会抛出一个IllegalArgumentException异常,并提示我们使用addFilterBefore或者addFilterAfter方法将自定义的拦截器加入到拦截器链中,这一提示很有用,因为本系列文章后面会讲到表单登录原理的时候加入图形验证码功能将用到这一特性(将图形验证码的验证拦截器加入到UsernamePasswordAuthenticationFilter之前)。


上面的内容都是解释了BasicAuthenticationFilter是如何加入到拦截器链中的,属于知识前置铺垫,接下来我们通过源码分析BasicAuthenticationFilter是如何进行验证的。


@Override
protected void doFilterInternal(HttpServletRequest request,
HttpServletResponse response, FilterChain chain)
throws IOException, ServletException {
final boolean debug = this.logger.isDebugEnabled();
// 从请求头中获取头属性为Authorization的值
String header = request.getHeader("Authorization");
// 判断请求头中是否含有该属性或者该属性的值是否是以basic开头的
if (header == null || !header.toLowerCase().startsWith("basic ")) {
// 说明不是HTTP Basic认证方式,所以进入到拦截器链的下一个拦截器中,本拦截器不作处理
chain.doFilter(request, response);
return;
}
try {
// extractAndDecodeHeader是解码Base64编码后的字符串,获取用户名和密码组成的字符数组
String[] tokens = extractAndDecodeHeader(header, request);
assert tokens.length == 2;
// 数组的第一个值是用户名,第二个值是密码
String username = tokens[0];
if (debug) {
this.logger
.debug("Basic Authentication Authorization header found for user '"
username "'");
}
// 判断当前请求是否需要认证,具体的判断标准可以进入到authenticationIsRequired中查看,这里简单表述一下,这个方法的逻辑是:首先判断Spring Security的上下文环境中是否存在当前用户名对应的认证信息,如果没有或者是有,但是没有认证的,那么就返回true,其次是认证信息是UsernamePasswordAuthenticationToken类型且认证信息的用户名和传入的用户名不一致,那么返回true,最后认证信息是AnonymousAuthenticationToken类型(匿名类型),那么直接返回true,否则其他情况直接返回false,也就是无需再次认证。
if (authenticationIsRequired(username)) {
// 将用户名和密码封装成UsernamePasswordAuthenticationToken,并标记为未认证
UsernamePasswordAuthenticationToken authRequest = new UsernamePasswordAuthenticationToken(
username, tokens[1]);
authRequest.setDetails(
this.authenticationDetailsSource.buildDetails(request));
// 调用认证管理器来进行认证操作,具体的认证步骤在ProviderManager类authenticate方法中,该方法首先是获取Token的类型,此次认证的Token类型是UsernamePasswordAuthenticationToken,然后根据类型找到支持UsernamePasswordAuthenticationToken的Provider对象进行认证
Authentication authResult = this.authenticationManager
.authenticate(authRequest);
if (debug) {
this.logger.debug("Authentication success: " authResult);
}
// 将认证成功后结果存储到上下文环境中
SecurityContextHolder.getContext().setAuthentication(authResult);
// “记住我”中设置记住当前认证信息,这个功能后期会重点介绍
this.rememberMeServices.loginSuccess(request, response, authResult);
// 认证成功后的一些处理,可以自行实现
onSuccessfulAuthentication(request, response, authResult);
}
}
// 如果认证失败,上述的authenticate方法会抛出异常表示认证失败
catch (AuthenticationException failed) {
// 清除认证失败的上下文环境
SecurityContextHolder.clearContext();
if (debug) {
this.logger.debug("Authentication request for failed: " failed);
}
// “记住我”的认证失败后的处理,后面会介绍
this.rememberMeServices.loginFail(request, response);
// 认证失败后的处理,可以自行实现
onUnsuccessfulAuthentication(request, response, failed);
// 是否忽略认证失败,这里默认为false
if (this.ignoreFailure) {
chain.doFilter(request, response);
}
else {
// 认证失败后,默认会进入到这里,从而调用到了BasicAuthenticationEntryPoint类中的commence方法,该方法的具体逻辑是在响应体中添加“WWW-Authenticate”的响应头,并设置值为Basic realm="Realm",这也就是用到了HTTP Basic的基本原理,当浏览器接收到响应之后,发现响应头中包含WWW-Authenticate,就会弹出一个要求输入用户名和密码的对话框,输入用户名和密码后,如果正确,那么就会访问到具体的资源,否则会一直会弹出对话框
this.authenticationEntryPoint.commence(request, response, failed);
}
return;
}
chain.doFilter(request, response);
}


上述的源码中加入了详细的解析,对每一个重要步骤都进行了解说,上面提到,具体的认证过程用到了UsernamePasswordAuthenticationToken,这个属于UsernamePasswordAuthenticationFilter的认证范畴,后面的文章将重点介绍(请持续关注我的Spring Security的源码分析哦),这里简单说明一下:使用UsernamePasswordAuthenticationToken封装的用户名和密码将由UsernamePasswordAuthenticationFilter来进行拦截认证,认证管理器拿到这个Token对象后,会从众多的ProviderManager对象中选择合适的manager来处理该Token,会将该用户名和密码与我们在配置文件中配置的用户名和密码或者默认生成的UUID密码进行匹配,如果匹配成功,那么将返回认证成功的结果,这个结果将由FilterSecurityInterceptor判断,它决定最后是否放行,是否允许当前请求访问到/demo路由。


五、案例代码说明


为了方便交流,本篇文章以及后续的文章中涉及到的案例代码都将托管到码云上,读者可以自行获取。最新代码都将在master分支上,《Spring Security入门到实践》的每一篇文章都有对应的分支,后续文章都会体现每篇文章具体对应于哪一个分支。由于本人水平有限,源码分析难免有不妥之处,欢迎批评指正。


代码托管链接:https://gitee.com/itlemon/learning-spring-security/tree/chapter1/


六、Spring Security连载文章计划


本篇文章是连载系列文章:《Spring Security入门到实践》的一个入门文章,后面将围绕Spring Security进行深入源码解读,做到不仅会用,也知其所以然。该系列文章章节内容大致安排如下:


  1. Spring Security入门到实践(一)HTTP Basic在Spring Security中的应用原理浅析

  2. Spring Security入门到实践(二)表单认证实践及原理分析

  3. Spring Security入门到实践(三)详解Spring Security过滤器原理——以图形验证码为例

  4. Spring Security入门到实践(四)详解Spring Security过滤器原理——以手机号登录为例

  5. Spring Security入门到实践(五)详解Spring Security过滤器原理——以“记住我”为例

  6. Spring Security入门到实践(六)密码加密机制分析

  7. Spring Security入门到实践(七)自动登录和注销登录原理分析与实现

  8. Spring Security入门到实践(八)会话管理与基于Spring Session的集群会话解决方案

  9. Spring Security入门到实践(九)Spring Security支持CORS跨域原理分析

  10. Spring Security入门到实践(十)Spring Security支持防御CSRF攻击原理分析

  11. Spring Security入门到实践(十一)OAuth2协议简介

  12. Spring Security入门到实践(十二)Spring Social整合OAuth2原理分析——以QQ登录为例

  13. Spring Security入门到实践(十三)Spring Social整合OAuth2原理分析——以微信登录为例

  14. Spring Security入门到实践(十四)Spring Security OAuth实现授权服务器及核心源码分析

  15. Spring Security入门到实践(十五)Spring Security OAuth实现资源服务器及核心源码分析

  16. Spring Security入门到实践(十六)总结


了解更多干货,欢迎关注我的微信公众号:爪哇论剑(微信号:itlemon)


发布于: 2020 年 07 月 22 日阅读数: 234
用户头像

还未添加个人签名 2018.09.30 加入

Java码农一枚。

评论

发布
暂无评论
Spring Security入门到实践(一)HTTP Basic在Spring Security中的应用原理浅析