写点什么

工作流持久化详解!Activiti 框架中 JPA 的使用分析

发布于: 2021 年 06 月 08 日
工作流持久化详解!Activiti框架中JPA的使用分析

Activiti 中 JPA 简介

  • 可以使用 JPA 实体作为流程变量, 并进行操作:

  • 基于流程变量更新已有的 JPA 实体,可以在用户任务的表单中填写或者由服务任务生成

  • 重用已有的领域模型,不需要编写显示的服务获取实体或者更新实体的值

  • 根据已有实体的属性做出判断(网关即分支聚合)

JPA 实体要求

  • Activiti 中 JPA 只支持符合以下要求的实体:

  • 实体应该使用 JPA 注解进行配置, 支持字段和属性访问两种方式.@MappedSuperclass 也要能够被使用

  • 实体中应该有一个使用 @Id 注解的主键,不支持复合主键 @EmbeddedId 和 @IdClass:

  • Id 字段或者属性能够使用 JPA 规范支持的任意类型:

  • 原生态数据类型和他们的包装类型(Boolean 除外)

  • String

  • BigInteger

  • BigDecimal

  • java.util.Date

  • java.sql.Date

JPA 配置

  • 引擎必须有一个对 EntityManagerFactory 的引用才能够使用 JPA 的实体,这样可以通过配置引用或者提供一个持久化单元名称

  • 作为变量的 JPA 实体将会被自动检测并进行相应的处理

  • 使用 jpaPersistenceUnitName 配置:


<bean id="processEngineConfiguration" class="org.activiti.engine.impl.cfg.StandaloneInMemProcessEngineConfiguration">
<!-- 数据库的配置 --> <property name="databaseSchemaUpdate" value="true" /> <property name="jdbcUrl" value="jdbc:h2:mem:JpaVariableTest;DB_CLOSE_DELAY=1000" />
<property name="jpaPersistenceUnitName" value="activiti-jpa-pu" /> <property name="jpaHandleTransaction" value="true" /> <property name="jpaCloseEntityManager" value="true" />
<!-- job executor configurations --> <property name="jobExecutorActivate" value="false" />
<!-- mail server configurations --> <property name="mailServerPort" value="5025" /></bean>
复制代码


  • 配置一个自定义的 EntityManagerFactory,

  • 这里使用了 OpenJPA 实体管理器

  • 该代码片段仅仅包含与例子相关的 beans,去掉了其他 beans.

  • OpenJPA 实体管理的完整并可以使用的例子可以在 activiti-spring-examples(/activiti-spring/src/test/java/org/activiti/spring/test/jpa/JPASpringTest.java) 中找到


<bean id="entityManagerFactory" class="org.springframework.orm.jpa.LocalContainerEntityManagerFactoryBean">  <property name="persistenceUnitManager" ref="pum"/>  <property name="jpaVendorAdapter">    <bean class="org.springframework.orm.jpa.vendor.OpenJpaVendorAdapter">      <property name="databasePlatform" value="org.apache.openjpa.jdbc.sql.H2Dictionary" />    </bean>  </property></bean>
<bean id="processEngineConfiguration" class="org.activiti.spring.SpringProcessEngineConfiguration"> <property name="dataSource" ref="dataSource" /> <property name="transactionManager" ref="transactionManager" /> <property name="databaseSchemaUpdate" value="true" /> <property name="jpaEntityManagerFactory" ref="entityManagerFactory" /> <property name="jpaHandleTransaction" value="true" /> <property name="jpaCloseEntityManager" value="true" /> <property name="jobExecutorActivate" value="false" /></bean>
复制代码


  • 也可以在编程式创建一个引擎时完成配置:


ProcessEngine processEngine = ProcessEngineConfiguration  .createProcessEngineConfigurationFromResourceDefault()  .setJpaPersistenceUnitName("activiti-pu")  .buildProcessEngine();
复制代码


配置的属性有:


  • jpaPersistenceUnitName: 使用持久化单元的名称:

  • 要确保该持久化单元在类路径下是可用的,默认的路径是 /META-INF/persistence.xml

  • 要么使用 jpaEntityManagerFactory 要么或者是 jpaPersistenceUnitName

  • jpaEntityManagerFactory: 一个实现了 javax.persistence.EntityManagerFactory bean 的引用:

  • 将被用来加载实体并且刷新更新

  • 要么使用 jpaEntityManagerFactory 要么或者是 jpaPersistenceUnitName

  • jpaHandleTransaction: 在被使用的 EntityManager 实例上,该标记表示流程引擎是否需要开始和提交或者回滚事务:

  • 当使用 Java 事务 API(JTA) 时,设置为 false

  • jpaCloseEntityManager: 该标记表示流程引擎是否应该关闭从 EntityManagerFactory 获取的 EntityManager 的实例:

  • EntityManager 是由容器管理的时候需要设置为 false: 当使用并不是单一事务作用域的扩展持久化上下文的时候

JPA 用法

简单示例

  • 首先,需要创建一个基于 META-INF/persistence.xml EntityManagerFactory 作为持久化单元:包含持久化单元中所有的类和一些供应商特定的配置

  • 使用一个简单的实体作为测试,其中包含有一个 id String 类型的 value 属性,也将会被持久化

  • 在测试之前,创建一个实体并且保存:


@Entity(name = "JPA_ENTITY_FIELD")public class FieldAccessJPAEntity {
@Id @Column(name = "ID_") private Long id;
private String value;
public FieldAccessJPAEntity() { // Empty constructor needed for JPA }
public Long getId() { return id; }
public void setId(Long id) { this.id = id; }
public String getValue() { return value; }
public void setValue(String value) { this.value = value; }}
复制代码


  • 启动一个新的流程实例,添加一个实体作为变量. 其他的变量,将会被存储在流程引擎的持久化数据库中.下一次获取该变量的时候,将会根据该类和存储 Id EntityManager 中加载:


Map<String, Object> variables = new HashMap<String, Object>();variables.put("entityToUpdate", entityToUpdate);
ProcessInstance processInstance = runtimeService.startProcessInstanceByKey("UpdateJPAValuesProcess", variables);
复制代码


  • 流程定义中的第一个节点是一个服务任务,将会调用 entityToUpdate 上的 setValue 方法,其实就是之前在启动流程实例时候设置的 JPA 变量并且将会从当前流程引擎的上下文关联的 EntityManager 中加载:


<serviceTask id='theTask' name='updateJPAEntityTask' activiti:expression="${entityToUpdate.setValue('updatedValue')}" />
复制代码


  • 当完成服务任务时,流程实例将会停留在流程定义中定义的用户任务环节上:

  • 可以查看该流程实例

  • EntityManager 已经被刷新了并且改变的实体已经被保存进数据库中

  • 获取 entityToUpdate 的变量 value 时,该实体将会被再次加载并且获取该实体属性的值将会是 updatedValue


// Servicetask in process 'UpdateJPAValuesProcess' should have set value on entityToUpdate.Object updatedEntity = runtimeService.getVariable(processInstance.getId(), "entityToUpdate");assertTrue(updatedEntity instanceof FieldAccessJPAEntity);assertEquals("updatedValue", ((FieldAccessJPAEntity)updatedEntity).getValue())
复制代码

查询 JPA 流程变量

  • 以查询某一 JPA 实体作为变量的 ProcessInstances Executions

  • ProcessInstanceQuery ExecutionQuery 查询中仅仅 variableValueEquals(name, entity) 支持 JPA 实体变量:

  • [variableValueNotEquals],[variableValueGreaterThan],[variableValueGreaterThanOrEqual],[variableValueLessThan],[variableValueLessThanOrEqual]不被支持并且传递 JPA 实体值的时候会抛出一个 ActivitiException


ProcessInstance result = runtimeService.createProcessInstanceQuery().variableValueEquals("entityToQuery", entityToQuery).singleResult();   
复制代码

使用 Spring beans 和 JPA 结合

  • JPASpringTest, 在 activiti-spring-examples 中:

  • 已经存在了一个使用 JPA 实体的 Spring-bean, 用来存储贷款申请

  • 使用 Activiti,可以通过已经存在的 bean 获取已经使用的实体,并使用它作为变量用于流程中

  • 流程定义步骤:

  • 服务任务:

  • 创建一个新的贷款申请,使用已经存在的 LoanRequestBean 接受启动流程时候的变量(来自流程启动时候的表单)

  • 使用 activiti:resultVariable(作为一个变量对表达式返回的结果进行存储)将创建出来的实体作为变量进行存储

  • 用户任务:

  • 允许经理查看贷款申请,并填入审批意见(同意/不同意)

  • 审批意见将作为一个 boolean 变量 approvedByManager 进行存储

  • 服务任务:

  • 更新贷款申请实体,因此该实体与流程保持同步

  • 根据贷款申请实体变量 approved 的值,将利用唯一网关自动决定下一步该选择那一条路径:

  • 当申请批准,流程结束

  • 否则,一个额外的任务将会使用(发送拒绝信),这样就可以发送拒绝信手动通知客户


<?xml version="1.0" encoding="UTF-8"?><definitions id="taskAssigneeExample"  xmlns="http://www.omg.org/spec/BPMN/20100524/MODEL"  xmlns:xsi="http://www.w3.org/2001/XMLSchema-instance"  xmlns:activiti="http://activiti.org/bpmn"  targetNamespace="org.activiti.examples">
<process id="LoanRequestProcess" name="Process creating and handling loan request"> <startEvent id='theStart' /> <sequenceFlow id='flow1' sourceRef='theStart' targetRef='createLoanRequest' />
<serviceTask id='createLoanRequest' name='Create loan request' activiti:expression="${loanRequestBean.newLoanRequest(customerName, amount)}" activiti:resultVariable="loanRequest"/> <sequenceFlow id='flow2' sourceRef='createLoanRequest' targetRef='approveTask' />
<userTask id="approveTask" name="Approve request" /> <sequenceFlow id='flow3' sourceRef='approveTask' targetRef='approveOrDissaprove' />
<serviceTask id='approveOrDissaprove' name='Store decision' activiti:expression="${loanRequest.setApproved(approvedByManager)}" /> <sequenceFlow id='flow4' sourceRef='approveOrDissaprove' targetRef='exclusiveGw' />
<exclusiveGateway id="exclusiveGw" name="Exclusive Gateway approval" /> <sequenceFlow id="endFlow1" sourceRef="exclusiveGw" targetRef="theEnd"> <conditionExpression xsi:type="tFormalExpression">${loanRequest.approved}</conditionExpression> </sequenceFlow> <sequenceFlow id="endFlow2" sourceRef="exclusiveGw" targetRef="sendRejectionLetter"> <conditionExpression xsi:type="tFormalExpression">${!loanRequest.approved}</conditionExpression> </sequenceFlow>
<userTask id="sendRejectionLetter" name="Send rejection letter" /> <sequenceFlow id='flow5' sourceRef='sendRejectionLetter' targetRef='theOtherEnd' />
<endEvent id='theEnd' /> <endEvent id='theOtherEnd' /> </process>
</definitions>
复制代码


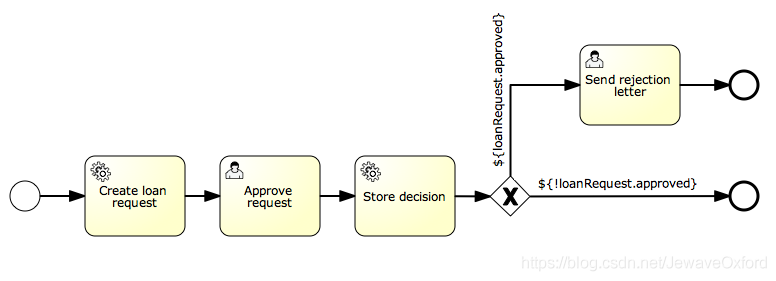
上面的例子展示了 JPA 结合 Spring 和参数化方法表达式的强大优势 :所有的流程就不需要自定义 java 代码(Spring bean 除外),大幅度的加快了流程部署

发布于: 2021 年 06 月 08 日阅读数: 11
用户头像

一位攻城狮的自我修养 2021.04.06 加入

分享技术干货,面试题和攻城狮故事。 你的关注支持是我持续进步的最大动力! https://github.com/ChovaVea

评论

发布
暂无评论
工作流持久化详解!Activiti框架中JPA的使用分析